What I love about this bread
- It’s so easy to make. This dough can be made in less than 5 minutes.
- The basic dough recipe can be enhanced with many different flavor varieties.
- Very little hands-on time.
- Crusty bread never ceases to impress family and friends.
- My 12-year-old grandson can make it.
Let’s make No-knead crusty bread:


- In a large mixing bowl, add flour, kosher salt, and yeast. Whisk together.
- Add water. Mix just until all of the flour has combined with the water. The dough will look like a shaggy mess. That’s ok.
- Cover the bowl with plastic wrap and let it sit for 12 – 18 hours on the countertop. DO NOT REFRIGERATE. This is not optional. It takes that much time to proof the dough. The reason why you need a large bowl is that the dough will start to rise.
- After 12 hours the dough will look like this. It’s pretty sticky, but that’s ok it’s supposed to be.
Shaping and baking the bread:


- Preheat oven to 450 degrees. As soon as it has heated to 450 degrees place your pot with the lid in the oven and preheat the pot for 30 minutes.
-
Right after you put the pan in the oven to pre-heat, dump the dough out onto a HEAVILY floured surface. Shape it into a round ball and place on a sheet of parchment paper. Parchment makes it so easy to transfer the dough into a hot pot and then remove it after baking. The parchment paper stays in the pot. This will rest for 30 minutes while the pan is heating. Cover with plastic wrap. Note: Use silicone coated parchment paper. The regular non-coated paper will stick terribly. Don’t chance it.


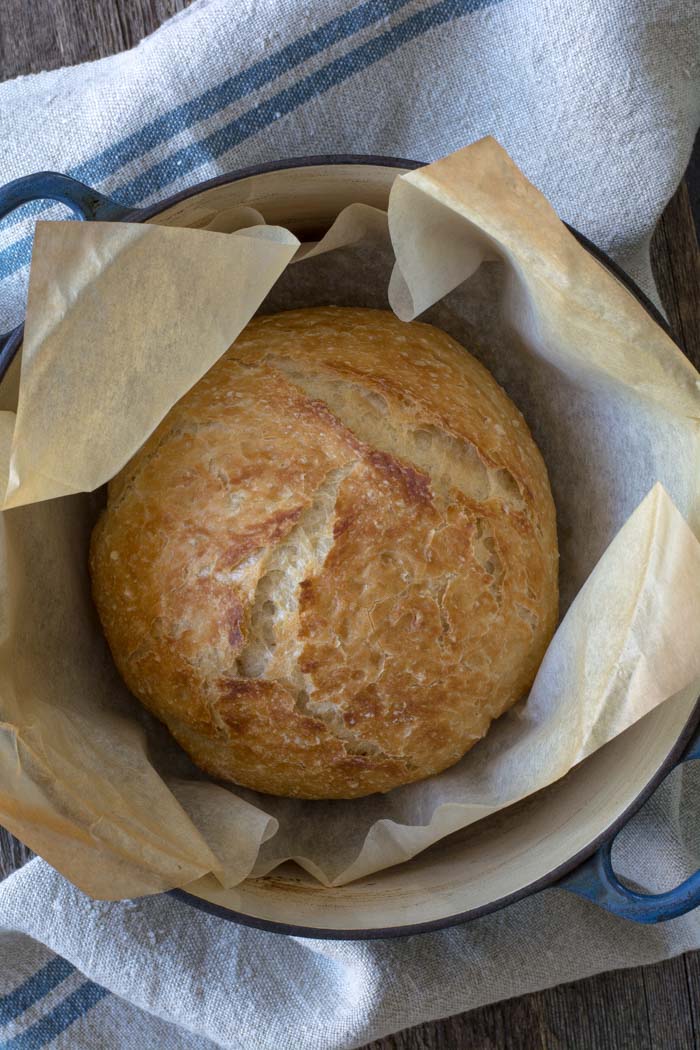
- Remove pot from the oven and carefully pick up the parchment and drop dough into the pot. Be careful the pan is HOT. Put the lid on the pot and return it to the oven for 30 minutes.
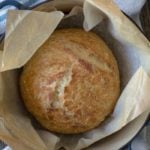
- After 30 minutes remove the lid from the pan. Bake for an additional 15 minutes or until nicely browned. You can test with an instant-read thermometer to make sure the bread is fully cooked on the inside. The temp should be between 190F and 200F degrees. Remove from the oven and carefully remove bread from the pot by lifting the edges of the parchment paper.
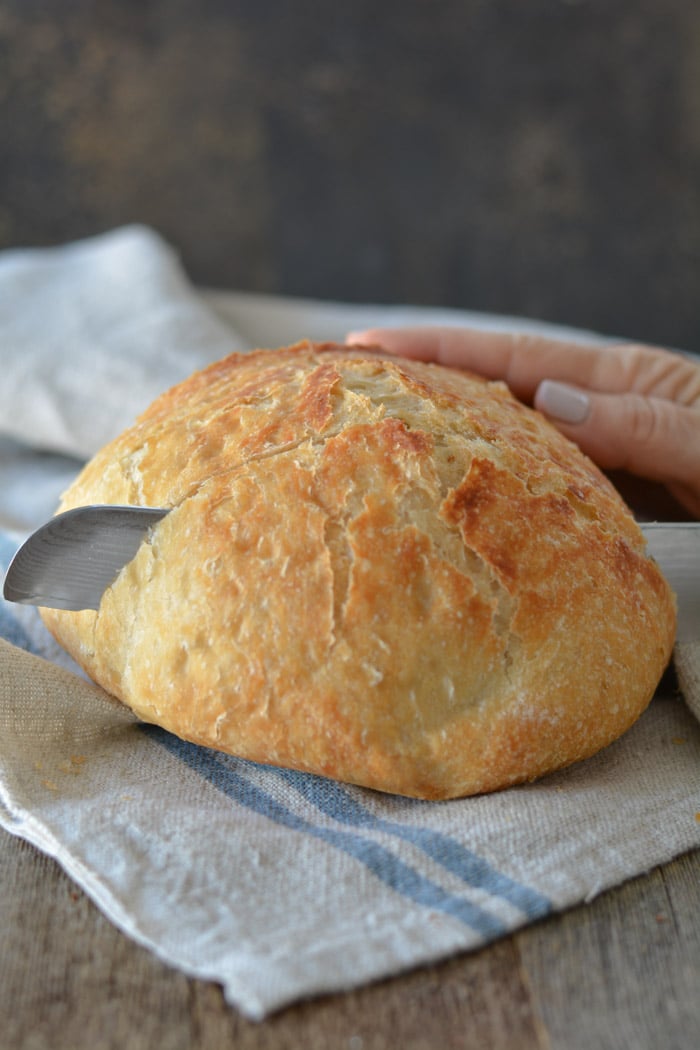
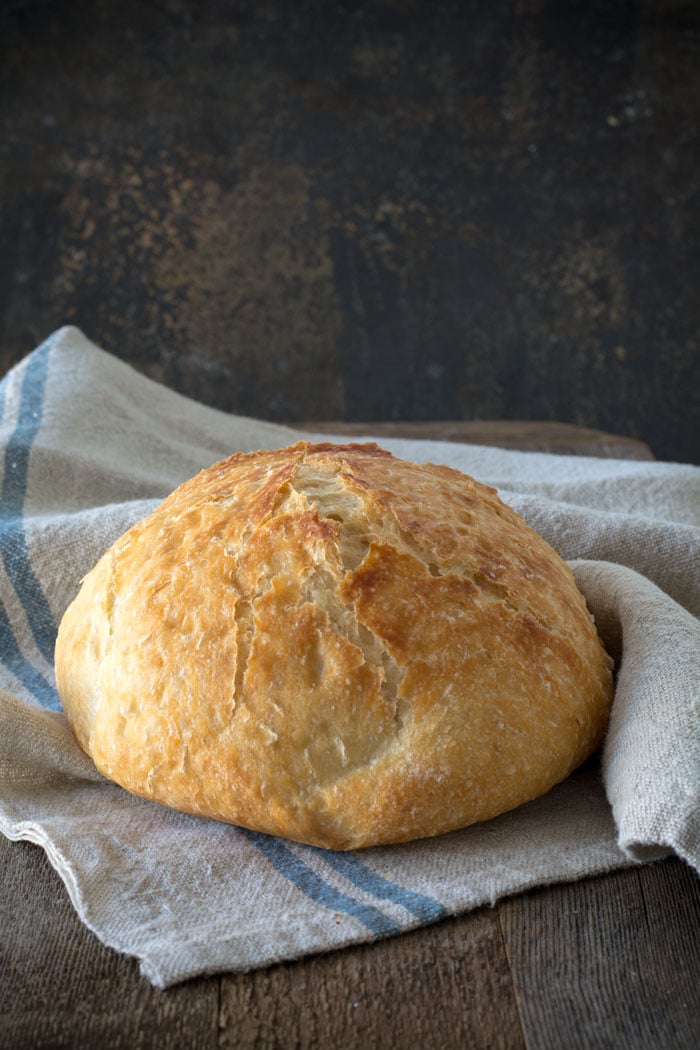
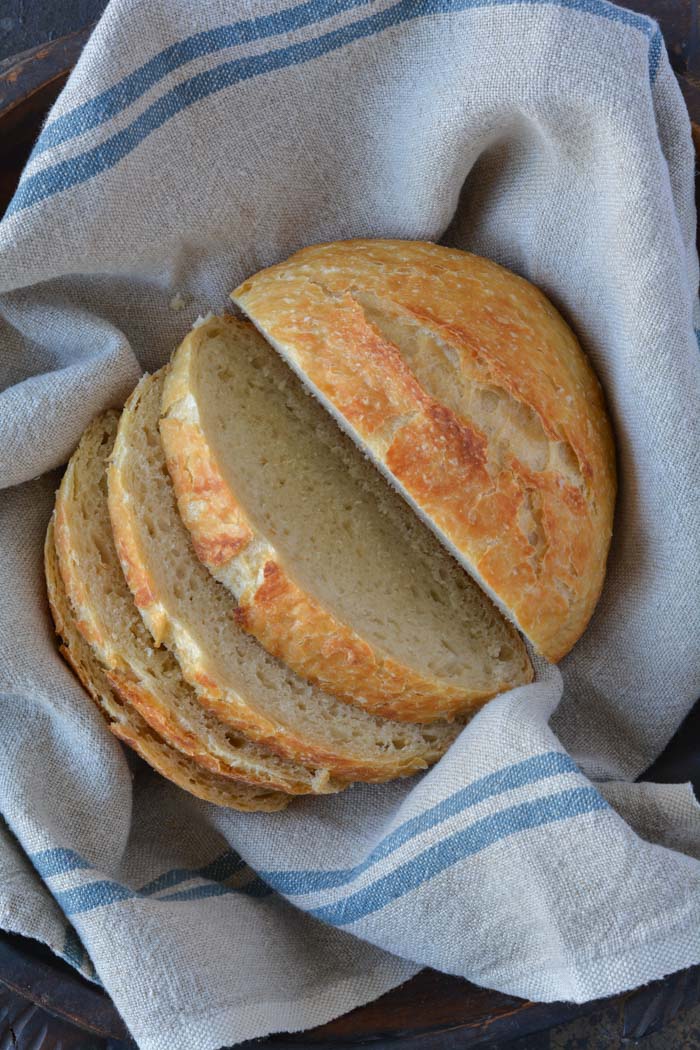
Holy cow! Can you believe how gorgeous that is? It’s best to wait for the bread to cool before slicing. Because I love warm bread I sliced it right away.
FAQ’s
Q: Do I have to use an enamel covered cast iron pan?
A: NO. You can use anything that can take the heat. The following have been used that I know of:
Clay pots with lids, Pizza stone with a bowl to cover the bread, insert from a crockpot, pyrex baking dish with a lid, stainless steel pot with a lid, baking dish covered with aluminum foil, old cast iron dutch oven.
Q: Do I have to use unbleached flour?
A: I always use unbleached flour. You can try bleached flour.
Q: Can I use self-rising flour?
A: I don’t know. I would just stick to all-purpose.
Q: What size is my pan?
A: My smallest pan is 5.5 quart. You can use as small as a 3 quart.
Q: What type of yeast do I use?
A: I use SAF instant yeast. Any yeast should work.
Q: Why is my bread turning out flat?
A: You could try using less 1/4 cup less liquid. Or add 1/4 cup additional flour. Make sure your dough appears to be dry when you first mix it. It will have more moisture during the rising time.
Q: Can my dough sit out longer than 18 hours? Does it HAVE to be between 12-18 hours?
A: I have let some dough sit as long as 24 hours and the bread was beautiful.
Q: Have you tried Gluten-free?
A: From what I hear the best GF is from King Arthur Flour https://shop.kingarthurflour.com/items/gluten-free-measure-for-measure-flour-3-lb
Q: Do I have to grease or oil the pan? Will my breadstick?
A: No you don’t need to grease the pan. I have never had the bread stick when using a cast iron pot. I haven’t tried anything else. The best way to be certain that the bread won’t stick is to form the loaf on a sheet of parchment paper and lift the bread into the pan using the sides of the parchment. Leave the paper in the pan. It’s won’t burn. When the bread has baked, just lift the sides of the parchment out of the pan. Voila! HOWEVER: Not all parchment paper is created equal. I use a silicone coated parchment paper. Regular parchment paper can stick something terrible. Don’t chance it.
No-Knead Crusty Bread
Wonderful yet easy artisan bread with a crisp crust. Prep takes just a few minutes with an overnight rise. Baked in a pot with a lid to create a steam oven. Bread can be made with many flavors and variations.
Ingredients
- 3 cups + 2 tablespoons unbleached all purpose flour (450 gr)
- 1 3/4 teaspoons Kosher salt (10 gr)
- 1/2 teaspoon Instant or Rapid-rise yeast (3 gr)
- 1 1/2 cups water cool (315 gr)
Instructions
-
In a large mixing bowl, whisk together flour, salt and yeast.
-
Add water and mix until a shaggy mixture forms.
-
Cover bowl with plastic wrap and set aside for 12 - 18 hours. Overnight works great.
-
Heat oven to 450 degrees. When the oven has reached 450 degrees place a cast iron pot with a lid in the oven and heat the pot for 30 minutes. OR pot can be placed in cold oven while oven is preheating leave in oven for 30 minutes.
-
Meanwhile, pour dough onto a heavily floured surface and shape into a ball. Cover with plastic wrap and let set while the pot is heating.
-
Remove hot pot from the oven and drop in the dough. Cover and return to oven for 30 minutes. After 30 minutes remove the lid and bake an additional 15 minutes. Remove bread from oven and place on a cooling rack to cool.
Recipe Video
Recipe Notes
FAQ's
Q: Do I have to use an enamel covered cast iron pan?
A: NO. You can use anything that can take the heat. The following have been used that I know of:
Clay pots with lids, Pizza stone with a bowl to cover the bread, insert from a crockpot, pyrex baking dish with a lid, stainless steel pot with a lid, baking dish covered with aluminum foil, old cast iron dutch oven.
Q: Do I have to use unbleached flour?
A: I always use unbleached flour. You can try bleached flour.
Q: Can I use self-rising flour?
A: I don't know. I would just stick to all-purpose.
Q: What size is my pan?
A: My smallest pan is 5.5 quart. You can use as small as a 3 quart.
Q: What type of yeast do I use?
A: I use SAF instant yeast. Any yeast should work.
Q: Why is my bread turning out flat?
A: You could try using less 1/4 cup less liquid. Or add 1/4 cup additional flour. Make sure your dough appears to be dry when you first mix it. It will have more moisture during the rising time.
Q: Can my dough sit out longer than 18 hours? Does it HAVE to be between 12-18 hours?
A: I have let some dough sit as long as 24 hours and the bread was beautiful.
Q: Have you tried Gluten-free?
A: No. I'm still waiting for someone to venture into the realm of Gluten-free. If you try it, let everyone know.
Q: Do I have to grease or oil the pan? Will my breadstick?
A: No you don't need to grease the pan. I have never had the bread stick when using a cast iron pot. I haven't tried anything else. The best way to be certain that the bread won't stick is to form the loaf on a sheet of parchment paper and lift the bread into the pan using the sides of the parchment. Leave the paper in the pan. It's won't burn. When the bread has baked, just lift the sides of the parchment out of the pan. Voila! HOWEVER: Not all parchment paper is created equal. I use a silicone coated parchment paper. Regular parchment paper can stick something terrible. Don't chance it.
More Notes:
Regular active yeast can be used in place of the instant or rapid-rise yeast. It will need to be activated in 1/4 cup warm water. Stir and let sit for 5-10 minutes. However, most of the comments I have received state that the rapid raise works the best. You choose. Whisk the flour, salt, and yeast together.


To clean your pots you can try ceramic stove top cleaner….it worked pretty well for me.
A funny thing happened to my bread – it turned purple!! LOL – I made a loaf of walnut, raisin, cinnamon, and it is purple – i am clueless as to why – but it's delish!!
🙂
Follow up to my previous post: I just ate a slice of the bread, still warm. I was a chef for 25 years, and I baked some pretty good bread in that time, but nothing to compare with this. The crust is light and crisp, the interior moist and chewy, and the flavor is sublime. Thank you for digging this recipe up and sharing it with the rest of us. Simply Marvelous!!!!
I'll never be able to thank you enough for this wonderful, super easy recipe. Just made it. Can't believe I could make something so delicious. Can't wait to try other variations.
Blessings to you!
Bread in oven as we speak…smells delicious!! I was waiting for an excuse to buy myself a dutch oven!!
THANK YOU!!!
K
Tip for fresh herbs – use a small food processor (mini-choppers) and blend the herbs with a half cup or so of the flour.
You get a better "chop" and they blend in more evenly.
Same with the fruit zests.
Well, i have read thru the comments on this a couple of times, and while i have made a few loaves, I seem to have the same problem each time – it's not as 'tall' as yours, so I hope adding a bit less water and more yeast will help – also, i have regular yeast – a whole jar full – and added it to the flour before adding it to warm water – so I hope by adding warm water to not cold yeast will help. I am also going to try my 1st add-ins – cinnamon, walnuts and raisins……yummmmm…
I am so happy so far with the taste tho – the 1st loaf was to be for dinner – I cut it to give 'little' tastes to all present, and had a line of demanding people down the hall, looking for more – it was pretty funny – my poor husband comes in looking for more, and gets yelled at for not waiting for dinner!! So I have been told we will stop buying bread – good thing? or not so good? depends on how busy a grandma with a job, kids, baby in house, online business and multiple hobbies is!! But, we do love it – and i can't wait to buy another pot – rotating multiple batches got me a burnt arm – but i will press on!!
LOL
Thank you for being here – you rock!!
(oh, and to the person who criticized you – can't they read? you said it was a recipe from the company, for goodness' sake!)
OMG! How amazing! I made my first loaf and it turned out awesome! Thank you so much for sharing this recipe. I know my oven is going to be busy for awhile. Thank you again!
I got your recipe off Pinterest and had to search for the appropriate pot to bake the bread in.
Found an aluminum Dutch Oven at a resale shop for $6.00 and got to it that night.
I was sure it would not work as the dough seemed flat when I put it in the pot, but I am now on my third loaf.
It is exactly the kind of easy-to-make, delicious bread recipe I have been looking for.
Thanks for sharing this awesome recipe!
I made this tonight and I was amazed! So easy and super delicious. Just as good as a bakery artisan bread and even better because I made it myself! 🙂
Gluten-free is here thanks to Holly. This is a copy of her post:
It worked! I made this "easy Bread" gluten free. It is a little denser than the reg loaf looks, but the flavor is good. I used "Bob's Red Mill, Gluten Free all purpose flour" and followed the above directions. You need A LOT of flour for your floured surface, bc the dough is VERY wet. Thanks so much for the recipe I am excited about trying new flavors now.
-Sarah Dolby
Thank you all for you great comments. They are so helpful to everyone. You can use a pizza stone and put a pan over the top. It has been tried by someone and they had success. Thanks for your many tips and ideas.
Made a double batch and going to try one loaf in my enamled pot and one in my regular aluminum heavy bottom pan…interested to see the difference, if any.
Just made this bread- it was SO easy and SO dang good!! I never want to buy bread again!! Thank you!!!
I took time this morning (I was needing a great mental break) to read the whole post. I have counted and written down all the variations, including Gluten Free. I had better get baking. And sharing.
thank god for pinterest! and thank you for the wonderful breads!! i've been making these breads almost every day for friends and family! PLEASE someone try Gluten free !!! and post it!! if not i'm going to have to try it! your blog is great!thanks for your time replying to every one! GO HOLY COW CLUB!!! love this bread soooooooooooo much!!!!
I purchased my towels from Ikea about 2 years ago.
There is a lot of concern regarding the heating of your pots empty. I have probably made over 100 loaves of this bread in my enamel covered cast iron Le Creuset. I haven't had any problems. Not even with the knob on the lid. They are a pricey investment and I understand any concern you may have. If you are nervous you may want to try another pot like a good old cast iron dutch oven. I realize my pots look pretty hammered, but I'm here to report and I have taken everyone's cleaning advice and now my pots look brand new.
Where do you get your dishtowels? CUTE!
I found a Le Creuset on sale and couldn't help myself, I had to buy it so I could try this recipe. When I opened the box and read the instructions it said not to heat the pot dry and that has me a little paranoid. I went ahead and made the bread anyway, it turned out fabulous and I'm starting another batch this evening. However, I'm still worried I might ruin the pot… anyone had any problems with Le Creuset pots being ruined?
loooove it! I was thinking…how about a slow cooker? would it work as well? It has a lid and you can set your temperature I guess?
Thank you for rocking my bread world! My lodge enameled cast iron pot is proud of its new lot in life. And I am proud of daily awesome bread that couldn't be easier to make. Happy girl in WA.
This bread was absolutely amazing!! It turned out perfectly! And I LOVE my Le Creuset pan as well! Great blog…I'm so excited to try more of your recipes!!
I made this today in a ceramic pot with a lid and it came out perfectly!! Thank you so much for this fantastic recipe!
I've been making this for months, it is a wonderful recipe! Why did I just notice the jalapeno cheddar suggestion!!!! OMG! Running to the store right now for some peppers!
Wow!! This was so easy and my bread is yummy…can't stop eating it!! I used sharp cheddar, jalapeno peppers and garlic. Now I am trying to come up with some more flavor ideas. I do have Gryere cheese, lemon and rosemary so I'll try that later. I better start running, otherwise I will be putting the weight on…thanks for such a great recipe!!
Darn. I didn't read far enough early enough. I used regular yeast. It's proofing on the counter right now. :o/ I hope it will turn out for a b-day party tomorrow.
It would be nice if the comments were shown with the most recent first, so those of us waiting for responses could find them without having to "load more" a million times.
I feel your pain. I have to do the same to respond. Unfortunately blogger doesn't have a simple fix to reverse the order. I'm looking into something more customized. Hang in there. Until that time, send me your email address with any questions and I'll respond promptly. I won't publish your email address.
Did you not let your dough rest after dumping it onto the floured surface and covering once again? Or is it because you used a different type of yeast, or what? I bake a lot of regular bread, so to me it seemed like it would need a second rise, but your recipe didn't mention how long or anything so I looked at an identical recipe and it said to let it rest for 2 hours after the dumping onto the floured surface stage. So which is correct? I am new to no-knead stuff so I am confused. I use regular active dry yeast (not the instant stuff) in case that matters.
You are going to have to trust me on this. Just dump the bread out onto a heavily floured surface. Dust the dough and your hands with flour and shape into whatever shape you desire. Do this when you preheat your pan for 30 minutes. Cover with the plastic wrap and let rest for the 30 minutes. Remove the pot, add the dough, cover with lid, place in the oven. After 30 minutes baking time, remove the lid and continue to cook another 15 minutes or until golden brown. that's it! No second rising time required…HONEST.
I have been sooooo excited to try this since I found your recipe on pintrest a few weeks ago. I received my Wolfgang Puck cast iron enameled Dutch oven the other day(I know I didn't need one to make this bread, but good excuse to get one anyway: ) and just took it out of the oven to take the lid off for the additional cooking time. MY FIRST LOAF OF CRANBERRY, ALMOND, LEMON BREAD LOOKS AMAZING!!!!! Like others, I can't believe something could be this easy, and be so good! Well, I haven't tried it yet because it's not quite done, lol but it's just beautiful!!!! Thank you!!! Karin
I made my first loaf (plain) about a week ago and am in love with this recipe!! I just made my 2nd starter loaf and this time added pepper jack cheese. Can't wait for it to bake! I think one draw is being able to add some many different things for variety. This is a great recipe and great bread! Thanks so much for sharing! I have been trying to make bread for a long time and this is the first one that actually worked! 🙂
Amy in Georgia
I have made 3 loaves so far and everyone LOVES this bread. I have to sneak and bake it otherwise my 8 year old is drooling on the oven the whole time 🙂 I use a old cast iron dutch oven that is about 4 quarts. The bread turns out perfectly everytime. Amazing! Found you from pinterest.
I tried this weekend using a 2.5 qt Corningware dish with lid. It worked great. I love this recipe and am scouring thrift shops to find the proper cast iron. I was concerned my corning might crack during preheat so i threw a wet tea towel in there and removed to put dough in. It stuck a bit in one corner so I will try the parchment paper next time. Thank you so much for a great recipe.
It worked! I made this "easy Bread" gluten free. It is a little denser than the reg loaf looks, but the flavor is good. I used "Bob's Red Mill, Gluten Free all purpose flour" and followed the above directions. You need A LOT of flour for your floured surface, bc the dough is VERY wet. Thanks so much for the recipe I am excited about trying new flavors now.
-Sarah Dolby
Wahoo! Finally someone took the challenge. Thank yo so much. Bob's Red Mill will be on my list to try. We all thank you.
OMG this bread was decadent!! I used a Pampered Chef Baker and a Cuisinart metal soup pot and the bread turned out great. I made two plain loaves and a third with thyme, lemon and parmesan reggiano and yet fourth with Rosemary, lemon and Gruyère cheese. I pulled off a little dough before cooking and made a 'T' (for Thyme) and 'R' (for Rosemary)and put on top of each before baking so I knew which bread was which. Has anyone frozen their bread after baking? Did you use freezer bags or foil?
Awesome, awesome! I sent the recipe to my mom and now she's going to try it too. I thought it could be served at any fine restaurant in town and I live in Chicago!! I used 1/2 bread flour and 1/2 white wheat. I have the blue oval La Creuset. YUM!!
Just made this today and it was really good! FYI: I have a Rachael Ray enamel CI dutch oven and while the pot itself was oven safe to 450 degrees, the lid was not. What I ended up doing was covering the top with a ton (a TON) of foil for the first 30 min. My bread came out less browned than yours but fully cooked and super yummy. I'm about to make a cinnamon raisin loaf now!
Is your crust crunchy? Mine is. It's really good tho!! 🙂
I just made this today and it is sooo good ! My husband has eaten most of it already 🙂 Going to do a double batch tonight ! Thanks so much for posting !
I just made this today and I must say I am so impressed ! It is sooo good ! My husband has eaten most of it so now I am going to have to make more 🙂 Thanks so much for posting !
Thank you for sharing this great recipe! Made my first plain batch tonight and it turned out perfect!! Making a few meals fur new moms thus week and I plan on making them a fresh loaf to go with their dinners.
Found this on Pinterest this week, and making it tonight/tomorrow morning. It's proofing now, and I did add 1 cup of shredded cheddar. I have a large Le Creuset dutch oven and funny enough I also have the Rachael Ray covered baker someone mentioned above. I will try the ceramic lidded RR pot, because again like the person above who mentioned this, I don't use it for anything. I'm a cook for sure, but not a bread baker. Wish me luck! (P.S. Some time ago, America's Test Kitchen recommended an enameled dutch oven available at Walmart for $50 or less. ATK loves Le Creuset, but they found this $50 version a very acceptable option. The name might have been Tramontina, not 100% sure.)
Are yeast and active dry yeast the same thing?
No. Instant yeast and active dry yeast and different. And people tend to call whichever kind they use "yeast" and that's fine, but in a recipe it should be specified which one you're talking about b/c instant yeast requires only 1 rise. Active dry needs 2, the long first rise (which is the only one instant yeast needs) and then a second rise (usually at least 30 minutes or until doubles in size) after it's been punched down and shaped into a loaf/rolls/whatever. If you use instant, after it's risen you just shape it into whatever you need it baked as and then bake it. So if a recipe just says "yeast" you might want to ask which or be sure to add a second rise period if it's not in the recipe unless it's been specifically said not to.
Maggie is correct in most cases while making regular bread. Not the case with this recipe. I have interchangeably used both the instant/rapid rise and active dry yeast. Both respond the same and the active dry doesn't require a second rise. Trust me on this. Just mix up the bread following my instructions and see what happens. So far, FOR ME, it has worked every time regardless of the yeast that is used.
This is gorgeous!
I want to make this recipe but don't have any yeast. Does anyone have experience using lemon juice and baking soda?
I have never tried using lemon juice an baking soda. Here is a link that just might help with adjustments. http://www.livestrong.com/article/424419-how-to-replace-yeast-with-baking-soda-lemon-juice/
Let me know if you try it. I'd love to hear how the bread rises.
Thank you so much for sharing your recipe. I tried it out on my clearance 6.5 qt. Tramolina dutch oven and it was delicious. I making making a second batch using fresh rosemary and pecorino cheese.
Truly awesome bread!! I added the lemon, cheese and rosemary- so good!! This is now my go to bread recipe.
-Anna
I made my 1st loaf yesterday, using a 8 qt stainless steel Dutch oven & the bread came out looking like your pictures. Yay! Now to start experimenting. 🙂
I love making bread making. I have never been to good at it. Can't wait to try this bread.
Clorox is also good to bleach out the stains in your pots.
OH MY GOSH!! This bread looks GREAT!!!! I've got to try it on Sunday! Oh and I'm not sure if anyone has answered about your stains on the creuset pot…I use Bar keepers friend on it…keep it on there for about a minute then scrub it out…it works GREAT on mine and it's gentle on it and won't scratch the color!! (P.S you have GREAT taste in color for your Creusets!!! LOL I've got the same color!)
THANK YOU for this recipe! It is really as easy as it looks and so tasty! We ate the entire loaf in about 2 hours. Hopefully the one that I am making now will last a little longer… although I am less than convinced of that:)
I also have a 6 qt. Lodge Enamel Cast Iron pot that I just used to make this bread the other day, and it worked great! I actually have a loaf in the oven in the same pan right now. My problem is that I'm so nervous to over-flour the bread, but it doesn't shape up into a very nice looking ball like yours does in the pictures. Mine is SO sticky and just flattens out quite a bit. I think I'll try the parchment paper, so I don't have to mess with it once the "ball" is formed. I also read some of your other suggestions. I live in Utah, at a higher elevation, do you think perhaps I should cut the water by a 1/4 cup to see if it makes it a little easier to handle?
I actually flour my dough quite a bit while trying to shape it. If my hands start to stick, I flour them then sprinkle a bit more on the dough. Parchment is wonderful because the dough is so sticky it WILL stick to your hands regardless of anything you do. You can try reducing the liquid to see if that helps. Don't worry about any dry spots that may be left in your dough from less water, by morning they will be gone and the dough will be bubbly. I hope this helps. Good luck.
I didn't read all the way through the comments, so I don't know if anyone else tried to make a honey oat bread. Turned out delicious. The bread did not rise as much as the others I made (regular, cranberry almond, & sharp cheddar) and was more dense. I did approximately a cup of oats & a 1/3 a cup of honey while adjusting down the amount of water.
When I first discovered this recipe, I went crazy, crazy baking every concoction I could dream up. I seriously went through 100 lbs of flour in just 2 months. Right now I have 2 loaves of chocolate, chocolate chip, pecan rising. It's a chocoholics dream. I'm visiting 2 married children tomorrow I will take the loaves to them. I hope they share.
I love hearing your creations and successes. Keep up the fabulous baking!
Saleta, I'm sorry you didn't have success with your first loaf. I have never had this problem. You could try turning down your oven like you suggested. I hope that brings you better luck. Let me know if that helps.
Nicky, I had someone comment that they added some citric acid to the dough and it gave the bread a sour dough taste. Someone also used orange juice for part of the liquid and they said that it gave off a sourdough taste to the bread. I hope this helps.
I have baked your bread four times. I follow your recipe to the T..I was a total hit with friends & family. I used my 5.5 quart cast iron pot, I'm sure that makes a big difference to the baking. Thanks for sharing your fabulous recipe.
I made my first one with bleached flour and it turned out perfect. I am now making a whole wheat one as requested by my husband. I followed the tips from an early post stating to use 1/4 cup less flour and 1/2 cup more water. It looks like a soupy mess. I am hoping tomorrow it will be ready to bake. Have you successfully made wheat bread? If so, what were your measurements? Also, I didn't use instant yeast and it worked great. Thanks for posting this recipe. We love it!
I recently found this on Pinterest! I just pulled my first loaf out of the oven and it is gorgeous! Sliced it immediately to taste and it is delicious, too! Now I am ready to make more! For my first loaf I flavored it with 1 t. black pepper, 1 t. seasoned pepper, 1/2 c. parmesan cheese, 3 cloves garlic (minced), and 2 t. fresh basil (finely chopped). Oh, so yummy!
Easiest bread I've ever made and just as delicious! I didn't have a LeCruset pot so I used my Calphalon non stick Dutch oven with parchment paper and it worked wonderful.
Just made this and couldn't believe how easy it was to make and how awesome it tasted. I used a Calphalon Dutch oven and it worked perfectly. Love love love it.
Thanks for posting this recipe! I have a question though (and if this has already been asked, I apologize). I made this today and every part of the process looked (and smelled!) amazing. When I pulled it out of the oven it was such a beautiful loaf of bread. However, when I sliced it, only the edge pieces were edible. The middle was very doughy and undercooked, but the bottom of the bread was rock hard. Help! What would cause this? I was thinking oven temp? I cooked at the 450, but wondering if maybe my oven runs hot and so cooking at 425 or 400 for slightly longer might be better? Not sure what caused this. Any ideas or suggestions would be great. Gonna try again this weekend.
Made up two bowls of dough, one plain and one cheddar and parsley…first time I'm attempting to make this bread…I'll bake it tomorrow..can't wait to see how it turns out..will probably spend all weekend making different flavors if I'm pleased with how these two turn out.
Wish me luck..!!!
Sam Schehl
Great recipe! Made it tonight. Turned out just like the recipe says. I used cheese, but plan to make the cranberry, almond, orange one next. I used a cast iron dutch oven. I'm really happy with the way it turned out!
I'll admit that I was REALLY skeptical about this stuff…I'm a self-proclaimed, avid bread baker, and I was sure that the dough would not rise…but GUESS WHAT? IT DID! I was amazed. The bread turned out very crusty on the bottom and soft and chewy (in a good way) in the middle and at the top. I made mine with Italian seasoning, garlic, and grated Parmesan cheese, and it was GOO-OO-OOD!
I have a question regarding letting the dough sit so long,
Because it sits for quite some time does the bread turn like sour dough bread? Does it taste like sour dough? Because I'm looking for a recipe that does not taste like sour dough.
Thank you so much for your help.
I've got this in the oven right now. I don't own one of the pots or a dutch oven so mine is in a Corning Ware baking dish with a couple layers of foil over it tightly wrapped around the sides! I peeked at it 20 minutes into the baking time and it looks good! We'll see what happens. Looking for a dutch oven or pot today. Your blog is great! Thanks!!
So excited made today, for a birthday party turned out great ! I was worried my loaves looked so small but they were fine. I added pepper jack cheese to one and it was good. I will defiantly be making this again, and playing with ingredients. Thanks so much !! I was very excited. Just keep looking at the little loaves after they came out, praying they would taste as good as they looked.
Just made this in my Lodge enamel Dutch Oven. I did not unscrew the handle, it was fine. I also did not have instant yeast, so used dry active. I put it in 1/4 cup warm (100 degree) water until it was all foamy, then poured in the flour along with the rest of the water (lessened accordingly to 1.25cup).
The bread rose wonderfully in the 18+ hours it sat. When I dumped it from my bowl it stuck a bit and also flattened out considerably. I gently folded the ends under to make it a bit more of a loaf… but I had trouble with transferring it to the heated Dutch Oven. When I picked it up it just kind of fell apart? I got it in the pot alright but I felt it was a bit flimsy. I think next time I will try with 1 cup water instead.
In any case the bread still came out great! Its a little denser than it probably should be but the crust is delicious and the texture of the bread is chewy and yummy. Thanks for the recipe I can't wait to play with the ingredients, including trying that IPA in there!!
Wow, made the plain loaf for the first time today. What fun. It looks exactly like your pictures. I baked it in the removable crock of my crock pot. Perfection. When I took the loaf out of the oven, actually did a little jig. (glad I was home alone) Next I think I'll try a cinnamon/raisin. Any suggestions as to how much cinnamon to use? Thanks…
sorry…i was thinking the plain not enamel lodge pots 🙁
you can heat a cast iron (lodge) pan in the over empty…ive done it many times.
I lent my clay baker with lid to my friend and she made me this bread.
It was AWESOME and I need my baker back so I can try making some
Janet, You already have hundreds of comments, but I just have to add to this. I do not like working with yeast..I seem to fail miserably with it. But your step by step and pictures made this encouraging, so I tried it. I have now made 15 loaves of bread! I bake it for friends and give it with a jar of home made jam! My niece took my advice and made her first loaf this morning and she is also amazed. My next experiment is to try a sour dough loaf. The whole wheat, cheddar, garlic/chive/parmesan, and herb loaves were wonderful, so I'm on a roll. I can't thank you enough for the encouragement and inspiration you gave me. :~) Debra in Seattle
Wow! What a compliment. Some of the best bread I have had has been in Seattle. You can now add your name to the list of famous Seattle bread bakers.
Where do you get those cute dish towels?
Ikea…about 2 years ago.
Would this bread make a good soup bowl?
absolutely.
Has anyone tried adding sugar for any variation?
It has been tried and was successful. The bread will brown just a bit more, however. Try it!
Janet – do you know how much sugar was added?
I don't have any lodge pots, but I was thinking… maybe you can heat them on low on the stove empty? Perhaps you don't have to get it to the exact temp as the oven, just don;t put it in cold. I know I do this with my uncoated Lodge cast iron rather than preheating in the oven for my corn breads and German pancakes.
Janet, I am going to start on a GF version asap with basic ingredients, flour, salt, yeast, water, and probably ground flax seed for that chewy binder. I'm not a fan of the xanthan or guar gums. I'll keep you posted!
Thanks for taking on the gluten free challenge. Many are waiting for the results including me.
please let us know how it is working out – post recipe plz. I love bread and love to bake it, but I feel much better if I don't eat so much gluten.
I have never tried using corn flour let me know how it works?