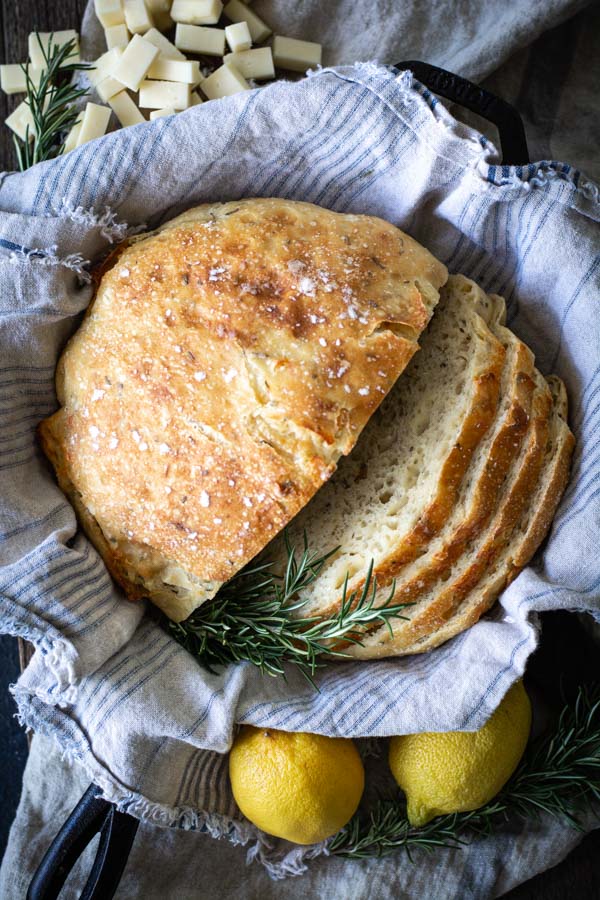
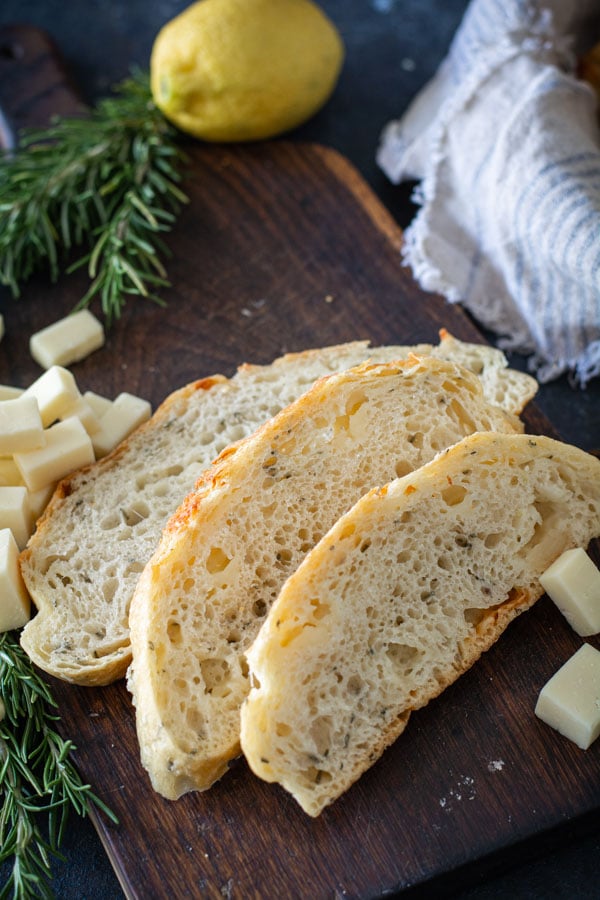
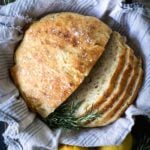
A simple No-knead Lemon Rosemary Gruyere bread. Fresh lemon zest and earthy rosemary studded with chunks of melting Gruyere cheese.
Making No-knead Lemon Rosemary Gruyere Bread
 1
1 2
2 3
3 4
4 5
5
- In a large mixing bowl, add flour, kosher salt, and yeast. Whisk together.
- Add the lemon zest, chopped rosemary, and gruyere cheese. Toss the ingredients together using your hands or a spatula. I like to cube the cheese, however, grated cheese is just as good.
- Add water. Mix just until all of the flour has combined with the water.
- The dough will look like a shaggy without any appearance of dry flour.
- Cover the bowl with plastic wrap and let it sit for 12 – 18 hours on the countertop. DO NOT REFRIGERATE. This is not optional. It takes that much time to proof the dough. The reason why you need a large bowl is that the dough will start to rise.
Shaping and Baking Crusty Bread
 1
1 2
2 3
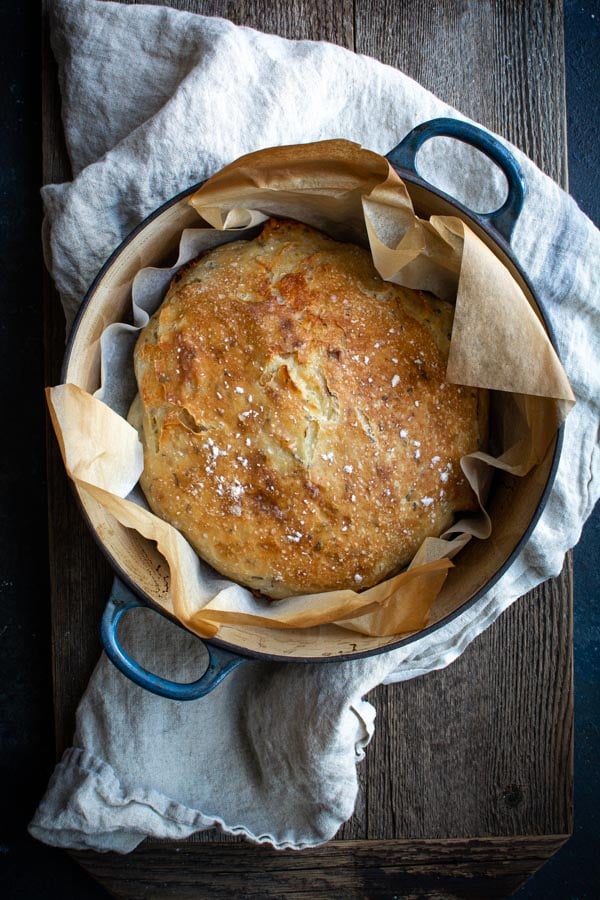
3- After 12-18 hours the dough will look like this. It’s pretty sticky, but that’s ok it’s supposed to be. Preheat your oven to 450 degrees. As soon as it has heated to 450 degrees place your pot with the lid in the oven and preheat the pot for 30 minutes.
-
Right after you put the pan in the oven to pre-heat, gently release the dough from the bowl onto a generously floured surface. Gently shape the dough into a round ball with floured hands and place it on a sheet of parchment paper. The parchment paper stays in the pot. This will rest for 30 minutes while the pan is heating. Cover with plastic wrap and let rest while the oven is heating.
- Remove pot from the oven and carefully pick up the parchment and drop dough into the pot. Be careful the pan is HOT. Put the lid on the pot and return it to the oven for 30 minutes.
- After 30 minutes then remove the lid from the pan. Bake for an additional 15 minutes uncovered until nicely browned. You can test with an instant-read thermometer to make sure the bread is fully cooked on the inside. The temp should be between 190F and 200F degrees. Remove from the oven and carefully remove bread from the pot by lifting the edges of the parchment paper
Note: Because the dough is so sticky parchment paper makes it easier to drop into a hot pot and then remove it after baking. But it is not necessary. Use silicone-coated/non-stick parchment paper. The regular non-coated paper will stick terribly.
No-knead Lemon Rosemary Gruyere Bread
Easy no-knead bread filled with melting chunks of gruyere cheese, lemon zest and fresh rosemary
Prep Time 15 minutes
Cook Time 45 minutes
overnight rise 18 hours
Servings 8 people
Calories 242 kcal
Ingredients
- 3 cups flour
- 1/2 teaspoon yeast
- 1 3/4 teaspoon kosher salt
- 1 cup Gruyere cheese 1/4 - 1/2-inch cubes
- 2 tablespoons fresh rosemary chopped
- 1 tablespoons lemon zest from 2 lemons
- 1 1/2 cups water
Instructions
-
In a large bowl combine flour, yeast, and salt. Whisk or sift to combine. Stir in cheese, lemon zest, and rosemary.
-
Pour water over the top of the flour mixture and stir just until combined. The mixture should look shaggy without any dry flour visible. Cover bowl with plastic wrap and let rise for 12-18 hours.
-
When ready to bake, heat oven to 450℉. Place a large ovenproof pot with a lid in the heated oven and let heat for 30 minutes. Carefully turn dough onto a lightly floured surface or a sheet of non-stick parchment paper. Cover with plastic wrap while the pot is heating for 30 minutes.
-
After 30 minutes remove plastic wrap and carefully lift the dough into the hot pot. Place the lid on the pot and bake for 30 minutes. Remove the lid and bake for another 15 minutes or until golden brown.
-
Remove from oven and carefully lift the hot bread out and place on a cooling rack. Cool for at least 1 hour before slicing.
Recipe Notes
- Parchment makes it so easy to transfer the dough into a hot pot and then remove it after baking. But it is not necessary. Use silicone-coated/non-stick parchment paper. The regular non-coated paper will stick terribly.
- White cheddar, Asiago, or Parmesan cheese can be used in place of Gruyere.
- Cheese can be shredded instead of cubed.
Nutrition Facts
No-knead Lemon Rosemary Gruyere Bread
Amount Per Serving (1 serving)
Calories 242
Calories from Fat 54
% Daily Value*
Fat 6g9%
Saturated Fat 3g15%
Cholesterol 18mg6%
Sodium 568mg24%
Potassium 71mg2%
Carbohydrates 36g12%
Fiber 2g8%
Sugar 1g1%
Protein 10g20%
Vitamin A 171IU3%
Vitamin C 1mg1%
Calcium 177mg18%
Iron 2mg11%
* Percent Daily Values are based on a 2000 calorie diet.


Hi! I have used this recipe for years and now hoping someone has tried GF flour and can tell me if it works out without me trying it first haha!
Any success with GF flour?
My SIL cant have gluten and im hoping to bake her a delicious loaf for thanksgiving so she can partake, i have a 1:1 GF flour already in the wings, thanks!!
Hi Janet! This is my second bread i have made from your website and it is ABSOLUTELY delicious! My husband is a full blooded swede and I make him swedish Limpa bread. Can you convert any bread recipe into no-knead? It would save me so many steps and time.
I’m so glad you love the no-knead bread recipes. They are so simple and so impressive! I’m going to try a no-knead version of Limpa bread. My only concern is the buttermilk and baking soda mixture. The baking soda is going to make the bread start to rise and foam. This sounds like a fun challenge/science experiment. I have a son that has lived in Sweden for 5 years now. He would be thrilled if he could bake a no-knead version of Limpa! I’ll get back to you. My fingers are crossed!
Hi Lisa, I’m thrilled you love the no-knead bread recipes. They are so simple yet impressive. I have never made Limpa bread, but I’m curious to see if a no-knead version would work. My only concern is the buttermilk and baking soda. The baking soda would cause the buttermilk to foam and start the rising process. I think it’s work a try. I’ll experiment a bit with it and let you know how my Limpa turns out. I have a son that has lived in Sweden for the past 5 years. He would love it if he could bake a no-knead version. Fingers crossed!
Too much salt! Recomm reducing the kosher salt to 1 tsp.
I’m sorry the bread was salty for you. I guess it depends on the type of salt used. I use Diamond Kosher. Thanks for your recommendation for other bakers.
I love this recipe and wonder if I could make a rye bread version by substituting a half cup of rye flour and two and one half cups of all-purpose?
Brilliant idea. I have tried adding rye flour and it is delicious. It does work best when added with all-purpose, so I think you’re spot on with your amounts. Once you try the bread with 1/2 cup rye, maybe you could try adding 1 cup of rye on your next bake. Please let me know how it turns out.
fantastic…so easy to make and absolutely delicious! The house smelled wonderful this morning with baking bread. I could hardly wait while it cooled to cut it! I do love your recipes…easy to follow and so far…perfect results! Thank you!!!!!!
Thank you so much for your review and I’m thrilled you loved the bread. You are right about the fabulous smells in the home while baking.
I would love to make this, but first – what type of flour is it SUPPOSE to be? All Purpose or bread flour? Thanks!
I use all-purpose flour but will work great with Bread flour. The difference is protein content. Bread flour has a higher protein content than all-purpose flour and will give the bread a tighter crumb. So the air holes one be as large. I hope this answers your question. Let me know if you need further help.
The recipe only lists “yeast”, is it regular yeast or instant rapid rise yeast? Want to make this bread this week, looks yummy.
You can use either. Instant yeast can be stirred right into the flour and regular yeast will need to be activated in 1/4 cup water. I always use instant.
Love your recipes, so excited to try them. Everything I have made has been delicIous!! Have 7 kids, some with spOuses and 12 Grandkids. Everyone raves about your recipes. We are pretty healthy eaters but Love our Sweet Desserts too. I am aLso impressed by the simpl and ease in preparing. You do a great job, explaining and usually with not Too many ingredients. Will continuE to wait and watch for new reCipes. Would love some great healthy vegetable side Dishes to
Go with fish, Shrimp, Beef, Pork or Chicken.
Thank you and God Bless,
Marcia BlackwOod
Thank you so much for your kind compliment. I’ll work on healthy side dishes.
This bread is So goof toasted! The cheese gets a little melted, and the lemon and rosemary are such a great combinatioN!
Yum! Great idea!