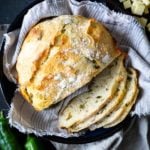
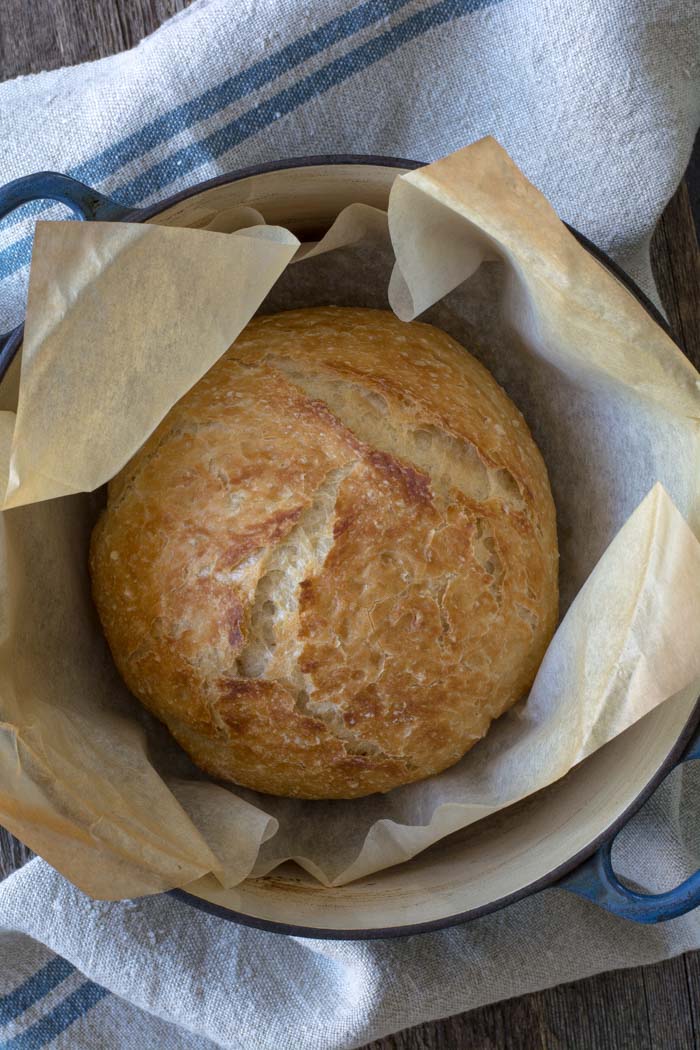
I’m giving a little spice to crusty bread with this seasonal No-Knead Green Chile Cheddar Bread. Roasted green Hatch chiles and chunks of white cheddar cheese mixed baked into a no-knead no fuss bread dough then baked in a dutch oven.
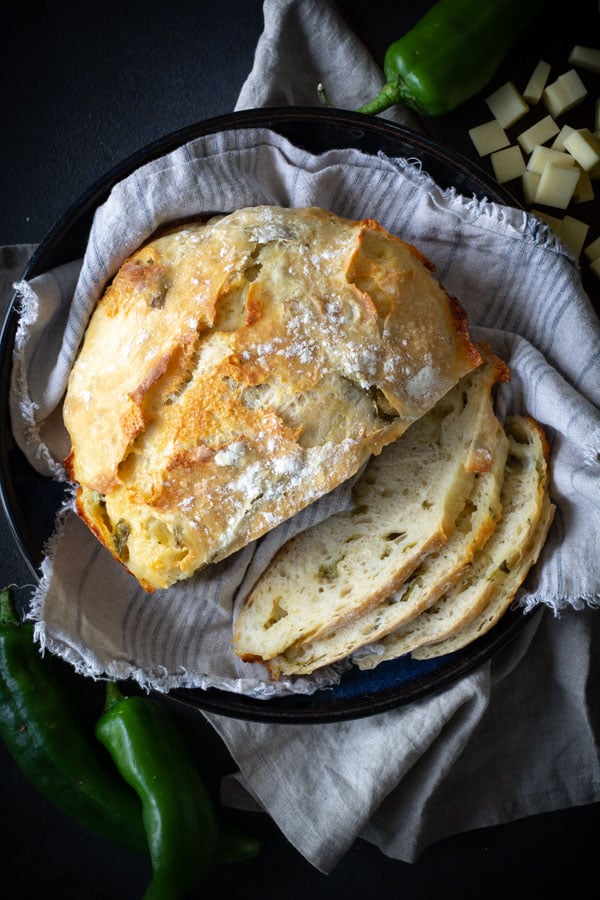
Out of all the crusty bread recipes I have created over the years this is probably one of my favorites. I love the smoky heat of the green chiles combined with sharp white cheddar cheese.
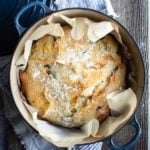
Chunks of cheddar cheese melt while the bread is baking. We fight over who gets the slice of bread with crispy melted cheese on the outside. Letting the dough rise overnight creates wonderful air holes and tunnels for the cheese to melt into. Leftover bread is amazing sliced and toasted with a schmear of butter. 🤤(drooling).
No-knead Green Chile Cheddar Bread Step-by-Step Instructions
 1
1 3
3 2
2 4
4 5
5 7
7 6
6 8
8- Cut cheddar cheese into 1/4-1/2 inch cubes. Roast chiles on a grill, under a broiler or on top of a gas burner flame. Cover for a few minutes to allow the chiles to steam. This will make it much easier to remove charred skins.
- Peel off darkened skins and remove seeds from chiles and cut into 1/4 x 3-inch strips.
- In a large mixing bowl, add flour, kosher salt, and yeast. Whisk together.
- Add chopped roasted chiles and cheddar cheese
- Gently toss chiles and cheese into the flour mixture.
- Add water.
- Mix just until all of the flour has combined with the water. The dough will look like a shaggy mess. That’s ok.
- Cover the bowl with plastic wrap and let it sit for 12 – 18 hours on the countertop. DO NOT REFRIGERATE. This is not optional. It takes that much time to proof the dough. The reason why you need a large bowl is that the dough will start to rise.
Shaping and Baking
 1
1 2
2 3
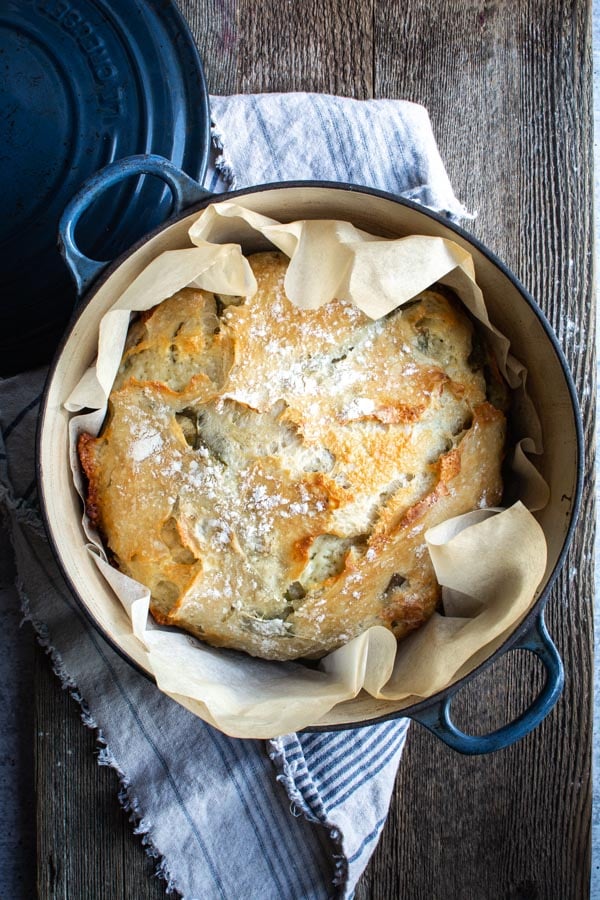
3- After 12-18 hours the dough will look like this. It’s pretty sticky, but that’s ok it’s supposed to be. Preheat your oven to 450 degrees. As soon as it has heated to 450 degrees place your pot with the lid in the oven and preheat the pot for 30 minutes.
-
Right after you put the pan in the oven to pre-heat, dump the dough out onto a generously floured surface. Shape it into a round ball and place on a sheet of parchment paper. Parchment makes it so easy to transfer the dough into a hot pot and then remove it after baking. The parchment paper stays in the pot. This will rest for 30 minutes while the pan is heating. Cover with plastic wrap. Note: Use silicone coated parchment paper. The regular non-coated paper will stick terribly. Don’t chance it.
- Cover with plastic wrap and let rest while the oven is heating.
- Remove pot from the oven and carefully pick up the parchment and drop dough into the pot. Be careful the pan is HOT. Put the lid on the pot and return it to the oven for 30 minutes.
- After 30 minutes remove the lid from the pan. Bake for an additional 15 minutes or until nicely browned. You can test with an instant-read thermometer to make sure the bread is fully cooked on the inside. The temp should be between 190F and 200F degrees. Remove from the oven and carefully remove bread from the pot by lifting the edges of the parchment paper.
Tips and Notes:
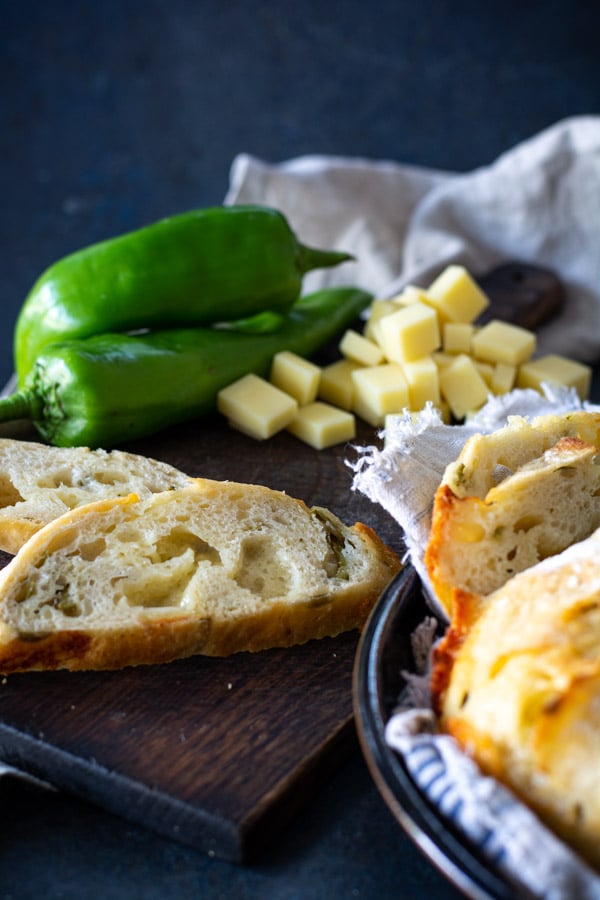
- I like to use roasted Hatch chiles. Roasting blisters the skin of the chile and separates it from the flesh making it easy to peel. Roasting, also, enhances the flavor.
- If fresh chiles are not available canned whole chiles can be used.
- Orange cheddar cheese may be used in place of white cheddar. I used sharp cheddar, mild cheddar can be substituted.
- It’s ok if the cheese pokes out through the dough. It can be pressed back into the dough or just leave it. I like to leave it so the outside of the bread has bits of crispy cheese.
- Remember this is your bread! Make it your own by using mild, medium, or hot chiles as well as mild, medium, or sharp cheddar. Pepper jack cheese can be used as well…why not? Ramp up the heat!
Check out my original post for Crusty Bread ⬅️ for more step-by-step photos and instruction. Along with hundreds of comments, questions & answers for this super simple yet amazing bread.
No-Knead Green Chile Cheddar Bread
Simple no-knead crusty bread with roasted Hatch green chiles and white cheddar.
Ingredients
Green Chile Cheddar Bread
- 3 cups + 2 tablespoons unbleached all-purpose flour (450 gr)
- 1 3/4 teaspoons Kosher salt (10 gr)
- 1/2 teaspoon Instant or Rapid-rise yeast (3 gr)
- 1 1/2 cups water cool (315 gr)
- 4 large Green chiles roasted and peeled, cut into strips
- 1 cup white cheddar cheese cut into 1/4-1/2 inch cubes
Instructions
-
In a large mixing bowl, whisk together flour, salt, and yeast. Add chopped roasted chiles and cheddar cheese. Gently toss chiles and cheese into the flour mixture.
-
Add water and mix until a shaggy mixture forms.
-
Cover bowl with plastic wrap and set aside for 12 - 18 hours. Overnight works great.
-
Heat oven to 450 degrees. When the oven has reached 450 degrees place a cast iron pot with a lid in the oven and heat the pot for 30 minutes. OR pot can be placed in cold oven while the oven is preheating leave in oven for 30 minutes.
-
Meanwhile, pour dough onto a heavily floured surface and shape into a ball. Cover with plastic wrap and let set while the pot is heating.
-
Remove hot pot from the oven and drop in the dough. Cover and return to oven for 30 minutes. After 30 minutes remove the lid and bake an additional 15 minutes. Remove bread from oven and place on a cooling rack to cool.
Recipe Notes
- Chiles can be roasted on a grill, under a broiler in the oven, or over a gas flame on a cooktop. Roast chiles until they begin to blacken. I roasted my chiles on my gas grill.
- I like to use roasted Hatch chiles. Roasting blisters the skin of the chile and separates it from the flesh making it easy to peel. Roasting, also, enhances the flavor.
- If fresh chiles are not available canned whole chiles can be used.
- Orange cheddar cheese may be used in place of white cheddar. I used sharp cheddar, mild cheddar can be substituted.
- It's ok if the cheese pokes out through the dough. It can be pressed back into the dough or just leave it. I like to leave it so the outside of the bread has bits of crispy cheese.
- Remember this is your bread! Make it your own by using mild, medium, or hot chiles as well as mild, medium, or sharp cheddar. Pepper jack cheese can be used as well...why not? Ramp up the heat!
You May Also Love


For step-by-step instructions for roasting green chiles check out Nutmeg Nanny
Great recipe!!! Very PRECISE directions!! Nice photos! This is a new FAVORITE for my Family. Thank you!!
Thank you so much. This is a family favorite in our home as well.
Is there any issue with spoilage of green chile when leaving the mixed beead out in the counter for a bulk rise for 8-10 hrs?
I have not had any issues with spoilage of green chile. I hope you try the bread. It’s delicious.
I made this bread this morning, prepared it last evening exactly as the recipe is written with the exception of canned diced chilis, because that’s what i had.
I took it our of the over about an hour ago when it was golden on top and an unternal temp of 205 degrees. My husband and I just had a slice and wow, it’s delicious and the textere is perfect!
This recipe was so easy. I was a little worrried about using cool water–that’s different than what I’m used to, but it worked out fine.
I used ALDi’s brnd of parchment paper and though it did get a little brown tinged around the egdes at 450 degrees, it was ok and there was no sticking at all. Also used their canned chilis and their rapid rise yeast.
This recipe is a winner. Thanks! I wish I could post a photo of the finished product!
Thank you so much for your kind and wonderful review of this amazing bread recipe. Happy baking!
2 QUESTIONS:
1) what size dutch oven did you use / how big is the bread loaf?
2) 1 cup of cheese, how much is that when it comes from a block of cheese that is 1 lb? Do you cut the blocks then see how much fits into a cup?
Thank you.
If i make this in a very large cast iron pot will it lose its shape? All your recipes look so good!
The bread will still work in a larger cast iron pot. I hope you love the bread.
Fantastic recipe! Very flexible – I don’t have a gas stove, and I’m lazy, so i use a 7 oz can of Macayo’s diced green poblano peppers (roasted and peeled) – liquid and all – for the chilis. The juice adds flavor, and i don’t adjust the water in the recipe because I live in a low humidity/hot climate (phoenix). it’s usually fully risen within 2-3 hours (!), and it bakes up just great. I do use parchment and also recommend combining the techniques included on recipetineats for world’s easiest yeast bread.
Also, I’d just like to say to all the mean spirited/self righteous ppl leaving comments on the origin of this recipe – although the base recipe may be a common one, Janet has created a derivative work, which in copyright law must add a sufficient amount of change to the original work, which she has done by adding the cheese and chilis. Geez, people.
Well done, Janet! Thank you for sharing this original recipe with everyone. I’ve made this at least a dozen times. It’s crazy good when you make a grilled cheese with it (yes, more cheese) and add some barbacoa meat into the middle, dang!
Thank you so much for such a kind comment.
I’ve been using your recipe for years, and the bread turns out perfect every time. Thank you for the easy, foolproof instructions 🙂
Wahoo! Thank you so much.
Used hatch chilis and sharp white cheddar. Bread turned out a little dense. after reading the comments, i understand why. I worked the dough a lot after the rise before adding to the pot. Cheese on the outside burned and stuck to the pot. Maybe use parchment paper next time. however….the bread was fantastic. going to make again and again! Thanks
Thank you for your review. Gently forming the loaf is key to retaining the good bubbles that develop in the overnight rise. Be sure to use non-stick parchment for bread that is easily lifted from the parchment with out sticking.
This was so so fantastic and so simple! Thank you for the recipe.
Mine turned out slightly dense and doughy, would you suggest cooking SLIGHTLY longer? I also can knead a bit if that would help, but as i said truly delicious
Thank you so much! The less you handle the dough after the overnight rise the better. You want to keep as many of the air bubbles in the dough as possible. Gently remove the dough from the bowl. With floured hands, gently form into a ball the gently lift into the hot pot. That should help you keep more air and lift in your bread.
Funny how this is the EXACT rec from the Made In New MEXICO website. You could have at least given credIt to the original author.
Hi Kris, Wow! I’m somewhat shocked and offended that you would assume that I had plagiarized a recipe from another site. But at the same time I’m flattered that they like my recipe and photo enough to post it on their site. If you look at the dates of the posts, you will notice that Made in New Mexico posted my exact recipe AND photo on July 4, 2022. I posted this recipe Aug 27, 2019. I have sent notification to the Made in New Mexico site asking for them to credit Simply So Good or have to remove it from their site. So in reality your one star rating is completely unfair.
The basic for recipe for this bread can be found on NUMEROUS – NUMEROUS – sites! I’ve found it on an italian baking site. So please don’t be offended if someone tells you they found it elsewhere – yes, they should have been less belligerant but they were wrong if they felt yours was the only source just as you are probably wrong in assuming this is your recipe! either way, it is terrific. Thry it plain or with dried cranberries, a version a friend “made up” (and I was thrilled to make) but I doubt she would ever claim it as hers!
The Hatch Green Chile site did respond by crediting Simply So Good for the recipe AND the photography.
THE BASIC FOR RECIPE FOR THIS BREAD CAN BE FOUND ON NUMEROUS – NUMEROUS – SITES! I’VE FOUND IT ON AN ITALIAN BAKING SITE. SO IT MOST LIKELY IS NOT “ORIGINAL” FROM MADE IN NEW MEXICO.. THR IT PLAIN OR WITH DRIED CRANBERRIES AND ORANGE ZEST/JUICE, A VERSION A FRIEND “MADE UP” (AND I WAS THRILLED TO MAKE) BUT I DOUBT SHE WOULD EVER CLAIM IT AS HERS!
Thanks again, Barbara!
Fabulous! I swapped half of the bread flour for whole wheat pastry flour, then because i’m low sodium, i cut the salt in half, used 50/50 salt instead and swapped the cheddar for swiss. I’ve been needing a recipe like this. Oh! Also, i jused frozen roasted hatch chilies and added the chilie water collected during defrosting to the water. The spicy chilie taste was in every bite.
Bravo! I love the addition of the chili water. That is such a brilliant idea. I will take all the heat I can get. I will definitely try that the next time I bake up this bread. Thank you so much for your kind comments.
In tour dirEctions it says to set aside? So i did overnight. Well it was mush. Was it supposed to go in fridge? If so DIRECTIONS should say it. Very disappointed.
Hi Lori, Did you bake the dough that you had turn to mush? I’m not sure what you mean by that, but the dough will be very loose. The dough would have probably baked up beautifully. It is NOT supposed to be refrigerated. The dough will be loose and bubbly. If the dough seems extremely wet, try adding 2-4 tablespoons of additional flour. You can, also, blot the green chilis (if using canned to soak up any additional liquid.
Do i need to put some in bottom of pot so it doesnt stick?
I have never had the bread stick to the bottom of the pan. I generally put the dough on a sheet of NON-STICK parchment paper. Not all parchment paper is non-stick. Make sure it is or it will stick the the bottom on your bread and there is no getting it off! Greasing the pot will smoke like crazy due to the high heat. I have just dropped the dough into the heated pot/dutch oven and I have never had it stick to the bottom of the pan.
I’VE BAKED NEARLY 15 LOaves of the “plain” version without parchment paper and it comes out of the pot perfectly. perhaps the cheese could make it stick but nothing else has.
Thank you Barbara. You’re right it could be the cheese.
Love this recipe so much! Curious about using my sourdough starter in place of the rapid yeast. Any suggestions for substitution amounts? Thanks!
I have never tried using sourdough starter for this bread but other readers have and they used 1/2 cup active-fed sourdough starter.
Made this this morning and love everything about this recipe. Just right spicy and lovely crumb. Easy bread recipe with fantastic flavor results. I also liked baking this early in the morning after it sat overnight. That’s a perk for not heating up my kitchen in hot summer temps. Looking forward to trying more of your no-knead recipes.
Thank you so much! I hope you love the other recipes as well. Let me know if you make your own creations.
Do you have to USE RAPID rise yeast or will REGULAR yeasT work?
No you don’t have to use rapid-rise yeast. Regular yeast will work just great.
This recipe lOoks so good and i want to give it a try. What size (quarts) cast iron pot did you beake this dough in? Thank you.
I use 4-quart pots with lids. Larger sizes will work as well.
I’vE tried several chilE cheese breads and this was the best! I couldn’t get fresh chilEs so I used a 4 ounce can of chopPed green chilEs and a 4 ounce can of chopped jalapeños, which worked fine (use a little less water). ThE one thing I don’t like about no Knead breads is The round Shape. Can you bake it like regular bread in an uncovered loaf pan? Or covered with foil but not pre-heated?
I love this bread so much! It’s a family favorite for sure. Yes, you can bake this bread in a regular loaf pan. You can choose to cover it or leave it uncovered. Covering with a piece of foil will help create the crispy crust.
Can bread flour Be used instead of all purpose flour?
You sure can!
Am wondering about the use of parchment paper as the photo shows. Necessary? If so, do you place in pot just before heating or when the dough is introduced? Do you oil the surface underneath the parchment paper?
The parchment paper is only an aid to help to lower the dough in and out of the hot pot. However, the parchment paper needs to be “non-stick” parchment paper or the bread will stick to the parchment. I have never had a problem with the bread sticking to the bottom of the pan. Parchment paper is not required for baking the bread. If using parchment paper, place the shaped dough onto the parchment paper and let rise while the oven and pot are heating. Then lift the parchment paper with the dough on it and carefully drop into the hot pan. I hope I have answered your question. Please let me know if you need any further help.
I have frozen chopped hatch chiles. I was looking at your pictures and trying to guesstimate an appropriate amount of chopped chiles to use. about 1/2 cup? maybe more? any advice would be most welcome!
Frozen chiles work just great. You are spot on with your estimate of 1/2 cup. You can even add as much as 3/4 cup if you want more chiles to your bread. Please let me know what you think of the bread.
Do you have any ideas on using this recipe to make rolls, instead of just one big loaf? Thank you, thank you!!
I have baked rolls using the Crusty bread recipe. I baked them on a pizza stone and they turned out great!
You can divide the dough into 6-8 smaller balls of dough. You can bake them in a pot or dutch oven on parchment.
If you put all of the rolls into one pot it would be more like a pull-a-part bread. Or you can bake only a few at a time
if you want individual rolls. The baking time would be reduced.
I have jarred roasted Hatch green chiles that are packaged with lime juice, salt and garlic. Do you think this will work? It is also fairly ‘wet’, should i adjust the liquid?
Jarred chiles will work just great. You can blot them on a paper towel to remove some of the moisture or just adjust the liquid in the recipe. The amount to adjust will depend on how wet your chiles are. Please let me know how your bread bakes up. You will find this bread to be very forgiving.
This looks so yummy amd will be trying! Any suggestions For baking this at altitude?
I live at 5,000 and this recipe works great. Let me know if you have any other questions.
I live at almost 7,000 feet and made no adjustment. The recipe worked very well.
Im making thos for the first tIme and I hesitate to put it in the oven without a second rise. Why no second rise in the revipe?
The dough does rest and rises a bit while the oven is heating. Trust me. It just works out great.
Looking to adapt this to sourdough, is there any reason you don’t proof in thE fridge dUe to the chiles or cheese? I am Use to letting the sour doigh rest overnight In the fridge. Cant wait to make this! Thanks!!
The reason the dough isn’t refrigerated is with the use of such a small amount of yeast, the dough needs a longer rise time at room temperature. Refrigerating the dough doesn’t create the height and bubbles that room temperature does. I have never refrigerated the dough with the use of cheese. I haven’t had any problems doing so. I have not yet had the success of sourdough with a no-knead dough. I’m still working on it.
I grew up in New Mexico, and this bread was a defining aspect of my childhood. Very excited to make it!
Any chance you’d be able to update the recipe with weight measurements for the Ingredients? I want to make sure my ratios are right, and this can be tricky with just the volumetric measurements. Thanks!!
Yes! I can add weight measurements. It’s a pretty forgiving recipe. I have added up to 1/4 cup more flour to a few tablespoons less flour and it always turns out. Give me a few days and I’ll get on posting the weight measurements.
Awesome, thanks! My primary concern is the amount of green Chile to use– I’ll be using it from a jar, so it will be contributing a little bit of additional moisture and I figure it might throw the ratios off enough to be a problem for my novice baking skills.
I added the weight measurements to the recipe card. However, the chiles that i used were from a farmers market. I couldn’t tell you the weight. but i’m sure that if you used 4 whole canned chiles the bread will work just great. This bread recipe is a very forgiving recipe. You could probably add 5 chiles and it would work great. I hope this helps.
I’m so glad I found this recipe. It’s getting me through quarantine. Thankfully i have a freezer full of green chile, already roasted, peeled and ready to go! Thank you!!
This is awesome! You are so lucky to have the green chile on hand. I always freeze the roasted Hatch chiles when they are available in the fall. ❤️🌶
What can you use besides A pot because i don’t have a dutch oven??
You can use anything with a lid that can take the hot oven temps. A crockpot insert will work. Just use the ceramic insert and use the glass lid. You have even use a pot or ceramic type casserole dish and cover it tightly with aluminum foil. Any type of pot.
I made this with calabrian chilis and provolone. It was absolutely delicious! Extremely easy reciPe! I cant wait to try some different variations. Thanks for the recipe!
Wahoo! That sounds so delicious. Thanks for sharing.
I made this for a moving party! My Whole family LOVED it! I wrote down the recipe in my cookbook! Thank you!
I’m so glad it was a hit! Thank you so much for your comment.
The printed recipe DOESN’T say when to add the green chilEs and cheese. I’m excited to make this as I’ve made your ORIGINAL no knead bread many times and it’s WONDERFUL.
Thanks for bringing that to my attention.🤪 The printed recipe has been corrected.
Wow, you have me drooling! That sounds wonderful…worth trying!
Thank you! Let me know if you give it a try. I’d love some feedback.
WHAT size of a Dutch oven pan is required with this recipe?
Hi Linda, I use a 4 quart dutch oven and it works perfectly. You can use any larger size as well. I hope this helps. Please let me know if you have any other questions. I hope you love the bread.