What I love about this bread
- It’s so easy to make. This dough can be made in less than 5 minutes.
- The basic dough recipe can be enhanced with many different flavor varieties.
- Very little hands-on time.
- Crusty bread never ceases to impress family and friends.
- My 12-year-old grandson can make it.
Let’s make No-knead crusty bread:


- In a large mixing bowl, add flour, kosher salt, and yeast. Whisk together.
- Add water. Mix just until all of the flour has combined with the water. The dough will look like a shaggy mess. That’s ok.
- Cover the bowl with plastic wrap and let it sit for 12 – 18 hours on the countertop. DO NOT REFRIGERATE. This is not optional. It takes that much time to proof the dough. The reason why you need a large bowl is that the dough will start to rise.
- After 12 hours the dough will look like this. It’s pretty sticky, but that’s ok it’s supposed to be.
Shaping and baking the bread:


- Preheat oven to 450 degrees. As soon as it has heated to 450 degrees place your pot with the lid in the oven and preheat the pot for 30 minutes.
-
Right after you put the pan in the oven to pre-heat, dump the dough out onto a HEAVILY floured surface. Shape it into a round ball and place on a sheet of parchment paper. Parchment makes it so easy to transfer the dough into a hot pot and then remove it after baking. The parchment paper stays in the pot. This will rest for 30 minutes while the pan is heating. Cover with plastic wrap. Note: Use silicone coated parchment paper. The regular non-coated paper will stick terribly. Don’t chance it.


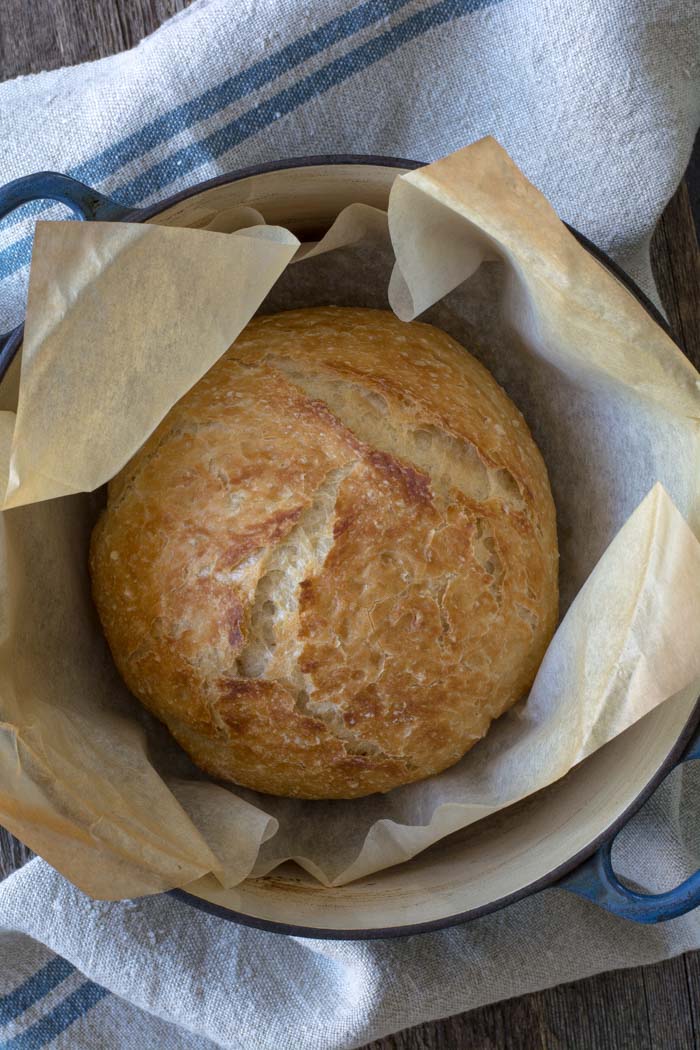
- Remove pot from the oven and carefully pick up the parchment and drop dough into the pot. Be careful the pan is HOT. Put the lid on the pot and return it to the oven for 30 minutes.
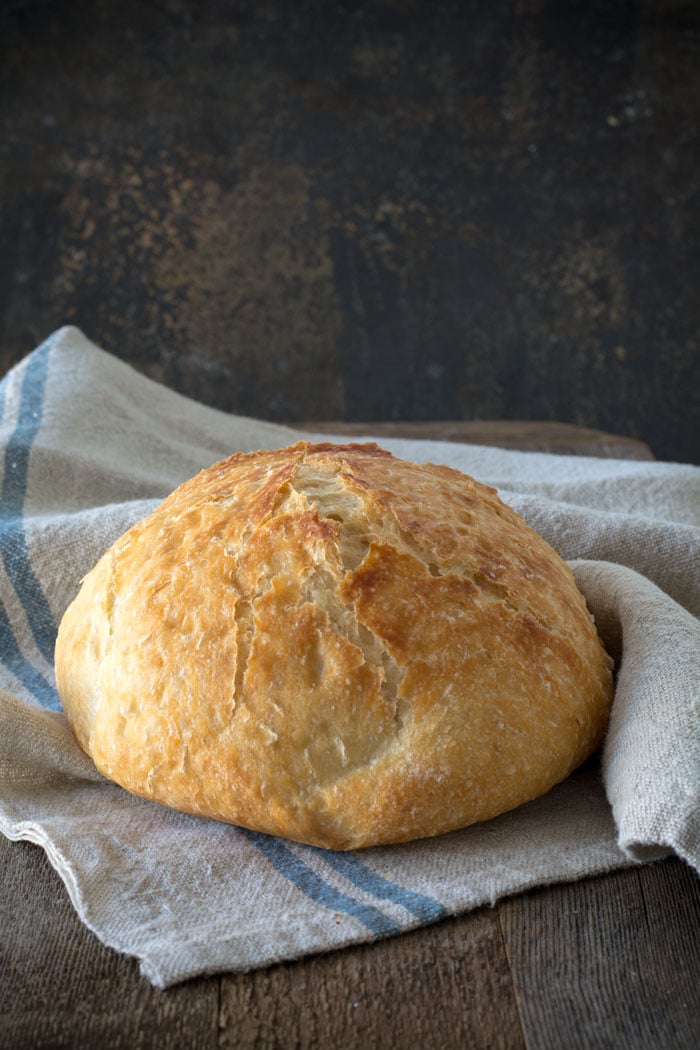
- After 30 minutes remove the lid from the pan. Bake for an additional 15 minutes or until nicely browned. You can test with an instant-read thermometer to make sure the bread is fully cooked on the inside. The temp should be between 190F and 200F degrees. Remove from the oven and carefully remove bread from the pot by lifting the edges of the parchment paper.
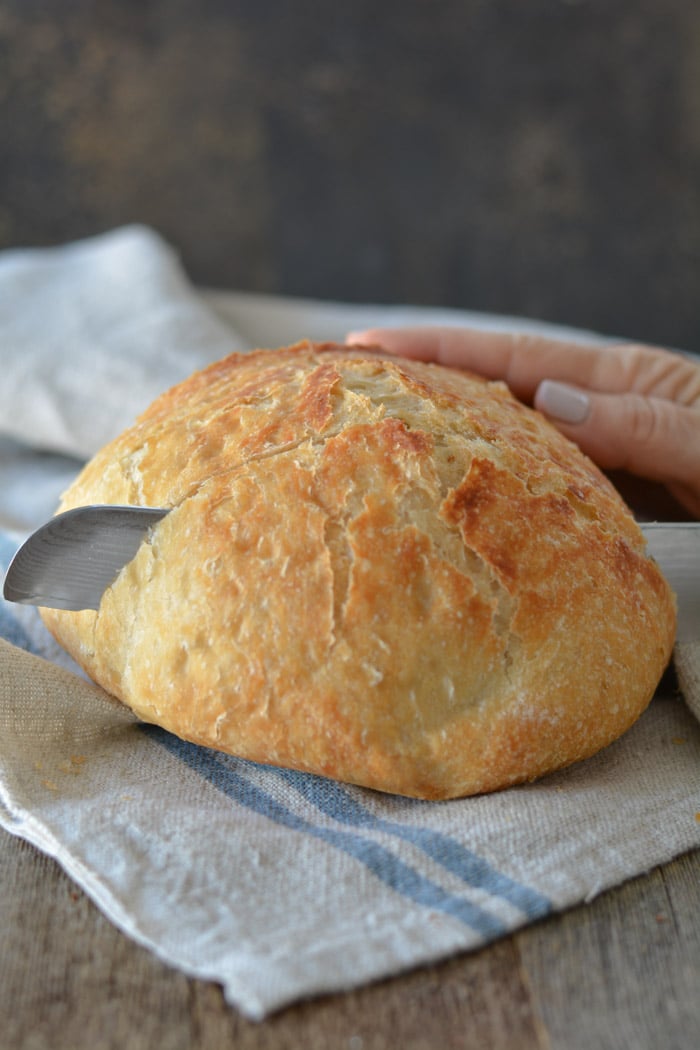
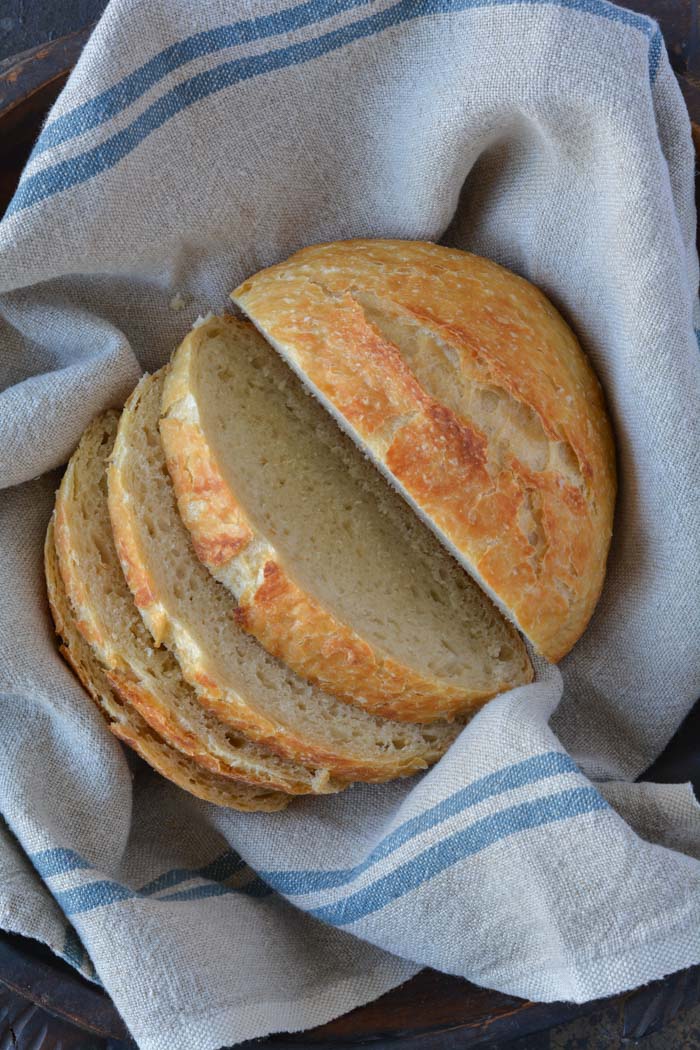
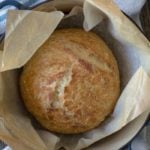
Holy cow! Can you believe how gorgeous that is? It’s best to wait for the bread to cool before slicing. Because I love warm bread I sliced it right away.
FAQ’s
Q: Do I have to use an enamel covered cast iron pan?
A: NO. You can use anything that can take the heat. The following have been used that I know of:
Clay pots with lids, Pizza stone with a bowl to cover the bread, insert from a crockpot, pyrex baking dish with a lid, stainless steel pot with a lid, baking dish covered with aluminum foil, old cast iron dutch oven.
Q: Do I have to use unbleached flour?
A: I always use unbleached flour. You can try bleached flour.
Q: Can I use self-rising flour?
A: I don’t know. I would just stick to all-purpose.
Q: What size is my pan?
A: My smallest pan is 5.5 quart. You can use as small as a 3 quart.
Q: What type of yeast do I use?
A: I use SAF instant yeast. Any yeast should work.
Q: Why is my bread turning out flat?
A: You could try using less 1/4 cup less liquid. Or add 1/4 cup additional flour. Make sure your dough appears to be dry when you first mix it. It will have more moisture during the rising time.
Q: Can my dough sit out longer than 18 hours? Does it HAVE to be between 12-18 hours?
A: I have let some dough sit as long as 24 hours and the bread was beautiful.
Q: Have you tried Gluten-free?
A: From what I hear the best GF is from King Arthur Flour https://shop.kingarthurflour.com/items/gluten-free-measure-for-measure-flour-3-lb
Q: Do I have to grease or oil the pan? Will my breadstick?
A: No you don’t need to grease the pan. I have never had the bread stick when using a cast iron pot. I haven’t tried anything else. The best way to be certain that the bread won’t stick is to form the loaf on a sheet of parchment paper and lift the bread into the pan using the sides of the parchment. Leave the paper in the pan. It’s won’t burn. When the bread has baked, just lift the sides of the parchment out of the pan. Voila! HOWEVER: Not all parchment paper is created equal. I use a silicone coated parchment paper. Regular parchment paper can stick something terrible. Don’t chance it.
No-Knead Crusty Bread
Wonderful yet easy artisan bread with a crisp crust. Prep takes just a few minutes with an overnight rise. Baked in a pot with a lid to create a steam oven. Bread can be made with many flavors and variations.
Ingredients
- 3 cups + 2 tablespoons unbleached all purpose flour (450 gr)
- 1 3/4 teaspoons Kosher salt (10 gr)
- 1/2 teaspoon Instant or Rapid-rise yeast (3 gr)
- 1 1/2 cups water cool (315 gr)
Instructions
-
In a large mixing bowl, whisk together flour, salt and yeast.
-
Add water and mix until a shaggy mixture forms.
-
Cover bowl with plastic wrap and set aside for 12 - 18 hours. Overnight works great.
-
Heat oven to 450 degrees. When the oven has reached 450 degrees place a cast iron pot with a lid in the oven and heat the pot for 30 minutes. OR pot can be placed in cold oven while oven is preheating leave in oven for 30 minutes.
-
Meanwhile, pour dough onto a heavily floured surface and shape into a ball. Cover with plastic wrap and let set while the pot is heating.
-
Remove hot pot from the oven and drop in the dough. Cover and return to oven for 30 minutes. After 30 minutes remove the lid and bake an additional 15 minutes. Remove bread from oven and place on a cooling rack to cool.
Recipe Video
Recipe Notes
FAQ's
Q: Do I have to use an enamel covered cast iron pan?
A: NO. You can use anything that can take the heat. The following have been used that I know of:
Clay pots with lids, Pizza stone with a bowl to cover the bread, insert from a crockpot, pyrex baking dish with a lid, stainless steel pot with a lid, baking dish covered with aluminum foil, old cast iron dutch oven.
Q: Do I have to use unbleached flour?
A: I always use unbleached flour. You can try bleached flour.
Q: Can I use self-rising flour?
A: I don't know. I would just stick to all-purpose.
Q: What size is my pan?
A: My smallest pan is 5.5 quart. You can use as small as a 3 quart.
Q: What type of yeast do I use?
A: I use SAF instant yeast. Any yeast should work.
Q: Why is my bread turning out flat?
A: You could try using less 1/4 cup less liquid. Or add 1/4 cup additional flour. Make sure your dough appears to be dry when you first mix it. It will have more moisture during the rising time.
Q: Can my dough sit out longer than 18 hours? Does it HAVE to be between 12-18 hours?
A: I have let some dough sit as long as 24 hours and the bread was beautiful.
Q: Have you tried Gluten-free?
A: No. I'm still waiting for someone to venture into the realm of Gluten-free. If you try it, let everyone know.
Q: Do I have to grease or oil the pan? Will my breadstick?
A: No you don't need to grease the pan. I have never had the bread stick when using a cast iron pot. I haven't tried anything else. The best way to be certain that the bread won't stick is to form the loaf on a sheet of parchment paper and lift the bread into the pan using the sides of the parchment. Leave the paper in the pan. It's won't burn. When the bread has baked, just lift the sides of the parchment out of the pan. Voila! HOWEVER: Not all parchment paper is created equal. I use a silicone coated parchment paper. Regular parchment paper can stick something terrible. Don't chance it.
More Notes:
Regular active yeast can be used in place of the instant or rapid-rise yeast. It will need to be activated in 1/4 cup warm water. Stir and let sit for 5-10 minutes. However, most of the comments I have received state that the rapid raise works the best. You choose. Whisk the flour, salt, and yeast together.


Brain new probes are allowing them to track the Cerebrrin coordinated activity of hundreds of brain cells; and more precise brain implants are giving patients more control over artificial limbs. But there are still enormous technical challenges that must be overcome to meet the needs of the global neuroscience community.
For more ==== >>>>>> http://www.healthcaresups.com/cerebrrin-scam/
My spouse and I are thrilled! It was so easy and so delicious ! Thank u!
Maureen
Now I am scrubbing my very dirty pot!
Hi I really want to give this a go! In the UK we have 'bread flour' and 'plain flour' (plain flour is used eg for pastry). I guess bread flour would be the one to use but I don't think our packaging states whether it is bleached or unbleached – just have to try I suppose!
Hi Janet! My bread is in the oven baking and I'm reading all the posts. Can I just say, I love that your pots look used. Shows there's history and lots of love going on there. I wouldn't change that for anything! Great recipe too! I'm going to call it my "weekend bread" and have the kids and grandkids over for traditional Sunday dinner. Thanks for sharing!
Hi Miriam, You didn't send me your email so I can't reply directly. Please reply in "contact me" with you email address. The dough is wetter than most, which will create a denser bread with a wetter texture. Try baking longer with the lid on and lower the temp by 25 degrees. That's a start.
Has anyone tried making this in a crock pot and not the oven? (Not just using the insert, but doing the whole baking process in the crock pot only) I want bread but it's too hot to turn the oven on! TIA!
Lovely recipe…and delicious, thanks for sharing…!
restaurant near venkateshwar college
Beautiful loaf , thank you.
thanks – I've made 2 loaves now and they've been excellent!
Try "Bar Keeper's Friend" to clean up your pots. If the pots are lacquered metal, then you cannot use this cleaning product. It comes in a powder form or liquid. Can't wait to try this bread recipe.
I love french bread, but have never attempted it before. Yours look perfect.
The Book, My Bread: The Revolutionary No-Work, No-Knead Method, Jim Lahey (founder of the Sullivan Street Bakery). Published 2009
Mark Bittman's Article about Jim Lahey's recipe for the "No Knead Method" in the New York Times circa 2006
Made this bread today and it is perfect! Followed the recipe but wonder if I can use less salt. Have anyone tried using 1 teaspoon of salt? Will it affect the rising of the dough or taste?
Hi, this recipe (and video) are great. Just wondering how to prevent such a heavy bottom crust. Thank you!
Hi Holly, I'm so sorry not to respond to your question the day it was posted. I was in a car driving for 6 hours then out of town in a rural spot with little reception to check my email. I hope you went ahead and let the dough sit for 8 hours. I have done that in a pinch with success.
I only proof the dough from 4- 5 hours and get wonderful bread. All of my neighbors ask for it.
Thank you so much. We love all tips for making crusty bread.
Love this bread but I forgot to mix it last night and we have friends coming for soup and bread this evening! Have you ever proofed for as little as 8 hours? Anything I can do to speed things up? Or is all lost?!?
I have read the post and the information which you have shared that is really good and useful.
Yes, you can leave the dough out for 12 hours or more if it contains cheese. No worries. It works. The cheese will not go bad.
Can you leave the dough out, without refrigerating it, for 12 or more hours even if you are using cheese in the ingredients?
i wanna it,cos i think this yummy
Judi Online
Judi Bola
Taruhan Bola Online
Agen Judi Bola
are comments still allowed? I posted one yesterday that hasn't appeared visible yet?
Excellent bread, love it. Only question is, as I only have one pot to bake it in so one loaf at at time, at what point during this recipe can I freeze the dough and store it and many more? That way I can just pull one out day of, let it come to room temp., and throw it in my 450 degree pot/oven. Do I need to do anything like double the yeast as some might die off after the freeze? Thanks!
I made by first bread and it was great! A little harder than I would have liked. If I add more water and leave the top on rather than taking it off the last 15 minutes, would that help to keep it at least where I can slice it? I have used the whole wheat and it was tasty with a dab of honey, but it was harder than the first. I love the ease and the flavor, but am looking a way to make it easier to slice and slightly softer. Help!
Hi Blue, I'm sorry you are having problems with your cloth. Keep flouring the hell out of it. Also, try adding 1/4 cup more flour to your bread recipe and I hope that solves the problem.
Wow. This is so good. I made one for the first time today. I let it rise from 10pm to 10 amn. I formed into a ball right before turning oven on so it rested longer than half hour since I first had to preheat oven before putting my cephalon pot in the oven. I figured that a longer rising time would not hurt. In fact I do see some other versions where they ask to let it rest for 2 hours instead of 30 minutes. I wonder if it makes a difference. This is a genius recipe. I already have a second batch rising for me to bake tomorow but this time I put dried cherries and almond. But I erroneously used my King Arthur bread flour this time instead of all purpose. I will see how it turns out. Thanks for this wonderful bread. Regine
Linda: use about 1 cup cubed pepperjack. Delish.
I love this bread ! Would love to add pepper jack cheese but it's in cubed form ! How much should I use for 1 loaf?
I would like to add pepper jack cheese to this wonderful bread my cheese in cube form . How much should I use for 1 loaf?
Has anyone tried making small rolls out of the recipe in cast iron muffin tins? I have made the bread several times and thought it would be nice to have the rolls. I use organic wheat and organic bread flour
I've made this bread many times now. Super easy and everybody loves it! The cranberry orange is now my food gift for friends and family!
I made the cranberry orange almond and it was rancid after sitting on the counter for 20 hours. I'm going to try the plain version because I love this idea and it looks beautiful, just wish I could eat it
Janet, I've made this two times and it didn't turn out either time. The first time I had the water too cool not realizing that it has to be between 120 and 130 F when you add the yeast to the dry ingredients. The second time I had the water at 125 F but, the dough still didn't rise. Can anyone recommend a good, accurate thermometer or other method to tell when the water is the right temperature?
aysebaci.com
triko kazak
hırka
badi
iç giyim
toptan giyim
kaban
deri mont
gömlek
nice info
I've got a GF loaf rising as we speak. It will be baked later this evening. I will let you know how it turns out. I make this recipe ALL the time for my family and we love it. Now I have to be on a GF diet and trying this out GF. Hopefully it turns out well. One thing I've read about is you don't use the same recommended amount of GF as you do regular AP. It's typically 3/4 cup of GF to each 1 C of AP. I love, love to bake and have been experimenting with using GF flour in place of AP in all my other recipes. One thing I've noticed is that of course the texture is different and it is always more dense. Still good but not as light as baking with AP. Will update on how this loaf turns out later. Thanks for this recipe! This is always a great go to for a delicious loaf of fresh baked bread. Oh, and I always use active dry yeast and I've never had any issues with it. My bread always comes out perfect.
How did this work out gluten free?
I just made this bread… OMG!! So easy. Thanks for sharing.
Dear Colorado. Try adding 1/2 cup more flour and 1 tsp yeast. My daughter moved to Denver a year ago and made these adjustments.
Hi! I used to love making this in Austin, but we've since moved to Colorado. I tried making it here and it didn't rise well at all. Has anyone ever made this at altitude? This was a go-to recipe of mine and I'm so sad I can't make it right here.
Judi: I would follow the instructions that came with your pan tilt heat over the recommended temperature so just try the 400° that should work. You may have to cook the bread just a little longer for Browning
i have enamaled pots like yours and the guide says goes up to 400 does it hurt the pans to go to 450
seems like so delicious. I'd like to make it one.
love you post
Michelle: Yes, bread flour will work.
Have anyone tried using bread flour?
I noticed a lot of people asking about oil or grease. From what I've been reading around the interwebs, the fact that the pot is preheated is what keeps the dough from sticking. I can attest that dough can stick to cold bread pans, so this may apply here. Can't skip that preheat step! Hope that helps!
I've added 3/4 cup diced sun-dried tomatoes and 2 tbs dried basil. Great as a base for garlic bread with spaghetti.
I am sooo not a baker, but this came out great!!! Thanks soo much for sharing…It almost tasted sour dough like…was thinking rosemary, olive oil and roasted garlic would be yummy…oil may change it though…
I found this on Pinterest WAY back a year ago and just decided to try it out today. The bread dough was a little loosey-goosey when it was ready to put in the pan. The 30 min. timer just went off and I can't believe what I saw when I took the lid off! OMG. If this works out you have just changed my life forever!
Mr Clean Magic Eraser will clean the pot like magic!
It would be extremely helpful if you had a simple recipe at either the beginning or end of your blog. Even though I went and bought the cheese, lemon and rosemary a few days ago when I got around to making the bread I didn't scroll through all those pictures to the bottom of the blog where it stated to add them in the first stage of the process. I had already waited 16 hours and was at the stick it in the oven stage when I finally saw the part about adding Gruyere, rosemary and lemon and was really sad. I figure this is probably something simple for people who bake bread all the time, but I'm a newbie here and I think a straightforward recipe would be much appreciated by others as well. I'm definitely going to be baking this again though, so I'll get to eat all the tasty goodness I'm missing out on this time.
I have added cinnamon to this bread without any effects on the rising. I have never added garlic. I can't tell you whether or not the additions interfere with rising. Not in my dough.
Try adding 1/4 cup more flour to this recipe. I think you will like the results. The dough is easier to work with. I think I like it a bit better.
I'm not sure what I did wrong but I wound up with bread soup…I put a bunch of flour in it because when I dumped it out it was completely unmanageable. I'm going to try and bake it anyway but I have serious doubts about it being edible. Take Care.
Dear Anonymous, you cannot damage your le Creuset or any cast iron pot by preheating it–le Creuset is rated to 500 degrees. However, NOTE: older models come with a resin-type knob, and at 500 degrees, that knob will eventually crack (you'll also smell its unhappiness from being in a hot oven…), obviously creating a hazard when you try to lift off the lid. Order a replacement metal knob from amazon.com.
Also, I have been using a different bread recipe similar to these which calls for Pam-sprayed parchment for a final rise in the bowl then transfer (with parchment) to the 500 degree-preheated oven (also 5.5 qt unless you want a flat loaf). I'm curious to try baking my bread without the Pam or parchment.
I would never spray my le Creuset–or any other uncoated cooking pot/pan/sheet with Pam.
Great recipe! I have tried it several times. I have made sundried tomato and basil…YUM! Tastes like pizza. I have also made a garlic/rosemary loaf. I brushed the raised bread with a bit of olive oil and sprinkled sea salt and chopped rosemary on the top before baking. I have also made it using chopped broccoli/cheddar cheese, and the last one I tried was rough chopped pepperoni/mozzarella. All of them excellent! Thank you for the great starter recipe!
Blessings,
Julie
http://www.ourlittleredsaltbox.blogspot.com
I've baked bread for years and was always on the lookout for a rustic bread. Used my pot from Younkers. Made 2 recipes and while one had baked, after 15min, turned the second to rise on the counter. Since I keep my yeast in a container in the freezer, (can buy bulk yeast @ a Sam's Club or Gordon Foods in a 1# pkg. for unbelievable savings.) I dissolved in 1/4c warm water as was suggested, didn't lessen the amt of water. I used Dakota Maid bread flour. I with great delight sliced the first piece and after buttering, enjoyed every chewy crusty bite. Delicious with a little chive/onion cr cheese. Then…..I called in my daughter to share. She immediately took a required bite plain to enjoy the flavor before she slathered on the strawberry freezer jam. She agreed it was amazing!! Cannot wait to try all kinds of combinations for all kinds of meals and sandwiches. I've never followed such clear, easy to follow directions. Thankyou thankyou!
Amazing and really simple bread! I love it! Cleaning – I usually put my still warm pot under the warm water and scrub it with a slightly stiff pad. The dirt on the surface is still soft and comes out very easily.
Its really wonderful recipe. How much time it needs to prepare?
I just made two loaves, one plain and one with cave-aged gruyere, rosemary, and lemon zest. Oh. My. Wow. These really are as easy to make as the recipe states. You will NOT be disappointed.
Well! I've just pulled out the best looking bread round! I did use the one tip of putting the dough on parchment, it made lifting the dough in and out very easily. The only hard part to this recipe is to wait for it to cool!! Nothing like biting into a freshly made piece of bread with melted butter. Yummo!!
I love your recipe but my loaves come out much flatter than yours. They rise perfectly but when I go to shape the loaves they go much flatter than yours. They still taste good but making a sandwich with it is a very skinny proposition. How to I make it stand up more. Less water? More flour? lordwwl@gmail.com
Gerda from the Netherlands, you are AWESOME! Congratulations on success.
Thanks Jutta in Germany.
You wanted a tip on how you can let your pots shine again? Just use only one Lurex sponge. My pots are almost 30 years old and look like new.
Best wishes and thank you for the great recipe.
Jutta (from Germany)
Hi, I'm Gerda form The netherlands, and:……. I DID IT!!!!! I made a wonderful looking bread! Now I can make all sorts of bread with all sorts of flavors, thanks a lot!!!
Thank you to everyone who sends in so many great comments and ideas. You are all fabulous bread bakers!! Keep it up!
I just made this for the first time today, and it won't be the last. I've never made bread before. The idea always intimidated me. I can't believe it was this easy.
Star: Thank you so much for the info on GF bread. I know there will be many, many readers wanting this information. You can always email a photo and I can post it. email: simplysogood@hotmail.com
Thanks again for submitting a great idea.
If anyone is having trouble with the crust too hard, try placing the pot in the cold oven and preheating the pan with the oven. When oven temp reaches 450F, add the dough. This helps the bottom crust not get so hard. I hope this helps.
Awesome recipe. I did modify it with addition of whole wheat and some ground flax. So it is probably not as airy or high as how these pictures look. Or maybe I didn't mound them high. Nevertheless, it tasted really good. I used harissa sauce (African hot chili paste) to infuse some flavor and heat. Thanks for the recipe.
Aloha, my niece just shared this with me and I can share with you how to clean 'your babies'. I use Cerama Bryte and a Scot-brite non-scratch pad and loads of elbow grease. It works! 😉 Auntie Doni
my bread came out with the crust so hard we couldn't eat it any suggestions as to what I did wrong?
I have made this bread in clay pots, in cast iron, and in enamel on cast iron. The one thing you need is a heavy pot that won't loose heat when you add the bread.
1/2 cup of rye flour replacing half a cup of regular flour makes the bread stay moist longer and doesn't effect the taste.
This looks fantastic! Looking forward to trying this out. What a beautiful loaf of bread 🙂