What I love about this bread
- It’s so easy to make. This dough can be made in less than 5 minutes.
- The basic dough recipe can be enhanced with many different flavor varieties.
- Very little hands-on time.
- Crusty bread never ceases to impress family and friends.
- My 12-year-old grandson can make it.
Let’s make No-knead crusty bread:


- In a large mixing bowl, add flour, kosher salt, and yeast. Whisk together.
- Add water. Mix just until all of the flour has combined with the water. The dough will look like a shaggy mess. That’s ok.
- Cover the bowl with plastic wrap and let it sit for 12 – 18 hours on the countertop. DO NOT REFRIGERATE. This is not optional. It takes that much time to proof the dough. The reason why you need a large bowl is that the dough will start to rise.
- After 12 hours the dough will look like this. It’s pretty sticky, but that’s ok it’s supposed to be.
Shaping and baking the bread:


- Preheat oven to 450 degrees. As soon as it has heated to 450 degrees place your pot with the lid in the oven and preheat the pot for 30 minutes.
-
Right after you put the pan in the oven to pre-heat, dump the dough out onto a HEAVILY floured surface. Shape it into a round ball and place on a sheet of parchment paper. Parchment makes it so easy to transfer the dough into a hot pot and then remove it after baking. The parchment paper stays in the pot. This will rest for 30 minutes while the pan is heating. Cover with plastic wrap. Note: Use silicone coated parchment paper. The regular non-coated paper will stick terribly. Don’t chance it.


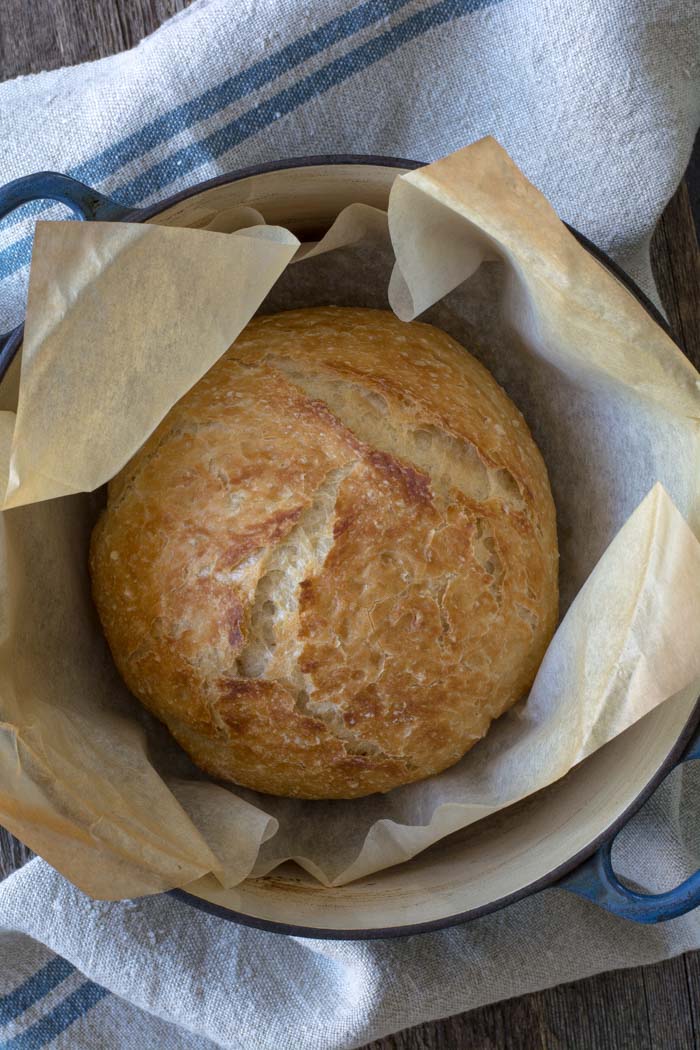
- Remove pot from the oven and carefully pick up the parchment and drop dough into the pot. Be careful the pan is HOT. Put the lid on the pot and return it to the oven for 30 minutes.
- After 30 minutes remove the lid from the pan. Bake for an additional 15 minutes or until nicely browned. You can test with an instant-read thermometer to make sure the bread is fully cooked on the inside. The temp should be between 190F and 200F degrees. Remove from the oven and carefully remove bread from the pot by lifting the edges of the parchment paper.
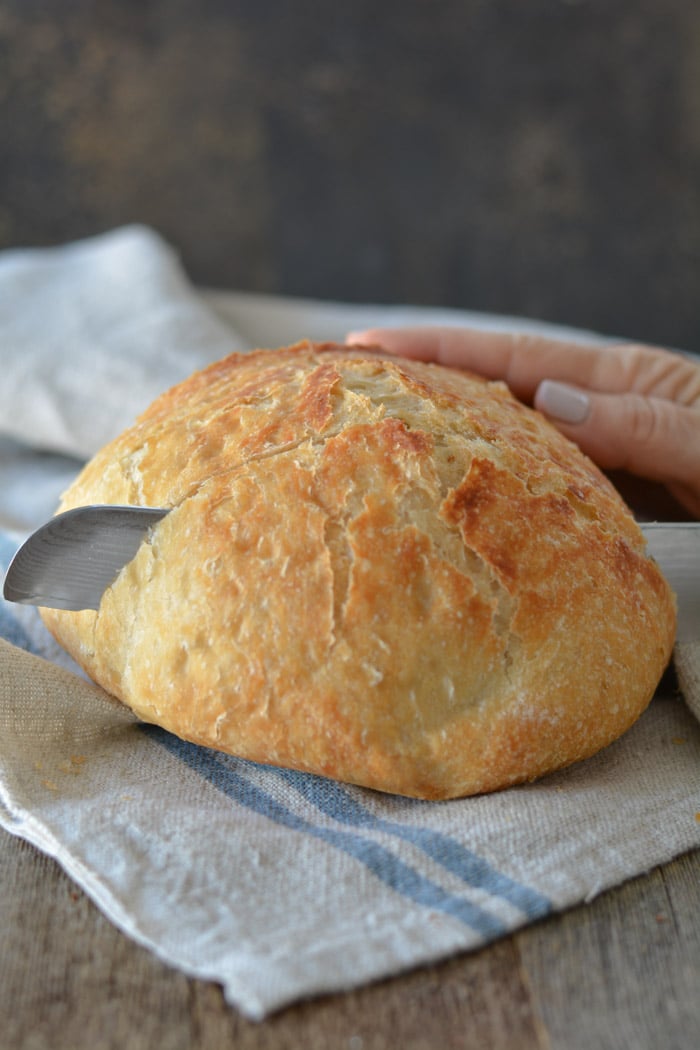
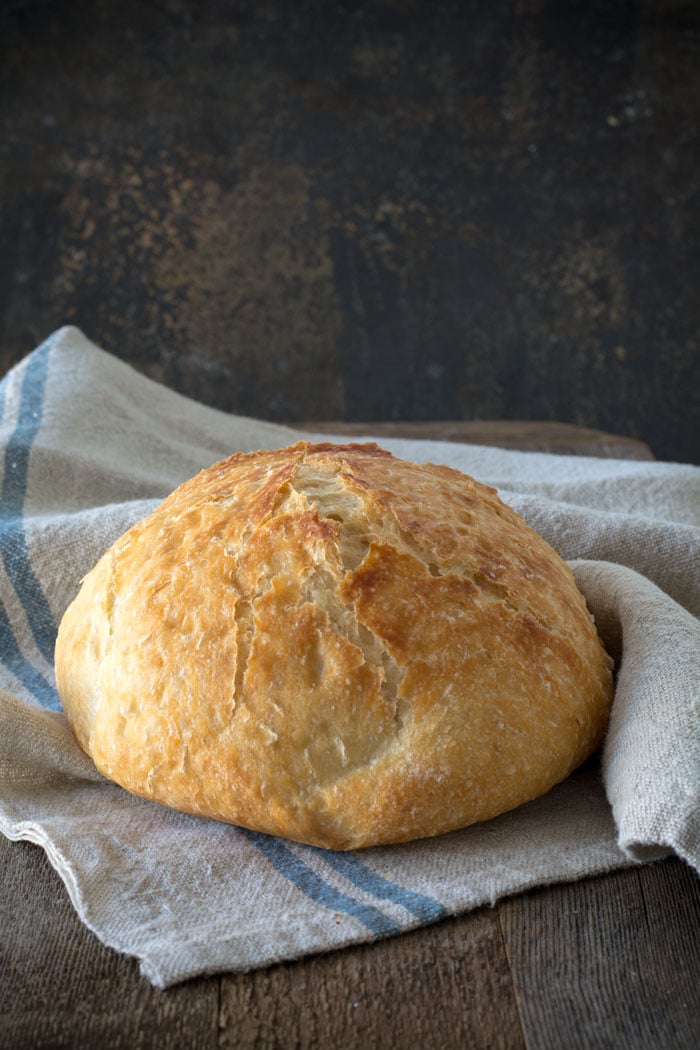
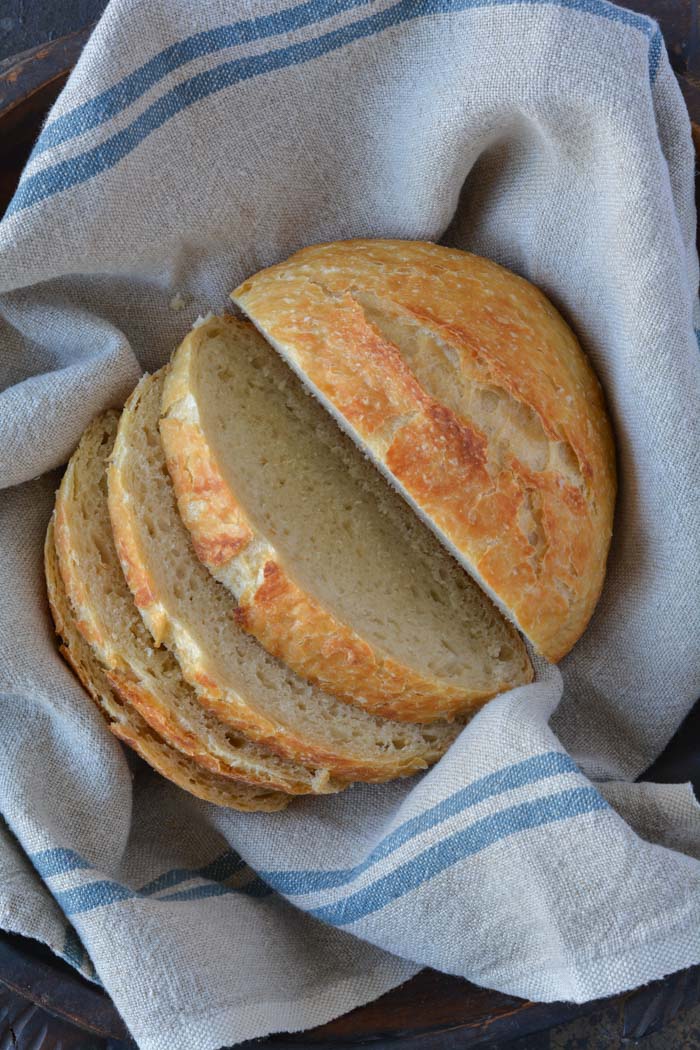
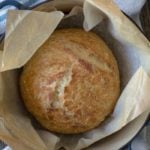
Holy cow! Can you believe how gorgeous that is? It’s best to wait for the bread to cool before slicing. Because I love warm bread I sliced it right away.
FAQ’s
Q: Do I have to use an enamel covered cast iron pan?
A: NO. You can use anything that can take the heat. The following have been used that I know of:
Clay pots with lids, Pizza stone with a bowl to cover the bread, insert from a crockpot, pyrex baking dish with a lid, stainless steel pot with a lid, baking dish covered with aluminum foil, old cast iron dutch oven.
Q: Do I have to use unbleached flour?
A: I always use unbleached flour. You can try bleached flour.
Q: Can I use self-rising flour?
A: I don’t know. I would just stick to all-purpose.
Q: What size is my pan?
A: My smallest pan is 5.5 quart. You can use as small as a 3 quart.
Q: What type of yeast do I use?
A: I use SAF instant yeast. Any yeast should work.
Q: Why is my bread turning out flat?
A: You could try using less 1/4 cup less liquid. Or add 1/4 cup additional flour. Make sure your dough appears to be dry when you first mix it. It will have more moisture during the rising time.
Q: Can my dough sit out longer than 18 hours? Does it HAVE to be between 12-18 hours?
A: I have let some dough sit as long as 24 hours and the bread was beautiful.
Q: Have you tried Gluten-free?
A: From what I hear the best GF is from King Arthur Flour https://shop.kingarthurflour.com/items/gluten-free-measure-for-measure-flour-3-lb
Q: Do I have to grease or oil the pan? Will my breadstick?
A: No you don’t need to grease the pan. I have never had the bread stick when using a cast iron pot. I haven’t tried anything else. The best way to be certain that the bread won’t stick is to form the loaf on a sheet of parchment paper and lift the bread into the pan using the sides of the parchment. Leave the paper in the pan. It’s won’t burn. When the bread has baked, just lift the sides of the parchment out of the pan. Voila! HOWEVER: Not all parchment paper is created equal. I use a silicone coated parchment paper. Regular parchment paper can stick something terrible. Don’t chance it.
No-Knead Crusty Bread
Wonderful yet easy artisan bread with a crisp crust. Prep takes just a few minutes with an overnight rise. Baked in a pot with a lid to create a steam oven. Bread can be made with many flavors and variations.
Ingredients
- 3 cups + 2 tablespoons unbleached all purpose flour (450 gr)
- 1 3/4 teaspoons Kosher salt (10 gr)
- 1/2 teaspoon Instant or Rapid-rise yeast (3 gr)
- 1 1/2 cups water cool (315 gr)
Instructions
-
In a large mixing bowl, whisk together flour, salt and yeast.
-
Add water and mix until a shaggy mixture forms.
-
Cover bowl with plastic wrap and set aside for 12 - 18 hours. Overnight works great.
-
Heat oven to 450 degrees. When the oven has reached 450 degrees place a cast iron pot with a lid in the oven and heat the pot for 30 minutes. OR pot can be placed in cold oven while oven is preheating leave in oven for 30 minutes.
-
Meanwhile, pour dough onto a heavily floured surface and shape into a ball. Cover with plastic wrap and let set while the pot is heating.
-
Remove hot pot from the oven and drop in the dough. Cover and return to oven for 30 minutes. After 30 minutes remove the lid and bake an additional 15 minutes. Remove bread from oven and place on a cooling rack to cool.
Recipe Video
Recipe Notes
FAQ's
Q: Do I have to use an enamel covered cast iron pan?
A: NO. You can use anything that can take the heat. The following have been used that I know of:
Clay pots with lids, Pizza stone with a bowl to cover the bread, insert from a crockpot, pyrex baking dish with a lid, stainless steel pot with a lid, baking dish covered with aluminum foil, old cast iron dutch oven.
Q: Do I have to use unbleached flour?
A: I always use unbleached flour. You can try bleached flour.
Q: Can I use self-rising flour?
A: I don't know. I would just stick to all-purpose.
Q: What size is my pan?
A: My smallest pan is 5.5 quart. You can use as small as a 3 quart.
Q: What type of yeast do I use?
A: I use SAF instant yeast. Any yeast should work.
Q: Why is my bread turning out flat?
A: You could try using less 1/4 cup less liquid. Or add 1/4 cup additional flour. Make sure your dough appears to be dry when you first mix it. It will have more moisture during the rising time.
Q: Can my dough sit out longer than 18 hours? Does it HAVE to be between 12-18 hours?
A: I have let some dough sit as long as 24 hours and the bread was beautiful.
Q: Have you tried Gluten-free?
A: No. I'm still waiting for someone to venture into the realm of Gluten-free. If you try it, let everyone know.
Q: Do I have to grease or oil the pan? Will my breadstick?
A: No you don't need to grease the pan. I have never had the bread stick when using a cast iron pot. I haven't tried anything else. The best way to be certain that the bread won't stick is to form the loaf on a sheet of parchment paper and lift the bread into the pan using the sides of the parchment. Leave the paper in the pan. It's won't burn. When the bread has baked, just lift the sides of the parchment out of the pan. Voila! HOWEVER: Not all parchment paper is created equal. I use a silicone coated parchment paper. Regular parchment paper can stick something terrible. Don't chance it.
More Notes:
Regular active yeast can be used in place of the instant or rapid-rise yeast. It will need to be activated in 1/4 cup warm water. Stir and let sit for 5-10 minutes. However, most of the comments I have received state that the rapid raise works the best. You choose. Whisk the flour, salt, and yeast together.


Tip from a fellow baker: I found a baking vessel for my "No Knead Bread"
A brown clay planter from Home Depot, 14 x 4 x 5.
My loaf was superb.
this is good post…
i like this…
please can you visit here..
http://bantalsilikon01.blogspot.com/
http://bantalsilikon01.blogdetik.com
tengs very much…
Great tip from Dee: to replace a Dutch oven lid use a long screw and nut with a flat tipand a large wood thread spool. it makes a fabulous lid handle which will stay cool.My grandfather used to do that for my grandmother.
You go grandma! Your bread will be as great as your granddaughters.
My little granddaughter has mastered this recipe & her bread turns out fantastic. My first ever batch is on the counter….can't wait to see what it looks like in the morn. YEAST has been my nemesis for 45 years. IF this turns out , it will be a miracle. I will post results but am not optimistic. Tx for your fun & informed page. 🙂
I appreciate how thoughtful this post is, and you have lovely pictures. I can't wait to see how my bread turns out. Don't let all the negative comments get you down, you are doing an awesome job!
I just made this bread today (I started it last night so I could bake it this morning) and it was amazing! I didn't make plain, I was too excited to make something a bit tastier…. so I added dried rosemary, dried thyme and fresh zest from one large orange. The whole family went mad for it! Thank you for sharing such a wonderful recipe!
I found your recipe on Pinterest and since them I have made this simple, but delicious, recipe over a dozen times! It's a favorite for big holidays dinners and gatherings, and I have used it to make the most delicious paninis!
Thank you very much for sharing this!
Use the same amount of yeast regardless as to what type it is. Instant, rapid-rise, dry active, etc.
If your dough is too wet, you can add more flour. I would start by deleting 1/4 cup of the water.
Janet, I haven't read through all of the comments, so don't know if this has been said, but…. just reading some of the flavor combinations makes me want to make some gourmet grilled cheese sandwiches. YUM!! My mind is racing with the possibilities. Wende J.
I baked my first loaf today and it turned out better than I expected. This is the first time I've made traditional "bread". I will say that I kind if forgot about the dough and it sat for approximately 28 hours. The only thing I can think I did wrong was there may have been too much moisture as the dough wouldn't stay formed into a ball. It didn't last very long in this house!
My bread was way too wet and stuck to the bottom of the pan when done; any suggestions? Also, doesn't yeast need sugar to activate?
I made mine bread in a non-stick, oval roaster. Perfect shape! Also, I didn't read well…oops, …and didn't add the stuff to the dry mix. I made lemon rosemary butter instead. It was delicious!
Hi Dana, Your 4 qt. pot should work just great. I like to add 1 cup 1/2-inch cubed cheese. It's so fabulous.
Hi there…I found this recipe and had to run out and get a cast iron pot…however, the one I bought was a 4qt…can I do this recipe in a 4qt or should I 1/2 the recipe?? Also, how much cheese do you recommend in one loaf? I am new this bread thing and am really excited to try this one!!
Thanks!!
Dana
I realize this post is old… but I just found it and made the bread for supper. I didn't want to wait to bake it so i just added extra yeast that I let sit in warm water and sugar for a bit. Turned out perfectly… yum….
Rosemary and garlic – I used a rosemary and garlic spice mix and also added some diced garlic before I mix everything together so it blends nicely – tastes great! (Sorry I didn't measure any amounts)
Thank you very much.I have an electrical bread making machine and i am donating it to Goodwill.How can I make a sour dough bread? I am making bread every week and have stopped buying bread from the stores.
I am trying different ingredients.
Thank you again.
Le Creuset makes a cleaner that brings any pot back from the dead..:)
I have a cast iron pot with a flat lid (no knob) it is great since you heat the pot upside down, open it and place the bread in the lid, this way when it is done you don't have to reach into a hot pot to get the bread out. Also I use the parchment paper with foil on one side ) it doesn't tear like plain parchment) and shape and rise the dough on that. This way I am not having to handle the sticky bread, just use the parchment to place it in the pot.. New flavor try cottage cheese or ricotta cheese, cracked black pepper and chopped fresh chives. Makes a great sandwich bread..
The only way I can explain "shaggy dough" is to have you look through my photo's and see the picture itself.
What does a "shaggy mixture" mean? What sort of consistency should the dough be before letting it rise for 12-18 hours/
Thanks!
you can clean your pots with barkeepers friend, found at your local fleet farm or menards (try a hardware store). there is powder ans liquid forms. i have 5 le cruset pots and they need a cleaning every now and then don't need much. no it does not scratch. use it for my stainless steel pans as well. keri
I made the bread today and it came out great. I put cranberries and raisins in it and baked it in my cast iron dutch oven. The only thing I noticed was that it stuck to the bottom. I got it off with no damage to the bread but is there something I can do to avoid that next time? And there WILL be a next time 🙂
Little G: If you have a yeasty smell, you may want to reduce the yeast and probably shorten the rise time. Adding sugar will activate the yeast, so it might rise faster. Sugar has been added by other followers with great success. The bread is a moist dense bread. You could bake the bread 5 min longer with the lid on. doing so might help the bread cook internally without over browning. You bread looked beautiful on pinterst. Bravo!
HI! I tried this again and http://www.pinterest.com/gaianab/food-stuff/ – the last three pins is the bread I was able to bake last night! However, there are a few questions that I still have. It baked well enough, but for my taste, the chewy bread inside the crust is still a bit too moist and heavy. And the yeast smell is also very very strong. How can I fix this? How can I make this dough lighter? What about adding a little sugar or what other spices can I put in my dough so that it still smells like bread but a bit sweeter and lighter? Any tips? And thank you again, for this wonderful blog post!
Try your self-cleaning oven to clean your pots
I found this recipe on pinterest and gave it a try today (starting yesterday, of course). It is AMAZING! I have a rare allergy to cottonseed oil, so most of the time I have to make my bread at home. This is by far the best one I've tried! I didn't have a dutch oven, so I used a roasting pan with a lid instead. At first I was worried about sticking, but it didn't stick at all. Thanks so much for sharing this!
Thanks for the milk tip, Deborah. I'll try it for sure! Good luck with home schooling. You must be a saint and one patient mother. Kudos to you!
Works great with fresh milled wheat too! Love this recipe.
Hi Janet,
I am not sure whether or not you received my email last week, but I have posted my version of your bread online, linking to your blog, as we had discussed a few months ago. I am quite pleased with it, and here it is if you fancy having a look: http://lecoindemel.com/easy-crusty-bread/. Mel
This bread is a miracle. I have not had luck with yeast in the past but I followed the recipe and the bread was delicious. I have made it twice. I had a part loaf leftover and I made bread pudding with it. Another winner.. Thank you for posting this recipe.
By all means add more salt if you find the bread under salted. Most comments state the bread is over salted.
I made this with oat and wheat flour, no white. Posted on our blog and also have the answer to cleaning the pots to "like-new"!!! 🙂 Thanks for the inspiration!
http://milkallergymom.blogspot.com/2014/01/dairy-free-egg-free-soy-free-wheat-oat_10.html
I found the amounts of extras to put in for the cranberry, orange, almond bread only…how much do you put in for some of your other suggestions? I'm not good at estimating amounts. 🙂
I just had time to relax and read all the recipes that I pinned on Pinterest. I had forgotten about this loaf of bread and after reading how easy it is I ran to the kitchen to get it going. This will be my first loaf and I added sharp cheddar. I simply cannot wait until Monday morning. I don't often say that, lol.
Found this recipe on pinterest. Bread turned out like the picture and was very crusty like the bread we used to buy at Costco. I used Red Star quick rise yeast in the little packets and added warm water when making the dough. Baked in a regular stainless steel soup pot w/lid. My main issue is that this bread was very under-salted, not sure if adding more salt would affect the texture but it sure could use a lot more flavor. Tip: don't wrap bread in a towel till it completely cools otherwise you will ruin the crispiness. Thank you for the recipe!
Regarding cleaning your pots, if you really want to be 'green', make a paste of borax and water, apply and leave on for about 5 minutes, then scrub with a non-abraisive pot scrubber. Needs a little elbow grease, and takes a little longer, but saves the environment from that large plastic bag, and the ammonia.
Regardless of what yeast you use, just use 1 teaspoon whether it is instant, rapid rise, or regular yeast.
Just read through all hundred million comments! You are a popular lady, and for good reason! Okay, I tried GF! In fact, I've been making them and selling them at our Farmer's Market for the past 4 weeks. I sell out every time! They are beautiful, but not quite as round and smooth as yours. Can't wait to try leaving it on the parchment paper, what a gooey mess!
I have to increase the water by 50% so I use 2 1/4 C water. I have tried Pamela's Bread Mix and Better Batter Bread Mix, they get pretty close to the same results. The only other alteration that I've had to make is I throw it in my stand mixer and let it go on low for 5 to 10 minutes. When it's GOOD AND BLENDED, I add the extras! The one that I came up with that sells out fastest is the "No Thyme" loaf. It has parsley, sage, rosemary and …. oregano?
WaaLa! Thanks for making "That Gluten Free Lady" look like she knows what she's doin'!
I have both Lecreuset and other pan like it . I have very good luck cleaning them with baking soda and a green scrubber . Hope this helps
If you use the regular yeast..which of course I just bought 2 pounds of. Do you put the same amount of yeast or 21/4 teaspoons like the pkgs are if you buy them separate? This looks so good and my 2 guys are bread lovers! I have made bread for years by hand..my aunt taught me and it's sure a good time to smell that yeasty smell thru the house!! Thank you so much.
Made this bread for the first time with my brand new dutch oven a week or so ago. I made two loafs, one regular and one with smoked gouda. Both were to die for. The best part is how easy it is to make. It doesn't get any easier than 3 basic ingredients and then add on to what you want. I did use bleached flour when it came to putting it on the counter and rolling it around since I don't have enough to do anything with except sort of waste and using flour that makes amazing bread seemed to be contradictory to me.
Either way I had two beautiful loads and would recommend this to anybody.
Hi Janet, you are a homemade bread rockstar. I cannot wait to try this – Thanks!
For anyone who wants to make a half loaf….I cut the ingredients in half and prepared it per directions. However, I baked it for 20 minutes with the lid on and 5 minutes with it off. Came out perfect. I love this recipe.
Thanks for all the comments and great bread ideas to everyone. For those who have asked. I purchased the tea towels from IKEA, but that was a few years ago. Keep up the great bread baking.
I love this recipe – it looks divine! and will definitely try it. In addition to plain, I will try two flavors: Rosemary and sliced olives and then a sun dried tomato with basil and parmesan cheese.
Your bread looks great. I just mixed up a batch so hopefully it will work for me tomorrow when I bake it. Where did you get those cute t-towels?
Thank you so much for this BEAUTIFUL recipe. My family and I LOVE it!!! My sister introduced it to me about 3 years ago, and I've been making it ever since. My family's favorite flavor is garlic and cheddar (just 4 cloves of sliced garlic and 1 cup sharp cheddar), it goes nicely with chicken soup. We also do garlic, italian herbs (dried), and parmasean for Italian nights. I don't kneed the dough, just dump it directly in my hot dutch oven. I was making it the proper way, but was pressed for a free hand, and decided to try without….I really couldn't tell the difference, it wasn't quite as dense because less flour was used, other than that, it was delicious. Anyway, just wanted to say thanks!!!
ooh they look fantastic! thank you, AND it's good to see well used cooking pots! Found you through attic24.
I used half whole wheat flour and augmented the yeast by a quarter teaspoon. the loaf was perfect and my family gobbled it up! Thank you.
I am DEFINITELY trying this recipe this week!
Also, have you tried using baking soda to clean your pots? Or a mixture of baking soda + vinegar or lemon juice? My pots usually clean up very nicely without nasty chemicals. 😀
I have been trying, and failing, to make bread for months. This came out perfect! I used regular yeast, putting it in warm water first, 2 cups bread flour, one cup white whole wheat, and cooked it in my pampered chef deep covered stone baker. Gorgeous!
What is you used warm water with the yeast before combining with the flour, would you not need to wait so long?
My bread tastes great but the crust is fairly hard and I don't want my guests to break a tooth eating it. We are at 6,000 ft. Any suggestions to making a little softer crust?
My only cast iron skillet is an 8" and I didn't have any bowls I knew I could trust at 450 degrees with a pizza stone, so I tried using my Calphalon skillet and lid, praying that I wouldn't ruin it by using it at the max temperature allowed…. Looks like it survived ok. Bread looked good, but the bottom was burnt. 🙁 Should I lower the oven temp next time or lower the time? By how much?
Also, how do you cut this bread? In slices? wedges? Do you use it for sandwiches or just eat it in chunks?
If I let it cool first, will it cut easily? Baked my first attempt for lunch today and we dove in on it while hot and it was a MESS (plus I had to cut the burnt bottom off, which was messy). Thinking about making another loaf to take to my in-laws tomorrow, but not if it's this messy!
And how do you store it? Wrap it in a dish towel? Put it in a ziploc?
I just read through all the comments and saw a few questions posed similar to mine but did not see answers. Sorry if I'm repeating! Thanks so much.
I have made several loaves of this over the past few months – all have turned out perfect! (Even the loaf that didn't rise due to me being stubborn about the heat in the house and being on a time crunch) It's a hit everywhere I go!
I have been using my Rachel Ray covered (4.5 quart) casserole pot to bake and it has been amazing! Of course, my loaves aren't perfectly round, but I make them more of an oval shape which yeilds more slices for company.
I usually put sharp cheddar cheese and some garlic powder in it, but I have a loaf rising right now with parmesean and garlic. Delicious! Thank you for sharing this amazingly easy and impressive recipe!
Cleaning: Le Creuset makes a cleaner. I have not yet tried it on the outside. But for the inside, so far it seems like a magic eraser. It's great.
As for other pots: Some of the problems with cheaper pots is that the lids don't fit right and other things that make them so much less expensive. I actually bought mine on a real clearance sale (not those sales that are always going on to show how the pots are less than the list price). The color was being discontinued. It was a stroke of luck. Also, beware of the pot size. The prices on these vary because the sizes are a little different for the Le Creuset pots depending where you buy them. One store might have something like a 6-quart and another has something like 5.75 quart. So, that makes it even harder to match.
I can't begin to say Thank You enough for this recipe…We have been making bread now for about a month and have never had a bad loaf…We have stopped buying bread from the grocery store and have even gone so far as to make homemade croutons with the Asiago loaf to put in our French Onion Soup…
Thank You again for sharing this and we wish everybody here Happy Baking and Merry Christmas from Wisconsin..
Best bread ever!!!! I use this (with Asiago and Basil) as a gift for teachers, work, and gifts for friends. It is amazing with spicy pumpkin curry soup. 🙂 Thank you!
I clean stainless pots and glass with oven cleaner. Might try that to clean your pots.
just got the dough going tonight, will bake tomorrow!
If plain works, really going to have withe the others, then to master the god of breads, Sourdough!
Jolie, You can find out how this dough is made for Pizza crust here: https://www.simplysgood.com/another-use-for-no-knead-bread-dough/
So fabulous! Here's the original article and recipe from the New York Times:
Original New York Times Article – Recipe – Adapted from Jim Lahey, Sullivan Street Bakery, Published: November 8, 2006 :
http://www.nytimes.com/2006/11/08/dining/081mrex.html
Original New York Times Article by Mark (who just had to get his hands in there too!), Published: November 8, 2006
http://www.nytimes.com/2006/11/08/dining/08mini.html
Now I'm off to try this out. Who could resist!
Tried your recipe using cranberries, orange zest and walnuts. It made a delicious and crazy easy bread. I will be using this again. Thanks for the recipe!
Wonderful! I was amazed and impressed and so was my family! I used a cast iron skillet and metal soup pot as the cover. Beautiful results! Crispy outside with a soft, sour dough like taste inside. Terrific with hot soup on a cold night. Will you share how you use the dough for pizza? It sounds like it would be great! Thank you for sharing!
did you recently revise this recipe? I don't remember ever adding 1 1/2 c of water…i made this last night and it turned out like a pancake (used boiling water instead of warm water for the yeast-my mistake) and so I'm remaking it now but the dough is very soupy-not at all like i remember it being like.
I did thyme, sage and rosemary for dipping into turkey (or chicken) soup. It was delicious. Then I did goat cheese and dried tomatoes…great with a bit more goat cheese under the broiler as bruschetta, and finally, black and green olive to go with spaghetti….. loved all of them….thanks so much for the recipe.
Hooray Melissa. I'm so glad you're hooked.
In regards to the questions about using GF flour in this recipe, I hope I might be able to help. I have been making this recipe about once a week for the last few months using Cup4Cup GF flour mix and it turns out great. I follow the directions exactly and use my lodge cast iron pot to cook it in. So far every time I have come out with a beautiful crusty loaf of bread. I believe that it is a little denser than the non GF version but I have no complaints. I have not used other flour blends but believe they would work very well for this recipe too. Hope this helps!
Thank you so much for this amazing recipe! I pinned it a while back but hadn't had the opportunity to make it until the week of Thanksgiving. Needless to say, I am hooked. The recipe is so easy that I couldn't believe I could get results like yours…but I did. Brought two loaves for Thanksgiving dinner and everyone thought I bought them at a high end bakery. Baking a l
The girlz and I made dark chocolate cherry preserve and dill cheese curd loaves…BEAUTIFUL!!
I don't think you need to make any changes for a smaller loaf. Only baking time…start by baking with the lid on for 10 minutes. Remove the lid and bake just until golden brown.
LOVE this recipe! I have also made it wheat free but I forgot how I did it! So I'm trying again for Thanksgiving.
About cleaning my pots, I use Universal Stone. It's all-natural, and requires little elbow grease, especially when used with a microfiber e-cloth. I demonstrated this on a cast iron pot for friends the other day at a party and they were all amazed. This stuff is awesome and will last a LOOOONG time. Yes, we sell it at our blog…but only because we are huge fans. 🙂
http://milkallergymom.blogspot.com/2013/01/e-cloth-allergy-friendly-store.html#!/~/category/id=6325622&offset=0&sort=normal