What I love about this bread
- It’s so easy to make. This dough can be made in less than 5 minutes.
- The basic dough recipe can be enhanced with many different flavor varieties.
- Very little hands-on time.
- Crusty bread never ceases to impress family and friends.
- My 12-year-old grandson can make it.
Let’s make No-knead crusty bread:


- In a large mixing bowl, add flour, kosher salt, and yeast. Whisk together.
- Add water. Mix just until all of the flour has combined with the water. The dough will look like a shaggy mess. That’s ok.
- Cover the bowl with plastic wrap and let it sit for 12 – 18 hours on the countertop. DO NOT REFRIGERATE. This is not optional. It takes that much time to proof the dough. The reason why you need a large bowl is that the dough will start to rise.
- After 12 hours the dough will look like this. It’s pretty sticky, but that’s ok it’s supposed to be.
Shaping and baking the bread:


- Preheat oven to 450 degrees. As soon as it has heated to 450 degrees place your pot with the lid in the oven and preheat the pot for 30 minutes.
-
Right after you put the pan in the oven to pre-heat, dump the dough out onto a HEAVILY floured surface. Shape it into a round ball and place on a sheet of parchment paper. Parchment makes it so easy to transfer the dough into a hot pot and then remove it after baking. The parchment paper stays in the pot. This will rest for 30 minutes while the pan is heating. Cover with plastic wrap. Note: Use silicone coated parchment paper. The regular non-coated paper will stick terribly. Don’t chance it.


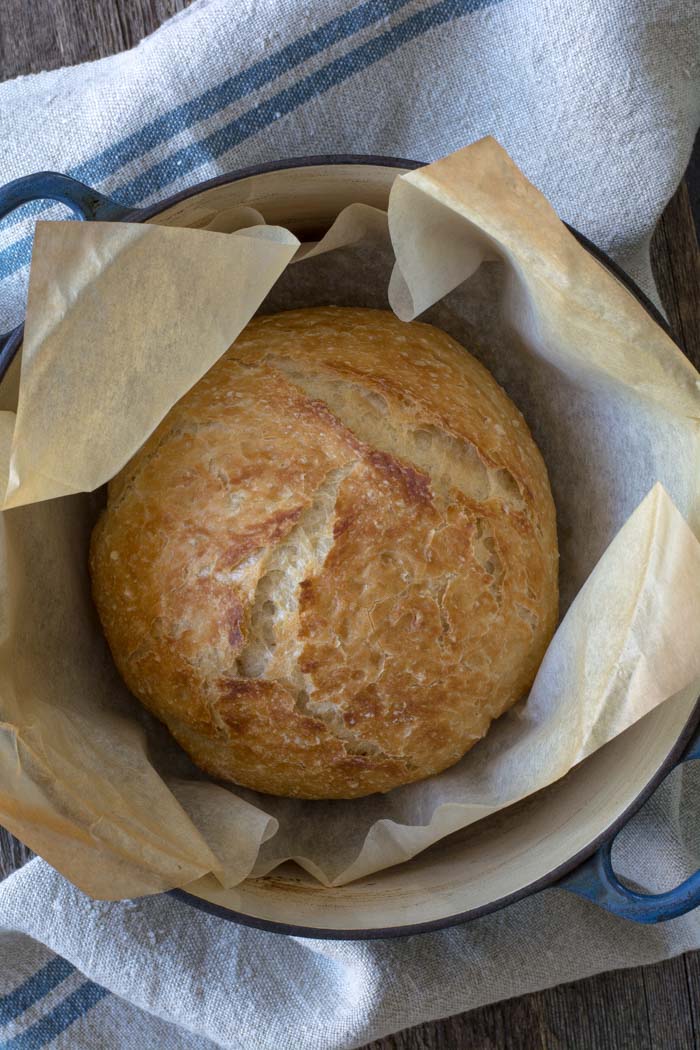
- Remove pot from the oven and carefully pick up the parchment and drop dough into the pot. Be careful the pan is HOT. Put the lid on the pot and return it to the oven for 30 minutes.
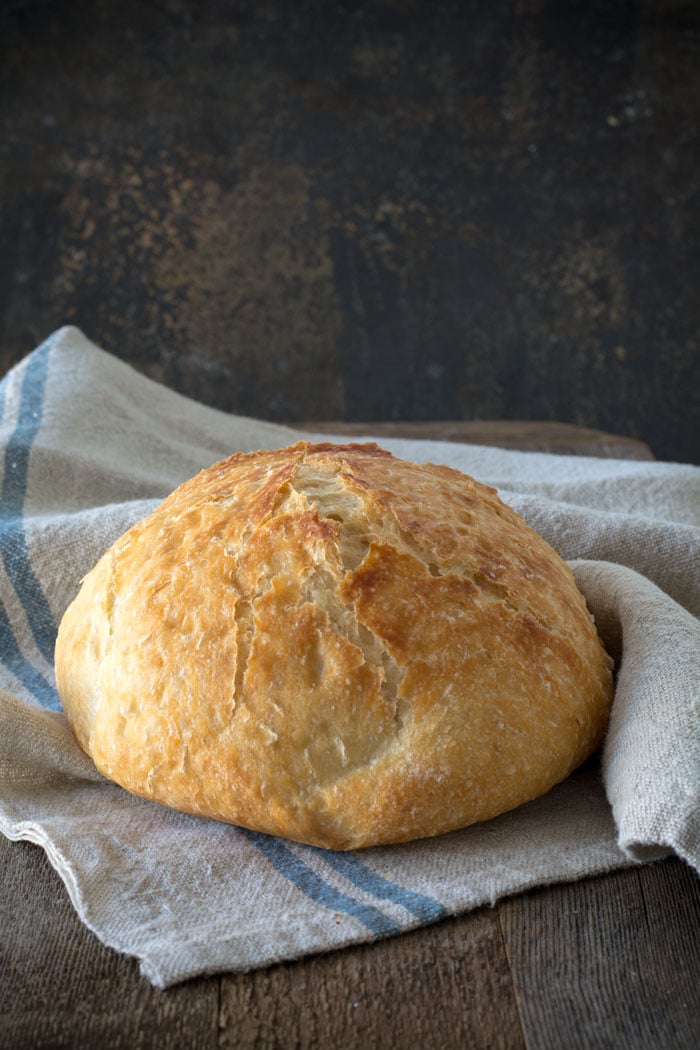
- After 30 minutes remove the lid from the pan. Bake for an additional 15 minutes or until nicely browned. You can test with an instant-read thermometer to make sure the bread is fully cooked on the inside. The temp should be between 190F and 200F degrees. Remove from the oven and carefully remove bread from the pot by lifting the edges of the parchment paper.
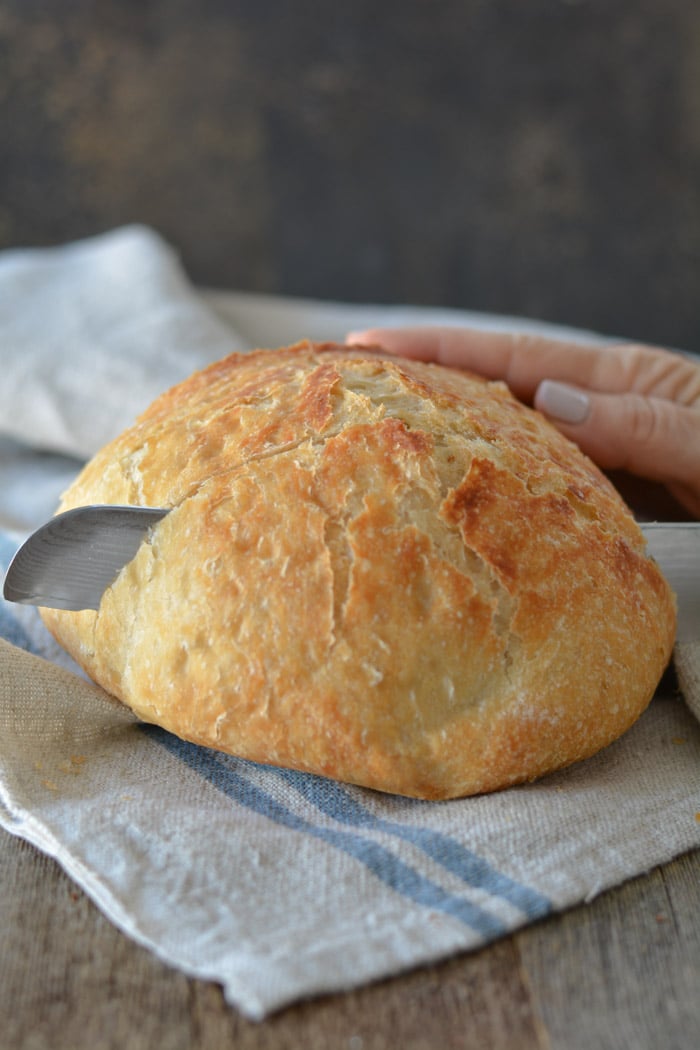
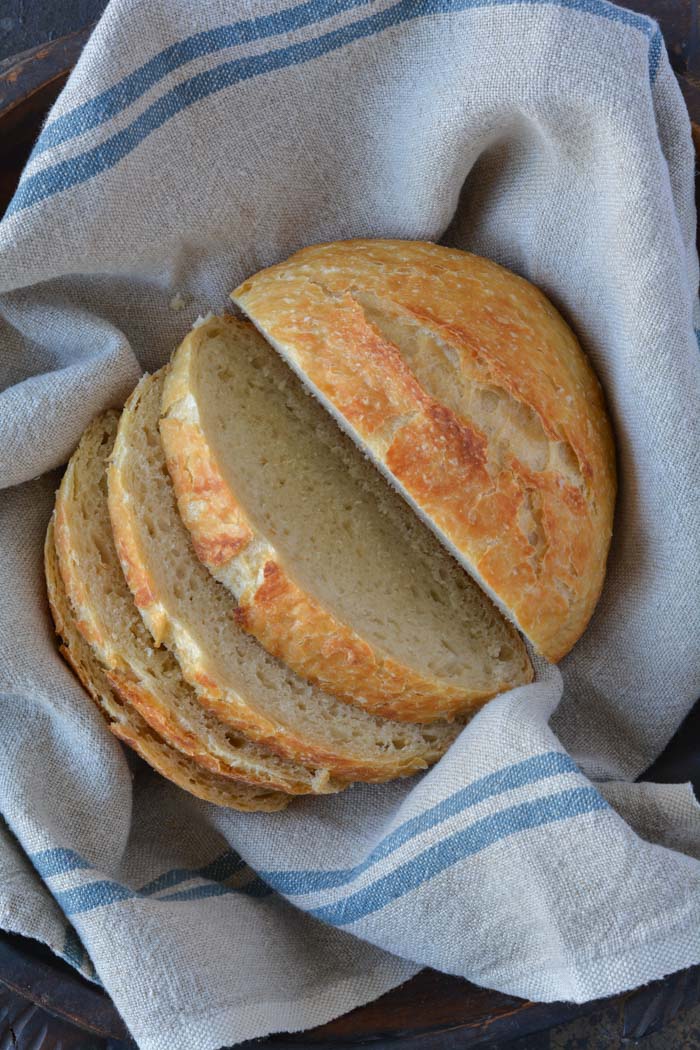
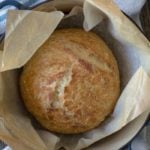
Holy cow! Can you believe how gorgeous that is? It’s best to wait for the bread to cool before slicing. Because I love warm bread I sliced it right away.
FAQ’s
Q: Do I have to use an enamel covered cast iron pan?
A: NO. You can use anything that can take the heat. The following have been used that I know of:
Clay pots with lids, Pizza stone with a bowl to cover the bread, insert from a crockpot, pyrex baking dish with a lid, stainless steel pot with a lid, baking dish covered with aluminum foil, old cast iron dutch oven.
Q: Do I have to use unbleached flour?
A: I always use unbleached flour. You can try bleached flour.
Q: Can I use self-rising flour?
A: I don’t know. I would just stick to all-purpose.
Q: What size is my pan?
A: My smallest pan is 5.5 quart. You can use as small as a 3 quart.
Q: What type of yeast do I use?
A: I use SAF instant yeast. Any yeast should work.
Q: Why is my bread turning out flat?
A: You could try using less 1/4 cup less liquid. Or add 1/4 cup additional flour. Make sure your dough appears to be dry when you first mix it. It will have more moisture during the rising time.
Q: Can my dough sit out longer than 18 hours? Does it HAVE to be between 12-18 hours?
A: I have let some dough sit as long as 24 hours and the bread was beautiful.
Q: Have you tried Gluten-free?
A: From what I hear the best GF is from King Arthur Flour https://shop.kingarthurflour.com/items/gluten-free-measure-for-measure-flour-3-lb
Q: Do I have to grease or oil the pan? Will my breadstick?
A: No you don’t need to grease the pan. I have never had the bread stick when using a cast iron pot. I haven’t tried anything else. The best way to be certain that the bread won’t stick is to form the loaf on a sheet of parchment paper and lift the bread into the pan using the sides of the parchment. Leave the paper in the pan. It’s won’t burn. When the bread has baked, just lift the sides of the parchment out of the pan. Voila! HOWEVER: Not all parchment paper is created equal. I use a silicone coated parchment paper. Regular parchment paper can stick something terrible. Don’t chance it.
No-Knead Crusty Bread
Wonderful yet easy artisan bread with a crisp crust. Prep takes just a few minutes with an overnight rise. Baked in a pot with a lid to create a steam oven. Bread can be made with many flavors and variations.
Ingredients
- 3 cups + 2 tablespoons unbleached all purpose flour (450 gr)
- 1 3/4 teaspoons Kosher salt (10 gr)
- 1/2 teaspoon Instant or Rapid-rise yeast (3 gr)
- 1 1/2 cups water cool (315 gr)
Instructions
-
In a large mixing bowl, whisk together flour, salt and yeast.
-
Add water and mix until a shaggy mixture forms.
-
Cover bowl with plastic wrap and set aside for 12 - 18 hours. Overnight works great.
-
Heat oven to 450 degrees. When the oven has reached 450 degrees place a cast iron pot with a lid in the oven and heat the pot for 30 minutes. OR pot can be placed in cold oven while oven is preheating leave in oven for 30 minutes.
-
Meanwhile, pour dough onto a heavily floured surface and shape into a ball. Cover with plastic wrap and let set while the pot is heating.
-
Remove hot pot from the oven and drop in the dough. Cover and return to oven for 30 minutes. After 30 minutes remove the lid and bake an additional 15 minutes. Remove bread from oven and place on a cooling rack to cool.
Recipe Video
Recipe Notes
FAQ's
Q: Do I have to use an enamel covered cast iron pan?
A: NO. You can use anything that can take the heat. The following have been used that I know of:
Clay pots with lids, Pizza stone with a bowl to cover the bread, insert from a crockpot, pyrex baking dish with a lid, stainless steel pot with a lid, baking dish covered with aluminum foil, old cast iron dutch oven.
Q: Do I have to use unbleached flour?
A: I always use unbleached flour. You can try bleached flour.
Q: Can I use self-rising flour?
A: I don't know. I would just stick to all-purpose.
Q: What size is my pan?
A: My smallest pan is 5.5 quart. You can use as small as a 3 quart.
Q: What type of yeast do I use?
A: I use SAF instant yeast. Any yeast should work.
Q: Why is my bread turning out flat?
A: You could try using less 1/4 cup less liquid. Or add 1/4 cup additional flour. Make sure your dough appears to be dry when you first mix it. It will have more moisture during the rising time.
Q: Can my dough sit out longer than 18 hours? Does it HAVE to be between 12-18 hours?
A: I have let some dough sit as long as 24 hours and the bread was beautiful.
Q: Have you tried Gluten-free?
A: No. I'm still waiting for someone to venture into the realm of Gluten-free. If you try it, let everyone know.
Q: Do I have to grease or oil the pan? Will my breadstick?
A: No you don't need to grease the pan. I have never had the bread stick when using a cast iron pot. I haven't tried anything else. The best way to be certain that the bread won't stick is to form the loaf on a sheet of parchment paper and lift the bread into the pan using the sides of the parchment. Leave the paper in the pan. It's won't burn. When the bread has baked, just lift the sides of the parchment out of the pan. Voila! HOWEVER: Not all parchment paper is created equal. I use a silicone coated parchment paper. Regular parchment paper can stick something terrible. Don't chance it.
More Notes:
Regular active yeast can be used in place of the instant or rapid-rise yeast. It will need to be activated in 1/4 cup warm water. Stir and let sit for 5-10 minutes. However, most of the comments I have received state that the rapid raise works the best. You choose. Whisk the flour, salt, and yeast together.


Thank you so much for your time, Janet. I have just made this beautiful bread. People like you help to make baking more wonderful. My husband’s father was a master baker and my husband loves bread. This bread is now his favourite, airy, crusty, tastes and looks delish.We ate it immediayely, could’nt wait till it cooled.
Love your recipes!
Thank you so much! You have just made my day!
I’m hooked. Never made bread before (i’m in my 60’s!), but a friend coaxed me with this recipe. so easy, and so delicious, and such a wonderful feeling of accomplishment for this kitchen klutz! I am now baking and sharing with my neighborhood. Will probably never buy bread again! Thank you.
Bravo, Tara!!! I’m so glad you’re loving the bread recipe. I’m sure your neighbors and friends just love you.
Hi Janet
This looks fab! do you have metric measuremeNts for this recipe?
Many thanks
GilL
Sorry, cant seem to come out of caPs.
The metric measurements have been added to the printable recipe in parenthesis. 450 gr flour, 10 gr kosher salt, 3 gr yeast, 315 gr water. I hope this helps.
Love this recipe and am currently Making the cheese version. Do i need to refrIgeraTe the doUgh since there is cheese in It? Will this affect the rise?
I’m thrilled you love this recipe. It’s a great recipe. To answer your question: No you do not need to refrigerate the dough because of the cheese. Refrigeration will slow down the yeast growth considerably. So go ahead and leave it out. I have made dozens of cheese bread recipes and I haven’t had any problems NOT refrigerating. I have some dough rising right now with gruyere cheese, lemon zest, and rosemary…yum. Coming soon the SSG.
First time making bread! your video says to use 3 cups of flour, but the recipe says 3 cups plus 2 tablespoons . What’s the correct amount? Also, can i use a meat thermometer to test for doneness? What temp should the middle of the bread be?
I started at an additional 2 tablespoons because many individuals were complaining that the dough was too sticky. The extra addition helps with that. Also, higher altitudes seem to need the addition. I think a meat thermometer should work ok. The internal temp needs to be 190-200℉.
I have made this bread many many times and its always amazing!! So grateful that I Found this recipe years ago, such a crowd Pleaser. My husband and i usually eat most Of it in one sitting 🙈 (can’t help it!) but have not found the best method for storing anything that’s leftover. Any tips? We’ll usually end up toasting anything Left the next day since its lost its crispness. Gifting a loaf to both our moms this moTher’s day aNd would love to know if YOU’VE had any success Keeping it fresh for a day or two once cut into 😊
The bread can be frozen and then thawed at room temp. To re-crisp the bread I place it in a 300℉ oven for about 7 minutes. Storing leftovers in a plastic bag will cause the crusty exterior to soften for sure. If I just have a few slices left, I will tip the bread cut side down onto my cutting board then cover with a clean dishcloth. I hope this helps.
I’ve maDe this reCiPe dozens of times over the last few years and it is fool-proof. I make 2 loaves at a time and have taken it to potlucks, parties and events. I always get so maNy compliments. When i explain how easy it is, people are shocked. Thanks for making me look like a mUch better baker than i am! P.s. Leftovers make the most amazing french toast.
Thank you so much for your comment. I love hearing from successful bakers. ❤️
This is amazing bread! Such an easy recipe and so very yummy! my husband is lucky there’s any left by dinner time. I’m not prone to eating lots of bread during the day and i cannot stay away from it!! I used redstar prmier blanc active dry yeast. I took 1/2 cup of the water and warmed it, added a pinch of sugar, and let the yeast foam before adding it with the remaining cup of cool water. i baked it exactly the times prescribed in the recipe. This will be a new favorite around my house—thanks!
Thank you so much for the tips on the yeast. Others will find this very helpful. I have the same problem with snacking on this bread. It’s hard to stop with one piece. I think I just love the chewy texture of the crust. It just keeps calling me back for more.
Could you do a version of this recipe with sourdough starter? I have some and can’t figure out the difference between fed and unfed starter. All the waiting time is messing me up. First time dough was too liquid and impossible to handle.
I’m working on it. I haven’t come up with one that I think is great! I have had the same problem as you with very sticky dough that doesn’t hold it’s shaping. A good test to see if your sourdough starter is ready is to drop a teaspoon amount into a cup of water. If the starter floats then you’re ready to do. Sometimes it will take a few feedings if I haven’t been feeding it regularly. I’ll keep working on it.
This bread is excelllent, but I found that if you use high protein bread flour, it is fantastic, with hints of sourdough and bagel. We used King Arthur’s bread flour.
Thank you so much for passing on this great tip. I, too, love KAF bread flour. I really appreciate your comment.
Hi, i only have active dry yeast, do i have to proof the yeast with sugar and warm water before adding to the flour and salt mixture? i read in a different post that salt kills the yeast if added together. I would love to try this bread, it looks delicious.
Use the yeast you have. I have had comments from most people that they do proof the yeast in water. Other comments state they just used as stated in the recipe. I think I’d proof it for your first attempt. Then you can experiment after you have the recipe down.
i MADE THE BREAD FOR THE FIRST TIME. wE USED A le creuset dutch oven. The dough was easy to mix. We didn’t have the parchment [paper you suggested so I just rubbed some butter in the bottom and sprinkled corn meal on the bottom. The amount of dough versus the size of the pot allowed me to place the dough in the pot easily enough by hand and formed it slightly more into a loaf than a ball.
We followed the exact time recommendations and the bread is amazing. the crust and interior were perfect. We’ll DEFINITELY be making this more often. THanks for the recipe. I’ll be looking at your focaccia recipe…. THanks again…
Wahoo!!! Thank you so much for sharing your success. Happy baking!
I LOVE THIS bread recipe! I’ve been using it for years but just started making it at my new house in a new oven and it seems to get too brown if I do the extra 15 min uncovered. it seems to be the perfect color after 30 minutes, before I take off the lid. should I reduce the cooking time? thank you!
Try leaving the lid on for an additional 5-10 minutes. You can check the temp of your new oven. Is it cooking hotter? Maybe lower the temp by 25 degrees???
Hi can i double it so its a highwr loaf in dutch oven?
Doubling the recipe will give you a greater yield for sure. The loaf will take longer to bake as well. You can try adding an additional 1/4 cup flour to the original recipe to see if the loaf will hold it’s shape better rather than spreading out.
Hi first attempt at making bread i onoy have fresh yeast is this ok?TIA
I’ve never used fresh yeast, but I assume it will work perfectly.
I’ve made this bread many times. I don’t hAve Instant yeast anD im not going to go to a store in this lockdown time, so here i go trying active yeast, i understand i have tO use 25% more. Hoe it turns out…Fresh bread for Easter!
I have never used 25% more yeast, but it’s always worth a try. It’s a pretty easy bread so I’m sure it will turn out great!
I got this recipe from my son originally and he hadn’t noticed that it called for instant yeast so has been making it for years with regular, following the instructions just as they are here. So same amount of yeast and added without softening first in water. I’ve made it once so far in the same way and it was successful.
Fabulous! It’s so great to hear that no adjustments need to be made. Just add the yeast and proceed. Thank you!
Hi! My first attempt came out pretty good but the inside was definitely squishy, undercooked slightly. It was still delicious and edible but definitely not the right consistency. I follow the recipe exactly, and the dough rested for 22 hours. However I did not let it sit under plastic wrap for the 30 minutes while the pot was heating. Could that have been the problem? Or is there another reason why it would be squishy/underdone in the middle?
Thank you!
I’m sorry your bread was a bit gummy. Letting it rest for 30 minutes will help. It gives the dough a chance to rest and start to form air bubbles after it has been removed from the bowl and shaped. You could try leaving the lid ON for an additional 5-7 minutes. This way you can bake it a bit longer without the bread over-browning. If you have an instant-read thermometer, check the internal temperature of the bread. It should be around 190-200 ℉. Also, letting the bread cool completely before slicing helps with the gummy texture, which is really hard to do! I hope this helps.
Thank you so much. I’ll try those tips next time! We still Ate all of it lol!
What happens if you dont let the bread rise for 12-18hrs?
The reason for a longer rise time is to create lots of large air bubbles that make great artisan bread. If the bread only rises for 8-10 hours, I’m sure the bread will turn out great. If the dough sits for 24 hours, the bread will still work.
I have made this recipe as well as whole wheat and cranberry orange almond and In my cast iron pot and each time the bottom of the loaf is so hard that you caN hardly cut it. Any suggestions.
Hi Gail, I’ve been researching this problem with a tough bottom crust. Apparently this is more common when using a black interior cast iron dutch oven (Lodge) because it gets super hot. Here’s the tip: After the 30-minute bake with the lid on, carefully lift the bread out of the pot and place it on the oven rack. Remove parchment if you are using that. Continue to bake the remaining 15 min. I’m going to try this next time I make it. I hope this solves the problem.
I DIDN’Thave any siLicone coated parch paper, so i greased and flour the paper i did have and i had no issu with it sticking.
Awesome! Thanks for the tip.
thanks posting! I don’t have silicone parchment and will use your suggestion of oiling & flouring the paper!
Parchment paper isn’t required for this recipe. You can just plop the dough right into the hot pot. Parchment just makes it a bit easier to put in and remove the bread from the hot pot.
The top of the loaf if amazing- by bottom crust came out a but touGh and hard to cut. Does it mean i beed moRe water?
Thank You!
Hi Jamie, Yes, I have had that happen. I haven’t tried using more water but that’s a thought. I have been placing my bread on a breadboard as soon as it comes out of the oven. It will soften the bottom a bit. Another option is placing the pot in the oven when it is first heating, once the oven comes to temp dropping the dough into the heated pot. I hope these options help.
I have also heard but not tried, to put a stone or baking sheet on the rack under the baking rack and to have the baking rack as high as possible in the oven.
Great tip! Thank you so much.
High altitude ADJUSTMENTS? My dough isnt shaggy, but very loose.
Try adding 1/4 cup more flour or you could reduce the water by 1/4 cup. If the dough looks too loose when mixing, don’t hesitate to add more flour until the mass looks “shaggy” Make sure you mix in the flour completely. The dough will loosen up and become wetter as it rises.
Just realized i added REGULAR yeast to the bowl with all the INGREDIENTS – help what now?
Sorry Amy, I’m just getting to my comments. I’m sure you have already found out that your regular yeast probably worked out just fine. Sometimes the yeast will need to be softened in a bit of water first. Please let me know if you had success.
My son, who told me about this recipe, hadn’t noticed that it called for fast rise yeast. He’s always used regular yeast, as that’s what I’ve always used in the house he grew up in, and never activated it in water beforehand. He just added it as the recipe directs and it has worked just fine. I’m thinking that regular yeast doesn’t need to be activated simply because the dough sits for so long it allows the yeast to work.
Just made this and it was pErfect! AbsoLutely crunchy on the outside, nice and soft and light on the insIDe. It’s All been eaten in just 10 hours! Id like to make a healthier version wIth a mix of whole wheat, rye and oat flours aling with the white flour. Has snyone tried making This recipe Into a heart healthy type Be
Read? We love it so much as it is but we have family members who only ear whole grain breads. Thank you for thIs wonderful recipe!
Yes, you can make a whole wheat version. Here is a recipe:
4 cups whole wheat flour
2 tsp salt
3/4 tsp active dry yeast
2 cups water room temperature
I have tried using Rye flour as well, but it worked best using a 50/50 blend of rye flour and white flour. Nuts and seeds mixed in make a great a bread.
Just wanted to let you know i made this recipe With gluten free flour and it turned out amazing! Was Nervous because the dough did not double in size, but it Baked beautifully and tastes delicious!
Wahoo! Thank you so much for sharing. Can you share what brand of GF flour you used?
What type of gluten free flour did you use, Tamara?
THank you so much for posting this. I am making this bread for friends and one of them is gluten free and i am attempting this recipe with gluten free flour substituted! I borrowed gluten free flour from my mom, so i am not sure what brand i used, i hope it turns out! What brand did you use, do you know?
I have received comments stating that King Arthur Flour or Bob’s Redmill GF flour works quite well.
Nothing but great success so far with this simple recipe. What if i doubled it? What would be THE COOKING time?
Great news. Thank you so much. I’m assuming you want a larger loaf of bread. I have never tried a larger loaf. I have doubled the recipe and cut the dough in half to make 2 loaves. I would bake the bread longer with the lid ON. I would start with 10 minutes. Remove the lid and continue baking until golden. The internal temperature should be around 200℉. I use an instant-read thermometer. If by chance the bread is browning too much before the temperature reaches 200℉, cover with the lid. This will prevent too much browning.
If i cut the recipe in half for a smaller loaf, do i keep the cooking time the same?
I don’t think you would cook the bread as long. I would bake the full 30 minutes with the lid on. Remove the lid and check the internal temp of the bread. An instant-read thermometer comes in handy for this. The internal temp should be 195-200℉. The bread may only require a little additional time to brown the top to a golden color.
Thank you 😊
hello, ive tried this recipe twice and both times was dOugh was suuuuper wet. It would not hold a ball shape at all and even with a ton flour was sticking to my hands and the parchment paper so much. I just saw the recommendation to try less water, but do you really think 1/4 cup less is enough? Mine is basically the texture of that slime kids Make on youtube
I’m so sorry you are having problems with your dough. Yes, the dough is very sticky and is much stickier than regular bread dough and really doesn’t holds the shape while sitting. It will start to spread out quickly. It’s amazing how the bread just puffs right up while baking. However, your dough should not have the consistency of slime. I’d really like to know what brand of flour you are using. I have found that not all white flour is created equal. Most all-purpose flour will work for this recipe. I’m sorry you have had two failures. Next time try making focaccia if the dough is thin. No need to toss the dough. Try it anyway. Start by reducing the liquid by 1/4 cup and add 2 tablespoons more flour. 🤞🏼
So….. no spraying of Pam in the dutch oven?
NO! It will smoke like crazy! Just drop it in the heated pot. I have never had my bread stick in a dutch oven.
Can the parchment be re-Used?
I don’t see why not. If it isn’t crispy and falling apart, I think you could reuse it. 🤷🏼♀️
when do you add cheese if you are using it? Before the warm water? Can it sit out for 12-18 hours? I was thinking Fontina would be awesome!
Add the cheese with the flour. It is ok for the cheese to sit out at room temperature while rising.
I have been following your site for years. My 5 year old REQUESTS the five minute FOCACCIA weekly! Thank you for all of the WONDERFUL
Recipes 🙂
I do have a question, my bread keeps coming out a little undercooked/dense in the middle. Do you know why this couLd happen? I HAVEN’T changed ANYTHING from you recipe (including the sAme cookware). Should i try stretching it out more into of an oval shape?
Try lowering your oven temp 25℉ and baking an additional 5-10 minutes with the foil on. Then remove foil and bake until golden. Let me know if this helps.
Thanks for the recipe and tips. I made this last night for a family in my neighborhood to go with a friend’s soup she was making for them. They’re a 3 generation family of 8, including 4 teens, so I doubled the recipe and baked it in an oblong 4 L Pyrex dish. My son shared this recipe with me and hadn’t noticed it called for the fast rise yeast. He makes it just as your recipe instructs without activating the regular yeast he uses. I made mine the same way he does, mixing the regular yeast in with everything else and it worked as well for me as it does for him. I THINK WITH AS LONG AS THE DOUGH SITS, IT’S NOT NECESSARY TO DISSOLVE THE REGULAR YEAST IN WATER FIRST. I even used expired yeast, which I have kept in the freezer since opening so it would last a bit longer. I just heaped the yeast in my measuring spoon so it was probably half as much more. I knew it was still good because I’d used it the day before to make rolls, heaping it then, too. I no longer have the box my parchment sheets came in so I didn’t use one as I wasn’t sure if it is coated. It would have made transferring the larger, oblong loaf into the baking dish a lot easier. I was afraid I’d worked out too many of the bubbles transferring it but it rose just fine while baking. My son uses a heavy stainless steel dutch oven without parchment and has never had it stick. It stuck just a bit in my pyrex dish but I loosened the edges a bit with a spatula and dropped it slightly onto the cooling rack and it came out with just 3 tiny spots sticking to the dish. If I double it again, it will probably be for my own family when I have a houseful visiting so I can try the baking parchment I have to see if it works. I won’t mind so much if I have to cut it off for my own family.
Families are perfect for experimentation…right? I love your idea of a large pyrex dish. I really appreciate you sharing your information on yeast and using an oblong dish for a larger loaf. This information will be so helpful to others trying to make this bread and shows just how forgiving the recipe is. Happy baking!
Greetings! Quick question that’s completely off topic.
Do you know how to make your site mobile friendly?
My blog looks weird when browsing from my iphone.
I’m trying to find a template or plugin that might be able to correct this
issue. If you have any suggestions, please share. Appreciate it!
I was noticing just yesterday that my mobile has some issues. I’m hoping my tech guy can get on it soon. Thanks for bringing this to my attention.
I am going to make this bread today. I am a sourdough novice, but have baked a fair bit of bread. How can I incorporate a bit of starter in this recipe?
I have never made sourdough, but I have received several comments from others who have. They add 1/2 cup sourdough start in place of the yeast and a little less water.
You used ToTo have posted with this recipe different ingredient combinations that would taste good in the bread. But I don’t see that anymore. DoDo you think you could email me the different combinations that go good together as examples. WeWe absolutely love this bread and love the samples of ideas that you had like create Craisins and sunflower seeds and garlic chunks so I want to make it again but I don’t see those listings anymore!
Thank you!
I’d love if you could post the Alternative combos as well. Per your RECOMMENDATIONS i used To make one with rosemary but can’t remember the other ingredienTs. Thank younso much!
I will start working on a list of alternative ideas. There used to be a lot of ideas in the comments, but we had to delete many of them because it was taking way too long for the bread recipe to post. There were over 2,000 comments! The rosemary bread recipe is as follows: Rosemary Lemon Gruyere: Before adding the water stir in the zest from one lemon, 2 tablespoons fresh chopped rosemary and 1 cup grated gruyere cheese (swiss cheese or a Vermont cheddar works well too)
I have used this recipe for years aftEr seeing a similar recipe on youtube. ABSOLUTELY lOve it!
Thank you so much for your positive comment. It IS a great recipe.
I have made many times.. my question is, can you convert this recipe to cook in the ninja fooDie? It is to hot here to turn oven on..
Hi Karen, I agree that summer is not a time to heat your oven up to 450℉. I have never used a Ninja Foodi. I assume it would be like using an instant pot??? From what I have researched it is completely possible. Here are two links you can follow to bake bread in a pressure cooker. Please let me know if you try baking in your Ninja.
https://www.chatelaine.com/food/how-to/instant-pot-bread/
This recipe was so easy – prepped last night and baked it this afternoon. it was the perfect rustic bread with fresh pasta!
Bravo! I love hearing success stories. Thanks so much for commenting.
Thank you so much for this recipe, it has given me confidence to bake breads
So great to hear. Thank you, Stacy.
I love th crusTy bread!
I’m DEBATING on GETTING an Insta Pot vort, air FRYER,
Cou this be ma in there? And if so, how wo i alter
The HEATING TIME and TEMPERATURE?
THANK You in advance
Dawn larson
I so happy you love crusty bread. I have never used an instapot or air fryer to make the crusty bread. I’m sorry I’m not much help. I’ll google it and see what I can find.
I tried this recipe with gluten-frEe Flour. The outdide was lovely With a golden crust. But the interior stayed doughy even agter baking it longer.
I called King Arthur Mills and Bob’s Mill to get help. Both said gluten is required for The success of this Recipe.
I’m gluTEn free but make this for others because it’s soooo good!
Interesting. I have received some comments below about success with certain types of GF flour. There are over 2,000 comments, so it takes a while to scroll through them. I’ll take a look to see if I can find a successful GF recipe. However, I trust King Arthur and Bob’s completely. They are the experts.
Pro tip. After you finish mixing it dump it into another bowl with the parchment paper already in it. Then the next day just plop the whole thing in the baking pan and you don’t have to deal with the sticky mess.
Bless your heart, Stanley. Best pro tip ever! I will do that from now on. Now why didn’t I think of that?
So, if after mixing you plop it into another BOWL WITH parchment paper.
does that mean you don’t need to do the shaping on a heavily floured surface step ?
Sorry if it seems obvious, but I am a novice baker and so far this recipe as is working for me.so i don’t want to mess up
That’s correct. Once the bread is on the parchment there is no need to reshape on a floured surface. However, I must say that not all parchment is the same. Make sure you use a silicone coated parchment paper. I used parchment paper from a roll and the paper stuck horribly. I had to cut the bottom of the bread off because I could not get the parchment off. I hope this helps.
Wow this bread is super wonderful and so easy – i lOve the crispy Exterior and NIcely chewy interior! Just perfect! Reminds me of our favorite ace bakery bread. I folLowed all steps listed but couldn’t get it into the Oven until 24 hrs – no problems at all. I shared the recipe with all my frIends too! Re active yeast i wonder if the first step “proofing” is just to make sure the yeast is viAble before wasting your flour. I plan to try your variations soon and would love to see how the Whole wheat and gluten free wOrk. Thanks for a great Recipe.
The recipe is very forgiving for sure. It’s so fun to make. Thanks for sharing with your friends.
The only thought i had with this great idea is the dough has such a lovely soft velvety texture when you move it to the floured surface – you’d miss that nice feel when you shape it into a ball LOL
Totally!
Jenn, I use regular yeast rather than the fast rise. I got the recipe link from my son who hadn’t noticed it called for fast rise so he had been making it with regular because that’s what he had on hand, because that’s what his mother has always used. We make it just as it says in the recipe, adding the yeast to the dry ingredients. I think because it sits for so long, there isn’t a need to activate the yeast in water first.
It’s amazing how forgiving this recipe is.
I lOve this recipe- i have been using it for years. I give the bread as gifts often and eveyone loves it!! I have tried it with so many added options- always wIth grEat results. My question is- how long can i leavE the dough out? Can i make a Triple batch and just cook Part each day for a few days? We prefer it fresh.
Hi Heather, Thank you so much for your kind comment. I’m so happy that you are gifting your bread. I agree with you, it is much better fresh. In the book Artisan bread in 5 minutes a day, they make a large batch of the dough and refrigerate the dough for up to 2 weeks. Portions of the dough are pulled out of the large batch and formed int a loaf, let rise, bake. I think if the dough is left out longer than 24 hours the dough will begin to taste too “yeasty”. You can read more information from their site: https://artisanbreadinfive.com/ I think refrigerating the dough is a good idea. I hope this helps.
Great bread,had it with homemade clam chowder.Perfect
Yum! Thank you so much for your comment. I love hearing success stories.
Does the bread freeze well after baking?
The bread freezes very well. After the bread has cooled, wrap in plastic wrap then in a layer of aluminum foil. Freeze for 2-4 weeks. To thaw, unwrap the bread and let stand a room temp. To reheat place in a 300 degree oven for about 10 minutes. This will warm the bread and re-crisp the crust.
Can you use whole wheat flour instead of the white flour or perhaps use 1/2 n 1/2?
hi.3 questions…First, I noticed you put all the water in at once. my dough looked a little too wet when i did this. Should I incorporate it a little longer so it feels more dry before i proof? 2. The bottom of my bread was too crispy that it was hard to cut. Any suggestions? 3. If i wanted a slightly softer crust, should i take the lid off at the end for a shorter period of time? will that help my too crispy bottom crust? Thank you!
You can try adding 1/4 cup more flour so the batter isn’t so wet. For the hard crust on the bottom, place the pot in the oven when you first turn it on to preheat. As soon as the temperature reaches 450F degrees, add the dough into the pot. Skip the 30 minutes preheat on the pot. That just might help with the tough crust.
Hi! If i’m halving the recipe to make a smaller bread. What will my cooking time be?
I think I would start checking the bread after 15-20 minutes of baking. If the bread is browning, then you can remove the lid and continue baking until nicely browned. If you have an instant-read thermometer, you can test the internal temp of the bread. It should be 190-200F degrees. I hope this helps.
Thanks! I did 20 mins of baking and another 10 mins uncovered. The bread came out perfect.
This bread is incredible. Seriously, I can see why it has 1 million shares. Even I couldn’t screw this up!
Is anyone familiar with the Lekue silicone Baker? This recipe looks like it would work in it, but wondering if anyone has tried it???
To answer your question about the gluten free version. Why yes, yes you Can. I used 1c cup4cup wholesome gf flour 1c Pamala’s gf all purp flour & 1c cup4cup gf all purp flour (I used differeNt floUrs only because I didn’t have enough of one so I simply used what I had) I followed the rest of the reCipe & instructions.
HazzAh!!!! I had a fabulously goRgeously DELICIOUS gluten free rustic yummIness. I made 2 loaves in 2 days brought the second to work hot out Of The oven & it waS gone in about 20 mins & everyone said they would never had knoWn it was gf (i win when the “regulars” can’t tell).
Thank you so much for sharing this GF recipe. Fabulous!
PS: I forgot to ask you a couple of questions:
Does active dry yeast work for this recipe? I use this one: http://redstaryeast.com/products/red-star/red-star-active-dry-yeast/
Do you punch the dough down before making the ball?
THank you !
Hi Bea, Yes, active dry yeast will work great. Just dissolve the yeast in 1/4 c water prior to adding to flour. Should work just great. For your second question- no I do NOT punch down the dough. I like to retain as many bubbles as I can in the bread.
THANK you Janet and ha a love weekend ?
You are so welcome. Happy baking!
I GOT THIS RECIPE FROM MY SON, WHO HADN’T NOTICED THAT IT CALLED FOR FAST RISE YEAST SO HE JUST USED THE REGULAR, ADDING IT TO THE DRY INGREDIENTS AS THE RECIPE SUGGESTS. SO THAT’S WHAT I’VE DONE. IT’S TURNED OUT GREAT WITHOUT TEMPERING THE ACTIVE DRY YEAST, PROBABLY BECAUSE IT SITS FOR SO LONG BEFORE BAKING SO ANY YEAST WILL HAVE TIME TO DO ITS JOB.
Like I say, it’s a very forgiving recipe.
Good morning 🙂
I looked at your picture and noticed your Le creuset lid. I thought they couldn’t go in the oven since the black handle seems to be made of plastic… Can you confirm please? Thank you !
This recipe looks really good and I can’t wait to try it. Thank you and happy new year!
B 🙂
Hi Bea, I put my lid in the oven with the knob on it. I have not had a problem with it…yet. If you are concerned, I would definitely take the knob off. I think a heat proof knob can be purchased on Amazon.
I use a metal knob that I found at the Le Creuset outlet. You can also buy online. But switch back to plastic if you are using on the stovetop, or use a hot mit… as the metal gets hot quickly!!!
Brilliant! Thanks for the great tip.
I use a very fine water sandpaper for all my pots, works amazing( the sandpaper is black)
Hi Janet, I made a loaf the other day. Came out perfect. Today, I added a jar of Olive Tapenade. I will let you know how it turns out. The first bread turned out great and I did not activate the yeast, but then again, I store it in my refrigerator and not sure if I have fast activated or not. I used parchment paper and had not problems with the bread sticking to the cast iron pot.
Any suggestions for adding strawberry and rhubarb?
What if I wanted to make a sourdough version, anyone have any tips one this?
I use between 1/2 to 1 cup of my starter discard then reduce flour and water appropriately. The discard is equal Ratio of water and flour. It workd great!
Great tip! Thank you so much.
So you’d mix one cup starter, one cup flour, and one cup water? Let rise overnight and everything else the same?
Hello and "Thanks -a-million" , I followed the instruction with one exception ,I used bleached flour as that is what I had on hand . The results were beyond my expectations.
I am a good cook and a horrible baker so I was skeptical.The loaf "fell " out of my old brick colored Le Creuset oval casserole.A miracle !
And the crust was fantastic. I was a little nervous when the dough was so stacky after i had floured it while waiting for pot to head. I may wait a little next time until 10 mins before placing in pot.
My loaf was deliberately oval to make small sandwiches.
My advice to anyone planning to try this. just follow step by step. watch oven temp , and set timer , take a deep breath and relax. Then enjoy some great bread.
All are saying the same thing repeatedly, but in your blog I had a chance to get some useful and unique information, I love your writing style very much, I would like to suggest your blog in my dude circle, so keep on updates.
Website for school uk
Has anyone tried this with Bread Flour?
YEs, bread flour works great.
One lady was concerned so she heated it from cold to 450 and it was fine….
IT is a lot safer to put the pot in the cold oven. THere is no need to put the pot in a preheated oven
I let my bread dough sit for 18 hours and it was still runny in the middle. It actually looked liquidy. Did I just not let it sit long enough? Or maybe I didn't stir it up enough?
Also, do not use a crockpot lid in the oven. I found out the hard way and the handle melted. This better be some amazing bread!!! 🙂
Those Magic erasers work well on enamel cast iron pans. Looks like new
I have tried and failed countless times trying to make bread, pizza dough, cinnamon rolls, you name it… But T H I S, is, amazing! I let my dough proof for about 20 hours and it turned out so beautiful that I almost didn't want to cut it (almost). My husband ate half the loaf. I added thyme to it and paired the bread with a similar recipe to your lentil soup – the bread was perfect for soaking up all the delicious broth. Thanks for sharing this recipe – it is definitely bakery worthy and will 'wow' my family, friends, and neighbors! (I have a few pictures of it too that I can share with you!)
I tried this bread today out of curiosity. I had to improvise, but found that I easily made a mock Dutch oven by inverting my cast iron frying pan over my cast iron chicken fryer. Easiest bread I've ever made – it has a thick chewy crust on it as good as San Francisco French bread! And.. I was raised in SF so I know this! I would like a tiny bit more sour dough flavor, but if you're a baker you need to try this once. There are variations of this with cheese, and other additions that I'll for sure be trying. I used regular yeast… didn't even proof the yeast (that's the part I missed). According to the recipe if you're not using instant or quick rise yeast you should proof your yeast. Oops.. missed that… I set the bowl near the woodstove before going to bed (it's nice and warm there). And.. with almost no effort I produced a wonderfully rustic Artisan like bread! This will be my go to bread for soup for EVER.
I SO WISH I could post a photo… but I don't see an option for that.
What about using butter or olive oil on your hands while putting the dough into the pan? And I would liberally brush the top with butter after taking from the oven…this will taste so good,but it will also soften the crust too…some of us don't care for the very hard crust.�� looking forward to making this…thanks for sharing.
We made this today and are impressed – easy, good flavor, nice texture – but the bottom of the loaf is pretty thick and hard to slice through. That wouldn't necessarily be a deal breaker for my husband and me, but our kids won't eat that part. Any suggestions?
Just tried this and it was really easy. I ended up using organic flour. Even tho it was good I could barely cute it especially on the bottom so I am not sure was it the flour or what. I followed the receipe exactly so not sure. If anyone can help I would really appreciate it.
I love this!!! Last night we started 2 baked off in afternoon today, both gone. Started more tonight with roasted garlic
Just wanted to thank you for this "life changing" recipe for me! I've been a frustrated french guy living in Canada and complaining about the bread (everything else is great in Canada but not bread) for so many years but I've just tried it and it's A-MA-ZING! Wife and kids are so proud of me, I'm the hero today thanks to you! 🙂
Just want to say that I made this bread this weekend and OMGOSH!!!!! I'm in love! I was planning on making this for Christmas gifts and wanted to try it out prior to gifting and am so glad I did. I will completely understand when the giftee slice it and butter it and then moan as they bite into it. So glad I found your recipe. Merry Christmas from Central New York!
Any suggestions for doing this low carb?
I clean all pots using Oxi-Clean. Just put a 1/4 cup or so in, fill with hot water and let it soak overnight, easy cleanup the next day. Works great on crockpots as well.
Hi Judy, Regular active dry yeast will work just fine.
i just used some dry, active regular old yeast I had in my cupboard. (The expiration was still good) Can I expect my bread to be as good as using instant or rapid yeast?
Hi Jen P: There are several comments regarding the use of a crockpot insert. I have not tried it, but it works according to all of the comments here.