What I love about this bread
- It’s so easy to make. This dough can be made in less than 5 minutes.
- The basic dough recipe can be enhanced with many different flavor varieties.
- Very little hands-on time.
- Crusty bread never ceases to impress family and friends.
- My 12-year-old grandson can make it.
Let’s make No-knead crusty bread:


- In a large mixing bowl, add flour, kosher salt, and yeast. Whisk together.
- Add water. Mix just until all of the flour has combined with the water. The dough will look like a shaggy mess. That’s ok.
- Cover the bowl with plastic wrap and let it sit for 12 – 18 hours on the countertop. DO NOT REFRIGERATE. This is not optional. It takes that much time to proof the dough. The reason why you need a large bowl is that the dough will start to rise.
- After 12 hours the dough will look like this. It’s pretty sticky, but that’s ok it’s supposed to be.
Shaping and baking the bread:


- Preheat oven to 450 degrees. As soon as it has heated to 450 degrees place your pot with the lid in the oven and preheat the pot for 30 minutes.
-
Right after you put the pan in the oven to pre-heat, dump the dough out onto a HEAVILY floured surface. Shape it into a round ball and place on a sheet of parchment paper. Parchment makes it so easy to transfer the dough into a hot pot and then remove it after baking. The parchment paper stays in the pot. This will rest for 30 minutes while the pan is heating. Cover with plastic wrap. Note: Use silicone coated parchment paper. The regular non-coated paper will stick terribly. Don’t chance it.


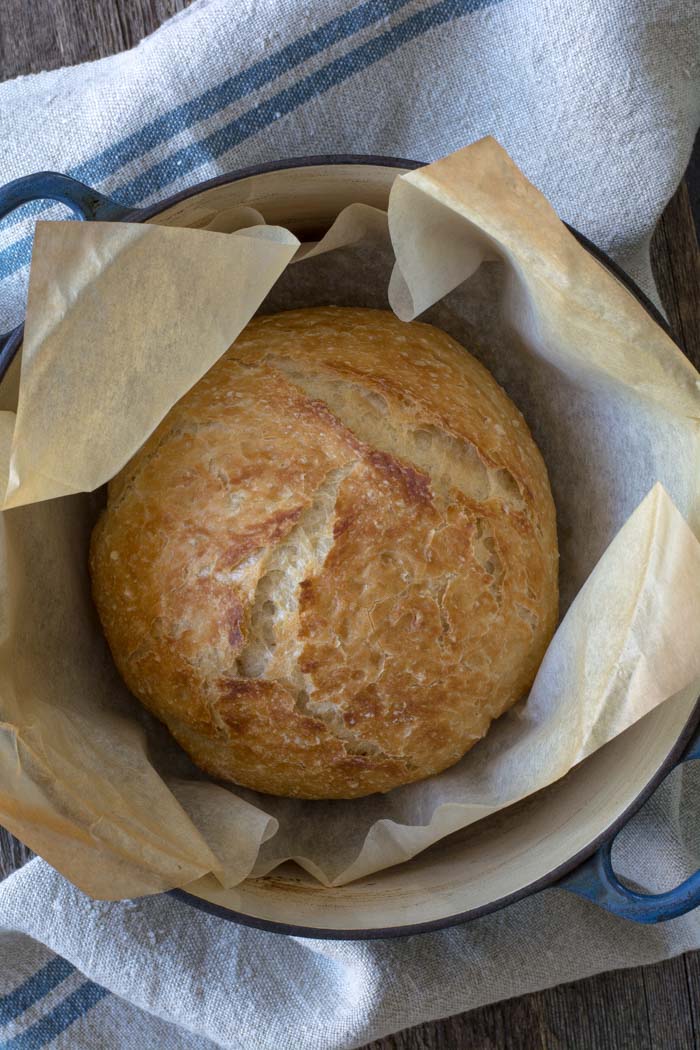
- Remove pot from the oven and carefully pick up the parchment and drop dough into the pot. Be careful the pan is HOT. Put the lid on the pot and return it to the oven for 30 minutes.
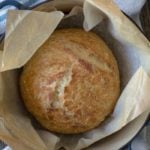
- After 30 minutes remove the lid from the pan. Bake for an additional 15 minutes or until nicely browned. You can test with an instant-read thermometer to make sure the bread is fully cooked on the inside. The temp should be between 190F and 200F degrees. Remove from the oven and carefully remove bread from the pot by lifting the edges of the parchment paper.
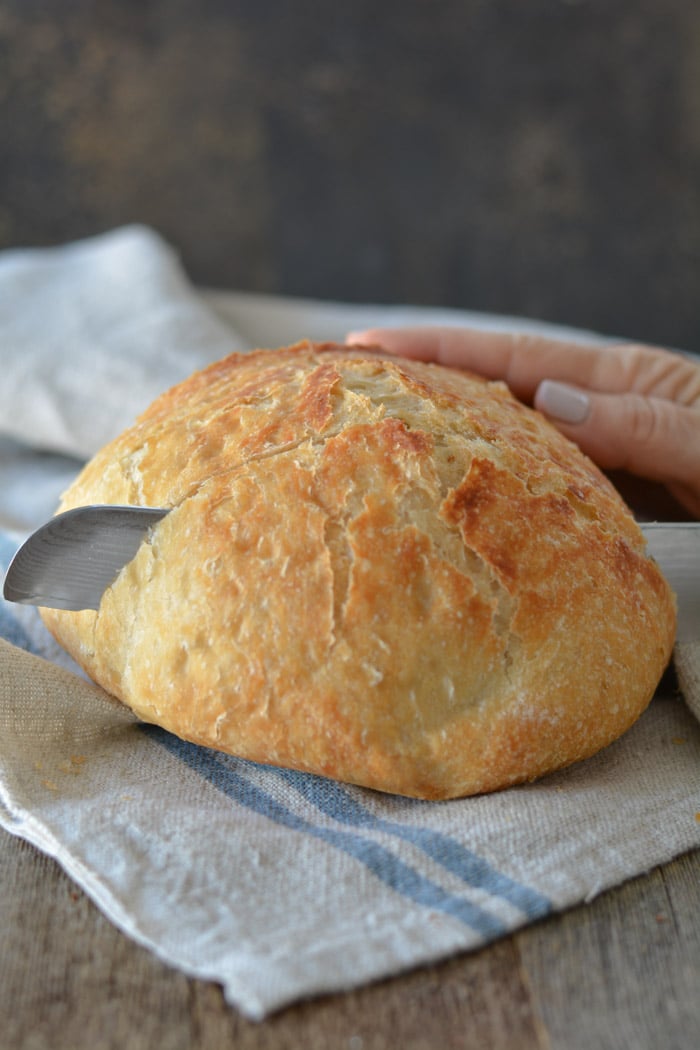
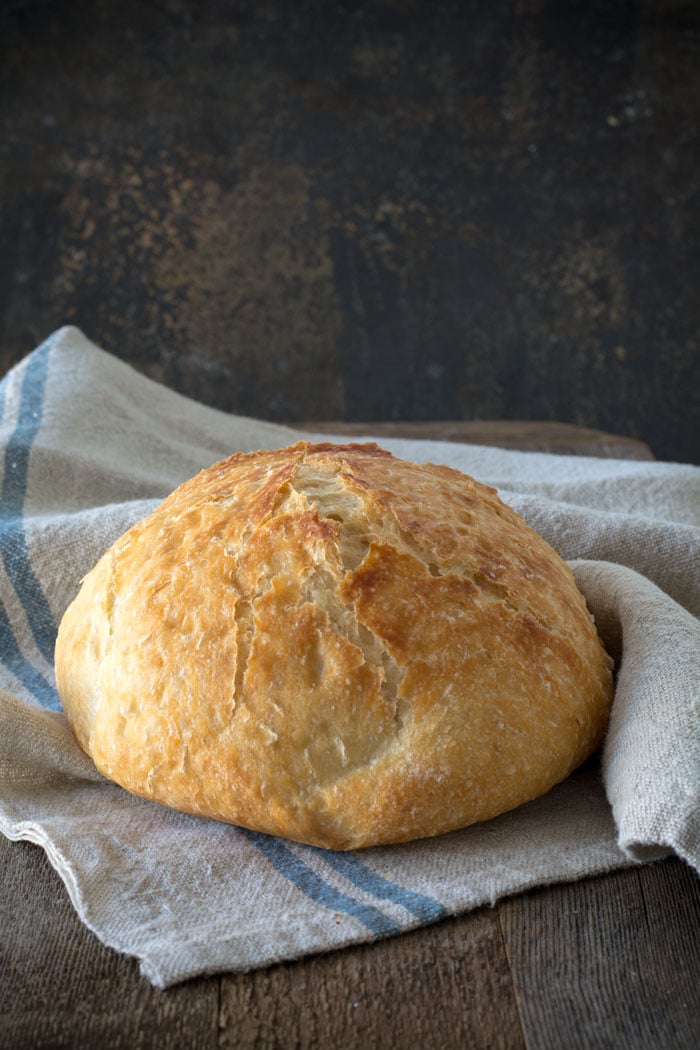
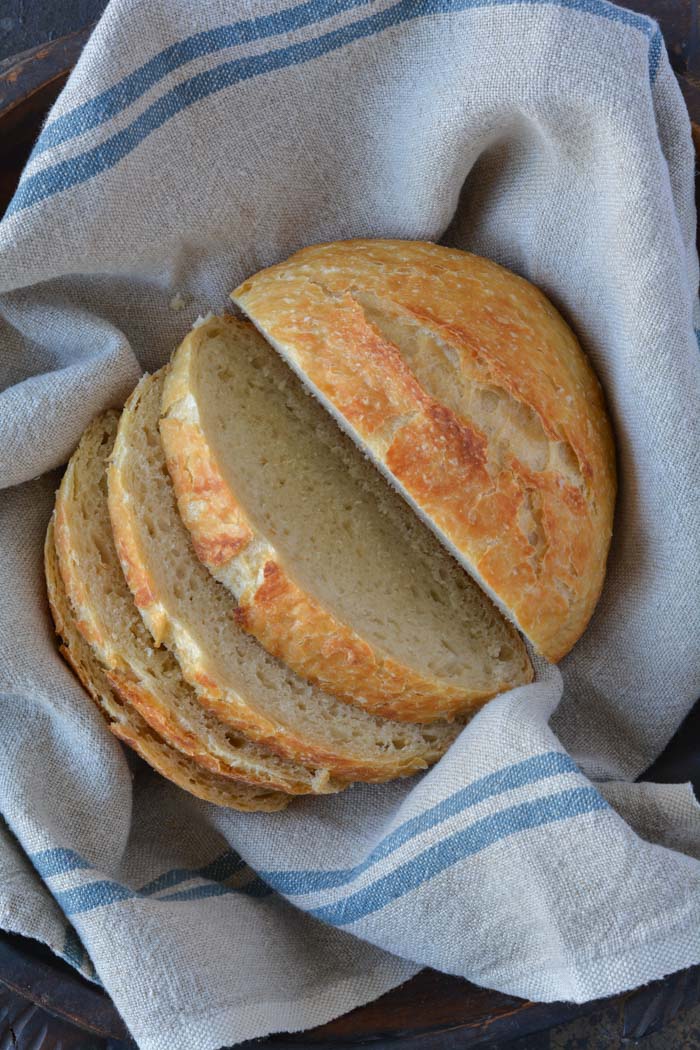
Holy cow! Can you believe how gorgeous that is? It’s best to wait for the bread to cool before slicing. Because I love warm bread I sliced it right away.
FAQ’s
Q: Do I have to use an enamel covered cast iron pan?
A: NO. You can use anything that can take the heat. The following have been used that I know of:
Clay pots with lids, Pizza stone with a bowl to cover the bread, insert from a crockpot, pyrex baking dish with a lid, stainless steel pot with a lid, baking dish covered with aluminum foil, old cast iron dutch oven.
Q: Do I have to use unbleached flour?
A: I always use unbleached flour. You can try bleached flour.
Q: Can I use self-rising flour?
A: I don’t know. I would just stick to all-purpose.
Q: What size is my pan?
A: My smallest pan is 5.5 quart. You can use as small as a 3 quart.
Q: What type of yeast do I use?
A: I use SAF instant yeast. Any yeast should work.
Q: Why is my bread turning out flat?
A: You could try using less 1/4 cup less liquid. Or add 1/4 cup additional flour. Make sure your dough appears to be dry when you first mix it. It will have more moisture during the rising time.
Q: Can my dough sit out longer than 18 hours? Does it HAVE to be between 12-18 hours?
A: I have let some dough sit as long as 24 hours and the bread was beautiful.
Q: Have you tried Gluten-free?
A: From what I hear the best GF is from King Arthur Flour https://shop.kingarthurflour.com/items/gluten-free-measure-for-measure-flour-3-lb
Q: Do I have to grease or oil the pan? Will my breadstick?
A: No you don’t need to grease the pan. I have never had the bread stick when using a cast iron pot. I haven’t tried anything else. The best way to be certain that the bread won’t stick is to form the loaf on a sheet of parchment paper and lift the bread into the pan using the sides of the parchment. Leave the paper in the pan. It’s won’t burn. When the bread has baked, just lift the sides of the parchment out of the pan. Voila! HOWEVER: Not all parchment paper is created equal. I use a silicone coated parchment paper. Regular parchment paper can stick something terrible. Don’t chance it.
No-Knead Crusty Bread
Wonderful yet easy artisan bread with a crisp crust. Prep takes just a few minutes with an overnight rise. Baked in a pot with a lid to create a steam oven. Bread can be made with many flavors and variations.
Ingredients
- 3 cups + 2 tablespoons unbleached all purpose flour (450 gr)
- 1 3/4 teaspoons Kosher salt (10 gr)
- 1/2 teaspoon Instant or Rapid-rise yeast (3 gr)
- 1 1/2 cups water cool (315 gr)
Instructions
-
In a large mixing bowl, whisk together flour, salt and yeast.
-
Add water and mix until a shaggy mixture forms.
-
Cover bowl with plastic wrap and set aside for 12 - 18 hours. Overnight works great.
-
Heat oven to 450 degrees. When the oven has reached 450 degrees place a cast iron pot with a lid in the oven and heat the pot for 30 minutes. OR pot can be placed in cold oven while oven is preheating leave in oven for 30 minutes.
-
Meanwhile, pour dough onto a heavily floured surface and shape into a ball. Cover with plastic wrap and let set while the pot is heating.
-
Remove hot pot from the oven and drop in the dough. Cover and return to oven for 30 minutes. After 30 minutes remove the lid and bake an additional 15 minutes. Remove bread from oven and place on a cooling rack to cool.
Recipe Video
Recipe Notes
FAQ's
Q: Do I have to use an enamel covered cast iron pan?
A: NO. You can use anything that can take the heat. The following have been used that I know of:
Clay pots with lids, Pizza stone with a bowl to cover the bread, insert from a crockpot, pyrex baking dish with a lid, stainless steel pot with a lid, baking dish covered with aluminum foil, old cast iron dutch oven.
Q: Do I have to use unbleached flour?
A: I always use unbleached flour. You can try bleached flour.
Q: Can I use self-rising flour?
A: I don't know. I would just stick to all-purpose.
Q: What size is my pan?
A: My smallest pan is 5.5 quart. You can use as small as a 3 quart.
Q: What type of yeast do I use?
A: I use SAF instant yeast. Any yeast should work.
Q: Why is my bread turning out flat?
A: You could try using less 1/4 cup less liquid. Or add 1/4 cup additional flour. Make sure your dough appears to be dry when you first mix it. It will have more moisture during the rising time.
Q: Can my dough sit out longer than 18 hours? Does it HAVE to be between 12-18 hours?
A: I have let some dough sit as long as 24 hours and the bread was beautiful.
Q: Have you tried Gluten-free?
A: No. I'm still waiting for someone to venture into the realm of Gluten-free. If you try it, let everyone know.
Q: Do I have to grease or oil the pan? Will my breadstick?
A: No you don't need to grease the pan. I have never had the bread stick when using a cast iron pot. I haven't tried anything else. The best way to be certain that the bread won't stick is to form the loaf on a sheet of parchment paper and lift the bread into the pan using the sides of the parchment. Leave the paper in the pan. It's won't burn. When the bread has baked, just lift the sides of the parchment out of the pan. Voila! HOWEVER: Not all parchment paper is created equal. I use a silicone coated parchment paper. Regular parchment paper can stick something terrible. Don't chance it.
More Notes:
Regular active yeast can be used in place of the instant or rapid-rise yeast. It will need to be activated in 1/4 cup warm water. Stir and let sit for 5-10 minutes. However, most of the comments I have received state that the rapid raise works the best. You choose. Whisk the flour, salt, and yeast together.


Two questions. Did you use unbleached all purpose or self-rising flour? All we use is 1 teaspoon of yeast? …ok three questions….does it have to be put together in a glass or plastic bowl? I made a batch last night…and it has not risen like I think it should.
Well my first loaf of bread just came out about an hour ago! I made it with Vermont cheddar, diced apples and prosciutto and we tried two slices when it was warm! Fantastic! Thanks for the delicious easy recipe!
FANTASTIC Bread!!! Thank you for the recipe. The whole family loved it and we plan to make some of your other variations of it. So good.
I use my magfic eraser on my pots, even my teapot, works geat
Love the idea of this recipe. Can the completed bread be frozen and "come back" as crispy and good as it went into the freezer?
Hi everyone!
I made a bread using Vermont Cheddar, diced apples and diced prosciutto! Can't wait till it bakes tomorrow! Love hearing about all the different combinations people are making! What great ideas!
Made my first loaf last weekend, loved it!
Thanks for the recipe!!!
Just read through all hundred million comments! You are a popular lady, and for good reason! Okay, I tried GF! In fact, I've been making them and selling them at our Farmer's Market for the past 4 weeks. I sell out every time! They are beautiful, but not quite as round and smooth as yours. Can't wait to try leaving it on the parchment paper, what a gooey mess!
I have to increase the water by 50% so I use 2 1/4 C water. I have tried Pamela's Bread Mix and Better Batter Bread Mix, they get pretty close to the same results. The only other alteration that I've had to make is I throw it in my stand mixer and let it go on low for 5 to 10 minutes. When it's GOOD AND BLENDED, I add the extras! The one that I came up with that sells out fastest is the "No Thyme" loaf. It has parsley, sage, rosemary and …. oregano?
WaaLa! Thanks for making "That Gluten Free Lady" look like she knows what she's doin'!
Looks yummy and I intend on making this very soon! Thanks for sharing 🙂
This may give you a hint on cleaning the pan
http://www.ehow.com/how_6723351_clean-le-creuset-pans.html
Some vinegar & baking soda works for cleaning the outside of your pans too! I can't wait to try this recipe!
i pinned this a while ago but finally made it tonight…so good!! i followed the directions and let it rise just over 18 hours. i can't wait to make it again and again. i'd like to try it with whole wheat, any advice or is it the exact same recipe?
I was wondering what size pot is needed to bake the bread in?
also from your cranberry orange bread did you used dried cranberries or what?
this is a random question but if you put cheese into the mix and leave it out for 12-18 hours, it seems that the cheese would go bad or would need to be in the fridge? i can't wait to try these different flavor combos though!
Hi Janet@simplysogood,
I had this recipe for a few days waiting to be tried. Yesterday started the recipe and just now the bread came out of oven and cooling to be eaten.
The recipe is simply simple and good, no complications at all. You were right when you said its a very forgiving simple recipe for a bread.
I made it on my pizza stone with an oven proof bowl to cover it. It worked well . The bread has risen good except that the bread is slightly less brown on outside than yours. I can't wait to try the bread and experiment with more flavours. Thanks agian for the recipe its my first successful bread. It will only encourage me to more baking.
You had mentioned on knowing how to clean your cook ware… My mother raised us on "Cameo". She has a set of Permanent Cook-ware and will not use anything else on it. It is a very good cleanser that is not abrasive; although, it is in powder form. We use it on everything, even my cast-iron skillets. If you have a stain, make a paste with the Cameo and your liquid dish soap and apply; let this set for 10-15 min and wash off. I personally use a plastic scrubber, but my mother uses a dish cloth. You don't have to use a lot of elbow-grease, either. You should try it. You will be amazed.
Don't know if you still get the comments, but I have a question. I followed these instructions, adding handful of sugar, raisins, and some cinnamon. The dough rose wonderfully overnight, but when I dumped the dough out to prepare it into a round loaf, it won't hold any height. It's like it's too soft, and keeps spreading out like a puddle. Not horribly (I can get about 2" height) but its definitely much flatter and than the pictures above.
Any suggestions? The only thing I know of that may be unusual is I used press-n-seal which sealed tightly to the container edges, so after rising, when I opened the container it still smelled very strong of the fermenting yeast – to the point it burned my nose. Would this affect anything in a negative way?
The yeasty smell could come from the additional of sugar and raisins. Sugar will feed the yeast. You could reduce the amount of yeast to 1/4 teaspoon or not let it rise as long. Try adding 1/4 – 1/2 cup more flour. I hope this helps.
6.5 qt enamel coated cast iron pot for $40 at sams club!!!! I will be baking my bread tomorrow. Hooray!!!!
I love this bread !!! Thanks so much for sharing this recipe. I made it 2 times. 1 time plain, it was wonderful, like some kind of Italian bread. Second time with whole weat. Was delicious too but it didn't rise as much as the first one. Today I tried it again and it was very wet ??? It was really runny. I will put it in the oven now and see how it turns out. I put some sunflower, pumpkin and pines in it.
Have a great day.
Laura
I am a little slow to the whole pinterest phenom, but alas I found your bread. Made my first loaf last night/today and when I pulled it out of the oven I could not even get a picture or let it cool my husband and eleven year old daughter had eaten the loaf within an hour with butter running down their chins…..Best bread recipe ever!! By the way I used a pyrex with foil and it turned out great!! I have three loaves on the counter for tomorrow!! Thanks for the recipe it is truly easy and wonderful!!
Janet, I don't know if you are following comments any more but I made this bread today and must say that it is awesome…..the crust is perfect. Thanks for posting all the info that helped me with this EASY project.
YAY!!! I'm so excited! My daughters (7 and 2) made two loaves last night (Cranberry/Orange/Almond and Plain) and baked them today. They look AMAZING! Can't wait to try other flavors.
I just purchased a porcelain enamel lined cast iron pot with lid, but the package states that the handle on the lid is oven-safe up to 350 degrees. Maybe not the right pot for this bread?? Wondering if I can use my pizza stone with a stainless steel bowl to cover the bread. Any insight?
Hi, I really want to make this bread but at the moment all I have is a 2L stainless steel pot with lid. I was wondering if that is big enough and if not, what size should it be? Thanks!
Where did you get your lovely towels you gifted your beautiful bread in?
Mine tured out PERFECTLY! I've mixed things up here and there and added some Italian herbs and a some cheese… it mades a great Italian bread too!
I used this recipe with whole wheat flour.. again, PERFECT!
Occassionally I clean my beautiful pot with an SOS pad. Works great.
AmyApril 22, 2012 9:28 AM
Any idea how this would work with gluten free flour? I think I am going to try it with an all purpose gluten free flour blend and see how it works out. This looks so awesome. I can't wait to try it both with gluten free flour and regular flour. I love bread!!
DID YOU TRY THE GLUTEN FREE??
I made your Cranberry, Orange, and Almond loaf following all your directions except I used 2 cups of Whole Wheat Flour and 1 cup of Nutri Blend Flour, the bread turned out better than I even thought! Great recipe, will make again
This was so good I had to blog about it. Thanks so much! Was great!
My bread burnt & stuck to the pan. I have the Costco version of la creuset. Anyone else use this & have problems? Not sure what it could be, I followed the recipe exactly. Very bummed I was looking forward to it. 🙁
baking soda and vinegar are awesome cleaining tools!!!
I tried this today and followed the directions to the letter and was so excited…couldn't quit eating it…it was perfect!!! Thanks so much…I am a rookie in the kitchen and this felt so good…
@janet – to clean your preciouses, try a peroxide and baking soda bath.
Made the bread today-it was beyond delicious! Everyone thought I bought it from Panera!
Never made a loaf of bread before. Finally got around to trying this recipe. It was extremely easy and turned out great.
I used Courtney's whole wheat flour suggestion: "I used 1/4 cup flour less and 1/2 cup more water and cooked it 5 less minutes." and added cranberries, pumpkin seeds and sunflower seeds. I don't have any fancy expensive bakeware, so I just used a baking sheet (a round one made for pizzas) and a pyrex glass dish over the top as a lid. grease the glass dish because mine stuck to a bit of one side as it expanded 🙁 The bread was a little undercooked and pretty dense. tasty though. Will try again with the original recipe.
You can use any stovetop or oven cleaner to clean your dutch ovens. Just make sure to use one that is safe for enamel. Spray it on, let it set for 10-30 minutes, and wash it off (thoroughly, oven cleaner is toxic). It works for my "babies" 🙂
I just made a Wisconsin cheddar loaf and the cranberry/orange/almond loaf and topped it with an orange glaze. OH. MY. GOSH. I was pratically weeping with joy as I tried each of them. I can tell I'm going to be going through a lot of flour in the near future!! LOVE this recipe! 🙂
I have made this 3 times and it has always turned out wonderfully. Love this recipe. I used my son's Le Creuset pot the first time, after that I used a ceramic pot made by Paula Deen that I bought for about $25.00. It works well. I do have a question…by "instant yeast" do you mean rapid rise? I have always used regular yeast, and it has always turned out great. I have run out of that yeast but have lots of the rapid rise kind.
TLC
I have a large aluminum stock pot which I have used to bake this bread. My first loaf didn't even reach the sides so my loaf was a little too spread out and flat. (It also could be the fact that I didn't use instant yeast, so I'll activate it next time.) I would like to try doubling the recipe and cooking it all into one, large loaf. Do you have any idea if this would work or if the ratios would be off? Any recommendations you can give would be much appreciated! This recipe and your blog have been incredibly helpful for me as I try bread making for the first time!
Try cleaning your pots with a Mr. Clean Magic eraser. I think I will try this recipe with jalapenos. I have a oval pot like your round one, will this work?
I just ate my first slice of the No Knead Bread. It was fantastic! I can't wait to try adding different ingredients. The bread is soooo easy to make. Thanks for the recipe!
This turned out awesome in my lodge cast iron dutch oven!!! Putting this in my recipe book for keeps!!!
I have made Asiago,sun dried tomato and basil; oil cured olive, fresh parmasean and roasted garlic; dried apple,cinnamon and walnut; lemon, dried blueberry and almond. All were fantastic. Amazing recipe.
Thank you for this awesome recipe. I live on the west coast and find I need to use about 1/4 cup more of water. Also tried and prefer 2 tbsp. of chia seeds added to the dough, thus making it healthier.Did have a problem incorporating the fruit and nuts to the dough before baking, so will try to add them in the initial mix before the water. I USED the bread machine to mix my breads before baking in the oven…this is so much nicer. Pat
Bar Keepers Friend is a cleanser that will remove the carbon grease from your cookware. It doesn't scratch and is safe to use on Stainless, Glass and Ceramic. You can find it near the Comet or Ajax at your local store. One of those old fashioned products that you would overlook due to the non fancy label/container.
Didn't read all through the comments to see if it has been mentioned, but Bar Keepers Friend is a cleanser that will clean the carbon grease right off of your cookware. It can be found near the Comet and Ajax in the cleaning section of most stores. It will not scratch and can be used on stainless, glass, ceramic, etc.
Looking forward to making the bread.
This has been a huge hit among my friends, & now many of them make it. My favorite variation is adding some rosemary to the dough, and drizzling some olive oil on top after I've dropped it in the pot, before the final baking. Then a sprinkle of sea salt. A friend has added cinnamon & sugar for a sweeter finish. YUM!
Made this over the weekend and loved it! Now, I just wish I had more than one LC dutch oven to use, so I could do more than one loaft at a time. But I'll work on that!!
Good bye bread machine! My family loves this bread. I tried making the orange cranberry gluten free with success. Of course sub a good GF bread flour blend. I added 1/2 tsp of xantham gum, 1/2tsp more yeast ( I may try a full tsp extra next time),1 tbsp of brown sugar. When shaping the dough, GF dough is much less elastic than reg bread dough, so I shaped it a little more flat than round. I was impressed with the rise, unusual for GF dough, and the taste is great. Next time I will bake it covered for the entire time to see if the inside will become a little fluffier and the outside less dark. Overall, I am very satisfied with how it turned out.
Made this bread today and it was amazing!!! can't wait to make again!
I made this bread today and it was so easy and tastes amazing! can't wait to play around with cheeses and other spices in the next batch!!
Thank you for all you positive comments. I'm happy to hear of the success most of you are having. I hope I can answer any questions from previous comments.
-You can make individual rolls I used and pizza stone to do this. Here is the link: http://simplysogood.blogspot.com/2012/05/another-use-for-no-knead-bread-dough.html You can also try baking them in the pot. I would reduce the cooking time to about 20 minutes covered then check them after uncovering for 10 minute or until golden.
– I don't know what a "Celebrating Home Bean Pot" is. I haven't heard of it. It should work as long as it can take the heat.
WOW!! I have got to try this recipe. I read the comments and figured it hs got to be almost fail safe. Thanks I have been looking for a no knead recipe that was easy for a long time. Thanks Janet for posting it.
I love this bread! I borrowed my Sister's Le Crueset to make it several times but eventually she demanded I return it. LOL So, I went on a quest to find a suitable pot since Le Crueset are expensive. I purchased a Lodge Cast Iron, it worked well but needs tender loving care after each use. I haggled on Ebay for a used Le Crueset and did win an old beat up pot it works like a dream. Finally, I was turned-on to a pot that Walmart sells and America's Test Kitchen approved. It's the Tramontina Enameled Cast Iron Dutch Oven which works like a dream and the price is incredible.( under $40) Thanks, Janet for the recipe and did I mention, "I love this bread!."
Love this bread! I recently purchased a Tramontina Cast Iron Enameled Dutch Oven from Walmart. I've used it three times already with great success. I requires hand scrubbing afterwards and I recommend Scotch Brite rescue pads. If I haven't said it already, I love this bread!!!
Just wanted you to know…I was very skeptical!! On my first attempt, I made a plain loaf and another with parm cheese and sundried tomatoes. I must say they looked beautiful and tasted even better! My family was in heaven. I couldn't wait to make another two loaves the following day; another sundried tomato and one with rosemary and garlic. They are sitting on my counter at the moment. Thank you so much:)
I was wondering if you can make individual rolls with this recipe? I have a giant enamelware roaster that I could use. I used my smaller enamelware pan for the bead and it turned out better that I expected! My husband loved it!
I made this in my enamelware pan not cast iron, but it worked beautifully! This was the best bread I have ever made….I make fresh bread every other day…no preservatives! My husband loved it, I just added cheese and it turned out the best. Thank you!!
Love this recipe! I have been using Bon Ami to clean my Le Creuset for over 30 years. Works great.
I apologize if this has been asked and I missed it… I tried to read through most all of the comments. Has it been tried in a Celebrating Home Bean Pot? I have a 4 quart one I would really like to try it with. Also, if using a crockpot insert, do you use the regular kid for it or better to cover with foil?
I am so excited to try this! Thank you so much for sharing and for sharing all the ideas on flavors! 🙂
Alicia
First of all thank you for your post. This bread looks amazing! I'm especially fond of orange and cranberries and will try that one immediately!!!
Second, I clean my Le Creuset pots with a mix of baking soda and a drop of dishwashing liquid. No chemicals like ammonia!
Try liquid Bar Keepers Friend on your well used pots and pans. Works very good for mine.
I have made about 25 trips to Europe. When I come home I always go through "withdrawal" because you cannot find good bread in this country. WELL! I have now made this bread about 10 times and it is the BEST bread ever…My husband and I are so in love with this bread. Thank you thank you thank you for sharing this recipe!!
Hi – loved your recipe so much I wrote a review on it –
http://blossomathome.wordpress.com/2012/09/19/who-can-resist-beautiful-crusty-loaf-of-bread/
I've just started making my own bread. Found this on pinterest and I don't think I'll bother to bake anything else for a long while. This is sooo easy and totally delicious and hubby seal of approval!! Asked me to make it again ASAP!
I used a camp Dutch oven and it was perfect. Today I put it in a loaf tin inside the Dutch oven – prefect again!! Now to experiment with different flavour combos!
Thank you so very much. As I looked at your recipe, I kept thinking, "It just can't be this easy. No kneading??" I made the recipe exactly per your instructions. Thankfully, my mother-in-law left me a La Crusette Pan, it's even blue! So, last night, I put the ingredients together….shaking my head, thinking, this just isn't going to work. This morning I baked it, again exactly per your directions. What I got was a beautiful loaf of hearty bread!! I was actually jumping for joy!! Couldn't wait until it cooled down enough to cut. Lathered on some butter, took my first bite, and I was in Heaven. I have already shared some with my neighbor (otherwise I would sit and eat the whole loaf). Can't wait to give to the neighbors for the Holidays–trying different mixtures. It will be so good with winter soups and stews. Definitely one of the best Pinterest recipes ever. Thank You. (by the way, my Dad was a baker—-so I know good bread!!)
I made a cinnamon raisin one and when I put it out on the board I put two layers through the bread of brown sugar,nutmeg,and cinnamon mixture. Just folded the bread over twice layering the mixture, then made it into a round covered it with plastic wrap and let it rise another 2 hours before baking it. It is absolutely delicious!! Best and easiest bread I ever made!!!
To clean your pans, try a paste of baking soda on a damp sponge (when the pan is not 450 degrees!). If you have soaked the outside of the pan in water for 15-30 minutes before you start, it will probably work even better.
Hi there! I read through all of the comments but didn't see anything about this, but if you wanted to bake this recipe as rolls, would you put the rolls in the dutch oven as well, or just do them on a baking sheet?
Have you tried a paste of cream of tartar and water to clean the gunk on your pots? Works well on anything that gets gunked up!
How has the worked in the crock pot insert?
try cleaning your pans with barkeepers friend, it works wonders! I use it on my Le Creuset pans all the time.
– The stone does work and the glass lid should be just fine.
– when doubling the recipe go ahead and double the water also. Personally I would bake two loaves separate rather than baking one huge loaf. Just to prevent the middle from being too doughy.
-You can make rolls. I made rolls, but used a pizza stone. They take about 15-20 minutes depending on how large you make them.
– The pan is heated sufficiently by putting it in the oven when preheating. Both ways work well.
Thank you for all your fabulous comments and ideas. You are wonderful bakers.
I just found on the stonedine website that they should be in the oven if its hotter than 350. Any suggestions?