What I love about this bread
- It’s so easy to make. This dough can be made in less than 5 minutes.
- The basic dough recipe can be enhanced with many different flavor varieties.
- Very little hands-on time.
- Crusty bread never ceases to impress family and friends.
- My 12-year-old grandson can make it.
Let’s make No-knead crusty bread:


- In a large mixing bowl, add flour, kosher salt, and yeast. Whisk together.
- Add water. Mix just until all of the flour has combined with the water. The dough will look like a shaggy mess. That’s ok.
- Cover the bowl with plastic wrap and let it sit for 12 – 18 hours on the countertop. DO NOT REFRIGERATE. This is not optional. It takes that much time to proof the dough. The reason why you need a large bowl is that the dough will start to rise.
- After 12 hours the dough will look like this. It’s pretty sticky, but that’s ok it’s supposed to be.
Shaping and baking the bread:


- Preheat oven to 450 degrees. As soon as it has heated to 450 degrees place your pot with the lid in the oven and preheat the pot for 30 minutes.
-
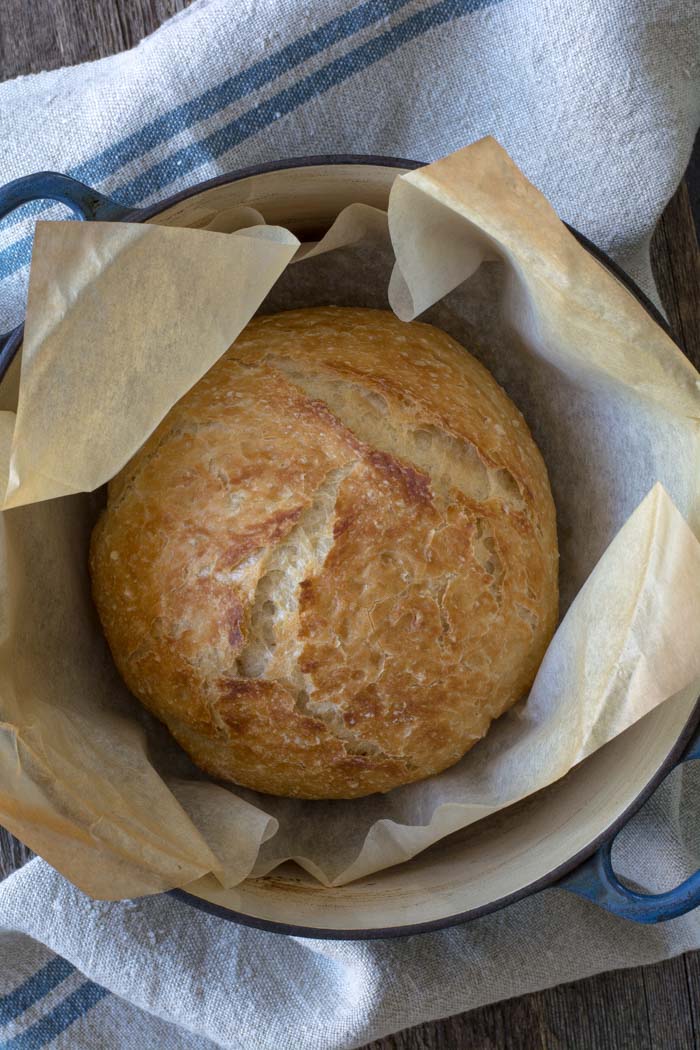
Right after you put the pan in the oven to pre-heat, dump the dough out onto a HEAVILY floured surface. Shape it into a round ball and place on a sheet of parchment paper. Parchment makes it so easy to transfer the dough into a hot pot and then remove it after baking. The parchment paper stays in the pot. This will rest for 30 minutes while the pan is heating. Cover with plastic wrap. Note: Use silicone coated parchment paper. The regular non-coated paper will stick terribly. Don’t chance it.


- Remove pot from the oven and carefully pick up the parchment and drop dough into the pot. Be careful the pan is HOT. Put the lid on the pot and return it to the oven for 30 minutes.
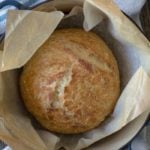
- After 30 minutes remove the lid from the pan. Bake for an additional 15 minutes or until nicely browned. You can test with an instant-read thermometer to make sure the bread is fully cooked on the inside. The temp should be between 190F and 200F degrees. Remove from the oven and carefully remove bread from the pot by lifting the edges of the parchment paper.
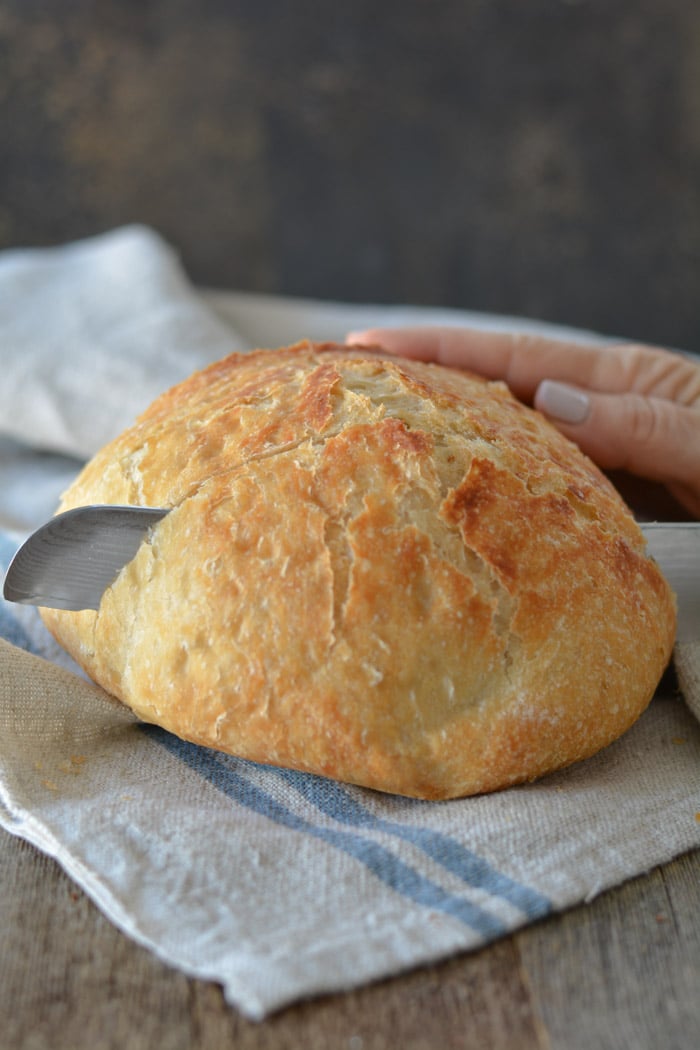
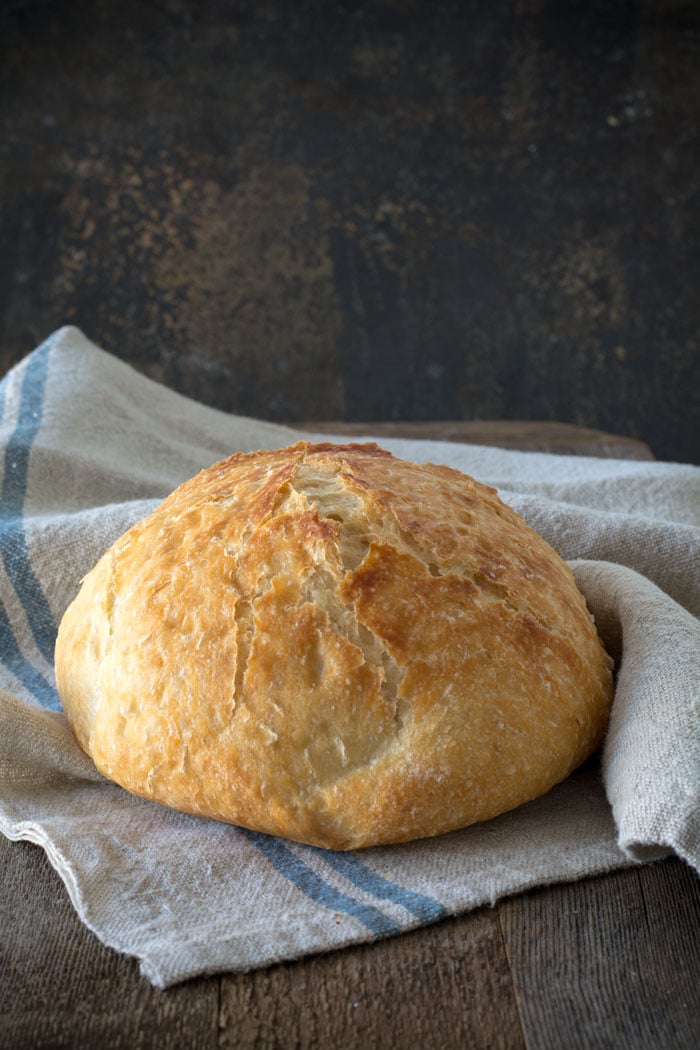
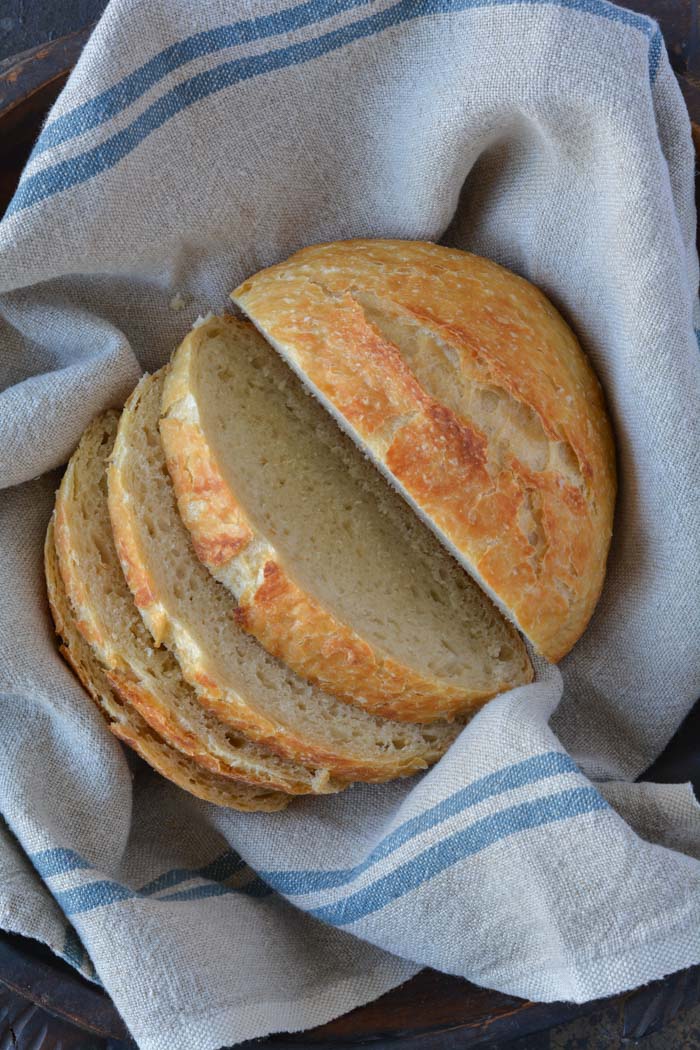
Holy cow! Can you believe how gorgeous that is? It’s best to wait for the bread to cool before slicing. Because I love warm bread I sliced it right away.
FAQ’s
Q: Do I have to use an enamel covered cast iron pan?
A: NO. You can use anything that can take the heat. The following have been used that I know of:
Clay pots with lids, Pizza stone with a bowl to cover the bread, insert from a crockpot, pyrex baking dish with a lid, stainless steel pot with a lid, baking dish covered with aluminum foil, old cast iron dutch oven.
Q: Do I have to use unbleached flour?
A: I always use unbleached flour. You can try bleached flour.
Q: Can I use self-rising flour?
A: I don’t know. I would just stick to all-purpose.
Q: What size is my pan?
A: My smallest pan is 5.5 quart. You can use as small as a 3 quart.
Q: What type of yeast do I use?
A: I use SAF instant yeast. Any yeast should work.
Q: Why is my bread turning out flat?
A: You could try using less 1/4 cup less liquid. Or add 1/4 cup additional flour. Make sure your dough appears to be dry when you first mix it. It will have more moisture during the rising time.
Q: Can my dough sit out longer than 18 hours? Does it HAVE to be between 12-18 hours?
A: I have let some dough sit as long as 24 hours and the bread was beautiful.
Q: Have you tried Gluten-free?
A: From what I hear the best GF is from King Arthur Flour https://shop.kingarthurflour.com/items/gluten-free-measure-for-measure-flour-3-lb
Q: Do I have to grease or oil the pan? Will my breadstick?
A: No you don’t need to grease the pan. I have never had the bread stick when using a cast iron pot. I haven’t tried anything else. The best way to be certain that the bread won’t stick is to form the loaf on a sheet of parchment paper and lift the bread into the pan using the sides of the parchment. Leave the paper in the pan. It’s won’t burn. When the bread has baked, just lift the sides of the parchment out of the pan. Voila! HOWEVER: Not all parchment paper is created equal. I use a silicone coated parchment paper. Regular parchment paper can stick something terrible. Don’t chance it.
No-Knead Crusty Bread
Wonderful yet easy artisan bread with a crisp crust. Prep takes just a few minutes with an overnight rise. Baked in a pot with a lid to create a steam oven. Bread can be made with many flavors and variations.
Ingredients
- 3 cups + 2 tablespoons unbleached all purpose flour (450 gr)
- 1 3/4 teaspoons Kosher salt (10 gr)
- 1/2 teaspoon Instant or Rapid-rise yeast (3 gr)
- 1 1/2 cups water cool (315 gr)
Instructions
-
In a large mixing bowl, whisk together flour, salt and yeast.
-
Add water and mix until a shaggy mixture forms.
-
Cover bowl with plastic wrap and set aside for 12 - 18 hours. Overnight works great.
-
Heat oven to 450 degrees. When the oven has reached 450 degrees place a cast iron pot with a lid in the oven and heat the pot for 30 minutes. OR pot can be placed in cold oven while oven is preheating leave in oven for 30 minutes.
-
Meanwhile, pour dough onto a heavily floured surface and shape into a ball. Cover with plastic wrap and let set while the pot is heating.
-
Remove hot pot from the oven and drop in the dough. Cover and return to oven for 30 minutes. After 30 minutes remove the lid and bake an additional 15 minutes. Remove bread from oven and place on a cooling rack to cool.
Recipe Video
Recipe Notes
FAQ's
Q: Do I have to use an enamel covered cast iron pan?
A: NO. You can use anything that can take the heat. The following have been used that I know of:
Clay pots with lids, Pizza stone with a bowl to cover the bread, insert from a crockpot, pyrex baking dish with a lid, stainless steel pot with a lid, baking dish covered with aluminum foil, old cast iron dutch oven.
Q: Do I have to use unbleached flour?
A: I always use unbleached flour. You can try bleached flour.
Q: Can I use self-rising flour?
A: I don't know. I would just stick to all-purpose.
Q: What size is my pan?
A: My smallest pan is 5.5 quart. You can use as small as a 3 quart.
Q: What type of yeast do I use?
A: I use SAF instant yeast. Any yeast should work.
Q: Why is my bread turning out flat?
A: You could try using less 1/4 cup less liquid. Or add 1/4 cup additional flour. Make sure your dough appears to be dry when you first mix it. It will have more moisture during the rising time.
Q: Can my dough sit out longer than 18 hours? Does it HAVE to be between 12-18 hours?
A: I have let some dough sit as long as 24 hours and the bread was beautiful.
Q: Have you tried Gluten-free?
A: No. I'm still waiting for someone to venture into the realm of Gluten-free. If you try it, let everyone know.
Q: Do I have to grease or oil the pan? Will my breadstick?
A: No you don't need to grease the pan. I have never had the bread stick when using a cast iron pot. I haven't tried anything else. The best way to be certain that the bread won't stick is to form the loaf on a sheet of parchment paper and lift the bread into the pan using the sides of the parchment. Leave the paper in the pan. It's won't burn. When the bread has baked, just lift the sides of the parchment out of the pan. Voila! HOWEVER: Not all parchment paper is created equal. I use a silicone coated parchment paper. Regular parchment paper can stick something terrible. Don't chance it.
More Notes:
Regular active yeast can be used in place of the instant or rapid-rise yeast. It will need to be activated in 1/4 cup warm water. Stir and let sit for 5-10 minutes. However, most of the comments I have received state that the rapid raise works the best. You choose. Whisk the flour, salt, and yeast together.


LOVED this recipe. thanks so much for posting!!
I hope I can answer everyone's recent questions. Thanks to everyone for sharing their great success stories and great addition ideas. They all just sound fabulous.
Katie – I think you should be ok with your bread rising for 30 hours. I have let mine dough go a bit longer than 24 without any problems. Please let us all know if you think the bread tastes too "yeasty". One option is to make it in the morning and add 2 teaspoons of red wine vinegar. Let set out for the day. I have tried this and it works just great. It was an idea from Jim Lahey the no-knead guru.
Kara – I generally add 2 tablespoons of poppy seeds, around 1/4 cup sunflower seeds. I pretty much just start tossing in a handful of this and that. I should really be measuring for informational purposes. Just start tossing and it will be great.
Thank you everyone for sending me cleaning ideas. My pots are looking new again. I just recently heard FABULOUS news. SLC is getting a LeCreuset outlet. BAHHHHHHH!!!!!! Actually I don't need any more, but still…..
Have you posted the recipes for the variations on your blog? I'm wondering how much of each seed (sunflower, poppy…)I should put into the mix.
Thanks
By far the best bread Ive EVER made, used mustard seeds and caraway seeds. Was AMAZING, kids had seconds! thank you SOOOOO MUCH!
So I came home and got over-anxious about making this great bread, mixed up the dough and realize it's going to be at least 30 hours before I bake it if I don't get up in the middle of the night to bake it before work tomorrow. Will it kill the yeast? OVERproof? Or should I bake it at 12 hours instead? I COULD do that but it will still be so late and will have to wait until tomorrow to be eaten. Suggestions?
Thanks so much for posting your great recipe and pics…going to troll around the rest of your blog!!
I can't wait to try this bread recipe!
As for getting your cook-ware clean, the Mr. Clean Magic Eraser will do the job! I learned that trick from my Mother-in-law who cleans for a living 🙂
Yes. I leave my bread out on the counter even if I put cheese in it. No problems so far. The bread tastes great and no one has gotten sick or died.
do you leave the bread on the counter when you add cheese to the dough? i did so last night but my dough smelled a little sour so i'm not sure if its bad, it looks good and the plain versions have been fantastic.
I just took my first one out of the oven… lemon Basil o so yuuum and warm. Thanks for passing knowledge
I just put the pot into the oven before I turn the oven on. So it get an extra 10 or 15 minutes of being heated. No big deal.
I have to comment just because I've made this a couple times using regular Bleached All Purpose flour. The bread comes out fine, but a little flat. For the first time, today I made it with the unbleached flour. It makes ALL the difference. WAY better: the yeast reacted with the flour, it rose a good bit in the sitting process, then rose even more during the baking process. Unbleached flour isn't more expensive at my grocery store, so it's totally worth it!
You asked for ideas on how to clean your pots. I have used Easy-Off oven cleaner on my Pyrex bakeware, that might be worth a try. I no longer have Le Creuset pots so don't know if this would work on them or not. I have the old fashioned cast iron dutch ovens and love them.
Just pulled my first loaf out of the oven: HOW AMAZING IS THIS!!! Finally, a way to have decent artisanal bread at home. I used a combo of white and "white whole wheat" flour. Came out just like the picture above! THANK YOU THANK YOU THANK YOU for this recipe!!!
I used King Arthur's whole wheat flour and followed the same recipe and it turned out great! Great recipe, thanks for sharing!
I cannot WAIT to try this bread. Thanks for sharing! I researched and found the original recipe post, btw. In case you want to link to it, it's here: http://www.nytimes.com/2006/11/08/dining/081mrex.html
regarding your pots – I have one of these and I fill the sink with hot water, put in my pot so that it's completely covered and add 1 Finish Quantum with powerball dishwasher tablet. Do not scrub the pot – just toss the dishwasher tablet in the water and leave it overnight. In the morning, your pot is squeaky clean – just wipe with a cloth and rinse well with warm water. Magic!
I received a question asking what difference the lid makes in the outcome of the bread. The lid creates a mini steam oven inside your oven. Steam is what helps create a crisp crust like an artisan bread. If you don't have a lid for your pot, try crimping a piece of aluminum foil on your pot. I have tried many recipes for an artisan bread. Many require a small pan in the bottom of the oven filled with water to create steam for a crisp crusty exterior of the bread. I just couldn't get this method to work for me. The lid on the pot does the trick.
I work for a well known store that sells LeCrueset pans and we always recommend Barkeepers Friend to clean the enamel pans. Just wet the area to be cleaned and sprinkle the magic Friend on and let it sit for a couple of minutes. Scrub and rinse, shiny and sparkly!
How important is it to use a lid when baking this bread. I've been making this bread for about a year with a cast iron skillet and no lid. The bread is great without a lid. How does using a lid improve the bread? I'm always looking for way to improve it.
Thank you ALL for such wonderful comments. I LOVE hearing what fabulous bakers you are and the creations you are making. Bravo! I'm sorry not to answer each individually, but I'm getting so many comments I'm having quite a time responding to them all. If you have any specific questions please send me your email address (it won't be published) and I'll answer them directly.
Answer for poppy seed bread: You can add a couple of tablespoons of sugar to sweeten the dough if you'd like. I would add the zest from an entire lemon for the lemon flavor. It will not be like a sweet bread, but should be fabulous. Best of luck.
Keep the comments coming.
Baking soda dipped in a sponge will take care of your pots … cleans mine every time. And, I LOVE my Le Creuset pot … I call it my "happy pot"
thanks for sharing a wonderful recipe!
Regarding cleaning: I read in a post here on Pinterest that Tea Tree Oil will take off all the gunk…maybe you could do a search for it for the exact details.
I made your bread using the cranberries, lemon and almonds. OMG! It turned out superb! I could eat the whole loaf. I can never make bread (seriously)!!! It was so easy and so awesomely good! Thank you and look forward to other blogs from you. Your descriptions and photo help a lot. Thank you! Thank you!
Hello, this is Jane from Florida. I just wanted to say thank you for this recipe. I discovered it on Pinterest and have made bread successfully twice now and shared the recipe with several baseball moms. Just yesterday I took cheese bread to a game, to rave reviews. We love it.
I baked in my OLD cast iron kettles. Never thought I'd bake bread let alone use these pots for anything other than a soup or stew.
You were right, when I took off the lids I almost broke my arm patting my self on the back.
But when my husband took his first bite and said "heavenly", I knew I had to send you a note.
Can't wait to do a cheddar, and a rosemary. Maybe a blue cheese and a dill, oooo what about…………
You can buy one of these enamel covered pots at Costco for really cheap. It's costsco's brand (kirkland) but the quality is excellent. I can't recall exactly how much I paid but it was between $30-50.
Hi, I had heard of no-knead bread for a while, even tried something that was close to it but didn't really succeed (I had no pot at the time, so I just used a baking sheet on the oven tray and an oven-proof bowl of water – didn't turn out as expected, my dough was too wet but we ate it anyway, it was not too bad just flat).
Then I bought a Pyrex pot but used it just now, two years later ! In fact a UK blogger put up a link to your site and what inspired me was the possibilities of flavors (and the fact that you seem to make it less of a hassle than on the original site, the NY times).
So this time my dough is still too wet, but we'll see and next time I'll try walnuts and cheese. I also love poppy seeds sprinkled on top of the dough just before cooking.
If it's a success, I'll link to your blog. Thanks for the great ideas !
This is the most amazing bread ever! I will never buy bread at the store again. My favorite flavor that I have made includes rosemary, tad bit of garlic and a pinch of oregano. So yummy with olive oil for dipping! I plan on making many for my wedding guests… Love your blog – plan on stopping by all the time!
I just found this from Pinterest. I read it Wednesday and my second loaf just came out of the oven. I'm getting rid of my breadmaker now. I will never need it again, since this is easier, makes better tasting bread, and takes up far less space!
Ok let me start off by saying I have never made any kind of breads before other than banana nut bread but I do not consider that as actually making bread. With that being said I took my chance and threw caution to the wind and Im so glade I did ! I made this bread last night and let it proof like you said and WOW it is so beautiful!!! I made just the plain kind but next time Im adding cheese! Thank you so much for this easy and good recipe!
Thank you. My kids were a bit skeptical. But this Mama knows a good thing when she sees it…lol.
This looks so delicious! Can't wait to have a go myself 🙂
Simply Fantastic, Thank for sharing this great recipe. It works every times. All my friends are impressed. everybody say " it is so hard to make bread…
I saw this recipe…will definitely try it
I have several enamel cast iron pots…My husband is a contractor. One day I was cleaning
a new home for closing and the kitchen sink was grimy after sub-trades had left and had put
their greasy tools in the sink so as not to scratch the counters. Didn't have anything to
scrub the sink with but I found a package of "sanding sponges" in my husbands stuff. I wet
the sponge and at first it was hard and difficult to squeeze but it got softer…put a bit
of dish detergent on it and proceeded to gently scrub the sink. It came out perfect. I now
use them for cleaning all my stainless steel pots to shine..even use them to clean my glass
cook top..just water and dish detergent and gentle circles…works great on the enamel cast
iron too…Hope this helps…Happy cookin!!
I am 40 years old and just now learning to bake breads. I was scared away from using any recipe that has yeast because both my mom and mother in law don't use it. Not anymore! This was my first attempt. I found this on Pinterest and I am thrilled that I did! You have a great easy to follow recipe. I love all the pictures! They helped me know that I was doing each step the right way. My family loves white bleached flour so that was my only substitute. My bread turned out PERFECTLY! I baked mine in a Pyrex dish because I don't own a cast iron (now on my Christmas wish list). My bread looks just like the pictures and my family wants it at least 3 times a week! I am now trying different types of flour and additions. You have inspired me to try a whole assortment of new things! I feel so silly not attempting this many years ago! I LOVE your blog!
congratulations to everyone on your amazing flavors and baking skills. I love hearing of your success stories.
In answer to some questions:
– Cooler temperature in your home may cause the dough to rise slower. After 12 hours it shouldn't be a problem.
– I'm not sure how many slices. I've never counted before we eat.
– How to cut the bread? Hmmm…well you can cut the loaf in half then slice the halves or just slice the round. Depends on the size of slices you want.
– I haven't had the dough go bad from putting cheese in in then leaving it out overnight.
Like very one else has said, it was amazing. Thanks for such a great, easy recipe. I used fresh rosemary & lemon zest (no cheese) and it was delicious.
does the house temperature matter? My house is kept deliberately cooler than most – seldom above 68F.
Amazing, amazing recipe. Can't believe how easy it was and how delicious the bread tastes. I made two – one with cranberries and walnuts, the other with chourica and cheddar cheese. They baked beautifully, and more importantly, taste so good. I fear how much bread I will now make on a regular basis because of this recipe! Thanks for the great step-by-step guidance.
I did it!!! Came out very good. I lost track of time, it was 22 hours before I got it in, but still good. I added Organic Greek Garden Seasoning to the dry mix. Very aromatic. I used the Lodge Color Dutch Oven. I only had to wipe it out with a paper towel after cooking.
Now I'd love to figure a way to make individual sizes. Thanks for sharing this.
Wow wow wow. Fantastic!! You almost feel french when you lift that lid!!!!
how many slices does this make?
I am trying this out tonight (baking tomorrow morning) and I have high hopes based on everyone's reviews! I've baked a lot of bread and pizza dough, but never a "mix it and forget it" recipe like this! Just a couple things to add to the tips and tricks, if you don't mind Janet… 🙂
– I have two enameled cast iron dutch ovens that I got from Costco (Kirkland brand) for probably 1/3 the cost of Le Creuset. If you have a Costco in your area, I suggest looking there! The newest ones are made in France (likely by Le Creuset) and they tend to carry them around Fall and Winter seasons.
– You get about 25% more sodium in 1 tsp of table salt compared to Kosher. If you use table salt in place of Kosher, adjust the amount down a little.
– If your bread turns out flat, the likely culprit is your yeast. It's either expired or simply a bad batch. Try purchasing some new yeast.
– Preheat the oven with the pan at the same time. Putting a cold, empty pan in a hot oven could ruin it (especially the enameled cast iron)… but gradual heating is a-OK.
– Self rising flour usually has baking soda/powder in it, which is a completely different leavening agent than yeast. You can certainly try it, but my guess is that it would turn out something like Irish soda bread.
– I believe you can add just about anything to bread as long as it's not super acidic (which would kill the yeast) or something that would mess with the moisture level. Obviously lemon zest works, but I bet lemon juice would kill it.
Awesome! I'm so going to try this. Your humorous comments made me smile too! Thanks!
I just pulled this bread out of the oven and it is amazing!!!!!!! So easy and now I regret not doubling the batch. I baked it in a 2 1/2 QT pyrex casserole dish and it turned out just like your pics.. Cant wait to impress my guests tonight at our open house!
I will heat my stainless steel pots in the oven and then quickly clean them while still warm. The brown stuff is just baked on grease. It will become sticky when cool. Warm it back up so it will be runny again and clean off. No harsh chemicals needed.
Keep those pots dirty on the outside!! You should see my cast iron. I take it camping and us it on open flames! Sure the ammonia will get the gunk off but yuck, why put a chemical on your precious, precious, precious cookery?! Your stains are your mark of excellence:)
Finally had a chance to try this. Jazzed !! Made a 2nd loaf with smoked gouda and rosemary. Very good, but next time, no rosemary. I am wondering if you can add sugar and cinnamon???? May try tomorrow. Thanks for the great tutorial. So detailed it gave me the courage to try. 🙂
Janet, I tried to read ALL the posts, you are a very popular lady! Just a quick note, when using whole wheat flour add 2 Tbsp. of lemon juice to 4 cups of water. Got this off a Rogers flour bag in Canada. It is a natural dough conditioner when baking with no additive flours. Love all the variations on this bread! I was very fortunate to have my mother-in-law show me how to make bread step by step. I'm sure there are many happy families out there because of this recipe.God bless
Janet,
I absolutley love the recipe. Thank you for sharing.
You might have already herd from others, but you wanted to know how to clean your Le Creuset.
In the well ventirated room like bathroom or laundry room with vent and utility sink Stick Le Creuset in air tight bag (I think a fresh trash bag should work), pour three table spoones of Amonia and seal the bag tight. Leave it over night or longer. I leave them in the back yard as my husband is very sensitive to odders. I recommend open windows before you open the bag. All the dark burned spot should come off like a dream.
Great recipe! I have tried this bread twice but it hasn't come out right for me yet (I'm not great in the kitchen.) The second time I used a little less water and the dough rose a little more but both times the bread was very tough (could barely get my seraded knife through it) particularly on the bottom. I actually could not get through the bottom of the bread and had to tear it! Not sure what I am doing wrong?? I use a Le Creuset pan and follow the directions exactly. Any ideas here? THank you so much!
thank you so much for sharing this recipe! i thought i would try it out, not to attached to how it would turn out…I brought the beautiful loaf to my mom's and she could NOT believe i had made it. this recipe i so easy and SO delicious. She wanted to know what sourdough starter i used and when i shared the recipe with her, a life long baker, she again could not believe it. i will be baking this bread for the rest of my life! im thrilled to start adding in things and giving as gifts. again, so many thanks!
The first time I made this bread, I followed your directions exactly. Unfortunately, it came out undercooked and doughy 🙁 I knew there was great potential, so I tried it again and let it cook 10-15 minutes longer and it came out beautiful and delicious! Thank you!
I am heating my pot now. I read on another site that you can use any oven-safe pot and cover with aluminum foil. fingers crossed!
I am trying this bread now. I read online that you could use any oven-safe pot and cover with aluminum foil. Gonna give it a try. Hope it works, the pot is heating now 🙂
We've made this several times now and it's always really delicious! So far our favorite combo is Juusta baked cheese, cumin and red pepper but we just mixed up a batch with Masala cheese, cumin, onion and white pepper so we'll see which comes out the winner. Thanks for posting such a great recipe and making it so easy to understand!
I made this tonight to RAVE reviews from the family. Even heard, "Mom, can you make another loaf tomorrow?" Going out to pick a handful of fresh rosemary to throw in…YUMMY!!!
I know its a dumb question but I have never eaten this kind of bread in a round shape just in regular loaves so how is it cut and served?
is it safe to leave the knob on the Le Creuset lid? I had read that it should be removed or replaced with a steel knob. but since I don't see this in your instructions, I will assume it isn't necessary. thank you for all the great recipes and instructions on your blog – Love it! Doris
I have a big enamel roasting pan with a lid, would it be alright to use that?
To start with I made 2 loaves, so we had leftovers. Some of it I cut some of it into short 'fingers'
and we dipped it in a small bowl of KRAFT Balsamic Vinagrette
dressing. It was delicious that way both fresh and the next 2 days! I can't remember if the crust stayed crisp or not, it was just plain delicious even the second and third day! Tamara
I MAKE A PASTE OF BAKING SODA & DISH SOAP TO CLEAN MY LE CREUSET POTS.
Kalamata Olives and walnuts is incredible in this recipe! Thank you for the recipe. We are ok with he heaviness of wheat so I do half and half.
Hi, to clean your pots I recommend spraying them with oven cleaner. I inherited a lovely enamel pan from my grandma, it was quite crusty. I put it in my sink and sprayed it with the oven cleaner, waited 2 hours and rinsed, all clean.
I made this bread today and it came out perfect! I had to add a little more water because of the humidity in Florida, but other than that it came out perfect! I even made it without an enamel cast iron pots. I had an old dutch oven my husbands grandmother cooked everything in used a lid from an old cast iron pot & it worked great. Thank you for posting and showing pictures…I can't wait to add flavors like cheese & garlic. Or cinnamon & raisin…
Do you need a 3 qt pan as stated in the text of the recipe or a 5 qt pan as stated in the answer part of this blog?
Arrox how much extra flour are you using to form your ball after the rising phase, I was afraid I was going to use too much. It was still really wet when I put it in the pan to bake it.
Jane@simplysogood, I saw the price you posted on the Martha Stewar cast iron pan and thought I would do a search on it. The first thing that came up is that there is a recall on it for two people being injured (not sure if it's the same one you have). Here is the link
http://www.cpsc.gov/cpscpub/prerel/prhtml11/11308.html
Good luck, Joanne
THANK YOU! I found your blog through Pinterest. Made two loaves today; reluctantly gave one away — it's that good! Very easy, fool proof….yummy! Thank you for sharing your helpful tips and talents. I love it! 🙂
Just FYI for all those new & old Le Creuset lovers… look for "Bar Keepers Friend" liquid cleaner. It works wonders on these pots!!! I found it at Bed, Bath, & Beyond for $4 for 26oz bottle. Enjoy your bread!! PS. I'm trying cinnamon raisin whole wheat bread…hope it works! 🙂
Looks great – would love to know if anyone has tried gluten free. Almond flour might work and give it a nice flavor. I may give it a try!
I made a bacon cheddar loaf. It was amazing!
you may clean your pots with spray on oven cleaner,spray put in plastic small garbage ban and close foe an hour ,wash with soap and water.
to clean your pots use spray on oven cleaner,put in small garbage bag and close tight for a coupil hours,will clean of with soap and water.
Any suggestions on how to make this gluten free?