What I love about this bread
- It’s so easy to make. This dough can be made in less than 5 minutes.
- The basic dough recipe can be enhanced with many different flavor varieties.
- Very little hands-on time.
- Crusty bread never ceases to impress family and friends.
- My 12-year-old grandson can make it.
Let’s make No-knead crusty bread:


- In a large mixing bowl, add flour, kosher salt, and yeast. Whisk together.
- Add water. Mix just until all of the flour has combined with the water. The dough will look like a shaggy mess. That’s ok.
- Cover the bowl with plastic wrap and let it sit for 12 – 18 hours on the countertop. DO NOT REFRIGERATE. This is not optional. It takes that much time to proof the dough. The reason why you need a large bowl is that the dough will start to rise.
- After 12 hours the dough will look like this. It’s pretty sticky, but that’s ok it’s supposed to be.
Shaping and baking the bread:


- Preheat oven to 450 degrees. As soon as it has heated to 450 degrees place your pot with the lid in the oven and preheat the pot for 30 minutes.
-
Right after you put the pan in the oven to pre-heat, dump the dough out onto a HEAVILY floured surface. Shape it into a round ball and place on a sheet of parchment paper. Parchment makes it so easy to transfer the dough into a hot pot and then remove it after baking. The parchment paper stays in the pot. This will rest for 30 minutes while the pan is heating. Cover with plastic wrap. Note: Use silicone coated parchment paper. The regular non-coated paper will stick terribly. Don’t chance it.


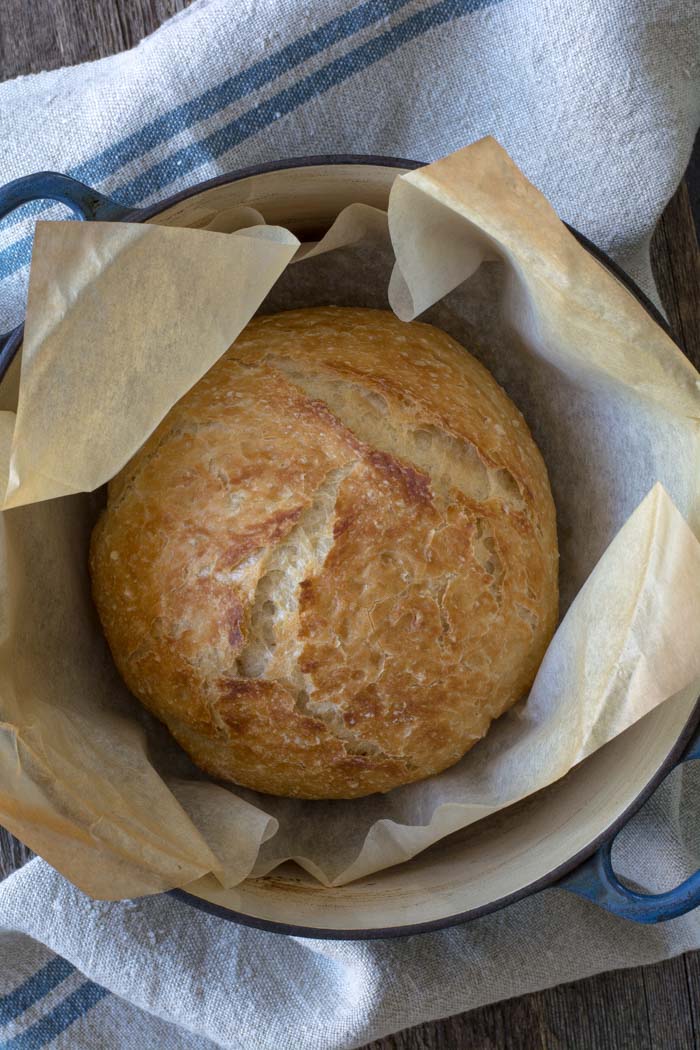
- Remove pot from the oven and carefully pick up the parchment and drop dough into the pot. Be careful the pan is HOT. Put the lid on the pot and return it to the oven for 30 minutes.
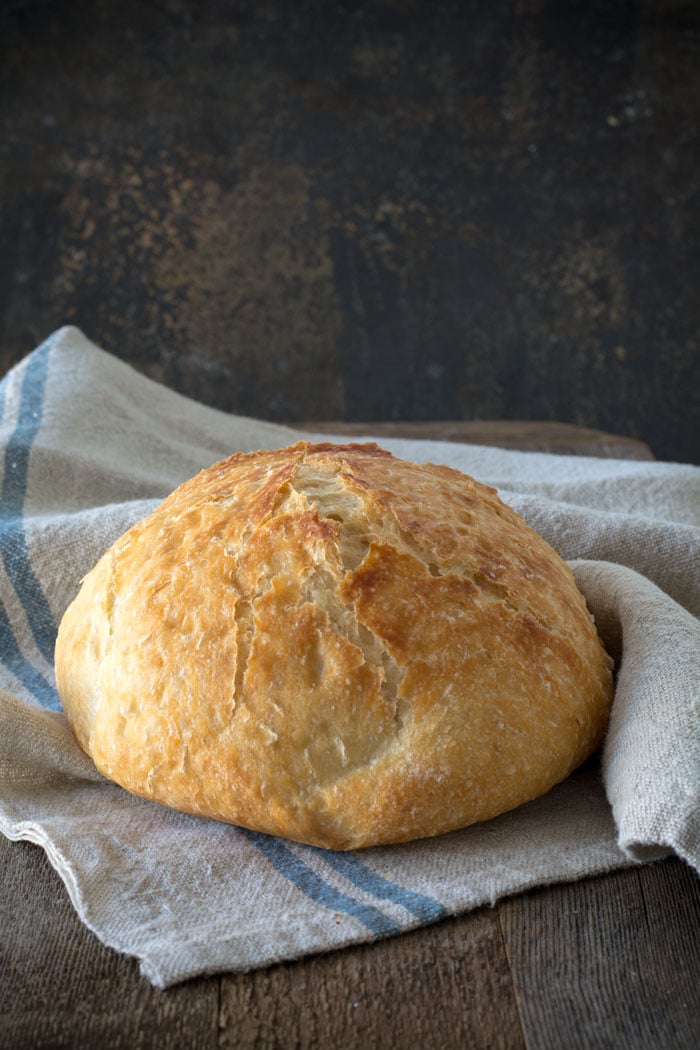
- After 30 minutes remove the lid from the pan. Bake for an additional 15 minutes or until nicely browned. You can test with an instant-read thermometer to make sure the bread is fully cooked on the inside. The temp should be between 190F and 200F degrees. Remove from the oven and carefully remove bread from the pot by lifting the edges of the parchment paper.
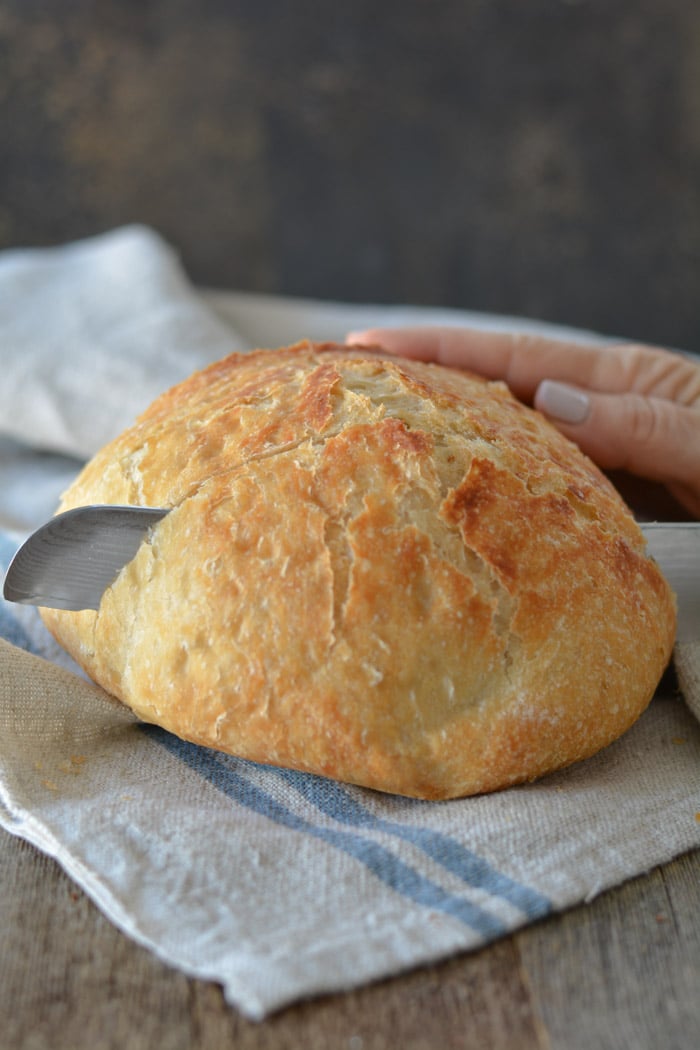
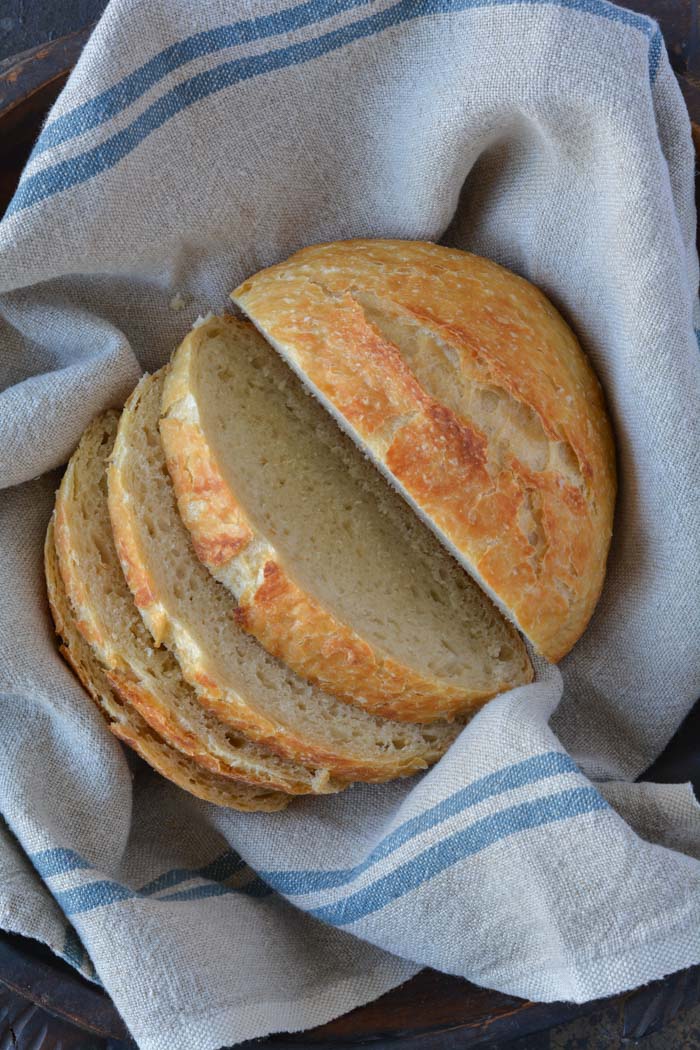
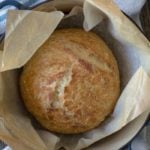
Holy cow! Can you believe how gorgeous that is? It’s best to wait for the bread to cool before slicing. Because I love warm bread I sliced it right away.
FAQ’s
Q: Do I have to use an enamel covered cast iron pan?
A: NO. You can use anything that can take the heat. The following have been used that I know of:
Clay pots with lids, Pizza stone with a bowl to cover the bread, insert from a crockpot, pyrex baking dish with a lid, stainless steel pot with a lid, baking dish covered with aluminum foil, old cast iron dutch oven.
Q: Do I have to use unbleached flour?
A: I always use unbleached flour. You can try bleached flour.
Q: Can I use self-rising flour?
A: I don’t know. I would just stick to all-purpose.
Q: What size is my pan?
A: My smallest pan is 5.5 quart. You can use as small as a 3 quart.
Q: What type of yeast do I use?
A: I use SAF instant yeast. Any yeast should work.
Q: Why is my bread turning out flat?
A: You could try using less 1/4 cup less liquid. Or add 1/4 cup additional flour. Make sure your dough appears to be dry when you first mix it. It will have more moisture during the rising time.
Q: Can my dough sit out longer than 18 hours? Does it HAVE to be between 12-18 hours?
A: I have let some dough sit as long as 24 hours and the bread was beautiful.
Q: Have you tried Gluten-free?
A: From what I hear the best GF is from King Arthur Flour https://shop.kingarthurflour.com/items/gluten-free-measure-for-measure-flour-3-lb
Q: Do I have to grease or oil the pan? Will my breadstick?
A: No you don’t need to grease the pan. I have never had the bread stick when using a cast iron pot. I haven’t tried anything else. The best way to be certain that the bread won’t stick is to form the loaf on a sheet of parchment paper and lift the bread into the pan using the sides of the parchment. Leave the paper in the pan. It’s won’t burn. When the bread has baked, just lift the sides of the parchment out of the pan. Voila! HOWEVER: Not all parchment paper is created equal. I use a silicone coated parchment paper. Regular parchment paper can stick something terrible. Don’t chance it.
No-Knead Crusty Bread
Wonderful yet easy artisan bread with a crisp crust. Prep takes just a few minutes with an overnight rise. Baked in a pot with a lid to create a steam oven. Bread can be made with many flavors and variations.
Ingredients
- 3 cups + 2 tablespoons unbleached all purpose flour (450 gr)
- 1 3/4 teaspoons Kosher salt (10 gr)
- 1/2 teaspoon Instant or Rapid-rise yeast (3 gr)
- 1 1/2 cups water cool (315 gr)
Instructions
-
In a large mixing bowl, whisk together flour, salt and yeast.
-
Add water and mix until a shaggy mixture forms.
-
Cover bowl with plastic wrap and set aside for 12 - 18 hours. Overnight works great.
-
Heat oven to 450 degrees. When the oven has reached 450 degrees place a cast iron pot with a lid in the oven and heat the pot for 30 minutes. OR pot can be placed in cold oven while oven is preheating leave in oven for 30 minutes.
-
Meanwhile, pour dough onto a heavily floured surface and shape into a ball. Cover with plastic wrap and let set while the pot is heating.
-
Remove hot pot from the oven and drop in the dough. Cover and return to oven for 30 minutes. After 30 minutes remove the lid and bake an additional 15 minutes. Remove bread from oven and place on a cooling rack to cool.
Recipe Video
Recipe Notes
FAQ's
Q: Do I have to use an enamel covered cast iron pan?
A: NO. You can use anything that can take the heat. The following have been used that I know of:
Clay pots with lids, Pizza stone with a bowl to cover the bread, insert from a crockpot, pyrex baking dish with a lid, stainless steel pot with a lid, baking dish covered with aluminum foil, old cast iron dutch oven.
Q: Do I have to use unbleached flour?
A: I always use unbleached flour. You can try bleached flour.
Q: Can I use self-rising flour?
A: I don't know. I would just stick to all-purpose.
Q: What size is my pan?
A: My smallest pan is 5.5 quart. You can use as small as a 3 quart.
Q: What type of yeast do I use?
A: I use SAF instant yeast. Any yeast should work.
Q: Why is my bread turning out flat?
A: You could try using less 1/4 cup less liquid. Or add 1/4 cup additional flour. Make sure your dough appears to be dry when you first mix it. It will have more moisture during the rising time.
Q: Can my dough sit out longer than 18 hours? Does it HAVE to be between 12-18 hours?
A: I have let some dough sit as long as 24 hours and the bread was beautiful.
Q: Have you tried Gluten-free?
A: No. I'm still waiting for someone to venture into the realm of Gluten-free. If you try it, let everyone know.
Q: Do I have to grease or oil the pan? Will my breadstick?
A: No you don't need to grease the pan. I have never had the bread stick when using a cast iron pot. I haven't tried anything else. The best way to be certain that the bread won't stick is to form the loaf on a sheet of parchment paper and lift the bread into the pan using the sides of the parchment. Leave the paper in the pan. It's won't burn. When the bread has baked, just lift the sides of the parchment out of the pan. Voila! HOWEVER: Not all parchment paper is created equal. I use a silicone coated parchment paper. Regular parchment paper can stick something terrible. Don't chance it.
More Notes:
Regular active yeast can be used in place of the instant or rapid-rise yeast. It will need to be activated in 1/4 cup warm water. Stir and let sit for 5-10 minutes. However, most of the comments I have received state that the rapid raise works the best. You choose. Whisk the flour, salt, and yeast together.


I'm not sure if this question was answered, but I was curious if stonedine pot would be do able? They have glass lids, is there an issue with glass in the oven?
I love this recipe, however I was a little confused by the instructions on the first go round. You may want to add that after you cover the dough with the plastic that you should let it rest for "30 minutes" while the pot is heating because for those of us who multi-task in the kitchen, we can forget a simple step like that and it does make a difference in the texture of the bread. I know it's mentioned later in the recipe, but it might help to visually see a number. Other than that, I LOVE this recipe and have made it several times! Thanks for sharing!
Made an amazing loaf in my crock pot with heavy foil! Cheddar cheese and Green Chiles!!!! So delicious!
to clean your pans, use a mr clean magic eraser.
This is the best and easiest bread I have ever made! Today is the first time I tried doubling the recipe and it seems too wet. How much water do you put in a double recipe or do you mix them separately? I am adding more bench flour to the second loaf before I bake it and it seems to help. Also, do you have any baking time suggestions for trying to make rolls rather than a loaf?
I love this bread! Today is the first time I have tried making a double batch and the dough came out flatter than normal. Don't think it will rise right in the oven but we will see. How much water do you use when making a double batch? Or do you mix them separately? Also, do you have any thoughts on bake time if I wanted to make rolls instead of a loaf? Thanks!
I just ordered an enamel cast iron pot from Walmart to make this bread. I can't wait for it to come so I can make this! Even with tax and shipping the pot was under $50.
http://www.walmart.com/ip/Better-Homes-and-Gardens-Cast-Iron-6-Qt.-Covered-Dutch-Oven/14915165#rr
Note: In my search for a pot I found that the Lodge enameled pots are only oven safe to 400*. Don't use these pots.
I just ordered an enameled cast iron dutch oven from Walmart to make this bread. I can't wait to get it so I can make this bread. With tax and shipping the pot was less than $50 and oven safe to 450*.
http://www.walmart.com/ip/Better-Homes-and-Gardens-Cast-Iron-6-Qt.-Covered-Dutch-Oven/14915165#rr
Note: In my search for a pot I read that Lodge enameled pot are only over safe to 400*. Don't use them.
Just took my loaf out of the oven and it's wonderful. I used a paula deen 2 Qt. stoneware casserole dish because I didn't want to spend the money on a dutch oven but now will have to get one so I can make a whole loaf. It took my husband about 15 minutes to devour the small loaf minus 1 piece for myself.Next time I will try one of the herb breads but this one was to die for thank you so much for whoever pinned this on pinterest.
If you put the pot in the oven while you are heating it to 450 degrees would the pot be hot enough once the oven reached its temp therefore saving you the 30 min. To heat the pot? Thank you!
I can't wait to try this in my Longaberger Flameware Dutch oven. It's not cast iron but ceramic and is fabulous as it handles thermal shock and all baking and cooking surfaces.
i didnt even flip the dough onto a flour surface and it turned out fine…just flipped it into the hot pot.
thank you thank you thank you for this! Mine just came out of the oven & it is amazing! Your directions & pictures made it soooo very simple! 🙂 Here is my version: https://www.facebook.com/photo.php?fbid=4536095561954&set=a.1154385941327.2025669.1278031777&type=1&theater
i used the glass insert from my crock pot with glass lid it worked beautifuly
To clean your pots, you might try tin foil. I use it all the time to clean my pots and pans. Tin foil will clean just about anything. I don't know that anything about those particular pots, but I don't believe that tin foil will scratch the paint. You may want to try it on a small section first. Love to clean with tin foil. Also, if you have regular cast iron, use salt and a damp sponge. Cleans great.
Elaine
My first loaf just came out of the oven and I am waiting for it to cool but it looks fantastic. Mine wasn't very big either, the hubby and I will probably devour it in a day or so! I got a Rachel Ray dutch oven for our wedding and have used it twice in 4.5 years, but it is perfect for this!
I made this bread for the first time yesterday and it is amazing! I put diced pepper jack cheese in the dough. It looked beautiful and tastes delicious! As soon as I took a bite I started my second batch of dough. Cranberry, orange. I baked it in a Lodge, cast iron pan that has a glass lid. I was slightly concerned about the glass lid but it worked beautifully!
Thanks for sharing the recipe. I have also been using Artisan Bread in Five Minutes. Great book!
I would really NOT try very hard to clean the stains off the pan. Most of the caustic chemicals (bleach, ammonia) are likely to burn off part of the enamel surface… it might not be as smooth afterward. I don't really know how it compares to the non-sticknesss of the stains, but personally, I wouldn't take the risk. My husband was aggressive cleaning his grandmother's enameled cast iron pot (IMHO), and it lost its shine/nonstick in the few years he had it (I'm going to guess she had it a lot longer). Le Creuset has their own brand of cleaner, so, of course, they don't recommend anything else: http://cookware.lecreuset.com/cookware/care_10151_-1_20002. Who knows what's in it… based on this Amazon review of their cleaner, they used to recommend laundry detergent! "Le Crueset recommends removing stains from enamel by boiling 1 part Tide or Gain and 3 parts water for 10 minutes in the enameled container." The fact that their cleaner gets bad reviews (for being too gentle) makes me think that it's better to be gentle!
Just wanted to say that I use a Corningware French White casserole dish, and it works perfectly! This is my new favourite bread recipe!
I tried a GF loaf. Not good results. Used a GF "all-purpose" baking mix, Xantham Guam(sp?), active dry yeast, kosher salt and filtered water. Not sure if it was the XG, the yeast, or the flour mix but it didn't rise at all. When I went to dump it, it was slimy and stunk! Threw that mix out and will try again another day. Just wanted to share what didn't work for me and look forward to reading what does work for someone else.
Looks delicious!!
Thank you for all of your great success stories and amazing flavor combo's. I'm anxious to hear about more GF breads. We will be anxiously awaitng to hear from Julie.
Anon: Yes you can use foil instead of a lid.
Check out the "No-Knead" bread forum page for more ideas and quicker response to questions.
I love this recipe!!! I used the insert from my crock pot and covered it with foil…..my husband didn't believe I made it!!! Worked just like you said!!!!
I am making this bread right now at 2 am I found this receipy and I am excited, I was wondering I used bleached flour does the directions stay the same?
HI! I have put a GF version of this recipe on to proof. I'll finish it tomorrow and let you know how it did and what I did to make it GF!! So excited!! 🙂
Hi Janet, can I use foil as a lid???
I ABSOLUTELY LOVE this bread! First time was a complete hit with my family. Have you done anything to try & get sourdough flavor with that perfect sourdough texture?
Janet, your pots may be "used" but your oven is SPARKLING!! My bread is on the rise at the moment and I'm using amaranth flour because that's what I've got so I'll let you know how that goes.. Also just scavenged an enamel cookpot at a thrift store for ten bucks. I have a newer one but am going to give my new old one a shot first. Besides, it's orange! Thanks for the recipe!
I just made my first loaf of bread this morning absolutely wonderful! The first of many no doubt. I saw your recipe and having several Le Creuset sized dutch ovens decided all I needed was to go buy some fresh yeast. SO VERY SIMPLE! Next I want to try a sweet raisin & walnut loaf. I love the idea of giving them as gifts…lovin' from the oven. THANKS FOR SHARING A GREAT RECIPE!
OMG – my daughter and I just finished our first batch (one plain, one with Gruyere, rosemary and lemon zest) and could hardly wait for the bread to cool. The house smells wonderful – and I have to agree with Anonymous' comment of 04/23 – I was hoping it wouldn't taste so good, because I'm sooooo going to be be gaining weight!!! I'm thinking as long as I'm getting fluffier, so will my friends – Christmas is just around the corner and I can't think of a better gift than homemade bread!
This is so cool, I can hardly wait to try this recipe. I have never had good luck with making bread so I hope this works for me. Thanks for sharing.
I love this receipe so good I have made the plain twice both time delicious and eaten within 24 hrs and then I tryed to mix it up and made an apple walnut raisin bread so good cant wait to try some other ideas thanks for the ideas
My second loaf is in the oven. I am using a dutch oven that I borrowed and it is over a hundred years old. The bread is beautiful!!! I can't wait to taste it, it is still cooling. I was wondering, have you have ever made a double batch of dough and made a huge loaf out of it?
Awesome recipe. I made mine in a ceramic casserole pot. I am sure that it would be way better in a le Creuset, but this worked fine. I can't believe how easy it was to make. I think you have just launched an addiction to bread baking.
I made this last night, and I couldn´t believe how fast it was to make! The mixture is in the oven as I type! I read almost all your reviews, I can´t believe you were patient enough to answer every time someone asked ¨Do you have to grease the pan?¨ I would have gotten so frustrated! Anyway, I saw a review that really helped. When I took the risen dough out of the bowl, I put it on some floured tin foil, then instead of taking it off, I just put the tin foil in the pan, so it still had the ball-ish shape… I will check back with you as soon as I eat this going-to-be delicious bread! (By the way, how about a parsley, basil and garlic bread?)
Can't wait to try this bread! In regards to cleaning your pot. Hot soapy water and fabric softener sheets… Soak all together for 15 minutes and then scrub with the fs sheet. I then wash with soapy water. It has worked on some of the most baked in messes in my kitchen…
I LOVE YOU, BLAIR!!! Thank you so much for giving us a GF version of this bread. I bow in your honor.
Hi, everyone. I know there are a lot of questions about whether or not this recipe can be tried gluten free. Just wanted to say, I did the recipe with gluten free flour blend (2 parts brown rice flour, 2/3 potato starch, and 1/3 tapioca starch), and it turned out great! I will say, however, it's not very good the next day. So if you're doing it gluten free, I would suggest eating it still warm from the oven. Also, don't forget to add some xanthan gum or similar product to keep the bread together; otherwise, you will have a crumbly mess. Has anyone tried to make these into small rolls, instead of loaves?
Made the bread this morning using whole wheat flour. It is awesome! I used a cast iron Dutch oven. I brought used for about $30 at a flea market. Cleaned it up, seasoned it, and it worked like a charm.
Ilke:
I have had my bread spread out as well. I don't reshape. I just drop it in the pot. I understand your concern about ruining the pot. Any pot is too expensive to ruin. Try add 1/4 cup more flour and see if that helps. Don't over work the dough trying to re-shape it. During baking, for some strange reason, it just seems to look good. Some have suggested to fill the pan with water while pre-heating, then dumping it out before adding the bread. You could try this. I have put my LC through a cleaning cycle in my oven with no damage. I did remove the knob from the lid before cleaning it. Let me know if you need help further.
Check out the No-Knead Forum for help finding answers more quickly: http://simplysogood.blogspot.com/2012/08/crusty-no-knead-bread-forum.html
What is the difference between active dry yeast and instant yeast (also known as bread machine yeast)?
Instant yeast is a little more potent than active dry yeast and can be mixed in with your dry ingredients directly. I generally find it easier to work with. Active dry yeast works just as well as instant yeast, but requires being activated in a little bit of warm water before being added to the rest of the ingredients. Failure to properly activate it will result in your loaf not rising adequately.
http://www.thefreshloaf.com/faqs/baking/yeast
I just made this bread but it did not come out like yours, I am so bummed 🙁 Crust did not develop like yours. While transferring with parchment paper into the oval big LC, it did not fit in the pan, because it flattened on the floured surface, it was hard to make it into a ball. I think I will add less water next time to make it less shaggy and easier to work with.
Also, I will try to use less expensive methods other than LC, not only instructions say not to put empty in hot oven, mine also said that the lid should not go into the oven higher than 350 or 375, I think. I saved up a while to buy that LC, so I dont want to ruin it. Everyone has come up with great ideas , I think I will try the pizza stone with a metal cover to see if it will be ok.
I am a stubborn cook, so I will keep trying until it comes out picture perfect 🙂
Just discovered your post on Pinterest and am going to try your recipe for sure, but I am responding to your comment about cleaning your pans. Try bar keepers friend. It's in the grocery store on the aisle with the Commet and Ajax, in a Gold can. Wet the surface of the pot, sprinkle with the cleaner and scrub in a circular motion with a DRY paper towel. Depending on the amount of baked on goo it may take quite a bit of elbow grease, but I have never had it NOT get it all off. I have used it on all types of surfaces and it is the only scouring paowder that works without scoring or scratching the surface. Good Luck.
Is active dry the same as instant yeast?
Awesome! I have made a similar recipe and we love it!
Regarding cleaning Make a paste out of baking soda and water and rub it on with your fingertips or a "no scratch: scrubbie (I love the crocheted ones my mom makes.
I was a Pampered Chef rep for over 8 years and this is the method I swear by for all my plain and glazed stoneware! I always taught all my customers to use this method. It also works great for getting stains off counters and my crockpot.
I now use this cleaning method for many things around my home. I love that it is safe non toxic and I do not have to put up with any type of fumes.
Good luck!
Soak your pots in oxy-clean (dissolved powder in hot water) soak overnight and rub with scrunge type sponge. Oxy-clean works great on everything and is not toxic.
Other natural cleaner is making a baking soda paste and leaving it on until is dries then gently scrunge sponge off.
Thanks for giving Crusty Bread recipe is great taste and especially kids like this recipe. preparation of this recipe is very simple at home and wonderful taste.
I have a garlic and shredded parmesan loaf in the oven right now… I can't wait until it is done. Smells amazing! -Brenna
Bryce B ???? Just a little confused.
Read through all the helpful comments and got up the nerve to make this ….. Even found my crockpot liner and baking stone ( gonna try using the crockpot as my "bowl cover") and wouldn't u know…….IM OUT OF FLOUR!!!!!!!! Wimper!
Just made this and followed recipe to a tee…flavor is great but it's very hard on top and especially the bottom! Also it didn't rise in the oven. What did I do wrong?
I cannnot wait to try this and make every flavor of bread I can imagine!!!! Thank you!! To clean your Le Crueset, put the cooled pan into the sink, fill sink and pot with hot soapy water and add a few tablespoons of baking soda, soak for 30 minutes or so, use a green scratchy and gently scrub clean. Voila! Good as new. 🙂 I have a lot of Le Crueset, I always clean them this way and it works great.
I have created a new page for questions and comments on this bread post. I hope this will make it easier to ask questions, have them answered then find the answer. I would love to hear about your favorite creations that you have made. Just click the following link: http://simplysogood.blogspot.com/2012/08/crusty-no-knead-bread-forum.html
Thank you.
Janet
Well that didn't work. Just cut and paste the link or go to the HOME page of Simplysogood.
I'm not one to shy away from salt but my rosemary/lemon zest/garlic loaf tasted a little too salty. Did anyone think this as well? Mine also didn't brown, even after the last 15 minutes in the oven. I ended up putting it on high broil for 3 minutes which ended up being a little too long. I may try low broil for 3 minutes next time. Everything else about this bread is fantastic! I made mine in a stainless steel stockpot. Love it! Can't wait to try a cranberry/orange loaf!
Janet – I got a Lodge cast iron enamel pot as a gift from a friend who knew I was dying to make this bread. I saw the comments about how you can't heat the pot empty, and confirmed it with their customer service. My friend who purchased it had the idea: what if you could heat the pot with water in it? dump the water out after the 30 minutes and plop your bread in. I called Lodge customer service back and they said it should work. I tried this out tonight and I had to post that it was successful! If you have a Lodge pot, fill it just under half full with water during the heat up phase. Carefully dump the water before the bread goes in and your pot is safe and you're good to bake. Please pass on to your readers who have a Lodge pot and are afraid this recipe will break it!
Idea to clean your pots.. Bi-Carb Soda and a nice clean cloth that will take a bit of a beating.. and will bring up even the most heavily baked on stuff off. And its NON-Toxic !!
Re: the olive oil question above, i added about 1/4 cup to my double recipe. I did not adjust the other volumes. It turned out beautifully. Very spongy. Mine were cranberry pecan and smoked gouda with garlic seasoning.
Made this recipe yesterday and it turns out, this recipe is my grail. I've been trying to recreate the crust and texture of a bread that i had at a restaurant 5 years ago and have made upwards of 200 loaves of bread since, without quite making it. This is it. The best bread i've ever made. I will likely never buy bread again. Thank you so much for posting this recipe!!
No, Please don't clean your pots. The patina on the outside of the pot is a testament to it's continued good use!
Just an FYI to all those out there who do not have a cast iron pot: a crock pot insert covered with foil worked like a charm for me. My garlic bread turned out fantastic! Tomorrow we will be doing jalepeno cheddar. YUM. Thank you for posting this great recipe!
Just an FYI…a crock pot insert and foil over the lid worked like a charm for this recipe. My garlic bread turned out AMAZING. Tomorrow I will be trying jalepeno and cheddar. Thanks for posting this recipe! Brilliant!
I've made quite a few loaves of this bread using my covered Pyrex casserole dish. The dish is in the oven right now heating up to bake my latest version. Are you ready? Dill pickle bread! I added 1 1/2 Tbsp dried dillweed, 2 tsp garlic powder and 2 tsp onion powder. I like fresh garlic and caramelized onions in most things but the powder mixes more thoroughly throughout the dough. I only wish I had some dill seed. Alas.
I can't wait to try this. As for cleaning your pot, "scrub buds" from Amway may help. I'm not a distributor, so I'm not pushing Amway. it's the only product I buy/use from them. They are stainless steel and don't scratch. I have a pan that I bought 37 years ago and it still looks pretty clean (no brown tell tale signs of use).
I am so thankful for this recipe. As a bread lover I could spend $$ for a delicious loaf, but looks like this is history now. I've baked half a dozen of these loaves and they're all out of this world. I've also attempted a whole wheat version (1.5 c all p. flour + 1.5 whole wheat) and it was very good. I tried half and half with bread flour – also good, but whole wheat so far is my favorite. Tonight I'll be making the cranberry/orrange/almond one. Can't wait to devour it tomorrow 😀
Note: I do not have Le Creuset 🙁 so I'm using deep stoneware baking dish and cover with alluminium foil. Works great and bakes very evenly, even on the bottom. If I start selling those breads, I may earn enough to get Le Creuset quite soon, LOL!
Yummy! Can't wait to try it!
As for cleaning your pots, try Mr. Clean Magic Erasers.
I just did my bread with cornmeal on the bottom.And it was great what a good bread.Now on to more flavors.
I am going to try this again tomorrow… but my first try ended up being more of an oval that didn't raise much and it was quite dense. I added just a tad more water than the recipe called for because it was so dry that it wouldn't even stick together in the bowl… maybe that could be my problem. But I'm also going to let it sit on the counter for a while longer. I'm not sure where I went wrong!!
Thanks for this fabulous recipe. My hubby loves Jalapeno/Cheese bread. I added a couple handfuls of drained Jalapeno's from the jar, then about the same amount of shredded cheese. Have tried baking it in several different "normal" pans. Then found an old clay pot in the garage. WHAT A DIFFERENCE!! The bread was more fantastic. With so many Jalapeno's in it, he thought it might be to hot, it wasn't. My 5 year old granddaughter decided to try a piece. She doesn't like spicy, but ended up eating 2 slices.
I love really spicy food, so made a loaf with Habanero Peppers and Cheese. It was absolutely the greatest. Had a spicy taste, but wasn't that hot. I shared it with my 21 year old granddaughter and she loved it and shared it with her fiance's family. Everyone was a little skeptical, but agreed it tasted great.
I need help… This actually made me cry ! Lol
I'm following the recipe however when I get to the part where I dump the dough onto the flowered surface…. It's a water mess! I find myself like I'm fortifying a moat! *sigh* I absolutely love bread and I Normally make my bread with the rising dough, kneading, blah blah. This would be a nice quick fix. I purchased tons of books for school and would love a pot such as yours however I cannot. I have a cast iron pan. It's plated but not enamel… I use maybe 3 cups of sugar for the heavily floured part… But the water dough sucks it all up making it seriously a disgustingly heavy cream colored river rock! Please help me !
Okay, this bread is seriously magic. I baked mine in my 4 qt. camping dutch oven and it turned out beautifully. I paired it with a Tuscan-inspired sausage and kale pasta dish. I blogged about it and linked to you. Also, hello from Cottonwood Heights :). http://newlywedscookbook.blogspot.com/2012/08/a-tuscan-dream.html
CAn you freeze the bread dough or baked bread and how does it turn out?
I am able to get baked on brown stuff off by scrubbing with one of those green scrub pads that is rough. The blue ones work as well but take a lot more elbow grease. But the secret is dipping that damp scrub pad in baking soda. I get all the nasty thick/dried on oils of everything with scrub pads and baking soda.
I was wondering if you had ever made a larger loaf (doubled the recipe, but not divided it). If you have, how much extra time do you add in the oven? I have made your bread a couple times and it always comes out great. The only problem is my husband eats it too fast! LOL
I HAD TO THANK YOU FOR THIS RECIPIE, I HAVE NEVER MADE HOMEMADE BREAD, I DID EXACTLY AS YOU SAID AND IT TURNED OUT PERFECT..
THANK YOU SO MUCH.
LINDA KAYE
Like everyone else, I love this recipe! I baked my first loaf yesterday and even though I was a bit apprehensive b/c it wouldn't shape into a ball.(perhaps the 6,000+ altitude had something to do with the shaping issues.) But it still rose plenty and tasted amazing! Just like the Artisan bread we buy from our local grocery's bakery, but didn't cost me $5! Also I used my pampered chef stone, with a large metal bowl on top. Tonight I'm going to try splitting a single recipe into 2 or 3 smaller loaves for bread bowls for our soup. I just hope I can get the baking time right. I can't wait to try a cinnamon raisin loaf for my daughter's preschool class!
A helpful hint from the bread we used to buy: If you made your bread ahead of time but want to serve it warm, heat your oven to 400 and put a whole loaf directly on the rack for 5 minutes to warm it just before serving. Doesn't dry it out at all & the crust stays crunchy. For leftovers, we keep it stored in plastic wrap and we use our toaster oven at 200 or 300 to reheat it. You can put individual slices in or half a loaf, but it can over-cook quickly. We've also heated bread like this wrapped in foil on the warming shelf on our grill (watch carefully). Great for summer dinners when you really don't want to have a 400 degree oven on! Lastly the packaging for the purchased bread says its best to freeze it if you're not going to use it within a 2 days. But I've never tried that myself.