What I love about this bread
- It’s so easy to make. This dough can be made in less than 5 minutes.
- The basic dough recipe can be enhanced with many different flavor varieties.
- Very little hands-on time.
- Crusty bread never ceases to impress family and friends.
- My 12-year-old grandson can make it.
Let’s make No-knead crusty bread:


- In a large mixing bowl, add flour, kosher salt, and yeast. Whisk together.
- Add water. Mix just until all of the flour has combined with the water. The dough will look like a shaggy mess. That’s ok.
- Cover the bowl with plastic wrap and let it sit for 12 – 18 hours on the countertop. DO NOT REFRIGERATE. This is not optional. It takes that much time to proof the dough. The reason why you need a large bowl is that the dough will start to rise.
- After 12 hours the dough will look like this. It’s pretty sticky, but that’s ok it’s supposed to be.
Shaping and baking the bread:


- Preheat oven to 450 degrees. As soon as it has heated to 450 degrees place your pot with the lid in the oven and preheat the pot for 30 minutes.
-
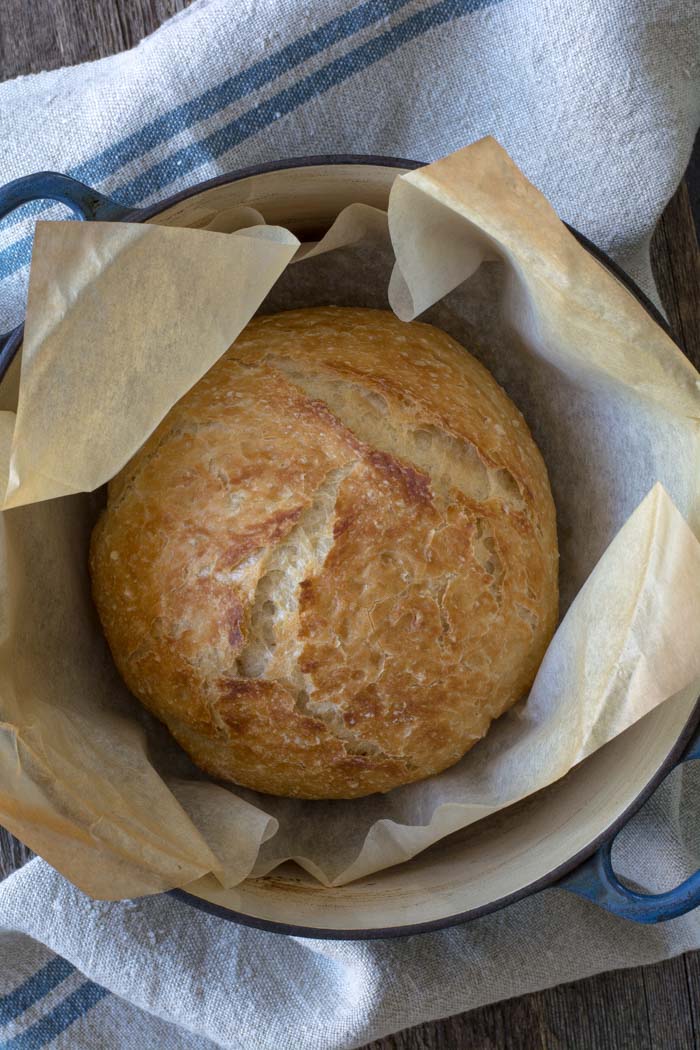
Right after you put the pan in the oven to pre-heat, dump the dough out onto a HEAVILY floured surface. Shape it into a round ball and place on a sheet of parchment paper. Parchment makes it so easy to transfer the dough into a hot pot and then remove it after baking. The parchment paper stays in the pot. This will rest for 30 minutes while the pan is heating. Cover with plastic wrap. Note: Use silicone coated parchment paper. The regular non-coated paper will stick terribly. Don’t chance it.


- Remove pot from the oven and carefully pick up the parchment and drop dough into the pot. Be careful the pan is HOT. Put the lid on the pot and return it to the oven for 30 minutes.
- After 30 minutes remove the lid from the pan. Bake for an additional 15 minutes or until nicely browned. You can test with an instant-read thermometer to make sure the bread is fully cooked on the inside. The temp should be between 190F and 200F degrees. Remove from the oven and carefully remove bread from the pot by lifting the edges of the parchment paper.
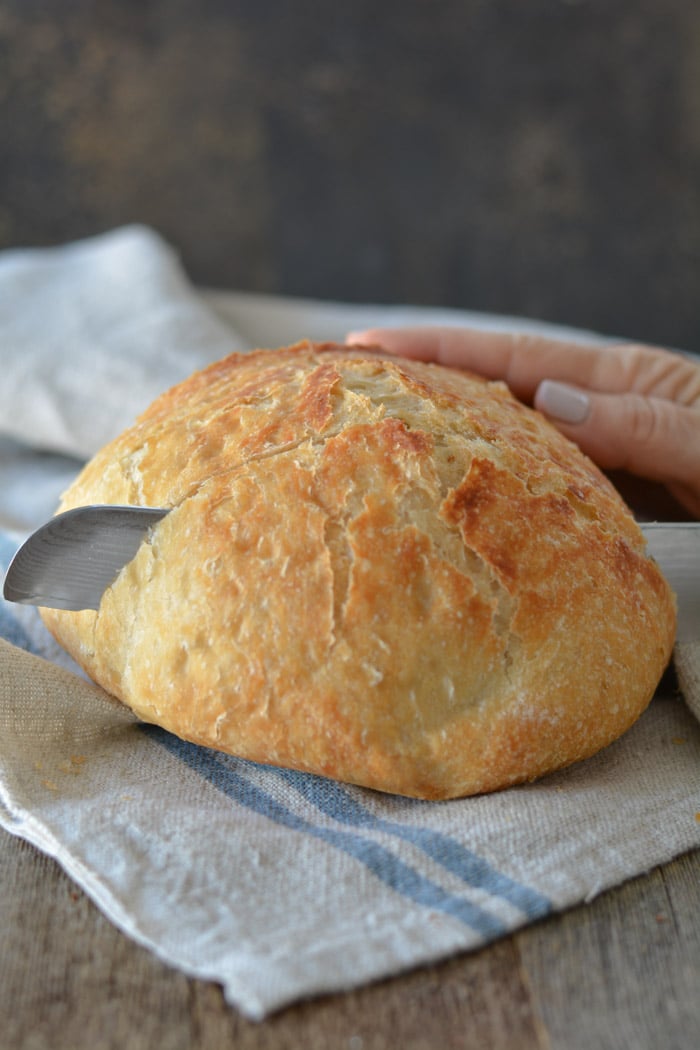
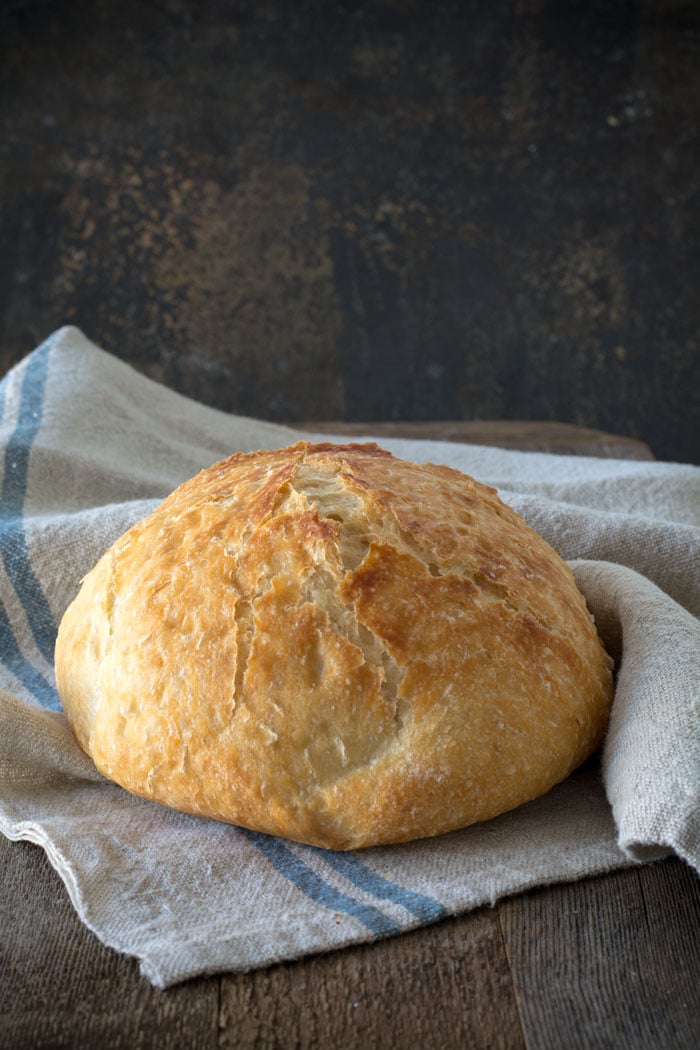
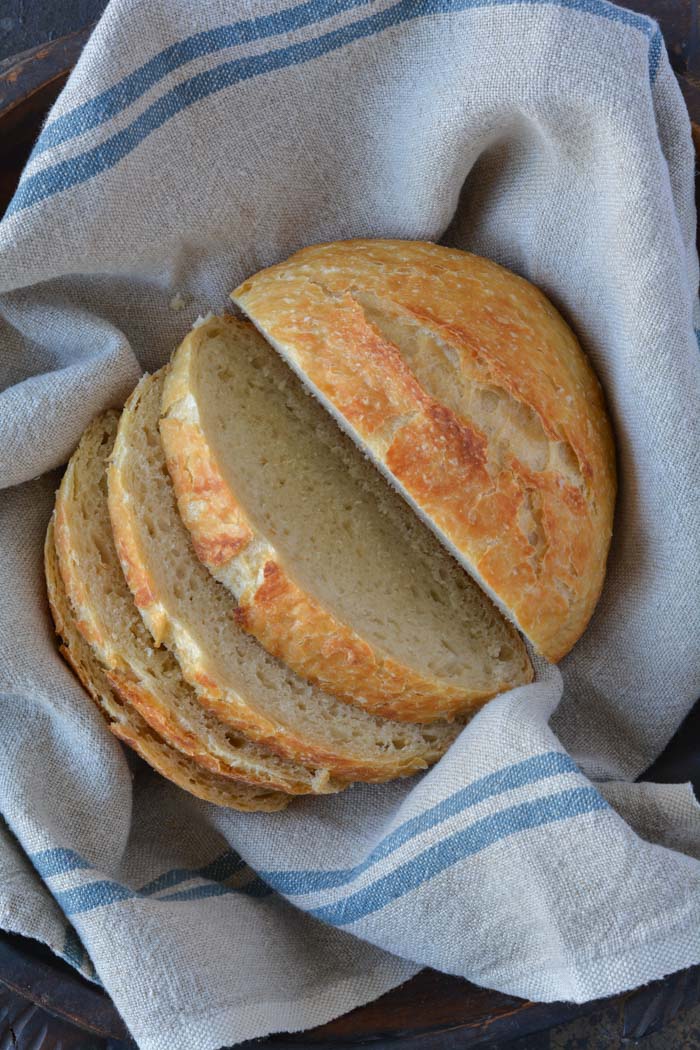
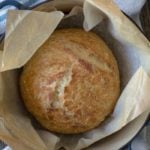
Holy cow! Can you believe how gorgeous that is? It’s best to wait for the bread to cool before slicing. Because I love warm bread I sliced it right away.
FAQ’s
Q: Do I have to use an enamel covered cast iron pan?
A: NO. You can use anything that can take the heat. The following have been used that I know of:
Clay pots with lids, Pizza stone with a bowl to cover the bread, insert from a crockpot, pyrex baking dish with a lid, stainless steel pot with a lid, baking dish covered with aluminum foil, old cast iron dutch oven.
Q: Do I have to use unbleached flour?
A: I always use unbleached flour. You can try bleached flour.
Q: Can I use self-rising flour?
A: I don’t know. I would just stick to all-purpose.
Q: What size is my pan?
A: My smallest pan is 5.5 quart. You can use as small as a 3 quart.
Q: What type of yeast do I use?
A: I use SAF instant yeast. Any yeast should work.
Q: Why is my bread turning out flat?
A: You could try using less 1/4 cup less liquid. Or add 1/4 cup additional flour. Make sure your dough appears to be dry when you first mix it. It will have more moisture during the rising time.
Q: Can my dough sit out longer than 18 hours? Does it HAVE to be between 12-18 hours?
A: I have let some dough sit as long as 24 hours and the bread was beautiful.
Q: Have you tried Gluten-free?
A: From what I hear the best GF is from King Arthur Flour https://shop.kingarthurflour.com/items/gluten-free-measure-for-measure-flour-3-lb
Q: Do I have to grease or oil the pan? Will my breadstick?
A: No you don’t need to grease the pan. I have never had the bread stick when using a cast iron pot. I haven’t tried anything else. The best way to be certain that the bread won’t stick is to form the loaf on a sheet of parchment paper and lift the bread into the pan using the sides of the parchment. Leave the paper in the pan. It’s won’t burn. When the bread has baked, just lift the sides of the parchment out of the pan. Voila! HOWEVER: Not all parchment paper is created equal. I use a silicone coated parchment paper. Regular parchment paper can stick something terrible. Don’t chance it.
No-Knead Crusty Bread
Wonderful yet easy artisan bread with a crisp crust. Prep takes just a few minutes with an overnight rise. Baked in a pot with a lid to create a steam oven. Bread can be made with many flavors and variations.
Ingredients
- 3 cups + 2 tablespoons unbleached all purpose flour (450 gr)
- 1 3/4 teaspoons Kosher salt (10 gr)
- 1/2 teaspoon Instant or Rapid-rise yeast (3 gr)
- 1 1/2 cups water cool (315 gr)
Instructions
-
In a large mixing bowl, whisk together flour, salt and yeast.
-
Add water and mix until a shaggy mixture forms.
-
Cover bowl with plastic wrap and set aside for 12 - 18 hours. Overnight works great.
-
Heat oven to 450 degrees. When the oven has reached 450 degrees place a cast iron pot with a lid in the oven and heat the pot for 30 minutes. OR pot can be placed in cold oven while oven is preheating leave in oven for 30 minutes.
-
Meanwhile, pour dough onto a heavily floured surface and shape into a ball. Cover with plastic wrap and let set while the pot is heating.
-
Remove hot pot from the oven and drop in the dough. Cover and return to oven for 30 minutes. After 30 minutes remove the lid and bake an additional 15 minutes. Remove bread from oven and place on a cooling rack to cool.
Recipe Video
Recipe Notes
FAQ's
Q: Do I have to use an enamel covered cast iron pan?
A: NO. You can use anything that can take the heat. The following have been used that I know of:
Clay pots with lids, Pizza stone with a bowl to cover the bread, insert from a crockpot, pyrex baking dish with a lid, stainless steel pot with a lid, baking dish covered with aluminum foil, old cast iron dutch oven.
Q: Do I have to use unbleached flour?
A: I always use unbleached flour. You can try bleached flour.
Q: Can I use self-rising flour?
A: I don't know. I would just stick to all-purpose.
Q: What size is my pan?
A: My smallest pan is 5.5 quart. You can use as small as a 3 quart.
Q: What type of yeast do I use?
A: I use SAF instant yeast. Any yeast should work.
Q: Why is my bread turning out flat?
A: You could try using less 1/4 cup less liquid. Or add 1/4 cup additional flour. Make sure your dough appears to be dry when you first mix it. It will have more moisture during the rising time.
Q: Can my dough sit out longer than 18 hours? Does it HAVE to be between 12-18 hours?
A: I have let some dough sit as long as 24 hours and the bread was beautiful.
Q: Have you tried Gluten-free?
A: No. I'm still waiting for someone to venture into the realm of Gluten-free. If you try it, let everyone know.
Q: Do I have to grease or oil the pan? Will my breadstick?
A: No you don't need to grease the pan. I have never had the bread stick when using a cast iron pot. I haven't tried anything else. The best way to be certain that the bread won't stick is to form the loaf on a sheet of parchment paper and lift the bread into the pan using the sides of the parchment. Leave the paper in the pan. It's won't burn. When the bread has baked, just lift the sides of the parchment out of the pan. Voila! HOWEVER: Not all parchment paper is created equal. I use a silicone coated parchment paper. Regular parchment paper can stick something terrible. Don't chance it.
More Notes:
Regular active yeast can be used in place of the instant or rapid-rise yeast. It will need to be activated in 1/4 cup warm water. Stir and let sit for 5-10 minutes. However, most of the comments I have received state that the rapid raise works the best. You choose. Whisk the flour, salt, and yeast together.


Can I use active dry yeast instead of instant dry yeast?
You can clean your pans with baking soda. Just rub a little bit on with some water and scrub with your hands- those stains will come right off. Mine have!
Janet;
Please help! I need the instructions for using this recipe for pizza crust. I've had the dough sitting overnight, and tonight is pizza night! I've read thru everything and thought there was a recipe, but I can't locate it. Once I form the crust, do I cook it before I add the pizza ingredients, or cook them all together? Time? Temperature? Do you cover the pizza pan with a lid, or do you just put a dish of boiling water in the oven with the pizza to create the steam? Hope you can answer in time!
Carol
Has anyone purchased a Tramontina dutch oven? Thought I might buy one. Wish I could buy a used pot somewhere.
I threw together a batch tonight and can't wait to see how it bakes up tomorrow! One thing I didn't find on the recipe or in the FAQ's was what temp the water should be. Hot-warm like most bread recipes or does it not matter? I'm sorry if you've answered this already, but I didn't want to scroll through all 900+ comments.
Hi. I just tossed my batch together and can't wait to bake it tomorrow. One thing I didn't notice on the recipe or the FaQ's was what temperature water to use? Warm-hot like typical bread recipes, or does it not matter? I apologize if you've already answered this, but I didn't want to scroll through all 900+ comments– thought you might want to add it to the FAQ's.
Jessica
My bread looks and is fantastic except for the outside is so crusty that you can't bite or chew this. I went back over directions and I did what you said. What can I do ?
Janet, to clean your enamel cookware–I don't have any secrets for the outside, but for the inside, I filled my pot with water and added about 2 T Oxiclean powder. Eight hours later, the inside was spotless–all stains had disappeared. (My Oxiclean powder is about 10 years old, and it still works. Perhaps with such results, I should use it more?)
I am doing my 4th and 5th loaves. The first was great, but 2 & 3 were wheat and not so great–they seems really too moist in the center. I have plain white and a wheat baking now and may leave the wheat in longer. Oh, the one wheat (#3) was really flat.
I just made this tonight after finding it on Pinterest, and used a cinnamon raisin combo in my dutch oven. I could NOT keep it from sticking to everything, my fingers, the mixing bowl, the floured surface. I was so happy with how great it smelled and tasted, but with the sticking it never really formed a pretty round shape. I'm definitely going to try it again, but if anyone has any tips I'm all ears 🙂
that should be the Mr Clean Bathroom Magic Eraser
Just made this and LOVE it! Thank you!
As for cleaning the pot… I have a yellow LC Dutch and it was clean going in.. But when it came out there were baked on marks all over (like the ones you have in your pics!) I was so annoyed! BUT i have a recent new secret weapon for baked on messes i just found. Mr Clean Bathroom Sponge. Lol It took them all off with minimal effort in only a few minutes.
Ok just made this and it is fabulous!!!!! Off to buy more flour and change my name to Martha! Thanks for the recipe, can't wait to make the next loaf.
I have NEVER, in all my 60+ years , been albe to make anything yeast related. I remember my grandmother telling me my hands were too hot( have always had very warm hands)and that I killed the yeast. With this recipe I have limited contact with the dough and I love it!!! Just made a loaf with Italian Herbs mixed in …OH the Aroma!! Thank you for this post.
RE: placing empty Le Creuset in oven. Would adding dry beans work? I use dry beans instead of pastry weights when baking pie crusts. I'm not sure if I'm supposed to re-use them, but I let them cool, and then store them in a ziploc until I need them again. Cheap and easy to use. Also, is it OK to place the enamel pot into the oven at the beginning of the preheating cycle rather than directly into a hot oven? Thanks.
Thank you, thank you, thank you for the wonderful recipe. I made two batches last night and baked them in my magnalite today. YUMMY. I'm going to make two more tonight. I'm having so much fun trying to decide what flavors to try next. I'm think sundried tomatoes and basil. I'll let you know. My daughter and her husband are my official taste testers. Thanks again.
Hi. Can you tell me how you store your bread so it stays crusty? I tried storing it in a ziplock bag–but it lost it's crusty appeal.
I made this bread today and can't believe how easy it was! I don't think I'll ever make bread any other way ever again. I'm so excited to have this with dinner tonight! I used bread flour and my loaf isn't as tall as your picture but it still turned out pretty darn nice. I'll have to restock my pantry with all purpose flour for next time. This is definitely my new go-to bread recipe!
mine is sitting on my counter, while i'm at work today… i added jalapeno, chives, and aged cheddar! i do not have a cast iron pot, so i'm going to try to use my Corningware baking dish… i'll let you know how it goes!
Anyone ever tried this with Gluten Free flour??
First try worked out really well! I used the parchment paper to get it into the pot, and it made it super easy to wrangle.
One note: It was a little pale at 30 minutes (I think my mix was a shade dry), so I just sprinkled a little water from fingertips around the edges and put it back in for about 8 minutes, and it developed that nice golden crust it was supposed to get.
Delicious! Now to experiment a bit with cheeses. 🙂
Fabulous! Fabulous! Fabulous!
This is awesome- thanks for sharing! I used my crockpot insert and covered tightly with foil; it turned out perfectly! I can't wait to try some creative additions. Thanks again!
My bread is turning out tough. Any solutions?
Wow! Thank you for the recipe! It worked out PERFECT even all the way over here in Estonia, Europe! We have different kind of instant yeast and probably slight difference in flour, but the bread came out perfect! The recipe I had been looking for! Oh, the crust! I really could just kiss you but um yeah, maybe later..
Great recipe, beautiful pictures, and where did you get those adorable dishcloths?
I just want to know where you got those great dish cloths??
I found this on Pintrest yesterday and couldn't wait to make it. Just took it out of the oven and my house smells divine! Thank you so much for the recipe!
I've found that when I'm making heavier breads in my bread machine, I have to add 1 TBSP Gluten Flour for every cup of heavy flour. When I changed one cup of All-Purposed Unbleached for my Whole Wheat Pastry flour, I added the gluten and it worked great! It was even light enough for my white bread loving husband!
Thank you so much for the great recipe! I'm sure I'll be using this one for years.
Just made this for the first time after pinning it several months ago. It turned out beautiful and I used a large Corningware casserole pan with lid. My orange cranberry bread is rising now. YAHOO! The men in my family adore bread so this will be a lifesaver!
This is amazing! I can't wait to try it!!! Following from http://www.aleahhelton.blogspot.com
Holy smokes! I've avoided making bread for a long time, for fear I'd mess it up, but your step-by-step instructions sound very do-able. Oddly enough, I just received a Le Creuset dutch oven (same vivid blue color as yours) as a gift. What great timing! I assumed I'd only be using it for soups, etc. Now I know better. The gifter included a bottle of the Le Creuset enameled pot cleaner, as well. Not sure if it's for general cleaning or to eliminate the tarnish/dark spots you have on your pot in the pictures. Once I try it out, though, I'll make sure to post back here on how well it works. Thanks so much for this recipe! 🙂
i've used a paste of baking soda and water to get baked on stuff off of my enameled cast-iron pot and it works like a charm. as to the bread… i've been making a similar recipe for awhile that used a second rise of 1-2 hours. i didn't really get the point of that, and i'm finding the results from your recipe to be just perfect… my family loves this bread.
THANKKK YOUUU SOOOO MUUUCHHHHHH for this recipe! It's AMAZING. so delicious and SO EASY!
TO ANONYMOUS…THE BLOGGER IS NOT TAKING CREDIT FOR THE RECIPE. SHE GOT IT FROM LE CREUSET (THE POT SHE IS BAKING THE BREAD IN) SO STOP BEING SO EVIL. ENJOY THE BREAD AND BE GRATEFUL. ON A MORE IMPORTANT NOTE…I CANNOT WAIT TO TRY THIS BREAD! AND THE VARIATIONS MAKE IT EVEN MORE APPEALING! ON THE HUNT FOR THE RIGHT POT THEN THEN I'LL BE OFF AND RUNNING! THANKS FOR SHARING AND ALLOWING NUS ALL TO LOOK LIKE GREAT COOKS
Your recipe doesn't state a temperature for the water. Is it important that the water temp be other than tap or room temperature?
Thanks so much
I just use cool water from the tap and it works just great.
WOW! I finally found a Dutch Oven at the Salvation Army!! A bargain! $9.99!! It's cast Aluminum…but it works FABO! I baked my first loaf tonight and it was delicious and SO simple. Waiting the 18 hours is the hardest part!
Thank you for your great blog…and the fact that I know you actually READ the comments …even 2 1/2 years after your original post!
Holy moly this bread is easy and delicious!! Kudos to you: two years later and people still can't stop talking about it. I finally got around to trying this recipe I had "pinned" months ago and I can't believe that I waited so long.
I made two: traditional plain loaf and a sweet loaf — YUUUUUM!
For the sweet loaf I added:
— 1/2 cup of dried cherries
— 1/2 cup of chopped dried figs
— 3 TBSP of brown sugar to the dough.
After I put the dough in the pot lightly sprinkled / patted about 1 TBSP more of brown sugar on the top. The sugar on top did not burn, just melted right on in. YUM!! I'm so excited to try it as french toast tomorrow!
I love this bread! Just made my first plain loaf…have a batch of cranberries,English walnuts and cinnamon. Can't wait for it. Hubby thought the crust was to tough…but I thought it was perfect.
Hello! This recipe is AMAZING! I made a honey wheat one yesterday (sprinkled with steel cut oats before baking) and a jalepeno cheddar one today. For the jalepeno cheddar one, I actually used some of the juice the jalepenos are jarred with in place of the water. So good!
My question. I'd like to make some of these for a friend across the country. Would you recommend I only par bake them? For example, just bake the 30 minutes, then send instructions to bake the last 15 once he gets it? I'd really like it to taste fresh and crunchy, but I don't know how to accomplish that if I'm shipping it!
Thanks to anyone for ideas!
I'm excited – I have my dough proofing on my kitchen counter right now. I added about a half cup of oats and a couple tablespoons of honey (can't just do it the original way the first time, oh no) and we'll see how it goes. I'm going to bake it in my old-fashioned, non-enamel cast-iron dutch oven. Meant to throw in some ground flax and chia seeds but forgot – man, anything you want to toss in had better be incorporated before the liquid is added, huh? I'll let you know how it turns out!
Forgive me if you have alread answered this one: I know that measuring flour by a measuring cup can be inconsistent. Do you weigh yours? I have never made bread but I do have a counter scale. Would I just go for 8 oz in weight per one recipe cup?
I COMPLETELY understand the stress of a wedding, as I just got married at the end of April myself. I'm going to make the bread tonight with roasted garlic and onions, and cheddar cheese!!!! I'll let you know how it comes out!!!
Has anyone made this in a 4.25 quart pot?
has anyone done this in a 4.25 quart pot???
I realize how difficult it is to post comments and ask questions. It's a great idea to list all of the ingredients that people have tried. Just as soon as my daughter's wedding is over (8-24-12) I will create a new page just for questions and comments on this recipe (my daughters suggestion). I will create a page for all of the different creations you all have created. Along with comments. I hope that helps. Hang on and be patient with me. My next month is horrific! Love to all.
Can someone make a last of things they've added? I would love to get some ideas! I'm going to attempt to make thing to being down the shore for sandwiches this weekend! DEFINITELY going to add cheese, just haven't decided on what to put with it….garlic and/or onion I think…;what does everyone suggest???
Has anyone tried this with Gluten Free flour?
Here's something funny… after I took the bread out of the oven I realized I forgot to make a vegetable to go with dinner. I popped the bead out, threw a spoonful of olive oil in the pot, bag of fresh spinach, salt, nutmeg, stirred it. And put the lid back on. 5 min later… Sautéed spinach. 🙂 all sitting on a trivet by the way.
Okay its in the oven day 2~
This is Jim Lahey from Sullivan St. Bakery's No-Knead Bread recipe that was featured in the New York Times. Please cite your sources!
Okay here goes I am making bread!!!!!!!!!!!
After baking exactly as directed, the loaf was very crusty but under baked on the inside. Does anyone have suggestions? Thank you.
Thank you for such a great recipe. Love it. Wanted to add that yesterday I forgot to get the dough started in the morning and at 1:30 remembered to put it together. Still baked it at 6:00 that night–so only about 4 hours of rising–and it still turned out great.
I really like this recipe for about three or four years now, and have found it to make the most wonderful bread, I bake it in a Corning ware lidded casserole dish, they preheat beautifully, and the bread is so good….I am very pleased to see that others are working hard on making new and fun breads with great addition to the dough. Thank you so much….
Well I am off work this week end, and even if I did make two loaves this past week end, I am going to make this one. Just my husband and myself here but I betcha we can take care of all of it.
I made this yesterday and it did not come out quite like yours. I did everything the reciepe said and let it rise for 15hrs. when you said you poured out the dough onto your pastry cloth you weren't kidding. Mine was very liquidy. I had to add alot more flour to make it hold together. I think it didn't rise quite as well because of the amoun of added flour. What can I do differently. The bread was a little dense.
I have 2 enamel coated cast irons (red on the outside, white on the inside), and I use Bartender's Friend to clean them up. No scrubbing needed!! It takes off the most stubborn cooked on stains very easily. It's pretty cheap, as well. It actually works great on stainless steel, too.
This reply is very late, but you should NOT use the Lodge brand to make this recipe. My Sister in law did it and the pot kind of exploded and the enamel chipped off. I have a Cooks brand pot and a Kirkland brand pot and they both work well and can handle that high of temperature.
I noticed you did not say if to use cold water or warm water
Walmart is currently selling Tramontina dutch ovens for the clearance price of $35.00 for the larger one. Read the favorable review from a highly reputable cooking magazine. I already have the smaller one and LOVE it for lamb shanks, spaghetti sauces, etc. EVERYTHING! Can't wait to use my new one for this wonderful bread recipe. Thanks for he post.
I made the basic version a week ago and it was a hit for my family! I'm going to bake a cheese version with Italian herbs for tomorrow. Thanks for sharing!
I used active dry yeast instead of instant. My bread did not raise properly. Should I have used more active dry yeast or USING 1 1/2 cups of water too much . I appreciate your help in determining what wen wrong.
We've made this bread two times this week at a very remote cabin in Idaho. No oven, so we bake the bread in a BBQ at around 450. Also don't have Le Creuset, using an old aluminum Guardian casserole pot with a glass lid. Did spray a bit of olive oil spray on the bottom of pot for second loaf. If we can make it work up here, anyone can do it!! Thanks so much.
The other recipes for this loaf call for a second rise after you shape it into a ball. At least an hour maybe an hour and a half. My loaf also came out a little "flat" following this tute. Next time – a second rise for me.
I just made this bread & it is awesome!!! Also gave me a reason to buy a Paula Dean dish.
I use plain old baking soda and water to clean mine. They clean up beautifully.
Thank you so much! This is so fantastic! Sorry for the late response but I did tag it on pinterest and took forever to getting around to try. Last night I mixed in 2 teaspoons of almond extract, some almonds a little orange peel, and a cut up block of cream cheese! When I took it out to bake I used powdered sugar instead of flour then topped with almonds and sifted more powdered sugar on top! It is good. Want to try using some butter milk with the water to see if it makes a sour dough flavor! Will let y'all know. Thanks again, I never thought I could make bread without hours of time! Oh also going to try putting more salt on top for a pretzel kind of bread.
I would like to try dill weed, not really sure how much to add. Any ideas also of what else would go good with that? Or maybe just do the dill. Plus I found my oven cooks rally hot, so if you find that same issue I cooked it covered for 20 min and 10 uncovered and it turned out beautiful. I just can't get over how soft it is. I expected this tough on the outside bread. So thriled to have found this!!
AMAZING. The monotony of an all-day bread making process is over! This recipe is delicious – thank you. I am now getting creative with flavors. Last night I added caramelized onions and Jarlsberg to a loaf. So delicious!
Made this bread and I absolutely LOVE it! Have you ever tried it with a whole grain or seven grain type of flour?
I have the Deep Covered Baker (all stone…lid and all) from Pampered Chef and it turned out perfect!
If the ammonia doesn't work…I am definitely going to try it. Try a paste made with baking soda and water. It scrubs and cuts through crazy cooked on grease without being too abrasive. You do have to scrub though…it's a good arm work out : )
Have you tried baking soda to scrub your pots? I use it on everything. Although I may try above mentioned ammonia trick! I make a paste by adding a small amount of water and scrub away. It's pretty nonabrasive, I don't think it will scratch the enamel and it does a great job. I use it on the metal inserts under the electric burners on the stove and can almost always get them clean. P.S your bread looks amazing and I'm going to try it asap.
two words: THANK YOU
three words: NOW I'M FAT