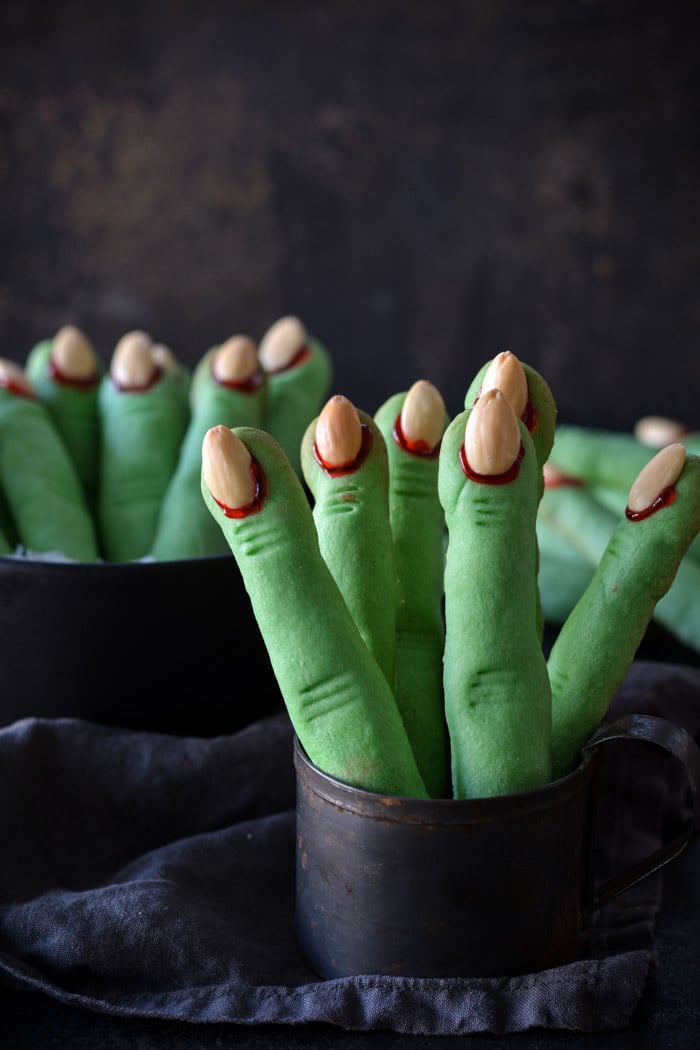
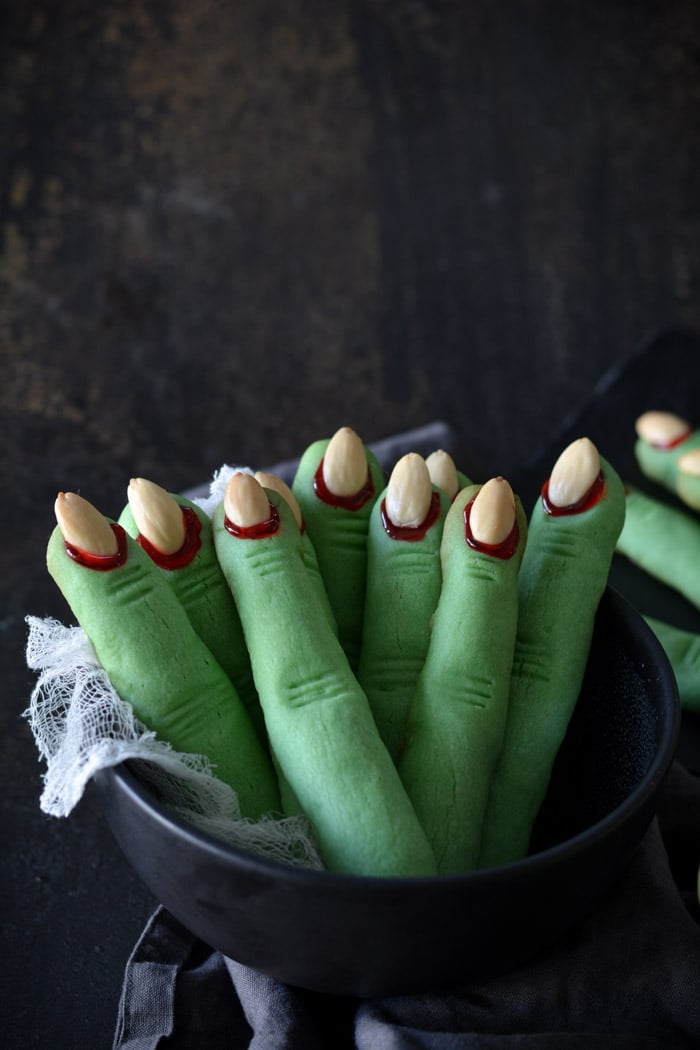
It’s almost scary how perfect these creepy witch finger cookies are as a Halloween treat. Buttery shortbread cookies are easy to make with green dye, and are finished with “bloody” red gel and almond finger nails. This witch finger cookie recipe is sure to be a spooky fun family tradition!
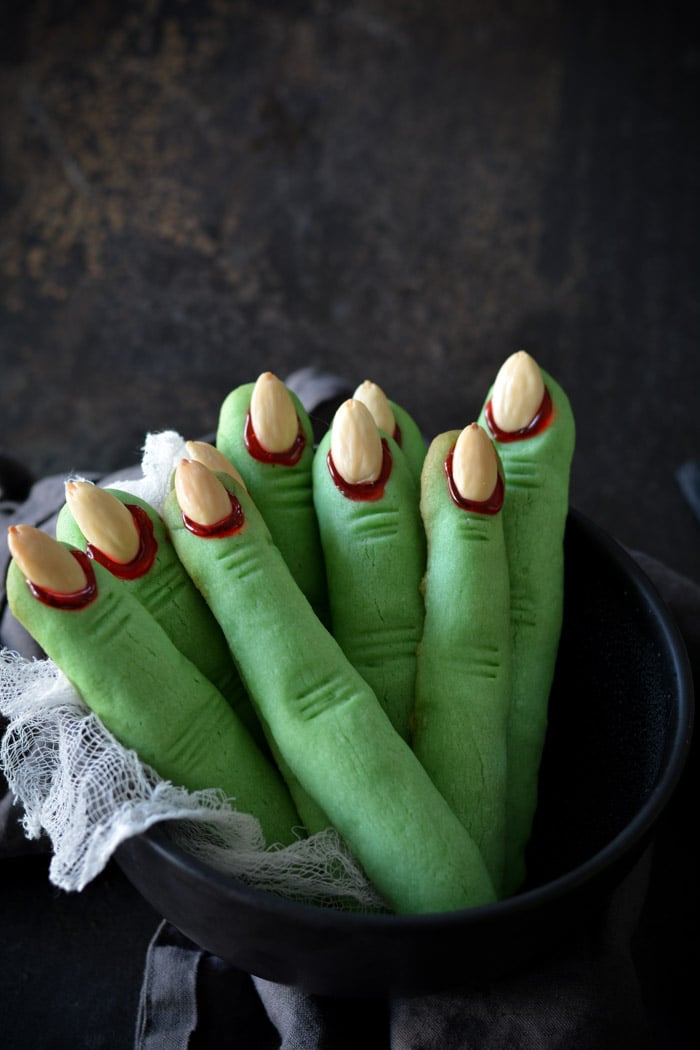
How can something that looks this spooky taste SO good? It’s because these creepy Halloween witch finger cookies with bloody nails are actually buttery, tender and crisp shortbread with almonds.
If you are planning to host a Halloween party you’ve got to add this recipe in your lineup along with Ghostly Cupcakes and Chocolate Baked Donuts with Beet Blood Glaze. Because creepy is in on Halloween!
Recipe Ingredients
- Unsalted butter
- Powdered sugar
- Egg
- Almond extract
- Vanilla extract
- All-purpose flour
- Baking powder
- Salt
- Blanched almonds
- Food coloring
- Red decorator gel
How to Make Creepy Witch Finger Cookies
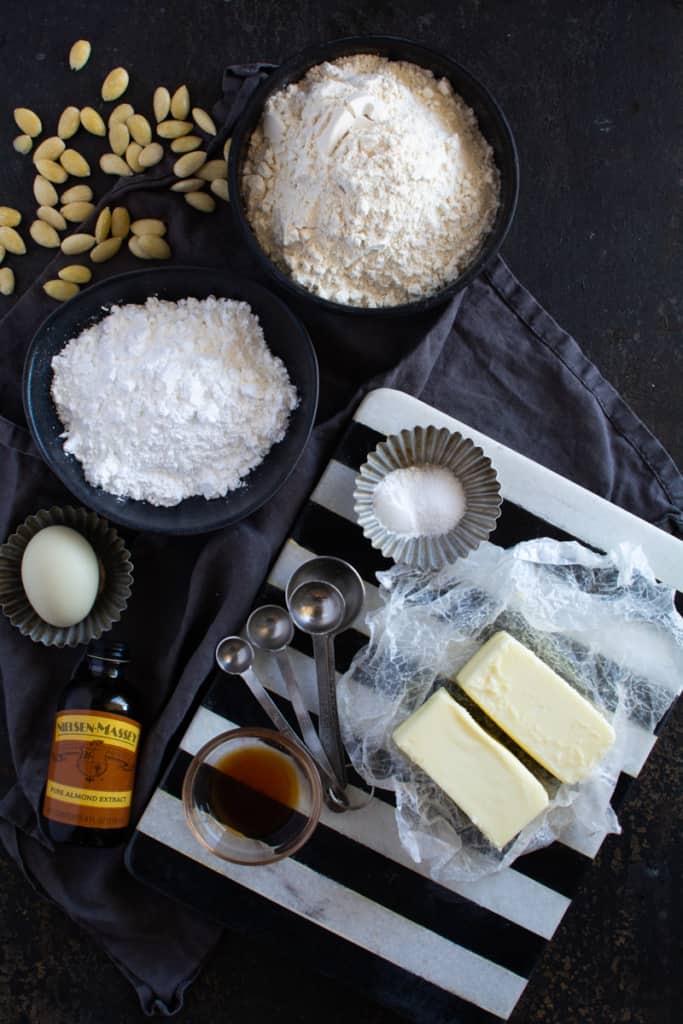
This is an extremely easy shortbread witch finger cookies recipe. Not much to it at all. Gather and measure all the ingredients.
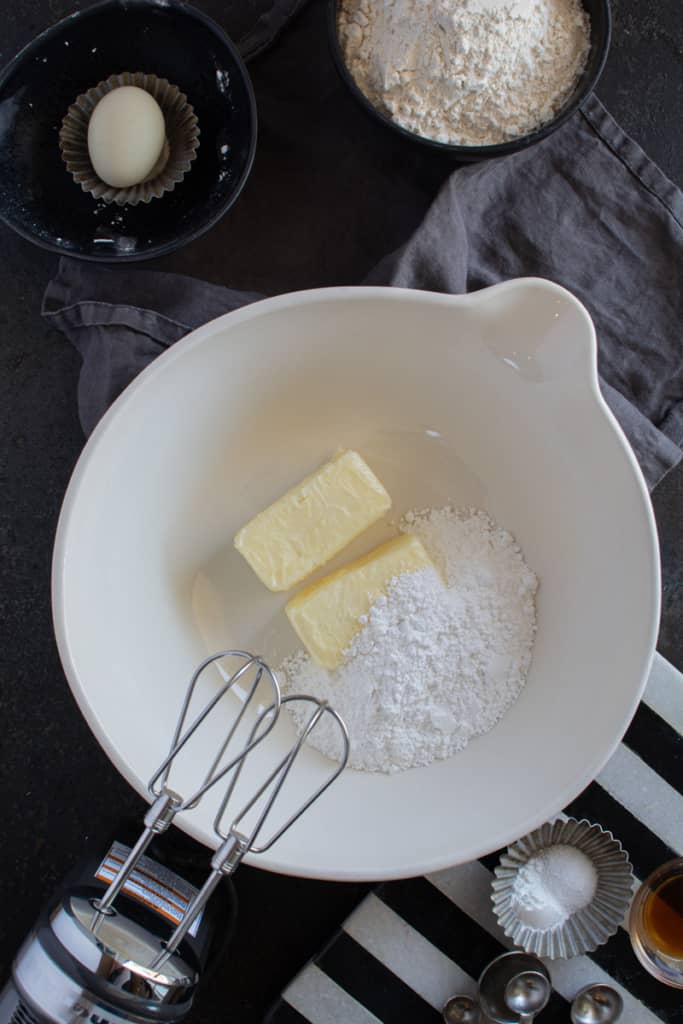
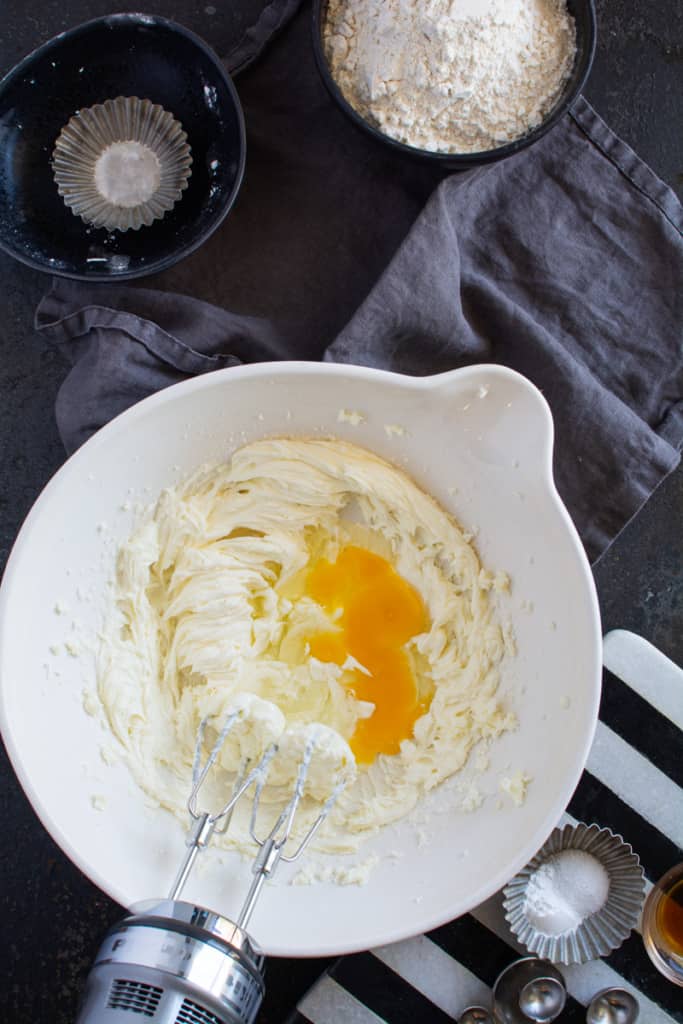
In a large mixing bowl, add the softened butter. Add powdered sugar.
Add egg, vanilla, and vanilla extract. Mix until smooth and creamy. Scrape the sides of the bowl.
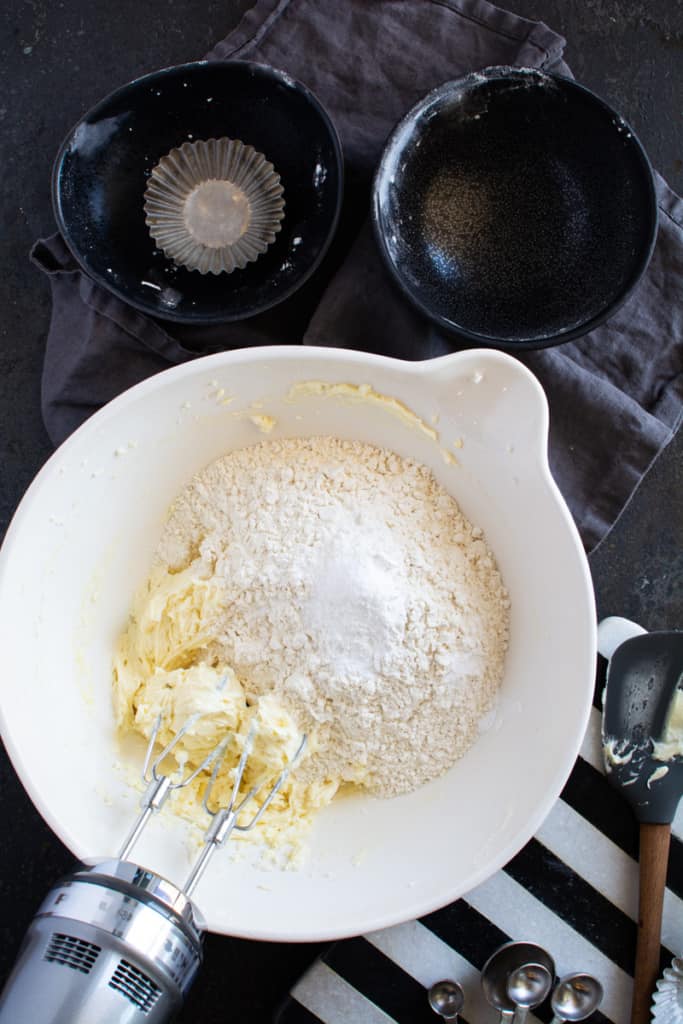
Add the flour, salt, and baking powder. Note: If by chance you don’t have unsalted butter, lessen the amount of salt from 1 teaspoon to 1/2 teaspoon.
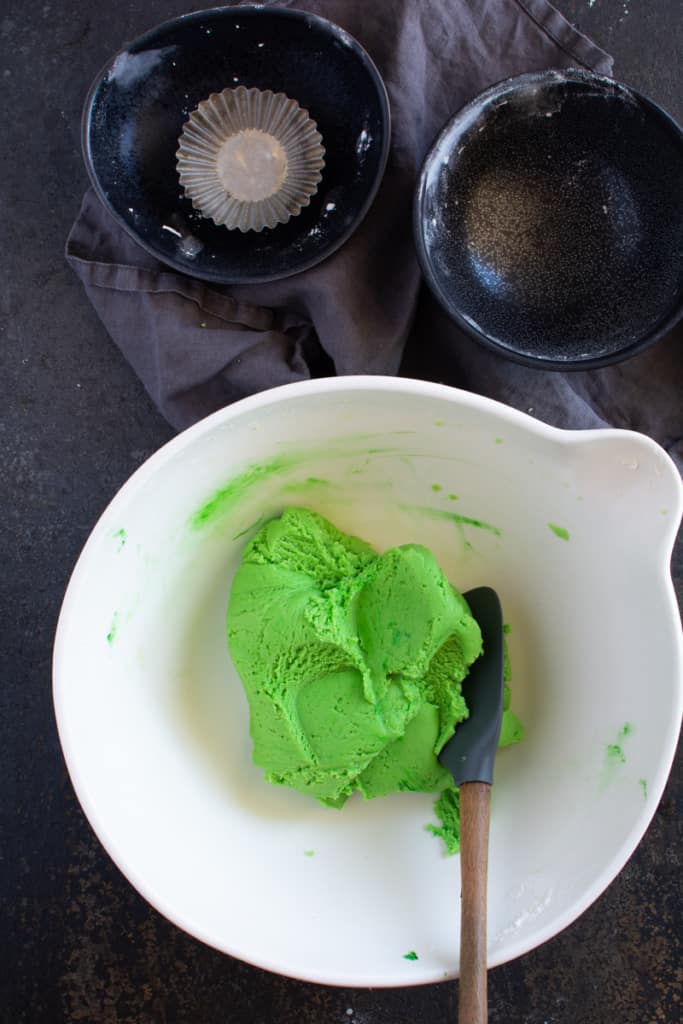
Mix until a stiff dough forms. Then add a few drops of green food coloring until you get the green that you want.
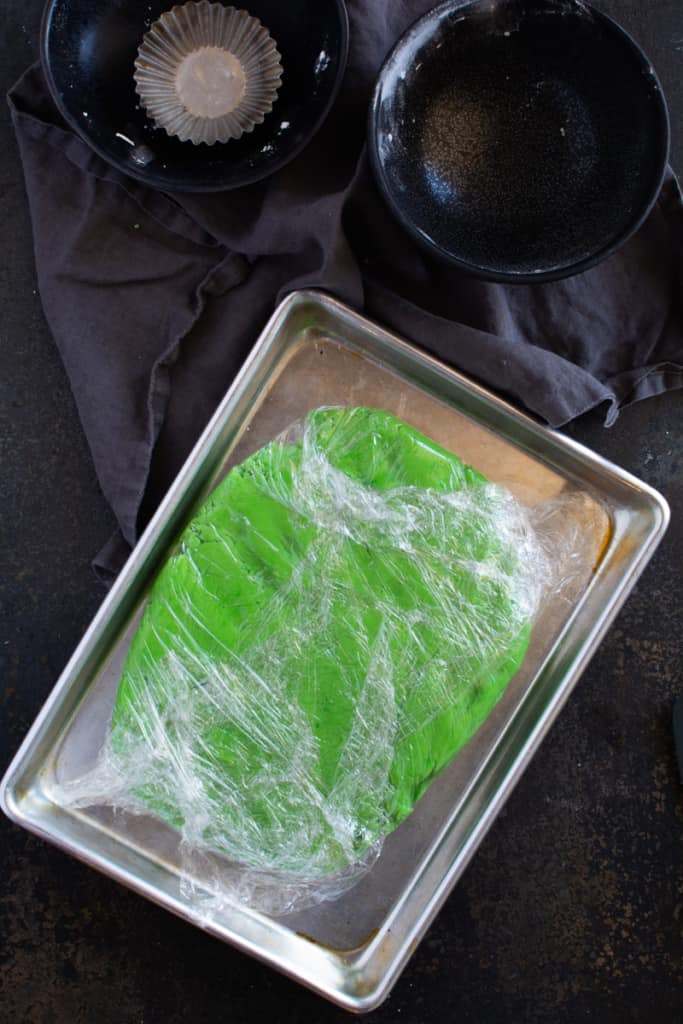
Place the cookie mixture onto a piece of plastic wrap. Wrap tightly and refrigerate for 30 minutes.
Tip: Make sure your blanched almonds and decorating gel are ready to go. You will need this after the cookies have baked.
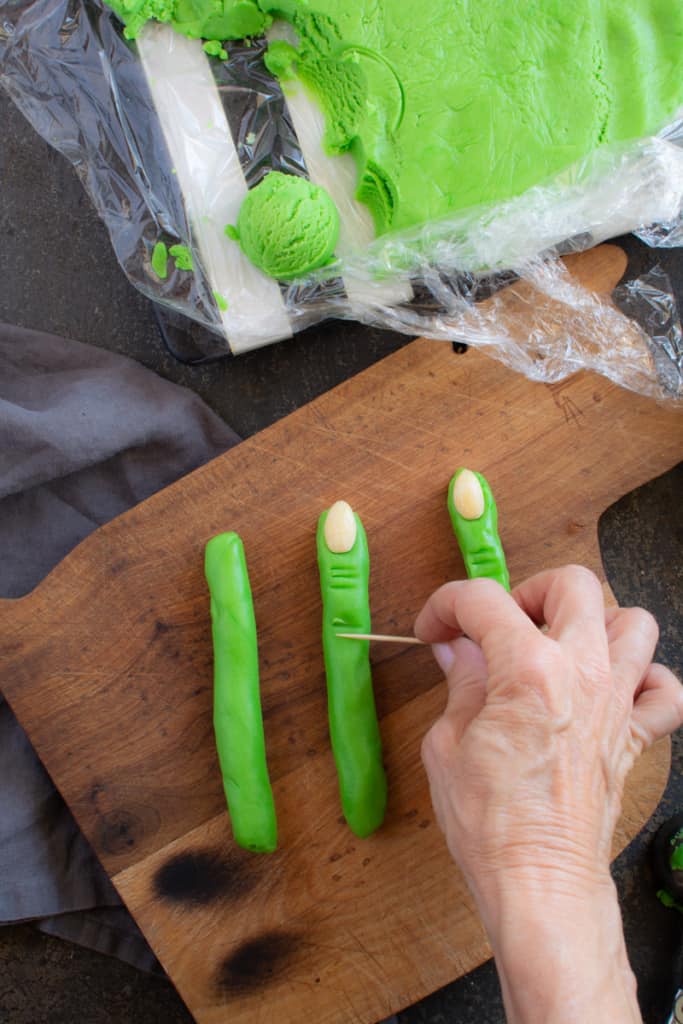
After 30 minutes, remove the dough from the refrigerator. I’m using an ice cream scoop that is about 1 rounded tablespoon. Using a scoop will help keep the fingers uniform in size.
Scoop out a portion of dough. Roll the dough into the shape of a finger. Place a blanched almond on the tip of the finger and press it in slightly. Shape the tip of the finger around the almond.
Using a toothpick or tip of a knife, make lines in the finger to recreate the wrinkles in my finger.
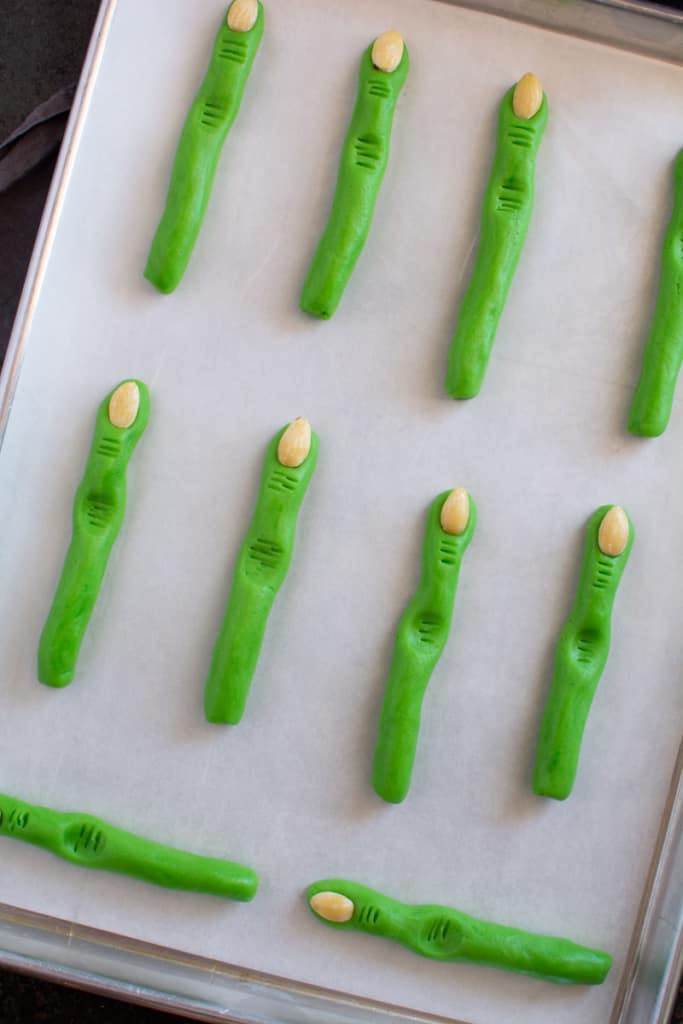
Place the fingers on a cookie sheet. I always line my cookie sheets with parchment.
Place in a preheated 325-degree oven and bake for 20-25 minutes or until beginning to lightly brown.
Let’s Get Creepy!

As you can see the cookies spread out a bit. Let the cookies cool for about 3 minutes.
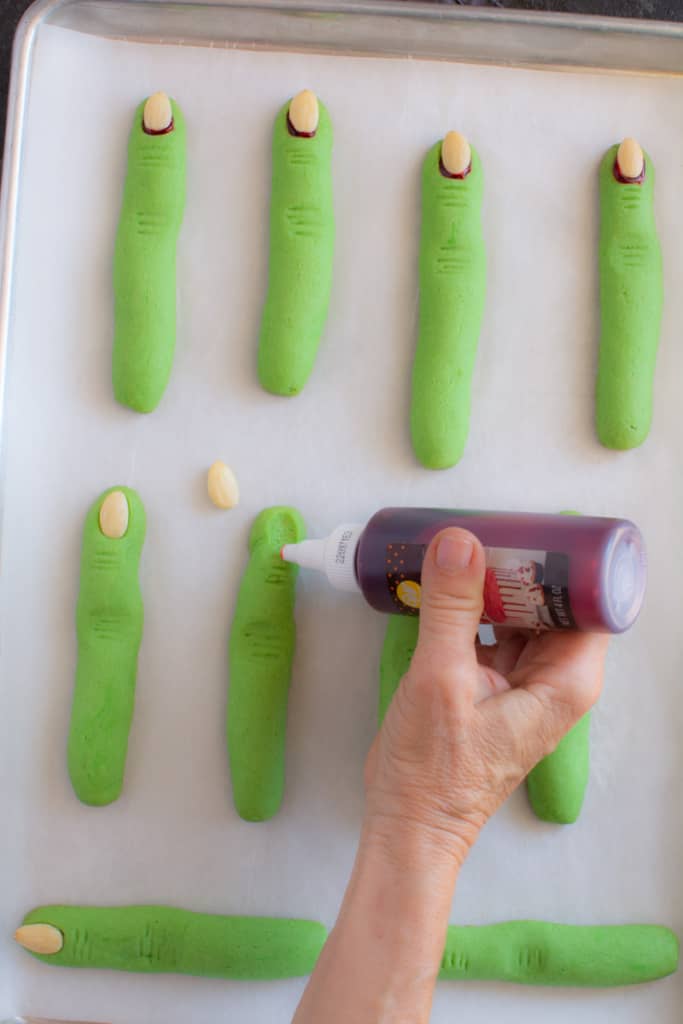
Carefully remove the almonds. Squeeze a bit of the red gel into the indentation.
Press the almond back in place and the blood will ooze out around the fingernail. Gross! (But hey, this is Halloween. Gross is in.) Repeat on the remaining fingers.
And there you have it! Chubby edible creep Witch finger cookies. If you have tried this recipe and like it, please rate the recipe below in the comment section after the recipe. I would greatly appreciate it.
Frequently Asked Questions
Yes, you can make the dough up to a day ahead of time. Keep the dough wrapped tightly in plastic wrap and store in the refrigerator.
You can even shape the creepy Halloween witch fingers ahead of time! Shape them and place on a baking sheet, then cover in plastic wrap and store in the fridge. Or shape and stack with pieces of parchment paper between each finger, place in a zipper bag, and freeze for up to a month or so. Let them thaw in the fridge overnight or at room temperature for 30 minutes or so before baking.
You can swap almonds for macadamia or Brazil nut slivers, or shaped pieces of tempered white chocolate. Or leave them off and paint the ends to look like nails with melted white chocolate or icing.
Absolutely you can. If you like, you can use an alternative color of food coloring. Or leave out the coloring entirely and have pale shortbread cookie-colored Halloween finger cookies.
Substitue your preferred all-purpose flour gluten-free baking alternative for a GF-friendly cookie.
Store them in an airtight container at room temperature for up to 4 or 5 days. They will keep for an extra day or so in the refrigerator, but will also likely dry out a bit.
To freeze, place the baked and cooled cookies all together in a plastic zipper bag. Squeeze out any excess air, and freeze for up to 3 months.
You May Also Love
- Chocolate Half Moon Cookies
- Scotch Shortbread Cookies
- Cracked Sugar Cookies
- Monster Cookies
- Jumbo Chocolate Chip Cookies

Creepy Witch Finger Cookies
It's almost scary how perfect these creepy witch finger cookies are as a Halloween treat. Buttery shortbread cookies are easy to make with green dye, and are finished with "bloody" red gel and almond finger nails.
Ingredients
- 1 cup unsalted butter softened
- 1 cup powdered sugar confectionery
- 1 egg
- 1 teaspoon Almond extract
- 1 teaspoon Vanilla extract
- 2 3/4 cups all-purpose flour
- 1 teaspoon baking powder
- 1 teaspoon salt 1/2 teaspoon salt, if using salted butter
- 3/4 cup whole blanched almonds
- green food coloring few drops
- 1 tube red decorator gel
Instructions
-
In a bowl, beat together butter, sugar, egg, almond and vanilla extract; beat in flour, baking powder and salt. Add a few drops of green food coloring until it reaches your desired green. Cover and refrigerate for 30 minutes.
-
Roll heaping tablespoons of dough into finger shape for each cookie. Press almond firmly into one end for the nail. Squeeze in center to create knuckle shape; using a paring knife or toothpick, make several places to form knuckle.
-
Place on lightly greased baking sheets or parchment lined baking sheets. Bake in a 325 degree oven for 20-25 minutes or until pale golden. Let cool for 3 minutes.
-
Lift up almond; squeeze red decorator gel onto nail bed and press almond back into place, so gel oozes out from underneath. Let cool. Makes about 28 large cigar size cookies. If you only use 1 teaspoon of dough, you will get about 4 dozen cookies.
Recipe Notes
- If you only use 1 teaspoon of dough, you will get about 4 dozen cookies.
- Raspberry jam may be used in place of red icing gel.
- If using salted butter, decrease salt to 1/2 teaspoon.
- Store them in an airtight container at room temperature for up to 4 or 5 days. They will keep for an extra day or so in the refrigerator, but will also likely dry out a bit.
- To freeze, place the baked and cooled cookies all together in a plastic zipper bag. Squeeze out any excess air, and freeze for up to 3 months.
Turned out great, macadamia nuts give a nice flavor contrast with the almond base
I love the addition of macadamia nuts! Brilliant idea.
How fo I soften the dough that i left in the fridge overnight?
Hi Anna, I’m so sorry I missed your question. I hope you just left the dough out at room temperature until it softened.
How long should these be cooked if only using a teaspoon size dough to make the fingers rather than a tablespoon?
I made these cookies tonight for my granddaughter’s birthday. she is having a horror them party.
cookies taste very good. only problem is that they puffed up a lot.
What can i do next time to make them not puff up too much?
What a fun birthday party. I hope the cookies were a hit!
Thanks for share this with us. amazing!!! We love it! God bless you 🙂
I’m thrilled!! I’m so happy your loved the witch finger cookies. Thank you so much for your kind comment.
I made these tonight and they were pretty good – i like really sweet desserts but these aren’t terribly sweet but still have a nice flavour. The fun is in the concept – kids get a kick out of them!
I loved reading this. They are a fun treat to make that kids love. Thank you.
I just made them. They r awesome. A bit soft. Id like them sturdier. I guess more flour will do the trick. Though what i added was enough and easy to roll. Thanks janet.
I’m thrilled you love the creepy witch fingers! A bit more flour will help or you could try baking them a few minutes longer to give them a crunch.
Can i freeze These cooki for a coup of weeks?
Yes. The cookies freeze very well.
I have made these fingers sever times they are easy to make look great and are always a hit
Thank you so much. I’m thrilled you love these spooky treats!
Very easy recIpe to follow! The COOKIES came out deliCious!! Love it!
Thank you so much. I’m thrilled you loved them!
Hi, I made these last year and they were a hit! This year, I have to make something without nuts. I am eliminating the almond flavour, but I don’t know what to do about the “fingernail”? Any ideas?
I’m so thrilled you liked the witch finger recipe. I’m sorry to respond so late. I have been racking my brains on a non-nut option for a fingernail. I’m drawing a blank. Last week I sat around a table with 3 men discussing options of a food that would resemble a witch finger. We thought of a large raisin as an option. But…still not convinced that would be the ideal. I would love to know what you decide to use. Happy baking.
Maybe mini marshmallows. I used them once when I used this recipe to make toes instead of fingers. Put them on after they come out of the oven.
Pumpkin sEeds, the large seed and not the pepita
I use jellybeans cut in half, very effective
Brilliant! I love that idea. Thank you so much for sharing your idea!
I am making these TOMORROW and I found some edible rose Flowers at hobby lobby that are made from corn starch and water that I PLAN ON dusting with purple lustre dust to use on green witch finger cookies.
I will be CAREFULLY cutting each petal – which are the perfect size and tear drop shape.
Cant WAIT for the FINISHED result!
How fun! I would love to see a photo of the finished product.
Pumpkin seeds?
try pumpkin seeds. They make them look extra spooky
HAVEN’T even made 5hem (still eating up Easter) but love this…..and your site
Great work. Bookmarked
Thank you that really means a lot to me.
Was an instant hit at my son’s halloween disco. Thanks so much for this one!
So great to hear! I’m thrilled they were a hit! Thanks so much.
I made these last year and they were a great hit. Mind you some people didnt want to try them as they looked too gruesome. I am now making aagain. Great idea and recipe
Can i sub almond with the cream cheese and ignore the gel if I can’t buy the almond?
Sure! Cream cheese won’t hold up as well and you’ll need to be careful stacking the cookies. Let me know if it works!!
Love this recipe. Made it last year For halloween. It was a huge hit! I am about to make a batch to kick of spooky season. I do have one question, can i make the dough 1 day ahEad, and let it sit in the fridge until ne t day, when i am ready to make them?
Thank you
I’m so glad the witch fingers were a hit. They are so much fun for Halloween. I think making them a day in advance and refrigerating them is a brilliant idea. They just may need a little extra time in the oven if you take them from the refrigerator and place them directly in the oven. Thank you so much for giving the witch fingers a 5-star review. I appreciate that so much!
I made this recipe twice now refrigerated and not, followed recipe completely. Both batches I ended up with fat Shrek fingers instead of witch fingers. What am I doing wrong?
Yes you can make the dough in advance and refrigerate it. You made need to let it sit out a bit at room temp. Should work great! I’m glad you love the recipe. So fun.
I loved this recipe! I actually won the office Halloween food contest with these this year! This recipe was very simple and straightforward. I agree with using more flour so thanks for those comments! Other than that, this recipe is definitely a five star. Thanks for this recipe post!
Oh my goodness! Thank you so very much. And thank you for such a great rating. I really appreciate it. These creepy witch fingers and so perfect for Halloween.
Wahoo!! I’m so happy you won the office contest!! Thanks for rating the recipe and for a positive review. I greatly appreciate it.
This was great. We rolled them a little higher And tHey still flattened quite a biT like otHerS stated, but with added cocoa powder they still looked gHoulish. We used black decorator gel for under the nails. Wish i could post a pic. They tasted great dipped in our marshmallow fluff from aNother recipe. (Im noT uSing caps lock. Not sure whats going on with the caps)
Awesome! Thanks for sharing. Yum Marshmallow fluff. You can send a pic to my instagram account. I’d love to see your Witch Fingers.
Very easy aNd fun to make. Perfect directions.
Big hit with the kids.
Glad I found your WEBSITE
Thank you. I really appreciate your comment.
Recipe was okay, I Am an avid baker and i followed the INSTRUCTIONS to a tee, howeVer the amOunt of flour called for was way too much. I dId not use nearly as much as called for. I suspect if i used the called for amount It woUld haVe been Way too dry anD crumblY. Make sure You don’T add ALL the flour at once, add by 1/2 cup’s to avoid Using too much (seems To be a common issue with this RECIPE) 🙂 besides that, amazing Recipe and ill be using it again! Kids loooooved it.
These were delicious!
But i have notes! put the food coloring in as early as possible! I had to Overwork my Dough to get thE color to spread, and even after refrigerating for an hour my cookiEs spread out flat when baked because i think the dough was overworked.
Here’s aNother tip! raspberry jam holds the fingernail on better if you put the jam on before baking.
Thank you for your notes. It’s interesting that some comments say they needed more flour and the fingers spread out. While others it’s too dry. Your comments will help other bakers.
Do these cookies freeze and store well? Thinking about making a big BATCH ahead of time for our upcoming Halloween party.
Yes! They freeze beautifully. Just layer them between sheets of waxed paper. They should freeze great for 2-3 weeks.
Just went to make this recipe and I don’t have butter…boo. is there anyway to substitute margarine? Can’t wait to eat one. Happy Halloween everyone.
I have never tried them with margarine, but my mother-in-law uses margarine all the time and just substitutes with equal amounts. But I really have no idea if there the outcome will be different. If you try it, please let me know. I’m sure other readers would like to know as well.
I have Made tHese for tHe past two years And they coMe out PERFECT. I lIve in california. I’m visiting my daughter in alasKa. Do i need to do anything diFferent to the recipe? I’m reading comments and see that some peOple have problems with the dough.
I’m not exactly sure. It seems that most of the issues have been in the pacific northwest. I’m assuming humidity plays a part in that. Just make sure the dough seems workable and not super sticky before you wrap it. If it seems super wet just add in more flour until it’s workable. Please let me know how they bake up. I’ll be anxiously waiting. Thanks so much.
I made these cookies. everybody loved it .
A kids friendly recipe during the pandemic for Halloween 2020.
Thank you
I am going to try no knead pumpkin breads too.
Wahoo! Thank you so much for commenting. Please let me know how your bread turns out.
Made tHese for the first time for a family Halloween dinner party. I followed the RECIPE verbatim, they came out fantastic And were a family favorite. I Will definitely be making theSe again!
(Unrelated note, the comments seem to only allow caps)
Wahoo! I’m so glad they were a great success. They are so fun to make and eat. Sorry about the “caps”, I’ll see if I can fix that problem. The comment doesn’t come through in all caps. Thank you so much for sharing your success.
These cookies are really fun to make! I cant wait to give them to my noece and nephew.
The cookies are a little dry, despite followifn the directions. I Think that wother my butter wasnt warm enough, as the mixture started TO BECOME crumbly or i overmixed it. But ill tey thw recipe again for tHe holidays because its easy and tasty!
As for the Almonds, blanched ones were tiugh to find, Oddly. But i settled for Unsalted, Raw marcona almonds that I found at Frah Thyme grocery stOre. They browned pretty well wJile baking so i looks fine to me. Thanks fir this fun recipe!
Marcona almonds are a great substitute. I’m really glad you liked the cookies. Maybe you could add a bit less flour next time you make them. The mixture really shouldn’t be crumbly. I’m sorry you have had problems with the text. For some reason, it appears in all caps while typing, but appears normal when I receive the comment. Thank you for your helpful information.
Good news! I made them again last Night. I was careful with the flour and it was still crumbly. But the butter was the right temperature and it began to mix well into the flour. The second batch was Better than the first.
I guess it starts out a litle crumbly and then melds well. I’m definitely keeping this recipe! Thanks for your reply and sorry for the typos in my original post.
hello!
I’m planning to make these next week, and had a question. are there any issues with the almonds adhering to the cookies after they’ve been removed and replaced? after baking? It seems like they’d fall off easily without some sort of adhesive agent. Does the red gel provide that? I was thinking that maybe I needed to make a paste with powdered sugar and water, but maybe not?
Good question. Yes, the almonds will fall out after being removed from the fingertip. The gel does act as an adhesive. I have not had a problem with the almond falling out because the gel will hold them in place. I hope this answers your question. Please let me know if you and any more questions.
I was wondering if there is a way To add chocolate into the recipe. Much love. Good recipe!!
Yes, I believe you can add chocolate to the cookie dough. I would use cocoa powder 2-4 tablespoons. I’d start with just 2 T because it’s possible the cocoa will dry out the dough a bit. I’d love to see photo’s of your chocolate creation. Please let me know if you have any other questions. xo Janet
We have always used strawberry or cherry jam for under the finger nail taste better. 🙂
Brilliant! Without artificial color or additives. ❤️
SpooktacUlar! I used what i had so i made indents with almond slices and then placed them after baking with a store bought royal icing instead Of the RECOMMENDED gel. I also added the severed finger blood.
Severed finger blood? Gross! I love it!!! I bet the looked fabulously creepy.
I WILL DEFINITELY BE MAKING THESE AGAIN THIS HALLOWEEN! MADE A BATCH LAST YEAR AND EVERYBODY AT WORK WAS GOING CRAZY FOR THEM. tHE ABSOLUTE PERFECT SPOOKY TREAT!!!
Awesome! Thanks for commenting. I sure appreciate it.
SUCH A COOL RECIPE!! AND EASY TO ADJUST TO MY ELEVATION by adding more flour!
Super easy and looked so good. However, they were very soft, fell apart when I tried to remove from the pan and tasted awful…not sweet at all. What did I do wrong? followed the exact directions? I really want to try again for my grandkids halloween party. should i use more flour and sugar? i too live in washington state.
Sorry to respond late but I want to make the cookies again. I’m not having the same problems as you are in Washington. Try just adding flour until you can form the dough with your hands without it sticking to your palms.
Refrigerate them for an hour before baking and work in batches so they don’t get warm. You can more add vanilla and almond extract for more flavor. I hope this helps. 🤞🏼
Perfect! I did add some extra flour. If you bake them right after chilling, they dont Spread much. I used fondant instead for the fingernails because of nut allErgies at school with red royal icing!
Wahoo!!!!
So so so good! And i DON’T like hard cookies, but these were amazing!!
So buttery and good. Thanks for your positive feed back.
Bummed to say I’m another one whose cookies spread and flattened out into blobs. I did wonder if the dough felt a bit too soft and almost added more flour, but didn’t want to end up with dense bricks either. chilled for 30 min and even upped the temp to 350. I’m wondering if the success of this recipe has to do at all with the climate you are in…I’m in Seattle which is very damp. I’d love to try these again! Maybe a 1/2 batch and up the flour. Fun recipe! Just maybe do a test run.
I’m so sorry to hear that your cookies spread out and flattened. I’m wondering about the altitude as well. I live at 5500 above sea level. At high altitude to prevent cookies from spreading out, I strengthen the batter by reducing the sugar and adding more flour. How soft was the butter? Room temperature butter is too soft. The butter should only be softened enough to leave a finger indentation. Let me know if you try them again and the changes you make.
made them for a ward trunk or treat! Super fun and easy. would be fun to make with kids.
Lucky kids! Thanks for sharing.
I made these a few years ago. They were a great hit. I did do the cocoa powder on the knuckles and then….. as a added creepy look,,…I used red icing on the end like they were cut off. I stacked them on a platter and added a little more blood (I mean red icing).
Awesome. Thank for sharing such great and creepy tips.
Made these fingers to take to my friend’s annual halloween block party. They were a hit. I used a bit less of the green food color which gave the cookies a creepy look. I used sliced almonds rather than whole.
Best of all I used my mom’s crooked finger as my model.
Planning on making them again this year.
I am going to try dusting the joints with cocoa powder as suggested in another comment.
Awesome! I love it! Cocoa powder in the joints is a brilliant idea. Thanks so much for sharing your success.
Can these cookies be frozen after they are prepared?
Absolutely!
We made these and they were a HUGE hit with the Grandkids! They cant wait for me to make More haha
Everything in the recip worked AMAZING!!! THANK YOU!!!!
Thank you so much for sharing your success. My grandkids love them too!
This is a fun and versatile recipe. I used slivered almonds, and painted some of them with red candy melts and pressed them into red sanding sugar, so they looked like fingers from glamorous witches. I served them with a chocolate/raspberry ganache dipping sauce. I saved half of the dough to make Christmas cookies this week. Thank you for a great recipe.
Thank you for your kind comments and wonderful suggestions and ideas. I love the idea of a dipping sauce. You are so creative!
Thank you for sharing your recipe. I made these at Halloween and they were a big hit and spooky enough that one of my nieces 4 yrs old said I’m not eating mo witches finger lol. I do have a question for you can You freeze these cookies after they are baked? I plan to make small cookies for THANKsgiving.
So sorry to respond so late. I’m visiting my daughter in Singapore. Yes! The cookies freeze great. I froze a batch for 3 weeks and they were great! I have noticed how some kids won’t touch the cookies. So funny.
Fingers came too wide. Really spread out. Didn’t look much like fingers. Dough was extremely hard to roll. TOO sift, Even AFTER PUTTING THEM In fridge. Dissapointed !
So sorry to hear about your witch fingers. I have never had problems rolling the dough. It should be quite pliable. The cookies do spread a bit, but never more than the photo. I’m sorry you have a bad experience with this recipe.
I know cooking times on ovens vary, But I did 325 degrees for 17 minutes and the cookies came Out on the softer side of a crumbly butter cookie. Mmm. Also, I broke the last inch OFF and Dipped the jagged end in a raspberry jam with the seeds. Now The ENDS look like they were cut off from the witch and laid Somewhere for a while so they are not only Bloody STUMPS but with maggots!(the raspberry seeds look like maggots.)
It is so wonderfully gross. My 8 year old son just loves the bloody maggot looking raspberry jam dipped witch fingers. I will mention a Small thing… i didn’t see where the Recipe said to add food coloring so I was Ready To PLACE in the Fridge when I Realized They Weren’t green. I added it In after The dough was Formed and it worked But wasn’t IDEAL – there Was ALOT of elbow grease used! 🙂 Next time I’ll Make Sure To add food coloring before the flour. What a great recipe!
I’m so sorry I neglected to put the food color in the recipe instructions. I have corrected that error. Thanks for bringing it to my attention. I just keep laughing over your raspberry jam/maggots. I love that idea. Try baking your cookies just a few minutes longer. It’s ok if they are starting to brown a bit. Thanks for sharing these great ideas!
Love THE look of this receipe (especially the Green food coloring). I have tried two others to make these witch fingers! Before I try this receipe, any advice on How to keep THEm from getting too hard and flat?
Thank you!
Thank you so much for rating this recipe. It means so much to me. I would try to shape the cookie fingers with a higher rise on top of the cookie…like thinner finger but higher up. Does that make sense? Not totally round. Kind of oval, but with the height on top. The cookie shouldn’t be soft. It should be more like a shortbread cookie or biscuit with a tender bite. I hope this helps.
Just made these and they came out perfect but I had to adjust one thing: I needed waaaay more flour than what’s in the recipe.
So to everyone who has problems with the dough: just add flour until you can form the dough with your hands without it sticking to your palms.
Make sure you use some extract (I added vanilla, almonds and some oranges to the other batch) to give them flavour.
Refrigerate them for an hour before baking and work in batches so they don’ t get warm.
My cookies held their shape completely, they haven’t gotten flat and they changed size only minimally.
Thank you for taking the time to give such great advice.
Can the cookie dough be left in the fridg overniGht?
Yes you can leave the dough in the frig overnight. If the dough seems to hard to roll, just let sit at room temp for a bit until it is easy to handle. Happy Halloween.
I like to use a clean paint brush and brush cocoa powder into the knuckles and around the fingertip. This gives them depth and makes them look a little dirty adding to the overall creepiness. 🙂
This is such an awesome idea!!!! I love it!! Thank you so much for sharing. I will try that when I make the cookies tomorrow. Brilliant!
These are a hit! I make them with ras jam instead Of red cake deCorating gel. Theyre deliciously creepy
Raspberry jam is such a great idea with healthier benefits. I’m so glad they were a hit and yes, so creepy.
Hello , I tried this recipe today for my office party , everything seems to work out well until they were baked . They spread and ended up becoming flat Bob fat fingers . I did chill the dough for about 30 mins . Don’t know what went wrong . Would like to try this again
Hi Kareina, I’m so sorry your fingers didn’t turn out. It’s hard for me to know what the problem could have been, so lets trouble shoot a couple of areas. Soften the butter only until soft enough to push a finger dent into it. Does that make sense? Don’t let the butter come to room temperature. Just soft enough to mix. Try adding 2 tablespoons more flour to help the dough hold it’s shape. You could, also, try refrigerating as long as an hour. I hope these tips help. I’ll feel so bad if your fingers flatten out again. Keep in touch.
Thank u so much ! I might give them a try again today . I’ll keep the tips in mind , I melted the butter completely .. so that might have been one of the reasons .
Best of luck.
Any idea what might have went wrong ? ?
I have used this recipe three years in a row now! Everyone loves them so much they have become a Halloween tradition 🙂
I used raspberry jam instead of red gel and then add a little jam/shredded coconut to simulate nerve endings & blood at the base of the finger.
They look so gross but taste so good!
Ha ha now that's just gross. I'm sure kids love them. Thanks for sharing a great idea.
Just made these with my grandson and they looked fine until we cooked them and they just spread into one big flat mass with almonds in. Don't know what we did wrong!!!!
I'm so sorry you had problems. I have not experienced the fingers spreading out. Try refrigerating the dough next time???
I have made this recipe a few times now over the years around Halloween and I love it. It's always a hit at the office.
To make the fingers extra creepy looking I cut the finger with a knife at the other end to make it look like they were severed off the hand and then I brush on some of the red decorating gel on the end to make them look like bloody severed fingers. Happy Halloween!
Ha ha what an awesome idea!!
Can these b made ahead like a day or 2 and put in tpperware container and should container b put in fridge or cupboard
Yes they can be made in advance. I have put them in the freezer for a week. They are pretty much a shortbread cookie, which will keep in a container for several days.
Can I use jam instead of deco gel?
Absolutely. What a great idea.
Love the step-by-step guide with the pictures and the laughs to go with it! Will be trying this soon. Thank you.
Thank you so much. I hope you do try them.
When baking the witch fingers, they fall flat. Why?
Hmmmmm…did you refrigerate them for at least 30 min? You may need to add an additional 2 tbl. flour and refrigerate longer or overnight.
I love them. Please allow me to add to my 2014 Halloween recipes ideas thanks!
Absolutely! You have a great Halloween recipe collection. Great Pinterest site.
I couldn't find almonds so I used pumpkin seeds. Worked out great.
That's great. I like that idea even better. Thanks for sharing your great tip.
Just made these for my son's class for tomorrow…they are amazing! He loves how creepy they look. He even helped make them! Thanks for the recipe!
Made these last night for son's party today. He said mom these are creepy looking lol i said good thanks for posting
Ha ha. That's so funny. You baked complete success. thanks for sharing your story I have smiled all day.
Thank you so much for this wonderful recipe. Rest assured it will be used for evil :). Still laughing about the second witch hand. Don't be so critical of your hands… I'm the same way ha ha ha
I just want to say this is a great recipe and thanks so much for sharing. But please don't say such bad things about yourself. Your hands may appear aged, as have mine, but your hands, and nails, look just lovely to me! Very well maintained, NOT another witch hand at all!!
would this work with the tubes of cookie dough?
I really don't think so. The dough will spread out and you will have a flat blob with an almond stuck to it. Pre-made cookie dough is less than delicious. These cookies may look gross, but taste delicious. They're more along the lines of a shortbread. Sorry for the bad news 🙁
Yes, you can use with pre-made cookie dough, just add one cup flour to the dough. If it gets too hard, add a couple of drops of water and work it in really well!
could you put the almonds in food coloring to have colored fingernails.
I'm not sure. I have never tried that. Why not?
I paint mine with foid coloring and let dry on wax paper befOrehand
So awesome. Thanks for sharing your fun tip.
i;ve GOT to do this with my grandkids…. i didn't have this recipe when MY girls were little.
thanks! like all your funny comments about your own hands! 😉
These are Great! I can't wait to make them for my grandkids. Thank you!!!
Aren't grandkids the best? Thanks for your kind comment.
i bet if you placed a few chocolate chip on them as they are cooling they could even look like warts…
What a great idea!
You are even more awesome than the finished product. Loved the commentary and wish you were my neighbor! Happy holidays
Just made these last night, and they were great. We joke that something that tastes so good has never felt so wrong! I couldn't find blanched whole almonds anywhere here (five stores!) and ended up using marcona almonds instead — actually worked pretty well due to the coloring/veining of the nuts, making them extra creepy and old-looking! Thanks for the recipe 🙂
They look amazing, will try to do them tomorrow. Greetings!
So much fun for Halloween. Thanks for commenting.
Very creepy! I am going to link to these in my upcoming Halloween Recipes post!
So fun. Thank you. The are pretty gross, aren't they?
Thanks Cristina. You made me laugh out loud. I'll be more careful about bashing myself. I really think you can make these witch fingers with chocolate. I think you'd be fine adding a few tablespoons of cocoa powder. Let me know how they work out.
This is super impressive. A couple of questions please, can we make a chocolate form of this? should I add cocoa powder? if yes, what quantities? or should I just shower the dough with chocolate chips? Is the texture of this thing crispy wafer like or soft cookie like?
Lastly, please do not badmouth your hands. We're your fans, we love what those hands can do. And the only reason you can conjure up such wonderful recipes to share is because those hands are willing to experiment instead of sitting pretty being pictured for some glossy magazine and struggling to not clutch at that next batch of fresh cookies.
Cristina
These ARE easy, because they don't have to look good. That's helpful for me.
These are so fun.. seeing them everywhere right now… You make it look surprisingly easier than expected. Thanks for sharing!
This looks really creepy..Should try it some day…Thanks for the recipe dear.
Check out my Giveaway and join in that..
http://yummytummy-aarthi.blogspot.com/2011/10/3-reason-to-celebrate-3-cookbooks.html