What I love about this bread
- It’s so easy to make. This dough can be made in less than 5 minutes.
- The basic dough recipe can be enhanced with many different flavor varieties.
- Very little hands-on time.
- Crusty bread never ceases to impress family and friends.
- My 12-year-old grandson can make it.
Let’s make No-knead crusty bread:


- In a large mixing bowl, add flour, kosher salt, and yeast. Whisk together.
- Add water. Mix just until all of the flour has combined with the water. The dough will look like a shaggy mess. That’s ok.
- Cover the bowl with plastic wrap and let it sit for 12 – 18 hours on the countertop. DO NOT REFRIGERATE. This is not optional. It takes that much time to proof the dough. The reason why you need a large bowl is that the dough will start to rise.
- After 12 hours the dough will look like this. It’s pretty sticky, but that’s ok it’s supposed to be.
Shaping and baking the bread:


- Preheat oven to 450 degrees. As soon as it has heated to 450 degrees place your pot with the lid in the oven and preheat the pot for 30 minutes.
-
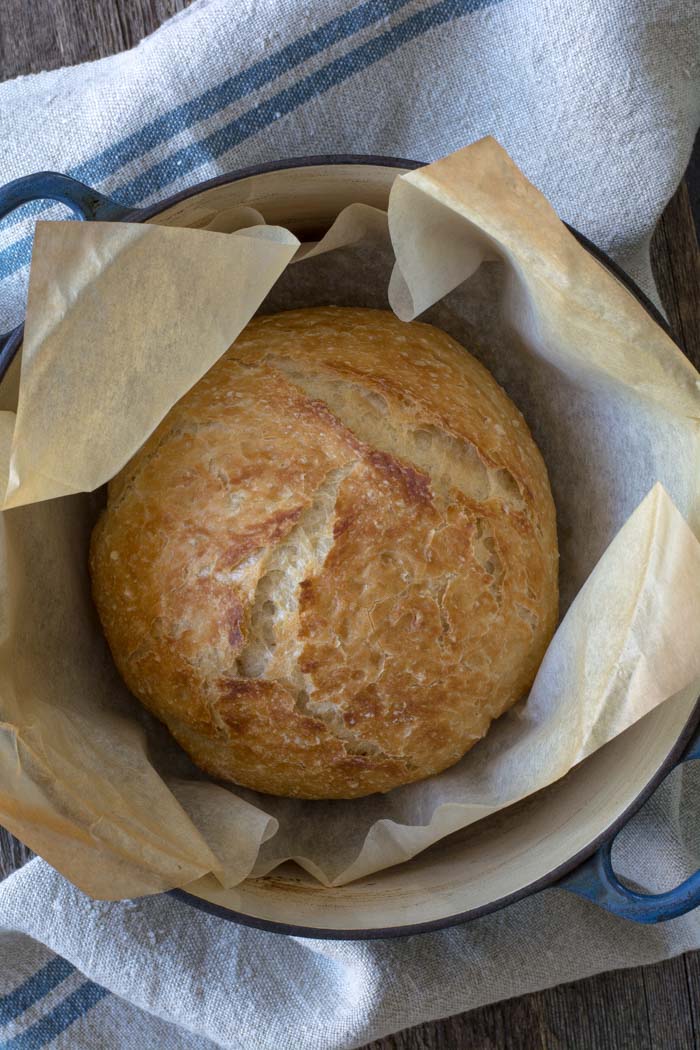
Right after you put the pan in the oven to pre-heat, dump the dough out onto a HEAVILY floured surface. Shape it into a round ball and place on a sheet of parchment paper. Parchment makes it so easy to transfer the dough into a hot pot and then remove it after baking. The parchment paper stays in the pot. This will rest for 30 minutes while the pan is heating. Cover with plastic wrap. Note: Use silicone coated parchment paper. The regular non-coated paper will stick terribly. Don’t chance it.


- Remove pot from the oven and carefully pick up the parchment and drop dough into the pot. Be careful the pan is HOT. Put the lid on the pot and return it to the oven for 30 minutes.
- After 30 minutes remove the lid from the pan. Bake for an additional 15 minutes or until nicely browned. You can test with an instant-read thermometer to make sure the bread is fully cooked on the inside. The temp should be between 190F and 200F degrees. Remove from the oven and carefully remove bread from the pot by lifting the edges of the parchment paper.
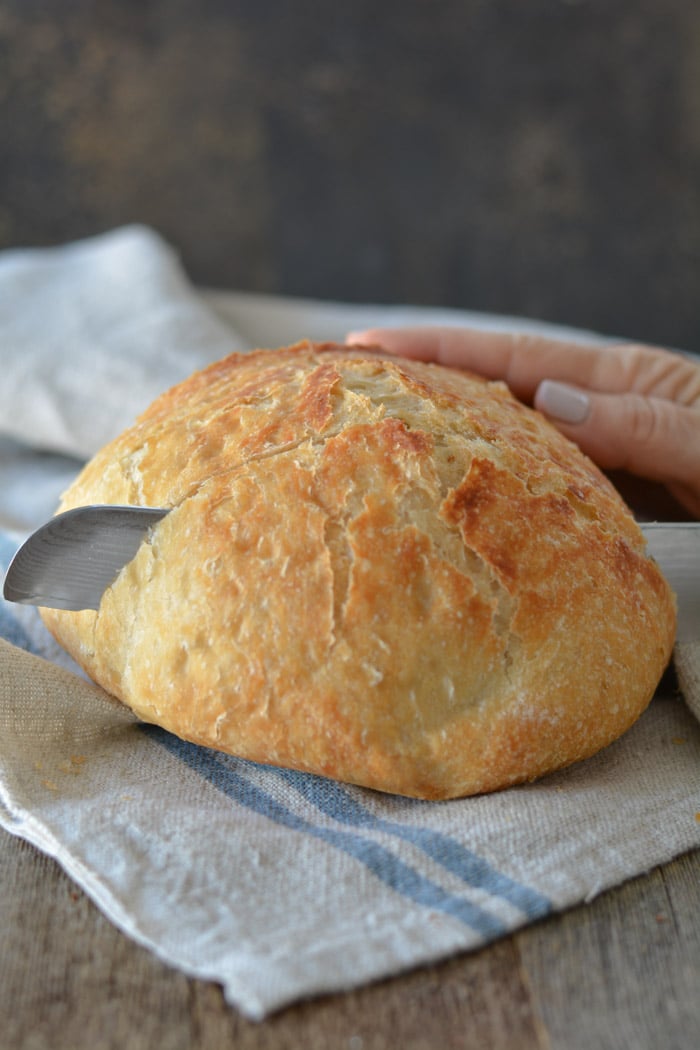
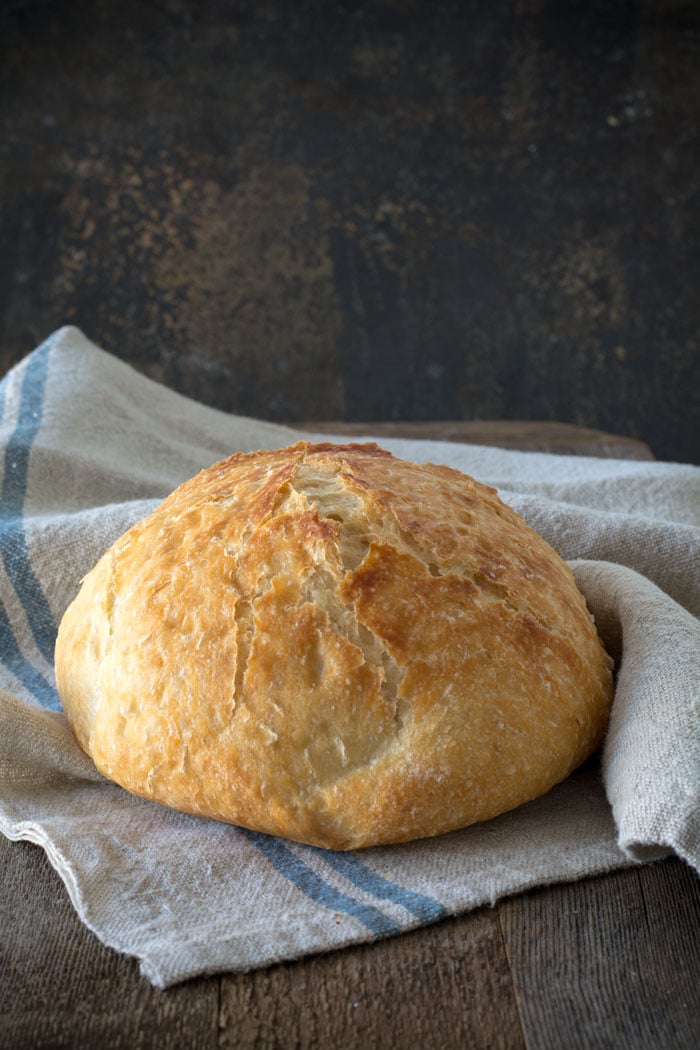
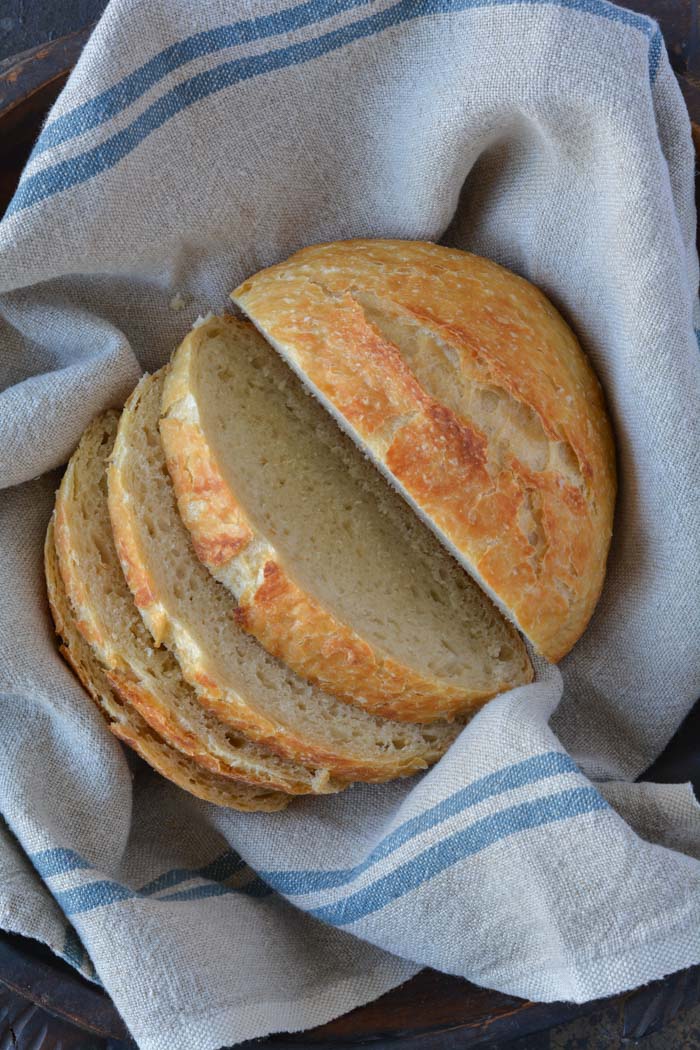
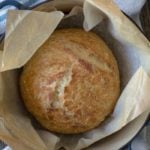
Holy cow! Can you believe how gorgeous that is? It’s best to wait for the bread to cool before slicing. Because I love warm bread I sliced it right away.
FAQ’s
Q: Do I have to use an enamel covered cast iron pan?
A: NO. You can use anything that can take the heat. The following have been used that I know of:
Clay pots with lids, Pizza stone with a bowl to cover the bread, insert from a crockpot, pyrex baking dish with a lid, stainless steel pot with a lid, baking dish covered with aluminum foil, old cast iron dutch oven.
Q: Do I have to use unbleached flour?
A: I always use unbleached flour. You can try bleached flour.
Q: Can I use self-rising flour?
A: I don’t know. I would just stick to all-purpose.
Q: What size is my pan?
A: My smallest pan is 5.5 quart. You can use as small as a 3 quart.
Q: What type of yeast do I use?
A: I use SAF instant yeast. Any yeast should work.
Q: Why is my bread turning out flat?
A: You could try using less 1/4 cup less liquid. Or add 1/4 cup additional flour. Make sure your dough appears to be dry when you first mix it. It will have more moisture during the rising time.
Q: Can my dough sit out longer than 18 hours? Does it HAVE to be between 12-18 hours?
A: I have let some dough sit as long as 24 hours and the bread was beautiful.
Q: Have you tried Gluten-free?
A: From what I hear the best GF is from King Arthur Flour https://shop.kingarthurflour.com/items/gluten-free-measure-for-measure-flour-3-lb
Q: Do I have to grease or oil the pan? Will my breadstick?
A: No you don’t need to grease the pan. I have never had the bread stick when using a cast iron pot. I haven’t tried anything else. The best way to be certain that the bread won’t stick is to form the loaf on a sheet of parchment paper and lift the bread into the pan using the sides of the parchment. Leave the paper in the pan. It’s won’t burn. When the bread has baked, just lift the sides of the parchment out of the pan. Voila! HOWEVER: Not all parchment paper is created equal. I use a silicone coated parchment paper. Regular parchment paper can stick something terrible. Don’t chance it.
No-Knead Crusty Bread
Wonderful yet easy artisan bread with a crisp crust. Prep takes just a few minutes with an overnight rise. Baked in a pot with a lid to create a steam oven. Bread can be made with many flavors and variations.
Ingredients
- 3 cups + 2 tablespoons unbleached all purpose flour (450 gr)
- 1 3/4 teaspoons Kosher salt (10 gr)
- 1/2 teaspoon Instant or Rapid-rise yeast (3 gr)
- 1 1/2 cups water cool (315 gr)
Instructions
-
In a large mixing bowl, whisk together flour, salt and yeast.
-
Add water and mix until a shaggy mixture forms.
-
Cover bowl with plastic wrap and set aside for 12 - 18 hours. Overnight works great.
-
Heat oven to 450 degrees. When the oven has reached 450 degrees place a cast iron pot with a lid in the oven and heat the pot for 30 minutes. OR pot can be placed in cold oven while oven is preheating leave in oven for 30 minutes.
-
Meanwhile, pour dough onto a heavily floured surface and shape into a ball. Cover with plastic wrap and let set while the pot is heating.
-
Remove hot pot from the oven and drop in the dough. Cover and return to oven for 30 minutes. After 30 minutes remove the lid and bake an additional 15 minutes. Remove bread from oven and place on a cooling rack to cool.
Recipe Video
Recipe Notes
FAQ's
Q: Do I have to use an enamel covered cast iron pan?
A: NO. You can use anything that can take the heat. The following have been used that I know of:
Clay pots with lids, Pizza stone with a bowl to cover the bread, insert from a crockpot, pyrex baking dish with a lid, stainless steel pot with a lid, baking dish covered with aluminum foil, old cast iron dutch oven.
Q: Do I have to use unbleached flour?
A: I always use unbleached flour. You can try bleached flour.
Q: Can I use self-rising flour?
A: I don't know. I would just stick to all-purpose.
Q: What size is my pan?
A: My smallest pan is 5.5 quart. You can use as small as a 3 quart.
Q: What type of yeast do I use?
A: I use SAF instant yeast. Any yeast should work.
Q: Why is my bread turning out flat?
A: You could try using less 1/4 cup less liquid. Or add 1/4 cup additional flour. Make sure your dough appears to be dry when you first mix it. It will have more moisture during the rising time.
Q: Can my dough sit out longer than 18 hours? Does it HAVE to be between 12-18 hours?
A: I have let some dough sit as long as 24 hours and the bread was beautiful.
Q: Have you tried Gluten-free?
A: No. I'm still waiting for someone to venture into the realm of Gluten-free. If you try it, let everyone know.
Q: Do I have to grease or oil the pan? Will my breadstick?
A: No you don't need to grease the pan. I have never had the bread stick when using a cast iron pot. I haven't tried anything else. The best way to be certain that the bread won't stick is to form the loaf on a sheet of parchment paper and lift the bread into the pan using the sides of the parchment. Leave the paper in the pan. It's won't burn. When the bread has baked, just lift the sides of the parchment out of the pan. Voila! HOWEVER: Not all parchment paper is created equal. I use a silicone coated parchment paper. Regular parchment paper can stick something terrible. Don't chance it.
More Notes:
Regular active yeast can be used in place of the instant or rapid-rise yeast. It will need to be activated in 1/4 cup warm water. Stir and let sit for 5-10 minutes. However, most of the comments I have received state that the rapid raise works the best. You choose. Whisk the flour, salt, and yeast together.


I have just tried this recipe. For some reason I have been afraid of dissolving the yeast in warm water, and now I have this awesome bread that looks, smells and tastes just great. I am newly retired and have "yeast breads" on my discover list. Thank you to all who contributed to sharing this recipe and its variations. I'm ready to start making it every day! but I don't have much storage for the flour I could use. Merry Christmas.
Thank you so much for this amazing bread recipe! It turned out so beautiful I don't want to cut it! I also wanted to let you know that I used my pampered chef dutch oven and it turned out amazing! Rebecca from Minnesota 🙂
I have made this recipe a number of times now, always using a Lodge enameled dutch oven. I think using a cast iron dutch oven is really the key for this recipe, the moisture is what makes it crusty. It nearly always works, however I just pulled a loaf from the oven that stuck to the pot. I think it stuck because the pot wasn't that hot when I flipped the dough in. I put another loaf in just now, and this time made sure the pot was really hot and I also put some flour in the bottom, just to make sure it doesn't stick. Hopefully the sticking was a one-time thing! The flavors I have done are: rosemary, rosemary olive; lemon, garlic and rosemary; and rosemary parmesan. I'm baking these for Christmas gifts and will also probably try herbs de provence, cheddar cheese, roasted garlic, poppy seed, and cranberry orange.
Hi Janet
I was excited to try this recipe, but alas my bread is flat and doughy…it never really rose as I thought it should, so I am wondering if it was the yeast? I had just regular yeast from the bulk barn..could have died??? anyway I am trying another loaf today with Fleishmanns instant "quick rise yeast" and I used warm water do you think that might help?? Anyway I did try this and I will update tomorrow!!
thanks again for you inspiring recipe.
Well, I did it. I baked bread for the first time EVER. I decided to 'go deep' for my first attempt, and made "Garlic Cheddar". It's cooling right now, but have to say, it looks Ah-mazing. It's heavy, not sure what that means, dense, delicious, cheddar….that's what I'm thinking. This is a simple, fun, "gonna make more" recipe. Thanks for posting it. Regardless of how this loaf tastes, I WILL be making this again, with different additions. Oh Baby….Daddy's a Baker… 🙂
I just got out my breads of the oven. i made 3: one with oatmeal, cranberries, orange zest and almonds. Another one with "jamón serrano"(the spanish prosciutto), parmesan cheese and green olives. The other one was plain. I wish i could post here the photo. They're beautiful and so delicious!! Thank you! Greetings from México!!
My god… It actually worked! I can't even make cereal most days so this was a pleasant surprise lol. Thanks!!!
I cannot believe how easy this was!! And the bread is PERFECT, so delicious! Thank you thank you thank you for sharing!!
I just made this bread. I haven't tasted it yet but it is so beautiful!!! Thanks for the recipe.
I just made this and I'm in shock! It turned out so beautiful and was the easiest thing in the world. I used a covered ceramic dish to bake. I can't wait to try some with add-in's. Thanks!!
It looks like my Pyrex is not big enough because when I baked it yesterday 10 min into the lided bake my loaf was already touching the lid.I am wondering if I could use my slow cooker pot but covered with foil.The lid has a cheap plastic knob…
Help
If you add cheese, can it sit out for that long and not be bad to eat?
Awesome recipe, works a treat, I really enjoy bread making and anything to make it easier can't be bad, only tried the basic bread so far, but looking forward to trying some of the different flavours. Cheers, and Merry Christmas x
I love this bread! I made one loaf yesterday and am making two today. I put Tastfully simple Dried Tomatoe and Garlic Pesto Mix in two loaves. It's so good and am making one with chopped hazelnuts. 🙂
Recently diagnosed with Type 2 Diabetes. Does anyone have the carb count on this bread?
Do you think this can be done in just a crock pot? if so about how long do you think it would take on low or high setting?
I baked a loaf of bread for the first time ever today thanks to you and the appealing simplicity of this recipe and the way it was presented. Thank You! I really thought I had messed up when I thought the dough was too dry so I added probably 1/4c water in the beginning – not to mention I thought my yeast might be to close to the end of it's usable date so I upped the amount to 1tsp, (plus I added a dash for good measure because I really like a yeasty bread). I didn't know what to expect when I rose this morning (soup perhaps), although the dough was very "loose" and didn't really want to hold a firm shape I still pressed on. I also did not have a ceramic covered cast iron dutch oven, so I used my corning wear covered casserole dish. WOW! The house smelled amazing and I was so shocked when I lifted the lid and that beautiful crusty loaf was revealed! I was delighted to say the least. I loved it, the kids loved it, and my husband LOVED it. I'm so happy I tried this recipe, no matter what it's original origin, the way you presented it made me believe I could do it – and I did! It tastes just as good or better than any artisan bread I have bought at the bakery – the extra yeast lends itself to a more sourdough style without the need for a starter, and the texture is perfect. Am looking forward to making a variety of versions with this recipe, thanks again.
I made my first loaf of your bread today! I used my large Pyrex square casserole dish with its clear glass lid, since I don't have a cast iron pot. I used 1.5 cups white flour and 1.5 cups whole wheat flour. The resultant loaf was very tasty, but apparently I am the only person in the world who has had a loaf stick to the bottom of the casserole dish, because mine was so stuck I practically had to dig it out, which ruined the appearance of the loaf because it become "bottomless"! It smelled wonderful as it was baking, and tasted very good. Next time, I'll be sure to form the dough into a loaf on parchment paper, and after the 30 minute rise, place the dough still on the parchment paper into the casserole dish for baking. Hopefully, that will eliminate the sticking to the bottom of the pan. I can't wait to make more, and add herbs, cheese, artichokes, etc for even more great flavor.
Just tried this recipe and I am in bread heaven!!
I used 2-1/2 cups all purpose flour, 1/2 cup whole wheat.
I really wanted a sourdough taste so I started with 1/4 cup buttermilk and added the water to equal 1-1/2 cups.
I also increase the yeast to 1 tsp and it raised beautifully and has a delightful sourdough taste.
I cannot believe just how easy it was! Thank you so much for sharing the recipe!
About on how to clean your pots. If you have a self cleaning oven. You can put those pots in there while the oven is in the self cleaning mode. It will burn all that goo right off so that it will be easy for you to clean. I know this because I have same pots and it is how I clean them. Other way is to use the green Brillo pads and comet and scrub hard the old fashion way.
this bread is amazing!!! thanks for sharing–i would love to have the recipe for the pepper jack cheese and the jalapeno cheese bread
love this recipe. The drs have been after me for years about kneeding dough and what it does to arthirtic wrists!!! Now a bread that looks wonderful and needs no kneeding. Can't wait to try it. Love the idea of giving it away wrapped in a tea towel. I love giving away my homemade goodies and farm fresh eggs. I found this recipe just in time for Christmas presents. Can't wait to get started. Also how about the pizza dough recipe you hinted at??? I've never found a good recipe for pizza dough.
Janet, thank you so much for this recipe, I tried it and it looks just like the one in your picture, it's amazing! I can't believe how easy it is! You are the best ! It looks and tastes just like the bread from my country ( Portugal) that I miss so much! You made me very happy and I will be baking a lot of bread for sure! Thanks again!
Did you use chopped fresh cranberries or craisins?
To clean your babies…you may want to try using a baking soda paste…it will cut all the stuff but won't harm the finish. I use it on all of my appliances, big and small, also on all of my bake ware when they get that way. Just a little water and baking soda made to the consistency of toothpaste add in a little elbow-grease and there you go, clean pots.
Just made this bread and it turned out beautifully 🙂 And the best part is I just did it with my regular old stove top 6 quart pot!
YUM! Looks FABULOUS! Did you oil your pot ora anything before baking the bread? Just wondering if it will stick?
Thanks!
Just got the bread out of the oven after 30 minutes and it was done. The outside was a little over done. The berrys were dark also. What do I do? Should I bring the temp down to 400?
I found this Blog last week, baked my first bread today, and it turned out really good and tasted delicious. I'm from the Netherlands, and one of the things I missed most when I moved here, was all the good bread they have my country. Bread here usually tastes too sweet (the whole wheat) or tastes like actually nothing. Thank you so much for this wonderfull and easy to make recipe, I don't think I ever need to buy any other bread in the store. I'll want to try whole wheat next time, or half and half. And for sure I'll make a raisin-nut bread one day. That's one of my favorite breads.
By the way, I baked mine in the pan from my slow cooker with aluminium foil to cover it. Worked out good.
Hi. I can't wait to get started on my dough and I may just do that in the next few minutes after I leave this message. I just wanted to say with regards to the issues of rising/not rising dough: I know you've already stated that you only use instant dry yeast, and I think this is at the crux of the issue. I make pizza dough all the time and have the packaged yeast on hand that requires proofing in warm water (between 110-115°, so I think using this yeast would require as you suggest subtracting the amount of water from your recipe that you would use in proofing the yeast, which takes only about five minutes. So, 1/4 cup of really hot tap water which is usually around the 110° mark, added to the yeast, then add to the recipe. There is a brown jar of yeast granules sold on the grocery store shelves as opposed to the individual packets that specifies that it is great for use in bread machines, which is yeast that can be added to dry ingredients. Also, as to the beer question – beer has yeast, so you may get a bit more air holes in your bread than usual. Not sure, but that's the sum of my contribution. Hope this is helpful info. I am off to get started. I have an ancient dutch oven that I will use.
I have made about 5 loaves already. Everyone had been super impressed! I followed your directions and the bread came out beautifully! Thank you so much for the blog!!
I was so excited to try this bread! I made my first loaf today after letting it proof overnight and I'm very pleased – though I'd love to play around with the recipe a bit. I used white wheat flour, added 1T rapadura sugar, rosemary and granulated garlic. Per another reader's suggestion I subtracted five minutes from each of the baking times, and it seemed just right – though I was surprised how brown the outside got! I wonder if I can cut off even more baking time. I'm definitely going to try a sweet version, like cranberry with nuts or chocolate.
Hi my daughter got me hooked on this recipe!!! I have made several, carmelized onion and Kalamati olives, sharp chedder and bacon and my favorite so far is dried apricots, raisins, walnuts and cranberries…..adding to that lots of cinnamin and 2 heaping tablespoons of sugar, what a great breakfast bread. Thanks to my daughter for showing me how to do it and THANKS to you for posting this….any more suggestions on ingredients?
Debbie
I made this bread with lemon zest and chopped lavendar and dusted with confectioners sugar. It was fabulous for brunch!
This was absolutely wonderful. Mine just came out of the oven and my husband and I cut right into it. I am going to be making this at least weekly I am sure. Thank you so much!
Tried this for the first time yesterday…it was the most beautiful thing to ever come out of my kitchen!! I baked it while my husband was hunting. When he got home, he asked if I had frozen "the other half", that's how much my boys and I ate in the couple of hours he was gone! I used my NON-ENAMLED Lodge Cast Iron dutch oven, and no sticking…also KA bread flour. I've got another batch ready to bake this morning, but added 1 1/2 C of sharp cheddar and 1/3 C of chopped pickled jalapeños. I can't wait for lunch!
To answer the last few questions:
Anon: I have not tried this but I have comments on using a crock pot insert. You must remove the plastic lid or it will melt. You can cover the crock part with aluminum foil as well. You are trying to create a steam oven inside your pot so covering is most inportant. Some comments suggest to fill the crock pot liner with water while preheating to 450 degrees so it doesn't break. continue to follow remaining instructions. Good luck.
Maineiac: This recipe can be cut in half. You will need to reduce the baking time. Try baking with the lid on for 20 minutes and off until it's a deep golden brown. The glass lid and knob are a concern. You can remove the plastic knob or cover with foil as above.
Anon: I did use dried cranberries and raw almonds. I think toasted almonds would be amazing. I'm was just lazy.
Janet Brown: 🙁 So sorry your bread didn't turn out. Please send me your email address (I won't publish) and let's try to work out some of the issues that may have worked against you. Hope to hear back soon. Don't give up.
Love to all. Thanks for all comments. REmember you can always send me your email address for a quicker response and much easier to receive an answer instead of scrolling through all these dang, but wonderful comments.
You really couldn't find a simpler recipe. However I managed to totally screw it up. I thought I followed everything perfectly. It didn't rise (yes I had fresh yeast). After thirty minutes of cooking @ 450 It wasn't even starting to brown. I don't know that I'll try this again as it was very wasteful…
No recent posts on here so I sure hope you are continuing to answer questions, Janet! I just discovered this bread after eating it at my daughter's home a few weeks back. I said to her, "This bread is delicious! Where did you get it?" When her answer was, "I made it," I nearly fell off my chair, as I never thought my daughter had time for baking bread with working and raising 2 little kids. I said, "You must have a bread machine." She said I'd be very surprised, and sent me this recipe. I'm getting ready to try it.
My question is this…for the cranberry orange almond version, the pic looks like dried cranberries but I wanted to make sure about the cranberries you use. And do you use raw or toasted almonds? My inclination would be raw but wanted to be sure.
Wish me luck! Hope to hear from you!
I live alone, 83 yrs old, in Senior housing and have very little storage space.. Could this recipe be cut in half and made in a small Crockpot liner ?? The liner has a glass lid and I would be concerned about that high heat on the lid and Knob handle..
I'm trying this right now in my stainless steel Lagostina (however I did oil it while heating it, because everything sticks to stainless) …I'm crossing my fingers and hoping for good results
I don't have the right bowl with a lid for baking. Someone said you can do it in a crock pot? Any suggestions from anyone?
thanks, Pam
I used a pyrex casarole baking dish with the cover and it came out awesome
This recipe came to my attention when a friend posted it on Facebook. I tried it today and Oh…My….God!!! Yum! I had my doubts when the dough seemed flabby and wet and sticky….however, what I got after baking (in my Rachel Ray ceramic covered crock) was a beautiful loaf of bread! Crunchy on the outside, moist and deeeeelicious on the inside! The way bread should be. Can't wait to try some variations.
Hi Janet,
This looks YUMMY! Am going to check to see if I have all the ingredients soon!
In regards to your pot and cleaning it, bicarbonate of soda, either a cleaning sponge or cloth and a bit of elbow grease. The bicarb scrapes it off without damaging the pot and without you having to deal with chemicals. It does wonders, just cleaned one of my dishes yesterday and got most off before I decided sewing was more important!!
2 questions for you…
1. Can you add the flavor ingredients after the 12-18 hours?
2. I made a double batch so can I make small portions and create 4 loves intead of just 2?
Thank you!
I have some many questions and comments I hope I answer all the questions if not, please send me your email address and I will sent a reply right away and will not post your email address.
– You can add sugar to the recipe. However, it will brown more and may be darker on the bottom. But would be delicious.
– you can make individual loaves. You will need to adjust the baking time probably by 5-10 minutes.
– I'm sorry you ruined you knob to your crockpot lid. Try Amazon for a replacement knob. I think you can buy a metal knob as well.
– I live at 5,500 feet above sea level and have not made adjustments to the recipe.
I LOVE hearing about the success you are having with baking. Keep it up. You are amazing. I love reading about the wonderful flavor creations.
Just made my first loaf today with your excellent recipe!! Thanks so much. It's beautiful!! And I just mixed up another batch for tomorrow. Picking up some Gruyere cheese so that I can make your Lemon Gruyere and Rosemary bread recipe. Can't thank you enough for the excellent tutorial and recipes!! Thank you!!
Just pulled this bread out of the oven and it was great. Nice and soft on the inside and very crunchy on the outside. Mine did not rise like a round loaf, more like an oval but still fine as I didn't fuss with it at all. Just put flour salt and yeast in bowl, added cold water because didn't realize I should use warm but it still worked just fine. I have some roasted jalepenos left over from Nacho Night so tonight I will mix up a Jalepeno and Cheddar and see how that comes out. Thanks for a great recipe! BTW I did use regular bleached all purpose flour and mine only baked 5 or 6 minutes after I took the lid off because it was getting to brown. I cooked it in a large Corning Ware and it worked just fine.
OK, Just pulled mine out of the oven and can not stop eating it, lol. AMAZING!! I made a cheddar and rosemary bread. I baked it in my 2qt casserole pot. I can not wait to make this for all the up coming parties. I love bread bowls and this is perfect!!
Any changes for high altitudes?? I'm at 5,000 feet.
I've seen so many comments about the type of pan and whether you can/can't pre-heat them without ruining them. I have a Corningware Vision pan. 5.5 quarts I believe. It's the glass one. Do you think I can use that? Thanks much!!
Thank you SO much for posting your recipe with variations! Everyone on Pinterest and Facebook were astonished with how beautiful my loaves are. My kids devour the bread almost instantly, and my family thoroughly enjoyed a loaf of regular bread sliced and dipped in olive oil as an appetizer.
Tonight I am making my first nutty loaf with flax, and sunflower seeds. Can't wait to get it in the oven tomorrow! I think my daughter and I will make a few loaves for class snack soon.
Thank You!!
This recipe sounds wonderful. As far as crockpot inserts are concerned, Some of them instruct you to not use in the oven. Thanks
Thank you for this recipe!! Mine looks beautiful! Guess what everyone at work is getting for Christmas!!
Oh and I used a white pyrex baking dish and put the wax paper under the ball of dough and kept it there as it baked. Covered it only with aluminum foil and it worked great! Wish I could attach my pictures on here.. I have to remind myself that it actually came out of my oven! 🙂
I just took my bread out of the oven and my goodness, it is absolutely BEAUTIFUL. I made the almond cranberry one minus the orange zest and for a first attempt, it turned out pretty dran good. My mother said that she could have used more cranberries and almonds (she's all for the meat of the bread) but I fell in love with it nonetheless. Cannot WAIT to show/feed it to Dad when he gets home from work! I have baked a ton of things in my short 19 years of life and this is by far the easiest. heartiest, fulfilling, most mind-blowing baking attempt yet. THANK YOU!
I TOTALLY made bread!!!! I added WARM water and used my crockpot insert as some suggested! PERFECT! I got a ton of compliments.
THANK YOU!!!
Just got a Tramontina 5.5 qt enameled cast iron dutch oven as an early Christmas present from my hubby – and this is the first thing I made. I just made them this evening, and let me say – the man is soooo glad he bought it for me. XD He absolutely loves breads with a thick, crispy crust and a soft center. I started with the plain loaves to see how they turned out and if I need to modify at all. We're at sea level on the East Coast and I only let it sit the minimum amount of time, but they turned out totally awesome. I think next will be cinnamon, honey, & apple for the kids. Hubby wants me to make an Italian, so I guess it will be garlic, basil, and rosemary. Then perhaps an old bay, cheddar, garlic? So many choices!!! Thanks again!
There is a hungarian recipe I've heard of that subs left over mashed potato for some of the flour. ever tried it?
Your site is marvelous – thank you for all the time, effort, and talent you put into it for us!
I love the idea of making this bread and plan to buy the right pot to bake it in, but I have one question first for you: From your pictures, it looks as though there's no difference in the sizes of the loaves baked in the 5.5-quart pan and the one baked in the 7-quart pan. So the sticky dough stays in its ball and doesn't spread out and make a bigger, flatter loaf when it has more room?
Thanks very much.
Sheila
I'm so excited to try this
I have tried this recipe today for my family. I was a bit nervous as I had to convert the proportions as I live in Europe but the bread was fantastic at the end. Everybody asked the recipe. Thanks.
I made this bread for Thanksgiving and it turned out beautiful! I am now trying to do an apple cinnamon one. I added 1 apple, 1/3 cup sugar and 3tsp cinnamon 1/2 tsp nutmeg to the basic recipe. The dough looks good, tomorrow we'll see!
Okay, so I tried this recipe with gluten-free flour mix and it came out dense and doughy. It did not rise much either. Smells good and it has a great crust. I am going to try it again, because it could be a number of factors. One, my husband left the heater on that night so it was warmer than usual in the house; two, I did not have plastic wrap so I used a damp cloth (I was told this might work)but it dried up completely due to the heat; and three, it could have just been the type of flour. I'll let you know.
im attempting a low gluten batch….i used 1 part all purpose flour, 1 part cornstarch flour & 1 part rice flour…(our going gluten free is a work in progress. :0)
ps i did a rosemary, thyme, garlic & parm cheese….here's hopeing
I was scouring my pantry for a new taste combo, voila, dried chili and sugar crusted mango. I chopped it up finely, added the zest of a small orange as well as its juice to the batter and about a half cup of raw pumpkin seeds. (I also used half white and half whole wheat flour) EVERYONE is raving about the flavor of this bread and asking for the recipe. I have a hit on my hands!
I am going to try using a gluten-free flour mix today, I'll let you know the results.
Hi! Not sure if anyone responded about cleaning your pots yet (I don't have time to read through all the comments to see if anyone already mentioned this). Le Creuset sells Enameled Cast Iron cleaner. It's actually on sale right now for ~$10 from Crate and Barrel. 🙂 I saw it on sale and it reminded me of your post!
Here is the link: http://www.crateandbarrel.com/sale/sale-kitchen/le-creuset-enameled-cast-iron-cookware-cleaner/s242309
I hope it helps!
I've been really missing a particular bakery in Minneapolis since we moved away. Then I found your post for bread on Pinterest. I've made a couple other recipes, but yours is my keeper. I have an antique Griswold dutch oven that works perfectly. The tip of dumping the dough onto parchment then just putting the parchment into the pan is genius! I've made a couple different flavors and look forward to making more. Tonight, I'm thinking dijon mustard and asiago cheese. Should be interesting! Thanks for a great, fool-proof loaf recipe.
Thanks so much for this recipe. I found it on Pinterest and I'm so glad I did. By far, the easiest bread I have ever made, and the results are wonderful! It is so awesome to lift the cover and see this beautiful loaf of bread! I made it for Thanksgiving since it was just my hubby and myself this year. I added thyme, rosemary and garlic seasoning, toasted onions, and a little shredded cheddar/Monterrey Jack cheese. The aroma was out of this world. Thanks again. I have reposted the recipe on my blog, with a link to your blog as well.
http://cakeideas.blogspot.com
OMG Janet,your bread looks crazy good
I've tasked hubby to make it as we do have a creuset. He's been making bread since Jan. 2012, and he's getting pretty good if I may say so myself. I showed him your method, and now he's curious. Can't wait to show you how it turns out… provided it does.
Now, all I have to figure out is how to subscribe to your site.
Thanks for a great recipe 🙂
Thank you SOOOO much for this recipe. I have been trying and trying to make bread with no luck. Even as I made this one, I was skeptical. It didn't look like much. But when it was all said and done, it was delicious. Better than anything I have bought at the bakery. I ended up making a minced garlic and shredded Parmesan version. YUM. Dipped in olive oil…incredible! I kind of wish I didn't ever see this because I will be making it all of the time. Now I just need to treat myself to a pot like you have. 🙂
If you use a crock pot insert, make sure the lid does not have a PLASTIC handle. I ruined my crock pot insert by not realizing this until it was too late 🙁 Am cooking the bread a different way because I didn't notice the suggestion of pyrex. If I try this again, I will go that route. Off to buy another crock pot…
Can you make this a sweet bread? Like when you add cinnamon and raisins? Would you add sugar? Brown sugar?
question
i want to make 2 breads from 1 recipe(i do not want to double the recipe)–
—is the cooking time the same ??
thanks
my italian bread–add chunks of cooked italian sausage or salami and provolone cheese and lots of fresh ground black pepper