What I love about this bread
- It’s so easy to make. This dough can be made in less than 5 minutes.
- The basic dough recipe can be enhanced with many different flavor varieties.
- Very little hands-on time.
- Crusty bread never ceases to impress family and friends.
- My 12-year-old grandson can make it.
Let’s make No-knead crusty bread:


- In a large mixing bowl, add flour, kosher salt, and yeast. Whisk together.
- Add water. Mix just until all of the flour has combined with the water. The dough will look like a shaggy mess. That’s ok.
- Cover the bowl with plastic wrap and let it sit for 12 – 18 hours on the countertop. DO NOT REFRIGERATE. This is not optional. It takes that much time to proof the dough. The reason why you need a large bowl is that the dough will start to rise.
- After 12 hours the dough will look like this. It’s pretty sticky, but that’s ok it’s supposed to be.
Shaping and baking the bread:


- Preheat oven to 450 degrees. As soon as it has heated to 450 degrees place your pot with the lid in the oven and preheat the pot for 30 minutes.
-
Right after you put the pan in the oven to pre-heat, dump the dough out onto a HEAVILY floured surface. Shape it into a round ball and place on a sheet of parchment paper. Parchment makes it so easy to transfer the dough into a hot pot and then remove it after baking. The parchment paper stays in the pot. This will rest for 30 minutes while the pan is heating. Cover with plastic wrap. Note: Use silicone coated parchment paper. The regular non-coated paper will stick terribly. Don’t chance it.


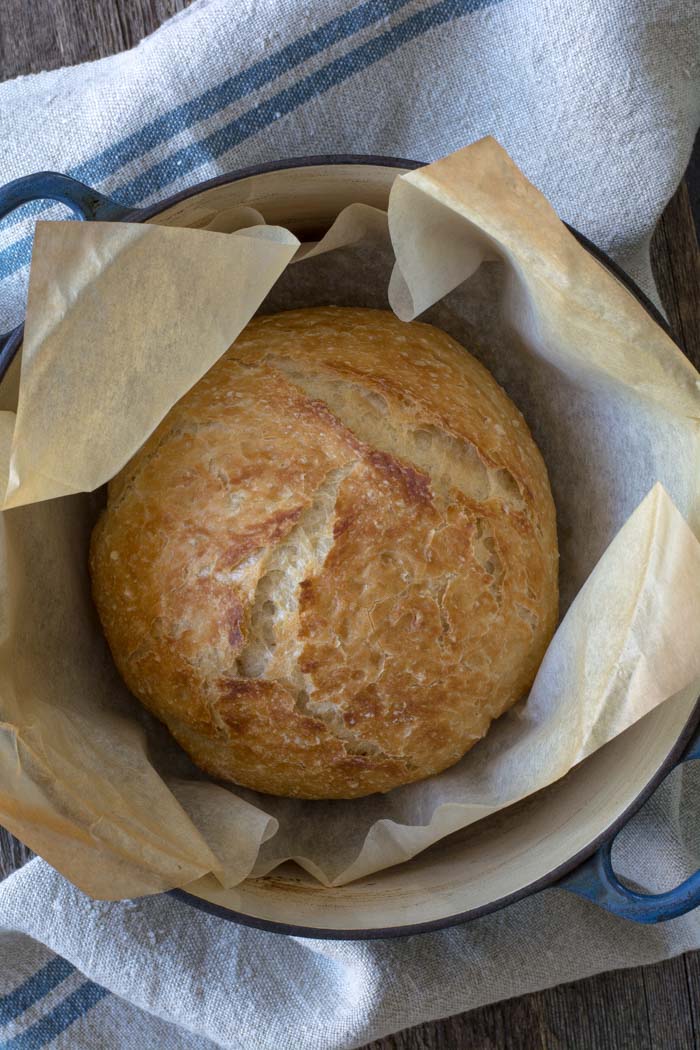
- Remove pot from the oven and carefully pick up the parchment and drop dough into the pot. Be careful the pan is HOT. Put the lid on the pot and return it to the oven for 30 minutes.
- After 30 minutes remove the lid from the pan. Bake for an additional 15 minutes or until nicely browned. You can test with an instant-read thermometer to make sure the bread is fully cooked on the inside. The temp should be between 190F and 200F degrees. Remove from the oven and carefully remove bread from the pot by lifting the edges of the parchment paper.
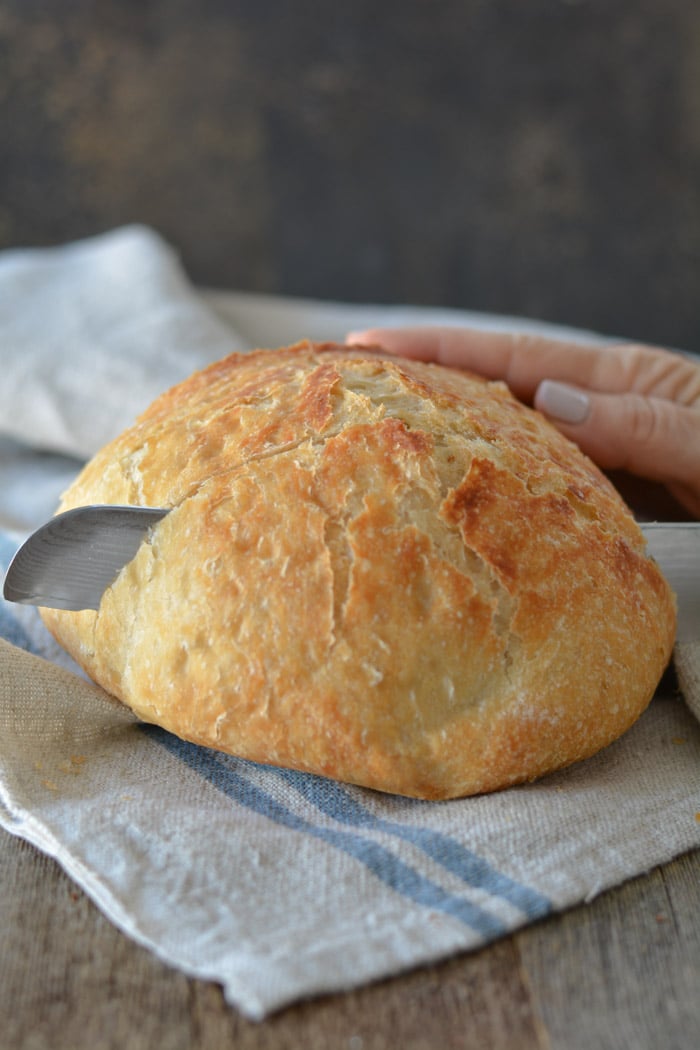
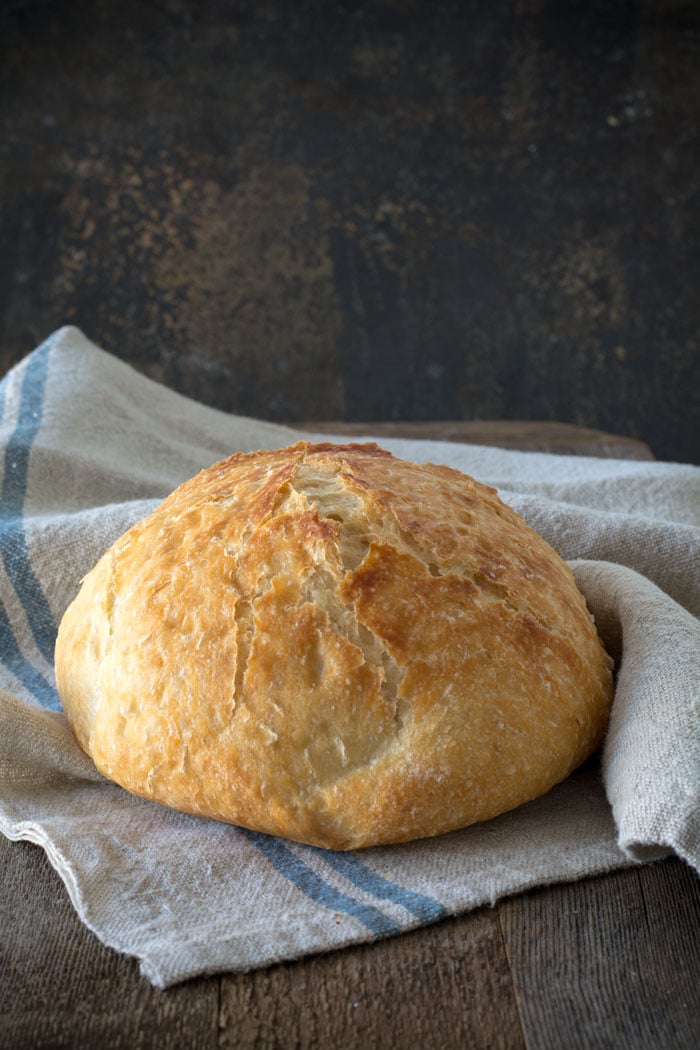
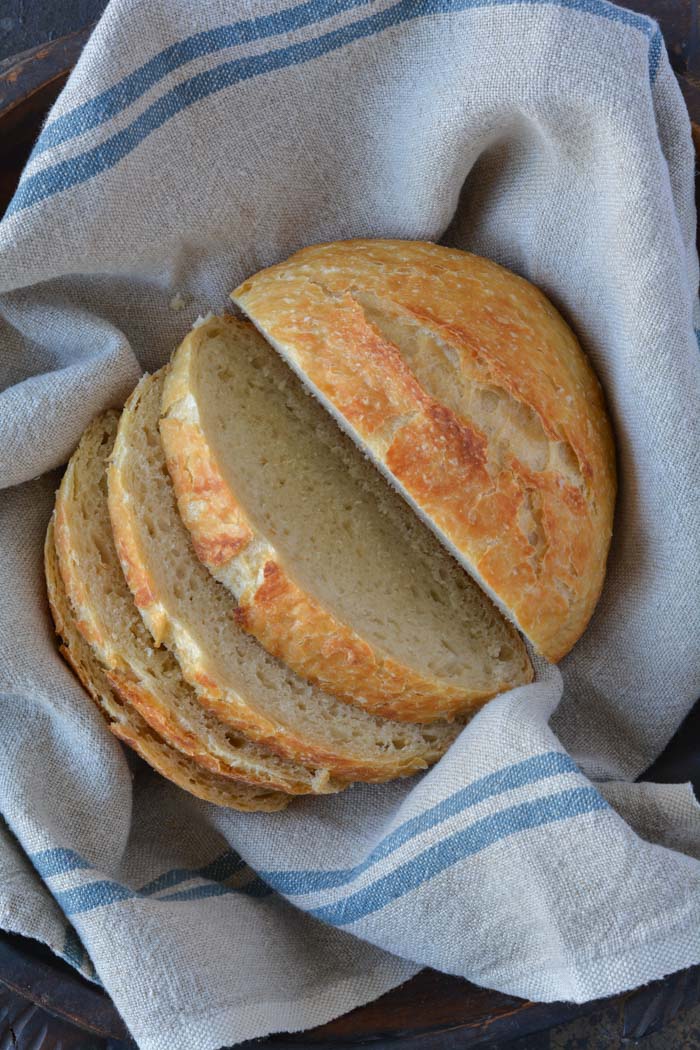
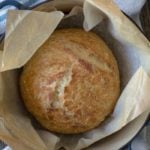
Holy cow! Can you believe how gorgeous that is? It’s best to wait for the bread to cool before slicing. Because I love warm bread I sliced it right away.
FAQ’s
Q: Do I have to use an enamel covered cast iron pan?
A: NO. You can use anything that can take the heat. The following have been used that I know of:
Clay pots with lids, Pizza stone with a bowl to cover the bread, insert from a crockpot, pyrex baking dish with a lid, stainless steel pot with a lid, baking dish covered with aluminum foil, old cast iron dutch oven.
Q: Do I have to use unbleached flour?
A: I always use unbleached flour. You can try bleached flour.
Q: Can I use self-rising flour?
A: I don’t know. I would just stick to all-purpose.
Q: What size is my pan?
A: My smallest pan is 5.5 quart. You can use as small as a 3 quart.
Q: What type of yeast do I use?
A: I use SAF instant yeast. Any yeast should work.
Q: Why is my bread turning out flat?
A: You could try using less 1/4 cup less liquid. Or add 1/4 cup additional flour. Make sure your dough appears to be dry when you first mix it. It will have more moisture during the rising time.
Q: Can my dough sit out longer than 18 hours? Does it HAVE to be between 12-18 hours?
A: I have let some dough sit as long as 24 hours and the bread was beautiful.
Q: Have you tried Gluten-free?
A: From what I hear the best GF is from King Arthur Flour https://shop.kingarthurflour.com/items/gluten-free-measure-for-measure-flour-3-lb
Q: Do I have to grease or oil the pan? Will my breadstick?
A: No you don’t need to grease the pan. I have never had the bread stick when using a cast iron pot. I haven’t tried anything else. The best way to be certain that the bread won’t stick is to form the loaf on a sheet of parchment paper and lift the bread into the pan using the sides of the parchment. Leave the paper in the pan. It’s won’t burn. When the bread has baked, just lift the sides of the parchment out of the pan. Voila! HOWEVER: Not all parchment paper is created equal. I use a silicone coated parchment paper. Regular parchment paper can stick something terrible. Don’t chance it.
No-Knead Crusty Bread
Wonderful yet easy artisan bread with a crisp crust. Prep takes just a few minutes with an overnight rise. Baked in a pot with a lid to create a steam oven. Bread can be made with many flavors and variations.
Ingredients
- 3 cups + 2 tablespoons unbleached all purpose flour (450 gr)
- 1 3/4 teaspoons Kosher salt (10 gr)
- 1/2 teaspoon Instant or Rapid-rise yeast (3 gr)
- 1 1/2 cups water cool (315 gr)
Instructions
-
In a large mixing bowl, whisk together flour, salt and yeast.
-
Add water and mix until a shaggy mixture forms.
-
Cover bowl with plastic wrap and set aside for 12 - 18 hours. Overnight works great.
-
Heat oven to 450 degrees. When the oven has reached 450 degrees place a cast iron pot with a lid in the oven and heat the pot for 30 minutes. OR pot can be placed in cold oven while oven is preheating leave in oven for 30 minutes.
-
Meanwhile, pour dough onto a heavily floured surface and shape into a ball. Cover with plastic wrap and let set while the pot is heating.
-
Remove hot pot from the oven and drop in the dough. Cover and return to oven for 30 minutes. After 30 minutes remove the lid and bake an additional 15 minutes. Remove bread from oven and place on a cooling rack to cool.
Recipe Video
Recipe Notes
FAQ's
Q: Do I have to use an enamel covered cast iron pan?
A: NO. You can use anything that can take the heat. The following have been used that I know of:
Clay pots with lids, Pizza stone with a bowl to cover the bread, insert from a crockpot, pyrex baking dish with a lid, stainless steel pot with a lid, baking dish covered with aluminum foil, old cast iron dutch oven.
Q: Do I have to use unbleached flour?
A: I always use unbleached flour. You can try bleached flour.
Q: Can I use self-rising flour?
A: I don't know. I would just stick to all-purpose.
Q: What size is my pan?
A: My smallest pan is 5.5 quart. You can use as small as a 3 quart.
Q: What type of yeast do I use?
A: I use SAF instant yeast. Any yeast should work.
Q: Why is my bread turning out flat?
A: You could try using less 1/4 cup less liquid. Or add 1/4 cup additional flour. Make sure your dough appears to be dry when you first mix it. It will have more moisture during the rising time.
Q: Can my dough sit out longer than 18 hours? Does it HAVE to be between 12-18 hours?
A: I have let some dough sit as long as 24 hours and the bread was beautiful.
Q: Have you tried Gluten-free?
A: No. I'm still waiting for someone to venture into the realm of Gluten-free. If you try it, let everyone know.
Q: Do I have to grease or oil the pan? Will my breadstick?
A: No you don't need to grease the pan. I have never had the bread stick when using a cast iron pot. I haven't tried anything else. The best way to be certain that the bread won't stick is to form the loaf on a sheet of parchment paper and lift the bread into the pan using the sides of the parchment. Leave the paper in the pan. It's won't burn. When the bread has baked, just lift the sides of the parchment out of the pan. Voila! HOWEVER: Not all parchment paper is created equal. I use a silicone coated parchment paper. Regular parchment paper can stick something terrible. Don't chance it.
More Notes:
Regular active yeast can be used in place of the instant or rapid-rise yeast. It will need to be activated in 1/4 cup warm water. Stir and let sit for 5-10 minutes. However, most of the comments I have received state that the rapid raise works the best. You choose. Whisk the flour, salt, and yeast together.


I'm sorry to hear that your bread stuck. I have never had problems with my bread sticking to my enamel pots. Parchment is a life saver.
To add my previous comment: I used Fleishman's rapid rise yeast, there wasn't anything in my grocery store named instant yeast. And, well, it tastes/smells yeasty.
rapid rise is the same as instant.
So, mine totally stuck to my Le Creuset. It took me about 20 minutes to get it out, in pieces. Also, it seemed a bit wet/doughy inside. Thoughts?
I'll definitely try the parchment method next time.
Cream of tartar and a sponge to help clean your pans…
Michelle: I have used both kinds of yeast. Rapid rise and active dry. They both work just great.
Cheryl Ann: I have made a seeded bread and it was fabulous. Pumpkin seeds, poppy seeds and sunflower seeds.
Michelle: If you are worried about ruining your pot, just heat the oven to 400 degrees. I would hate for you to ruin your new pot. I would be so sad.
I have my first loaf in the oven… can't wait to see how it turns out! I bought an enamel cast iron dutch oven at Tuesday Morning for $50. The directions included with it say not to heat hotter than 400 degrees. I stuck to the recipe for my first try, but do you think I could do 400 for a little longer in the future? I don't want to ruin my new pot!
Do you use rapid rise or active yeast
Thankyou
Do you use active yeast or rapid rise
Thanks so much for this awesome recipe!! Have you made it with different seeds such as poppy, fennel, black and blonde sesame seeds etc… Like a "everything seed" bread? I want to put them inside and out. With as sticky you and everyone says it is I bet they will have no problem staying on!! Thanks again, Cheryl Ann (Snowy40)
I been making this bread for a while and also if I may suggest , do invest on clay pots, no cleaning needed ever(they are cheaper than cruisets) just throw some corn meal on the bottom before you dump the dough in, pyrex works as well…always when in doubt…throw the corn meal in the bottom, no harm done in there.
– No you are not missing the printer friendly version. You are viewing the blog of someone who hasn't figured that out yet. I need a computer wizard to help me with that. I hoping to get on it. For now just cut and paste. Sorry 🙁
– I'm not sure why some folks are having problems getting their bread to rise. I would once again suggest that you try adding more flour or less water. Make a stiffer dough and see if that works.
– If your bread is browning too much, just reduce the baking time. Keep an eye on the bread while baking and when it looks that perfect golden brown, remove it from the oven. The inside should be just fine.
– If making multiple loaves, you do not need to reheat the pan. Just drop in another batch of dough and bake as you did your first loaf. Repeat as often as you need to.
– you do not need a cast iron enamel covered pot to make this bread. There have been several methods used with great results. Basically anything that can take the heat with a lid OR just cover with aluminum foil.
I hope I have answered everyone's questions. Thank you for sending me your great ideas for the add ins. They all sound divine!!
Hugs and kisses, Janet
Just finished my first time loaf. OMG it is gorgeous!!I can't believe I did this!! Thank you so much for the easy step by step instructions. Everything worked just like you said.
I have the exact same color le creuset and clean mine periodically with Barkeeper's Friend and a non-scratch pad like Scotch Greener Clean. So far that's worked for me.
Beautiful Photography! Can't wait to try it =)
Am I missing the "Print Friendly" version ? Would like to print…… but way too many pages. I'll look again.
Thank you so much for posting this! I just finished baking my first loaf of bread. My bread was dark brown on the top and very crusty on both bottom and top. If I shorten the amount of baking time would this make for a softer bread? I am sure these are basic questions but I am not a bread baker lol. Thanks for helping me out. Oh the middle of this loaf of bread is wonderful but the top is much browner than your's in the picture.
Just made this bread with Kalamata olives and fresh, shopped basil from my herb garden. I replaced some of the water with the juice from the olives and it is FABULOUS! I don't have a Le Creuset pot large enough for the recipe so I used a cast iron pot with lid and it turned out great. I did add a teensy bit of olive oil in the bottom since the cast iron is not ceramic coated like the Le Creuset.
Thanks for the tute!
I can't get my bread to rise like yours. Mine is more flat. And when I form it into a ball before I put it in the preheated pot, in a minute or two it flattens out, so I have to shape it again. Do you know what I am doing wrong? Tastes great, just looks funny.
Thanks for sharing your recipes!
I baked my first loaf last night, I bought a KitchenAid enamel covered cast iron Futch Oven on sale for 69,99 regular 199.99 it is 6.5 qt, worked great, the loaf is a little flatter due to the wide base of the pot but it is simply delicious. I'm making another one tonight in my 3.4 qt KitchenAid casserole now that I know how well it works. Time to start playing with different add-ins, this is going to be one tasty experiment. We love Artisian breads and this is something we can have regularly instead of a special treat.
Unfortunately, I gave all my Le Creuset to my daughter, but when I still had it I used Bon Ami to clean the outsides. It's the scouring powder with the little chick on the outside that says, "Hasn't scratched yet!" I used Bon Ami on everything, including a glass-topped stove and even the windows in a 100 yr old house. It never scratched anything. Don't use a scrubber sponge with the Bon Ami; just use a dishcloth. The scrubber sponge will scratch.
I love this bread. My Grandkids did too. Simple fast and cooks wonderful. I did not have the pot like you do but I have a cast iron dutch oven and a cast iron skillet I just heated both in the over and placed the skillet on top of the dutch over. Worked perfect!!!! I will share with all of my family and friends they will love it. I am going to make the next one with some honey to sweeten slightly I will let you know how that turns out. Thanks again for sharing this bread with the world.
I am very eager to get a pot and try this out. Quick question though, if you are planning to make multiple loaves, do you need to re-heat the empty pot for another 30 minutes or can you remove one loaf and immediately add dough for the next loaf (does baking a loaf pre-heat the pot enough)?
I only ask because it seems like it would be a good idea to make bread to go with my jam and give it has gifts at Christmas but an hour a loaf would make it difficult to make many to give as gifts.
Thanks.
so as i am reading these you must have a cast iron pot enamel steel will not work
Can you use a cast iron dutch oven in place of the enamel coated one?
Clean your pots with Bar Keepers Friend. They will look new.
Can I use a Club aluminum dutch oven?
to clean all baking dishes ,use baking soda paste,let +
set for couple hours,then wash with warm soapy water..
Can it be made with gluten free flour?
I live in CO do you have any adjustments for the high elevation? I have to adjust cookies and such. Ive never tried bread
So the bread needs to be baked in a cast iron pot absoulutely? CAn i use any other bakign dish instead?
I'm thrilled about this! The first plain loaf turned out beautiful and tastes perfect! Absolutely will be making again! The second is in the oven now, it's flavored with cheddar cheese and italian seasonings. Smells amazing! Thanks for this recipe! So, happy I came across this!
Ok so I just made this bread and it is absolutely beautiful!! I haven't tasted it yet since I just pulled it out of the oven, I hope it tastes as good as it looks!! I had a little trouble with the dough, it seemed to be to watery at first… I hope I didnt screw it up! Also, I just wanted to say that I don't have one of those fancy blue pots, so I baked mine in my Pampered Chef Deep Covered Baker and it is perfect!! If this loaf tastes good I'm thinking next time doing something with sun dried tomato, basil & mozzarella?!
I just made my first loaf of this recipe. I was a little worried when I saw how looked this morning but I used a lot of flour to shape the loaf and crossed my fingers. I do not have a Le Creuset so I decided to try my Pampered Chef stoneware baker with the lid. It worked just fine, and made a beautiful loaf. I am so impressed! I can hardly wait to dig in and start to experiment with all the variations! Love, love, love! Thanks for this easy wonderful recipe!
Janet- I am trying this bread for the second time and it is not working 🙁 both times the dough doesn't rise and is a wet mess. I figure I need to adjust the amount of liquid? Have you ever had this happen? I am using fresh flour and yeast. Thanks for some input! Emmie
Suggestions:
– If the bottom of the bread is getting too dark, try raising the rack in your oven a notch. Don't let the pan preheat as long. Or you could try setting your pot on a baking sheet. Hope this helps.
– I'm at higher altitude sometimes we need for flavor up here. At a lower altitude you could try reducing the salt.
– If at first you don't succeed, try try again. I'm sure this doesn't help. Seriously just play with it.
– There are NO guarantees that you will not eat an entire loaf in a day.
You're amazing! This is great!
Just pulled my first loaf out of the oven. Amazing! I'm feeling rather smug right now. I just want to display it on a board with a hunk of stilton and bottle of cab. Fun! I used about a half cup more water simply because all of the ingredients were not incorporated well, just enough to pull it all together and make it a bit sticky like you said. Mine did not pop right out of the pot, but after it sat a little while I was able to pull it out. The taste is fab, and I can't wait to try other variations. Soooo many possibilities with this bread. Thanks so much. As far as the Annonymous Patrol, The beginning of your blog says you got the recipe from Le Creuset didn't it? I'm so glad you posted this with all the ideas and those that have come from others as well.
Hi there….everything was going well (and yes, that dough is sticky) but then I started to smell a burning from my oven. The bread had been scorched on the bottom. I'm not sure if the oven was too hot or the quality of the dutch oven was poor…but my beautiful bread came out burned on the bottom. Any thoughts? Thanks!
ok, so I must have done something wrong somewhere and i have a sneaky suspicion what it was…
I mixed up a batch of plain and a batch of Cranberry Orange. Both were placed in Plastic bowls and covered with saran wrap…but I put them inside my oven (turned off) but with the light on…The Plain dough was practically liquid, i couldn't salvage it at all. The Fruit one looked like the picture when it had risen, but i had trouble putting it into my Le Cruset. Resuting in a slices that look more like biscotti size. It also seemed a bit salty..
do you think that letting it rise in the oven vs on the counter top had that much of an effect?
i also used White Lily AP Flour bc It's what I had on hand.
How DARE you post a recipe for something so unbelievably easy and deeeeeeelicious?! I went out and bought a Lodge cast iron pot yesterday just for this purpose and I can tell you it is going to get a work out baking bread!! Now just tell me how to keep from consuming the whole loaf in a day??!!
More answers to recent comments:
– It's hard for me to determine why the bread will go flat? I had that problem when I tried using 50% rye and when I tried adding some semolina. The dough is very sticky and difficult to work with. My plastic dough scraper from King Arthur flour is my best friend. I use it to shape and mound the dough. I have to admit sometimes the shape of my loaves are pretty funny. I don't stress about it too much. I will inevitably change during baking. I never know what the bread will look like until I remove the lid.
– I have found that parchment paper is a lift saver. Put the dough onto the parchment, let sit 30 minutes, lift parchment and place into the hot pan. When the bread has baked, just lift the bread out of the oven using the parchment. Works like a charm.
– If your dough isn't rising much, you could check your yeast to see how active it is. that could be a problem. Flour can make a difference. I only purchase flour that has about a 12% protein. That can make a difference. Many non-brand labels for flour have a protein content that fluctuates with the wheat they use. I like to use a good brand that is consistent with the protein content.
– Try adding 1/4 cup more flour to see if that will help the dough hold it's shape better. I find that when I add nuts, dried fruits or cheese that the loaf is a bit denser and will hold it's shape very well.
– I so happy to hear about the success stories. Keep up the great baking!
Best,
Janet
Found it on Pinterest 2 days ago, baked it today – AND IT WORKED !!!!
Unless my dough was pretty soft, wet and sticky !!!
Never thought it will come out as a bread.
Amazing. Thanks for this tutorial, will share it in German with my friends.
GREAT BREAD, GREAT TUTORIAL
My dough wouldn't form into a ball.. It just kept going flat & when I put it in the pan it lost all roundness..? what did I do wrong?
I love your bread, it is delicious but I am having some problems with the shape. When I take my bread out of the bowl and put it on the floured surface, rather than holding the ball shape as yours do in the picture it just flattens and spreads out. It still bakes into a loaf but not with the wonderful shape and height that yours do. Any suggestions?
I tried this yesterday and it came out very dense, not like the picture, any ideas?
my mom was totally skeptic but we are now believers this is wonderful!
I made this with Jalapeno, sharp chedder cheese and pork sausage , was amazingly delicious. Love this recipe thanks
Mine looked great on top but the bottom was black. I used a big pot and had to put it on the lowest rack, maybe it was too close to the heat?
I just saw this bread on pinterest. I have a similar recipe – actually have mine proofing right now. Mine calls for beer with the water. I've made it several times, I use an old fashioned black cast iron dutch oven. I love the idea of add ins for the bread. I made a seed bread a few months ago, but used a different recipe. In fact I have baked rye as well, using a different recipe. I love the idea of using the same base recipe. Will have to play around with it!
I can't wait to try this recipe. And excuse me if I'm duplicating a comment, as I didn't read all of them. I was a retail kitchenwares buyer for many years, and the best way to keep your Le Creuset cookware clean is to use Barkeepers Friend powder.Works like majic and will not scratch the enamel. Happy cooking! (or rather Baking!)
Has anyone tried baking this in a slow cooker? I just wondered if it would work so that you could wake up to fresh bread in the morning.
I am such a recipe follower! 🙂 Can anyone tell me how much cheese you put in for the cheddar loaves? How much cheese and jalapenos in that loaf? How much cinnamon/raisins (are there any special instructions for this?) for that loaf? They all sound so yummy and I want to make sure I get them right. Thanks! 🙂
Be creative!! You don't have to measure the Jalapeno's or cheese. Would guess that batch had about a cup of Jalapeno's and a cup of shredded cheese. But the exact amount isn't important.
has anyone tried a wheat free version? i didn't read all of the posts above…too many! I LOVE bread but it doesn't love me. This is so beautiful and looks fantastically yummy.
I've made this bread twice since I pinned it a couple of weeks ago. I use my Mom's old cast iron Dutch oven that has been around forever. The bread comes out beautifully. By far the best and most useful recipe I have pinned. Thanks! Can't wait to experiment with new flavors.
All of these great comments – I can't wait to try it – makes me very hungry~
I just made this bread for the first time….just the plain one. I have to say this is the best bread ever!! It worked out absolutely perfectly, crusty on the outside & chewy on the inside and the flavour was delicious. I was so excited, that I immediately took a couple of slices over to my friend's place & her husband declared it was the best bread he had ever eaten & wants me to share the recipe with his wife! Thanks so much for sharing the recipe….I ran out and bought some gruyere cheese & rosemary so I can try that one next and then who knows????
Ok…wanted an excuse to get the cast iron pot, so this will work!! Cant wait to try out the bread! I'll let you know!
Thanks!
Made the first loaf on Friday, with Jalapeno's and cheese. Should have adjusted the flour, since the Jalapeno's were wet, but it was great.
I wanted it a bit spicier, so decided to try it with 2 Habanero Pepper, 1/2 bulb of Garlic (chopped in Magic Bullet) and about 3/4 C Cheese. I don't have a heavy iron pan, so used a porcelain one. Let it get hot in the oven, put the bread into it. Baked it for 30 min, took off the lid and baked another 30 min. It turned out perfect. WARNING: It is HOT. Keep a glass of cold milk handy, just in case. My husband grabbed his milk, but went for a second slice. LOL The loaf is over half gone.
I made a diced jalapeno and cheddar loaf just today, I can't wait to taste it!
Thank you so much for sharing your recipe! I just made a loaf and it turned out perfectly. I didn't have the pot you mentioned, so I used a glass casserole dish with a lid and it turned out great. Thank-you, Thank-you!
Answers to recent comments:
– King Arthur flour is great. That shouldn't have been the reason why your bread stuck. I haven't had that problem. You should try using parchment that works great.
– Yes a pizza stone has been used with a bowl to cover the bread. It was successful.
-If your bread is flat try adding 1/4 cup more flour. Perhaps the dough is just too wet. That should solve the problem.
– Cast iron deep fryer should work great.
– I use SAF-instant yeast. Any yeast will work.
Thanks so much for this recipe. Just took the first loaf (Rye)out of the oven, couldn't wait for it to cool – yummy. Excellent recipe. Have another loaf proofing, can't wait to try many variations of this recipe.
I just had to get up and make this bread when I came across the blog. The next day, I had no idea what I was going to bake it in. I looked through my pots and pans, and decided to use a round roasting pan. I was just so excited I had to try it! Well, the bread turned out just like the pic, and tastes great, but the very bottom, center of bread stuck to pan. My husband loved it. I definitely will put a Le Creuset pot on my Christmas list this year!
The small hole shouldn't be a problem. If you think it could be, just cover the hole with aluminum foil. Garlic bread sounds amazing.
try them in a breadmaker
Help ! Made the bread in my le Cruset pot .It was good but it stuck really bad.I used King Arthur Bread Flour .could this be the problem ?
My first loaf is cooling. I need another pot so I can do 2 at a time. Can't wait to try it.
Have just taken my second loaf of Cheese and Thyme Bread out of the oven. First one is half finished on the bench. This bread is fabulous and SO easy. My only wish is that I had a bigger oven so I could bake more than one loaf at a time. Can't wait to try other recipes. Thank you so much for bringing this great recipe to my attention.
Has anyone tried this on a pizza stone with an upside down stainless stock pot as a lid? That's all I've got so I'm wondering if it would work…
I made the whole wheat version following Courtney's recommendation in the comments above to use 1/4 cup less flour and 1/2 cup more water. At first I thought it was going to be a complete failure, because my dough looked a mess – even more "watery" than in your pictures. When I "shaped" the dough before placing it into the dutch oven it resembled a pancake more than a loaf. But it turned out perfectly and puffed beautifully once in the oven.
I did not have an enamel dutch oven, but used my footed camping 6 quart Lodge dutch oven (about $60 on Amazon or at Walmart – http://amzn.to/KDrTZ7) and it worked wonderfully. The bread did not stick one bit. In fact, once it was baked, it slid nicely around the dutch oven without any prodding by me. If the thing wasn't made out of cast iron and didn't weigh a million pounds I could simply have tipped it over to drop out my beautiful loaf. But it did way a gazillion pounds. And was hot. So I refrained 🙂
I just took my first loaf out of the oven! Looks and tastes Great, but is very flat???
Question? How do I determine when it has risen enough? This dough acts and looks quite different.
I left it in the oven with just the light on for 18 hours. Baked it in LC. Can you make a double recipe into one loaf?? Thanks for any tips. Ingrid
I am totally addicted to this bread! So simple!! To clean your pot use a MAGIC ERASER- serious works like magic. Takes even the old baked on stuff off. I am thinking of selling these at our local farmer's market they are so good!! Thank you!!!!
Could I use a cast iron dutch oven? Mine is well seasoned.
I found this post via a friend's Pinterest post. I have made "No Knead Bread" (even posted a blog post about it, too). I *LOVE* your variations and can't wait to try them. I see you've received tons of recommendations on cleaning your LeCreuset pans. I use the Bar Keeper's Friend which has been recommended. Thanks for sharing all your ideas.
Stef at TooMuchToDoSoLittleTime.com
To clean try a magic eraser or put it in a plastic bag and a few tablespoons of ammonia in the bag not the pot. close the bag and let sit overnight. The fumes from the ammonia can lift the baked on stuff.