What I love about this bread
- It’s so easy to make. This dough can be made in less than 5 minutes.
- The basic dough recipe can be enhanced with many different flavor varieties.
- Very little hands-on time.
- Crusty bread never ceases to impress family and friends.
- My 12-year-old grandson can make it.
Let’s make No-knead crusty bread:


- In a large mixing bowl, add flour, kosher salt, and yeast. Whisk together.
- Add water. Mix just until all of the flour has combined with the water. The dough will look like a shaggy mess. That’s ok.
- Cover the bowl with plastic wrap and let it sit for 12 – 18 hours on the countertop. DO NOT REFRIGERATE. This is not optional. It takes that much time to proof the dough. The reason why you need a large bowl is that the dough will start to rise.
- After 12 hours the dough will look like this. It’s pretty sticky, but that’s ok it’s supposed to be.
Shaping and baking the bread:


- Preheat oven to 450 degrees. As soon as it has heated to 450 degrees place your pot with the lid in the oven and preheat the pot for 30 minutes.
-
Right after you put the pan in the oven to pre-heat, dump the dough out onto a HEAVILY floured surface. Shape it into a round ball and place on a sheet of parchment paper. Parchment makes it so easy to transfer the dough into a hot pot and then remove it after baking. The parchment paper stays in the pot. This will rest for 30 minutes while the pan is heating. Cover with plastic wrap. Note: Use silicone coated parchment paper. The regular non-coated paper will stick terribly. Don’t chance it.


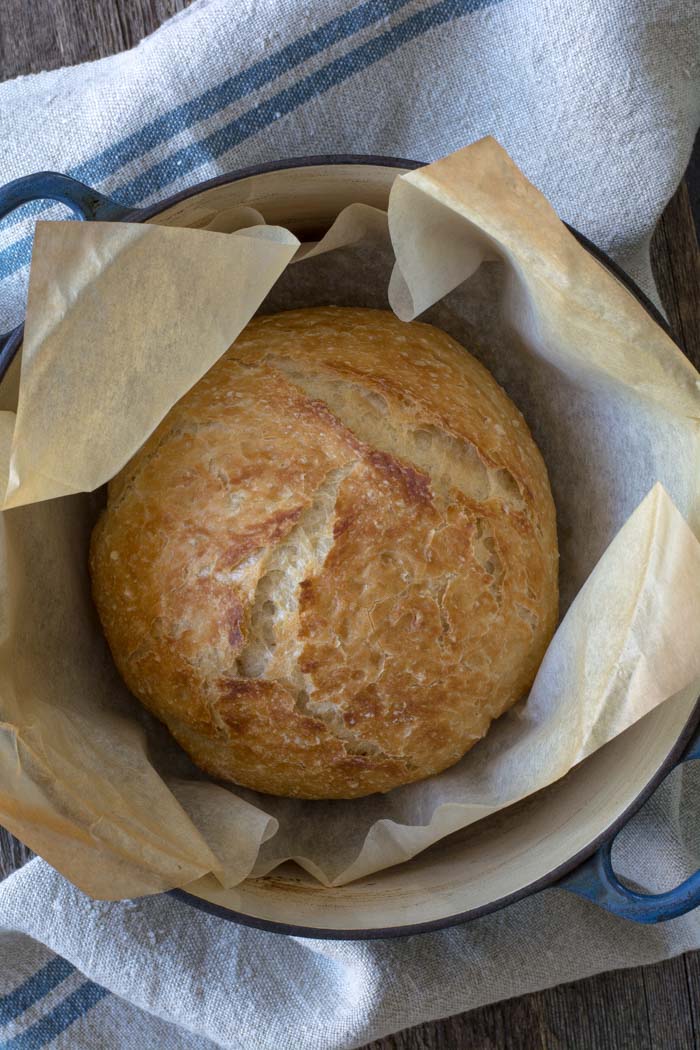
- Remove pot from the oven and carefully pick up the parchment and drop dough into the pot. Be careful the pan is HOT. Put the lid on the pot and return it to the oven for 30 minutes.
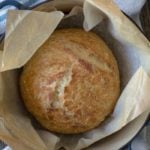
- After 30 minutes remove the lid from the pan. Bake for an additional 15 minutes or until nicely browned. You can test with an instant-read thermometer to make sure the bread is fully cooked on the inside. The temp should be between 190F and 200F degrees. Remove from the oven and carefully remove bread from the pot by lifting the edges of the parchment paper.
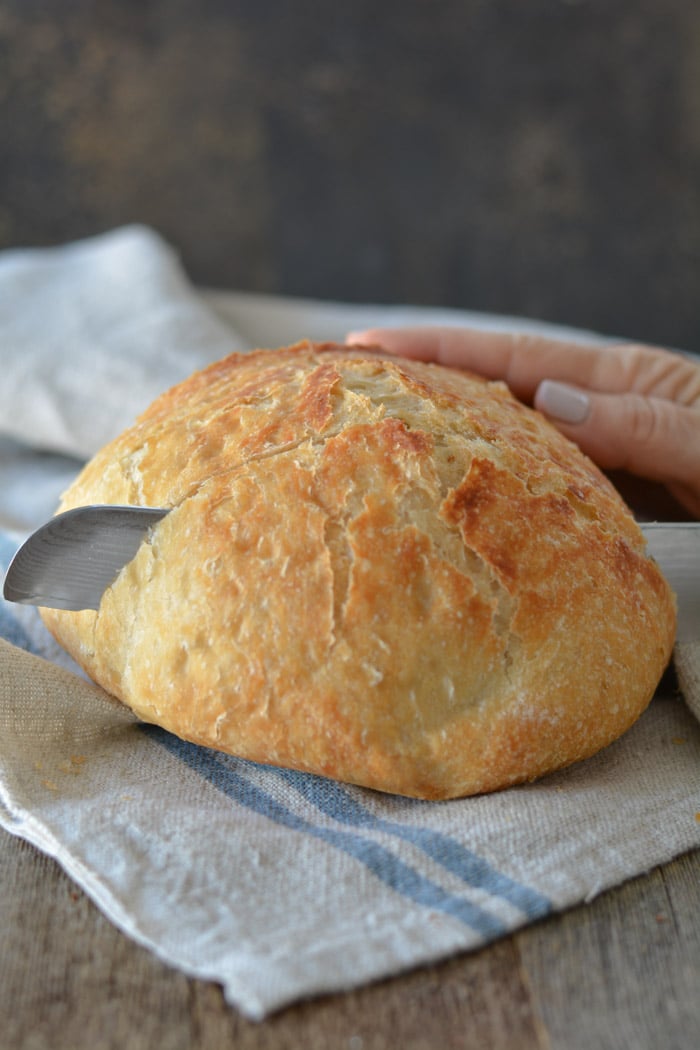
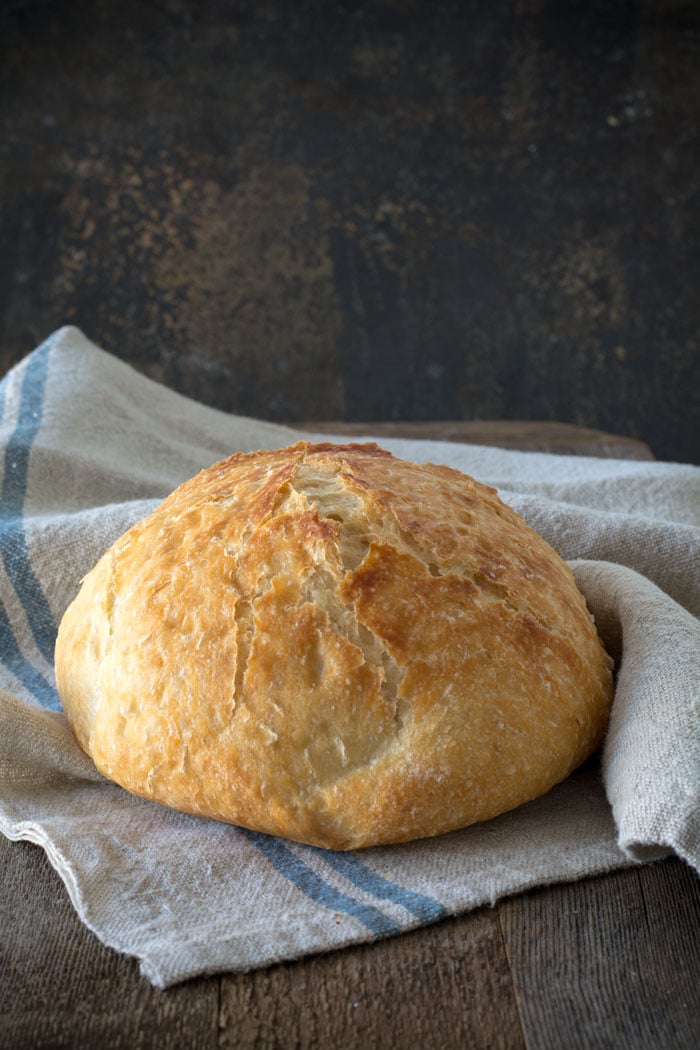
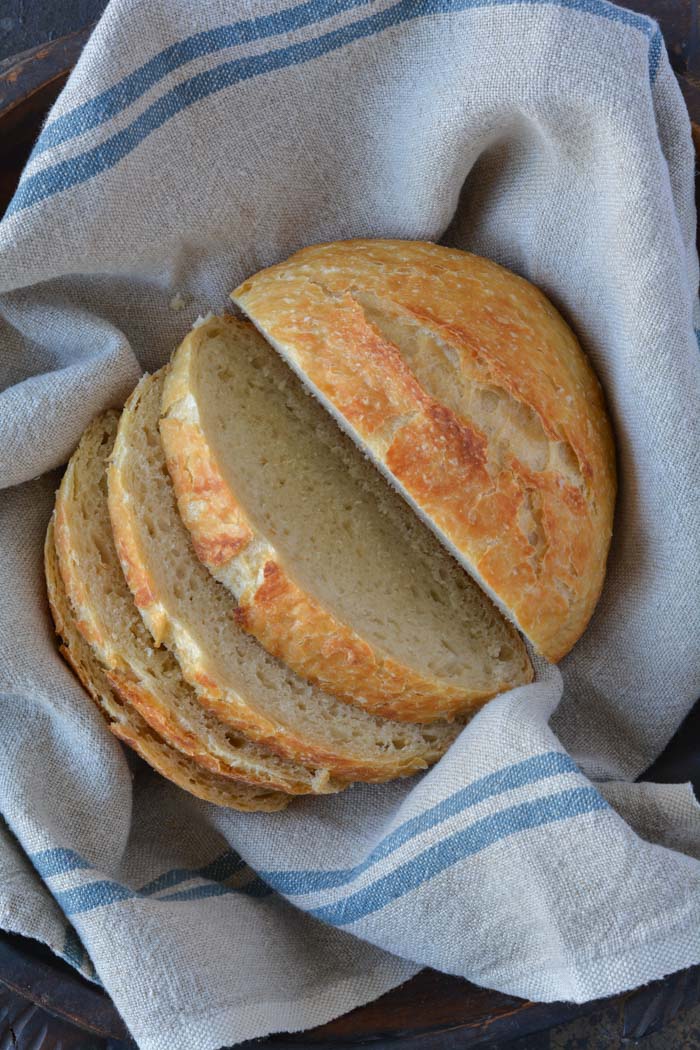
Holy cow! Can you believe how gorgeous that is? It’s best to wait for the bread to cool before slicing. Because I love warm bread I sliced it right away.
FAQ’s
Q: Do I have to use an enamel covered cast iron pan?
A: NO. You can use anything that can take the heat. The following have been used that I know of:
Clay pots with lids, Pizza stone with a bowl to cover the bread, insert from a crockpot, pyrex baking dish with a lid, stainless steel pot with a lid, baking dish covered with aluminum foil, old cast iron dutch oven.
Q: Do I have to use unbleached flour?
A: I always use unbleached flour. You can try bleached flour.
Q: Can I use self-rising flour?
A: I don’t know. I would just stick to all-purpose.
Q: What size is my pan?
A: My smallest pan is 5.5 quart. You can use as small as a 3 quart.
Q: What type of yeast do I use?
A: I use SAF instant yeast. Any yeast should work.
Q: Why is my bread turning out flat?
A: You could try using less 1/4 cup less liquid. Or add 1/4 cup additional flour. Make sure your dough appears to be dry when you first mix it. It will have more moisture during the rising time.
Q: Can my dough sit out longer than 18 hours? Does it HAVE to be between 12-18 hours?
A: I have let some dough sit as long as 24 hours and the bread was beautiful.
Q: Have you tried Gluten-free?
A: From what I hear the best GF is from King Arthur Flour https://shop.kingarthurflour.com/items/gluten-free-measure-for-measure-flour-3-lb
Q: Do I have to grease or oil the pan? Will my breadstick?
A: No you don’t need to grease the pan. I have never had the bread stick when using a cast iron pot. I haven’t tried anything else. The best way to be certain that the bread won’t stick is to form the loaf on a sheet of parchment paper and lift the bread into the pan using the sides of the parchment. Leave the paper in the pan. It’s won’t burn. When the bread has baked, just lift the sides of the parchment out of the pan. Voila! HOWEVER: Not all parchment paper is created equal. I use a silicone coated parchment paper. Regular parchment paper can stick something terrible. Don’t chance it.
No-Knead Crusty Bread
Wonderful yet easy artisan bread with a crisp crust. Prep takes just a few minutes with an overnight rise. Baked in a pot with a lid to create a steam oven. Bread can be made with many flavors and variations.
Ingredients
- 3 cups + 2 tablespoons unbleached all purpose flour (450 gr)
- 1 3/4 teaspoons Kosher salt (10 gr)
- 1/2 teaspoon Instant or Rapid-rise yeast (3 gr)
- 1 1/2 cups water cool (315 gr)
Instructions
-
In a large mixing bowl, whisk together flour, salt and yeast.
-
Add water and mix until a shaggy mixture forms.
-
Cover bowl with plastic wrap and set aside for 12 - 18 hours. Overnight works great.
-
Heat oven to 450 degrees. When the oven has reached 450 degrees place a cast iron pot with a lid in the oven and heat the pot for 30 minutes. OR pot can be placed in cold oven while oven is preheating leave in oven for 30 minutes.
-
Meanwhile, pour dough onto a heavily floured surface and shape into a ball. Cover with plastic wrap and let set while the pot is heating.
-
Remove hot pot from the oven and drop in the dough. Cover and return to oven for 30 minutes. After 30 minutes remove the lid and bake an additional 15 minutes. Remove bread from oven and place on a cooling rack to cool.
Recipe Video
Recipe Notes
FAQ's
Q: Do I have to use an enamel covered cast iron pan?
A: NO. You can use anything that can take the heat. The following have been used that I know of:
Clay pots with lids, Pizza stone with a bowl to cover the bread, insert from a crockpot, pyrex baking dish with a lid, stainless steel pot with a lid, baking dish covered with aluminum foil, old cast iron dutch oven.
Q: Do I have to use unbleached flour?
A: I always use unbleached flour. You can try bleached flour.
Q: Can I use self-rising flour?
A: I don't know. I would just stick to all-purpose.
Q: What size is my pan?
A: My smallest pan is 5.5 quart. You can use as small as a 3 quart.
Q: What type of yeast do I use?
A: I use SAF instant yeast. Any yeast should work.
Q: Why is my bread turning out flat?
A: You could try using less 1/4 cup less liquid. Or add 1/4 cup additional flour. Make sure your dough appears to be dry when you first mix it. It will have more moisture during the rising time.
Q: Can my dough sit out longer than 18 hours? Does it HAVE to be between 12-18 hours?
A: I have let some dough sit as long as 24 hours and the bread was beautiful.
Q: Have you tried Gluten-free?
A: No. I'm still waiting for someone to venture into the realm of Gluten-free. If you try it, let everyone know.
Q: Do I have to grease or oil the pan? Will my breadstick?
A: No you don't need to grease the pan. I have never had the bread stick when using a cast iron pot. I haven't tried anything else. The best way to be certain that the bread won't stick is to form the loaf on a sheet of parchment paper and lift the bread into the pan using the sides of the parchment. Leave the paper in the pan. It's won't burn. When the bread has baked, just lift the sides of the parchment out of the pan. Voila! HOWEVER: Not all parchment paper is created equal. I use a silicone coated parchment paper. Regular parchment paper can stick something terrible. Don't chance it.
More Notes:
Regular active yeast can be used in place of the instant or rapid-rise yeast. It will need to be activated in 1/4 cup warm water. Stir and let sit for 5-10 minutes. However, most of the comments I have received state that the rapid raise works the best. You choose. Whisk the flour, salt, and yeast together.


I wonder if this would work in my cast iron deep fryer? Its very deep and comes with a heavy glass lid. What do you think?
Mr. Clean Magic Eraser will clean your Le Creuset pots like new! They work well on a million other things too! Thanks for sharing your recipe and instructions!
I have a quick question…
My lid for my enameled dutch oven somehow broke (no one will fess up, haha) and now I have absolutely nothing that will fit it. Can I try tin foil when I bake the bread or maybe cover it with a plate?
I cannot wait to try this recipe the bread looks amazing, by the way I found on pinterest you can clean your pans with the white erasers :o)
I can't wait to try this. But I am wondering what kind of yeast did you use? I have dry active and instant dry yeast.
For the 7.5 quart pan do you double the recipe to fill it or or is it just the regular (not doubled) recipe?
OMG! I just made this wonderful bread. But I have a terrible problem, I am having trouble waiting for it to come out of the oven! It looks & smells so great I want it now!
I made the rye bread with 1 cup rye flour and 2 cups regular. It turned out like a rock. I'm going to try the regular version to see if that turns out better.
Hi Janet,
Is this bread suitable to be used for a cobb loaf dip?
Thanks
Oreollie
I have no idea what that is??? Sorry. Give it a try. Why not?
Baking soda mixed with vinegar foams up and cleans anything……..effortlessl.
I saw someone mention Bar Keepers Friend for cleaning your pots, but I go even easier: Baking soda. Make a paste with a little water and scrub away, it won't hurt the finish at all. Also works great on cleaning those stubborn greasy range hoods.
I save the baking soda box from the frig when I get around to changing it and use that to clean with.
I had my fingers crossed that this would work, and I just tried the bread and it reminded me of my favorite Pugliese bread that I like to buy at my local grocery store! I had used a heavy "Le Creuset" type pot that food network makes, and it came through for me! I can't wait to try all the other variety's of it! Thank You so much!
Try adding 1/4 Tsp sour salt (citric acid) found in the canning section of the grocery store or vitamin section at Walmart. It will give your bread a more tangy flavor like sour dough. I found this tip on the King Arthur website when I tried their quick sour dough recipe. I love not having to make and keep a starter and the fact that there is no kneading!
Made last night for the first time with no problems and excellent results.
In addition, I used a non-ceramic oval cast iron pot (Kitchen Aid to be specific) and had no problems with sticking or any other issue, but I've found that my oven/cat iron pot runs a bit hot (25 deg F hot) and need to adjust next time. My 10 year daughter, a picky bread eater, just loves the bread.
Always looking for a great recipe, this looks great and easy. I will love trying it. Also try using a sos pad on the pot I know it helps with the stuck on stuff on my pyrex.
Just took my first loaf out of the oven – – yay! I used a very old (was my grandmother's) heavy duty Wagner Ware aluminum dutch oven and it turned out great. The next loaf will be cinnamon-raisin. So thrilled I found this recipe! Thanks Janet!!
This looks AMAZING!!! Can you suggest what we can do if we don't have a le creuset?
Thanks in advance!
You should try White Chocolate Apricot for your next flavor. Just add white chocolate chips and small slices of apricot. I remember trying this at a really old bakery once and it was AMAZING! I plan on using this bread recipe to try and remake it. Thank you!
I have 3 blue Le Creuset pots that I dearly love and heavily used. I use Bar Keeper's Friend for cleaning the stains and it works quite well.
This looks amazing! And so easy!
Check out my latest recipe @ bakingblissful.blogspot.com
I now have over 1100 comments on this post. Wow! Who new that I'd get such a great response 2 years later?? Most questions I have already answered at least 100 times…seriously. I don't mind re-answering questions because it would take hours to read through all of the comments. I hope I can answer some of the newest questions. First let me thank everyone for sending in your success stories and wonderful ideas and creations. I have used several cleaning tips and my babies are now sparkling clean and look almost new. I still use them so much they do have some wear and tear.
I hope these answers will help anyone with questions:
– most any pot works for baking the bread. From Pyrex, stainless steal, crockpots, inserts, pizza stones, clay pots, old camping dutch ovens, you name it so far everyone that tries something different has success.
– condensation on the plastic wrap is normal. No problem. It just happens and won't effect the dough.
– Yes. You can let the dough rise longer than 18 hours. I have let it rise as long as 24. It's pretty forgiving.
– You can use as small as a 2.5 – 3 quart dutch oven with success.
– You can use parchment paper to lift the dough and place it into the dutch oven. The parchment can be left in the pot while baking for easy removal of bread. It's a great suggestion.
– If you bread browns too much on the bottom try placing a baking sheet under the pot. Someone mentioned that helped. OR just don't preheat as long.
– If your bread is flat, try adding 1/4 cup more flour. I hope that solves the problem. I bake at high altitude…which could make a difference.
– I purchased my towels from Ikea about 2 years ago.
– Thank you Queenstown, Austrailia for your comment. I love hearing from everyone. Your flavor combo's make my mouth water. I hope I haven't forgotten anyone.
Love to all. Janet
Janet, I just made 2 double batches. One plain and another with cheddar, jack, garlic, oregano, basil and some sage. I cannot wait to put these in the oven and bake thanks for sharing. AWESOME.
Hi, I was wondering if you knead the flour at all into the mixture? I dumped mine out onto my flour & it did not seem to have the shape that yours did. Thanks for any info.
The only issue keeping me from making this bread is the time-frame. Can I possibly let it sit for more than 18 hours? I have busy days and I would have to mix up the dough the night before and hopefully bake around dinnertime the next day.
Thank you..I have been searching for years for this type of recipe..it is great and so simple
A friend sent me this link. I love baking breads and this sounds so yummy and easy! I have a 5 quart Stainless DO rated for 500 degrees. Do you think this will work? Maybe use a baking stone too or line the bottom with parchment to avoid over browning? I do have an old style plain cast iron DO that was used as a camping pot by my son but the rim of the pot is bumpy and I am afraid it will not give a good enough seal not to mention it is so heavy. Also it is 10" so I am thinking it is a 4 quart DO. I want to try this recipe and add dill, garlic and parmesan cheese.
This recipe is just wonderful! The only thing I add to it is: One basket, one bottle of wine, a hunk of good cheese, a couple of apples and a ribbon. It's the perfect gift!
just look my loaf out of the oven and it's wonderful! my first loaf of bread ever!!
If you want to clean your pots soak them in caustic soda solution overnight and the baked on stuff will come off.
I tried this over the weekend and it was very easy. However, my bread did not rise very well. It was delicious…but a little on the flat side. I followed the recipe and directions to a 't'. Any suggestions? I let the dough sit for 18 hours. Was this too long?
I made the bread over the weekend. However, mine did not rise very well. It was absolutely delicious…but I wish it did the rising thing better! Any suggestions? I followed recipe and directions to the 'T'. I did let the bread sit out for 18 hours. Was it too long?
Wow! I'm definitely going to try this one! Looks delicious!
I made this bread today and I want to say a HUGE thanks!! This was the easiest, tastiest bread ever. Im going to try the different ways to make it..
Janet, I cannot believe that you answer all these posts, spanning years. Tah-Dah to you. Now, to the bread….I'm definately going to try this. No one has mentioned my very favorite combination of cheddar cheese and crushed garlic. So good, and toasted, with butter… it doesn't get much better. Thank you again.
KathyDe
Funny question – but I love your dish towels! What brand are they?
Made this today for Father's Day. Turned out great! Made garlic herb cheese bread. Didn't rise as much as yours but it's still awesome! LOVE this recipe!!!!!
OMG… thanks for the recipe it makes amazing bread.I don't own one of the enameled cast iron pots but do have a regular cast iron dutch oven so i lined it with parchment paper and cooked as directed…the bread turned out awesome. Thanks again
If your pots are enamel over cast iron and there are no chips, you can spray with oven cleaner, let sit for 30 minutes and wash as usual. It should take the yucky off. Karin Hamilton-Admire
"Please notice how used my Le Creuset pots are. Everything is my kitchen is heavily used. If you have any advice as to how I can clean my babies, please let me know."
I used baking soda and hydrogen peroxide mixed in a paste. You can scrub and rinse, or leave it on longer to work and not scrub as hard. I did the elbow grease method as I didn't know what it would do to the enamel. It took off the baked-on-brown, so my beautiful robins egg blue pot is beautiful again.
I made this bread yesterday and it's almost gone today. I put it in a 2.5 quart dutch oven and it turned out great. I'm definitely going to be making some more tonight. Thank you so much for putting this bread here.
I have had a ton of questions lately. My daughter just had a baby and I'm watching her three little ones. I'll respond later today. Sorry for the delay.
I'm attempting this recipe as my first bread ever! It has been rising for about 9 hours now, and there are some droplets of condensation on the inside of the plastic wrap. Is this normal? I've looked online but can't find anything specific about this topic.
thanx for sharing the recipe….I like to put chopped chives and parlsey , another dry fried onions, sun dried tomatoes chopped up really tiny and black or green olives , sometimes I used chilli flakes too.
ciao
joan in italy
What size is the dutch oven you used?
Have you tried BArkeepers Friend to clean your cookware? It is amazin. It does not scratch or damage.
You did not say anything about oiling your dutch oven. I will be using a regular cast iron dutch oven to make mine and feel that I will need to grease it.
I made two loaves, one with Cheddar Cheese and Italian Seasonings. One with raisins, brown sugar, and cinnamon. Both are amazing! However, the bottom seemed to get way over done. My husband and son actually cut it off because it is so hard. I can't move my rack up any higher and still fit the dutch oven in. Any ideas how to avoid this?
When I wanted to do my first attempt to this fabulous bread, I didnt have enough flour, so the next day I went to grocery store and I bought Wheat Flour… And then I read wheat flour would be too heavy… Well, I used 1½ cup of white flour and 1½ cup of wheat and my bread is perfect! Its smell like heaven in my house! Im so happy! I cant wait to try variation and I cant wait to share it with others! Thank you very much! 🙂
You asked about cleaning your Le Creuset cookware? Ammonia. It will need to soak, so place the pot upside down in a garbage bag, cover with an ammonia soaked towel, close the garbage bag and in the morning, you can wash it right off! (The fumes are awful, so make sure you do this in a well-ventilated area.) Good luck!
WOW..what great Bread..I saw your recipe last evening and just jumped up and mixed it up in my Grandmothers Large Mixing bowl.covered it with Glad wrap and a Tea Towel.and set it aside.I was so surprised to find it had filled the huge bowl this morning..Even though my oven gave me trouble today My oval Le Creuset pan held on to its heat as i re started my oven ,it took a little longer to cook but came our just beautiful.I just made the plain bread,but will try the fruit version soon..Thank you very much for sharing the great bread recipe..I did not have greese the pot and it just baked to perfection..Thank you so much for sharing..This will be passed on to the family..Bless you..
Also.about cleaning your pan…I have had a set of Le Creuset for 40years..we bought them when we first married.So they are well used.We spray the outside with a non caustic Oven Cleaner leave in on overnight and then just wash it off,(wear Rubber Gloves as this cleaner is quite strong)and your pan will be like new again.if not try it again..I use oven cleaner on my bar-b-que plates too..
Thank you once again..Frenchpossum..15/6/12 West Australia…
I am going to buy 2 pots tomorrow I can't wait to try this. My arthritis has stopped me from making bread and this is NO KNEAD! perfect! Thank you for sharing. AJ
Hi I am cooking this great loaf right now. It sounds wonderful and the dought filled my large bowl..with overnight
You can clean your loved cooling pot by spraying the outside with no caustic oven cleaner and leaving it over night .and washing of the next day.wear gloves to save your hands.you may need to do this a few times,depending on how marked your pans are.Mine are 40 years old and have been well used also..gives them that loved look..thanks for the recipe..I will post how I liked it once it is out of the oven..
Bless you frenchpossum..west Australia..
I will never use another "yeast" bread recipe. This is soooo good. Real butter slathered on it is the icing on the cake.
The first time I baked this bread, I brought a loaf as an illustration in our 1st grade Sunday school class. We were teaching about the miracle of the loaves and fishes. I also brought a tin of herring fillets. The bread was a huge hit with the children. Only two boys liked the herring fillets. 🙂 Thank you for helping me create a great visual and taste-y memory for the class.
Debra Ganas
Made this today in my pampered chef deep baker and it totally worked! No sticking, just one awesome looking loaf of bread (my first ever!). Can't wait for it to cool down so we can taste it 🙂
I was wondering if this bread is a good for sandwiches? I'm trying to get away from buying bread all the time if I can make it. And if anyone has some ideas of how I can have a cow or goat in my "no farm animals allowed" city home I would greatly appreciate it. My husband drink too much milk 🙂
OMG! I just made this bread and it looks just like the photos!! It was so easy! I used a plain old cast iron Dutch oven. I also used warm water when I added it to the flour, salt, yeast mixture..don't know if that made any difference or not. I also used plastic food service gloves sprayed with Pam when handling the dough. That helped keep me from having a sticky mess. Can't wait to slice it! Thanks so much for sharing your recipe! I'm definitely going to play around with some different flavorings!
How would Guardian Service Cookware work with this recipe
I use SOS pads on my Le Creuset and it works wonders. Can't wait to try your bread…YUM!!!!!!
how long will a loaf keep if you don't eat the whole thing right away lol
I cannot wait to try this! I am now craving bread. YUM!
Hi!! I fell upon your post on pinterest yesterday and just HAD to try making this bread! Into the oven it went today! I have to say, WOW!! what an amazing recipe!! I love it!!! Thank u so much for sharing it!! I followed your directions EXACTLY and it came out BEAUTIFULLY!! the only thing I did differently was I made an Italian olive loaf! Pimento stuffed olives mixed in some Italian spices and a sprinkling of hot chili flakes & mmmmm mmm mm yummy!!! Thank u so much once again!! …. Tammy from Montreal, Quebec!
ok, well, i love bread but still working on perfecting all my doughs:) can i use bread flour with this recipe and if so do you know if i add the same amount? i tried to google it but wasn't sure. thanks!!!
I found your recipe on Pinterest and made it yesterday. It came out so well! Thanks for sharing! I even made a comment on Le Creuset's FB page and someone asked for your recipe!:)
Janet,
I just received my first Le Creuset for Christmas from my lovely husband – I'd been hinting around for some time. I LOVE it! I proudly display it on my stove top. I use baking soda and elbow grease to get out most of the stains – have you tried the magic eraser? Can't wait to try your bread recipe.
Has anyone tried chopping maraschino cherries and adding them with chocolate chips?
I have the 2Qt. heart dish. I'm definitely going to have to try this recipe, and divide the loaf. Thanks! This looks great!
I have made the Artisan Bread before, but this looks so good. I have a cast iron dutch oven that I am going to use. Wish me luck
Another blog I follow showed a way to clean cookie sheets that might work on your pans, you take baking soda and mix enough peroxide in to make a paste. Put it on the gunky spots and let it it–like a couple hours. I tried it on the top of my stainless toaster oven that had pizza stone gunk on it–it wiped right off!
Also, regarding using whole wheat. I make whole wheat bread in my bread machine (well the dough) and discovered that when I added "Vital Wheat Gluten" in the amount called for on the box (like a couple tablespoons) it made the bread lighter. I don't find it in my local stores now, but you can get it on amazon. Try it and see if it helps!
Do you ever get tired of answering the same questions over and over?
LOL
Thank you for the beautiful blog! I won a Le Cruset pot, but admit I have not used it yet….I KNOW…that's awful, but it's just so beautiful?
I'm watching for a cast iron dutch oven bargain!
awesome!!! thank you 🙂 i clean my heavily used le crueset with baking soda and just enough water to use it as a paste. it will scrub off junk with out scratching your beautiful pot 🙂 i use that same recipe for loaves and i can keep the basic dough in the fridge up to 2 weeks. the longer it sits the more depth of flavor it gets 🙂
Try "Barkeeper's Friend" on your pot…that's what I use on mine…and on everything else!
Is the recipe listed here for a double or single?
Re: cleaning – +1 for Barkeepers Friend. It's made with powdered oxalic acid and is a great "gentle" cleanser. Not a bleach, so it won't weaken your enamel surfaces. Bon Ami is also a great abrasive powder.
Have you had anyone try with gluten free flour, would love to make this gluten free.
i just made this bread and it was that easy , i had a deep ccasst iron frying pan with lid and it came out exactly the way the directions were .. i am making spagetti for dinner and cant wait to eat this beautiful loaf.. im going to get fancy with my next loaf .. will let u know how it turned out .. !