What I love about this bread
- It’s so easy to make. This dough can be made in less than 5 minutes.
- The basic dough recipe can be enhanced with many different flavor varieties.
- Very little hands-on time.
- Crusty bread never ceases to impress family and friends.
- My 12-year-old grandson can make it.
Let’s make No-knead crusty bread:


- In a large mixing bowl, add flour, kosher salt, and yeast. Whisk together.
- Add water. Mix just until all of the flour has combined with the water. The dough will look like a shaggy mess. That’s ok.
- Cover the bowl with plastic wrap and let it sit for 12 – 18 hours on the countertop. DO NOT REFRIGERATE. This is not optional. It takes that much time to proof the dough. The reason why you need a large bowl is that the dough will start to rise.
- After 12 hours the dough will look like this. It’s pretty sticky, but that’s ok it’s supposed to be.
Shaping and baking the bread:


- Preheat oven to 450 degrees. As soon as it has heated to 450 degrees place your pot with the lid in the oven and preheat the pot for 30 minutes.
-
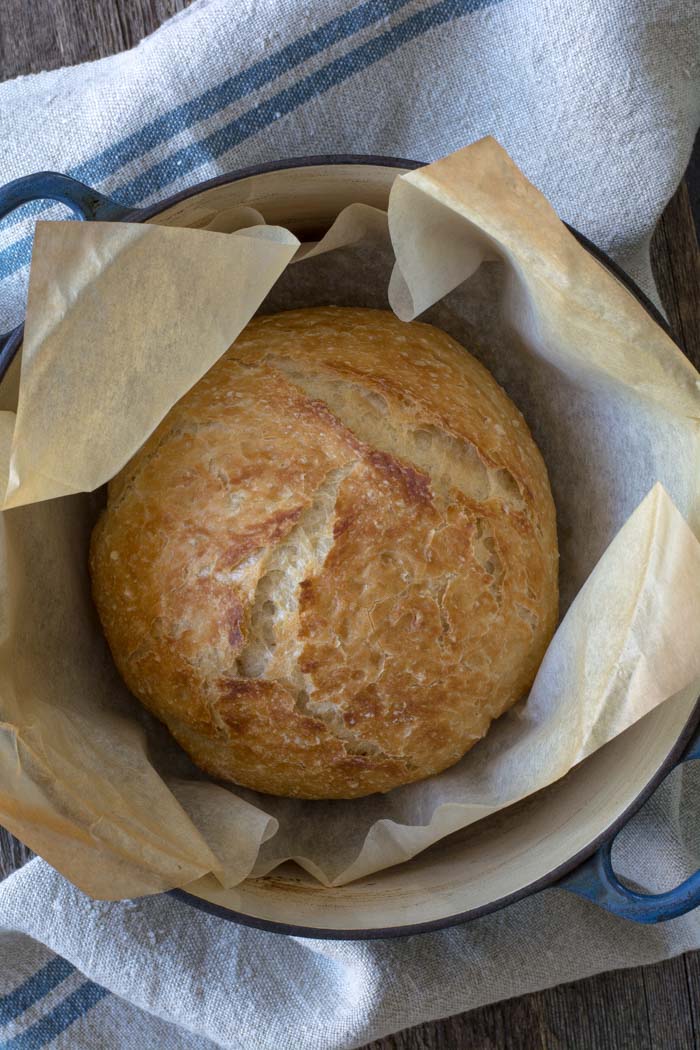
Right after you put the pan in the oven to pre-heat, dump the dough out onto a HEAVILY floured surface. Shape it into a round ball and place on a sheet of parchment paper. Parchment makes it so easy to transfer the dough into a hot pot and then remove it after baking. The parchment paper stays in the pot. This will rest for 30 minutes while the pan is heating. Cover with plastic wrap. Note: Use silicone coated parchment paper. The regular non-coated paper will stick terribly. Don’t chance it.


- Remove pot from the oven and carefully pick up the parchment and drop dough into the pot. Be careful the pan is HOT. Put the lid on the pot and return it to the oven for 30 minutes.
- After 30 minutes remove the lid from the pan. Bake for an additional 15 minutes or until nicely browned. You can test with an instant-read thermometer to make sure the bread is fully cooked on the inside. The temp should be between 190F and 200F degrees. Remove from the oven and carefully remove bread from the pot by lifting the edges of the parchment paper.
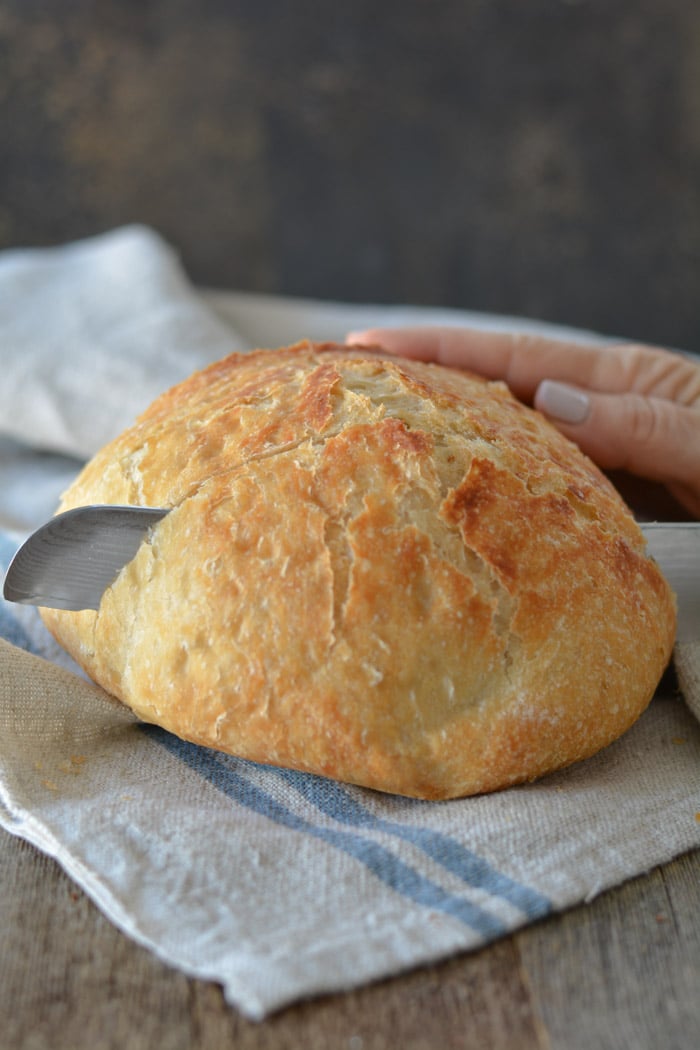
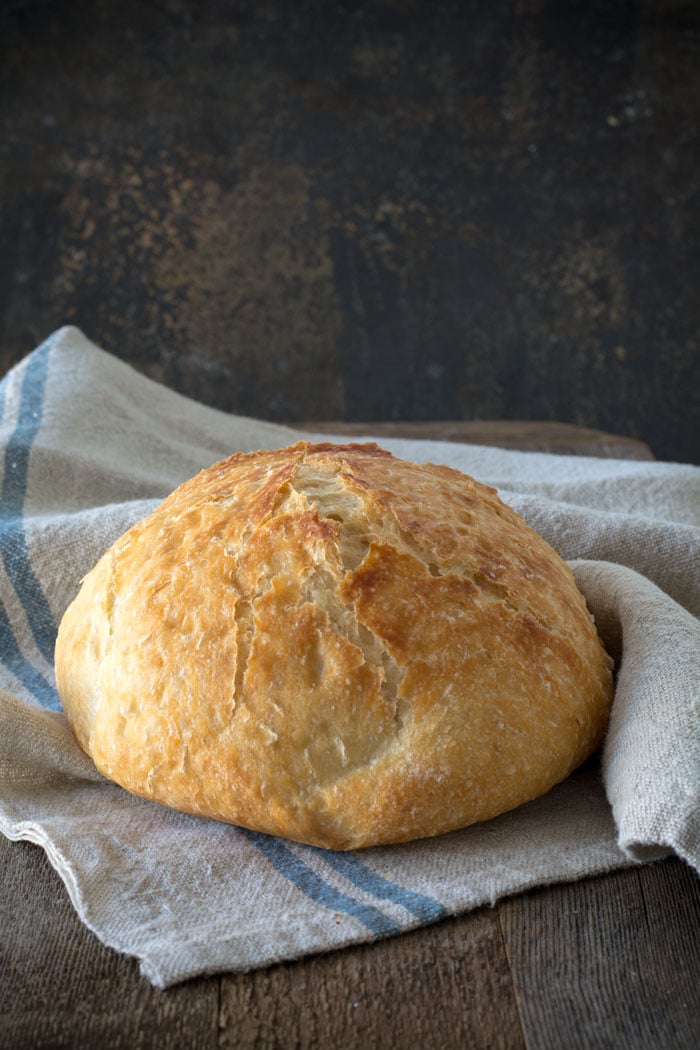
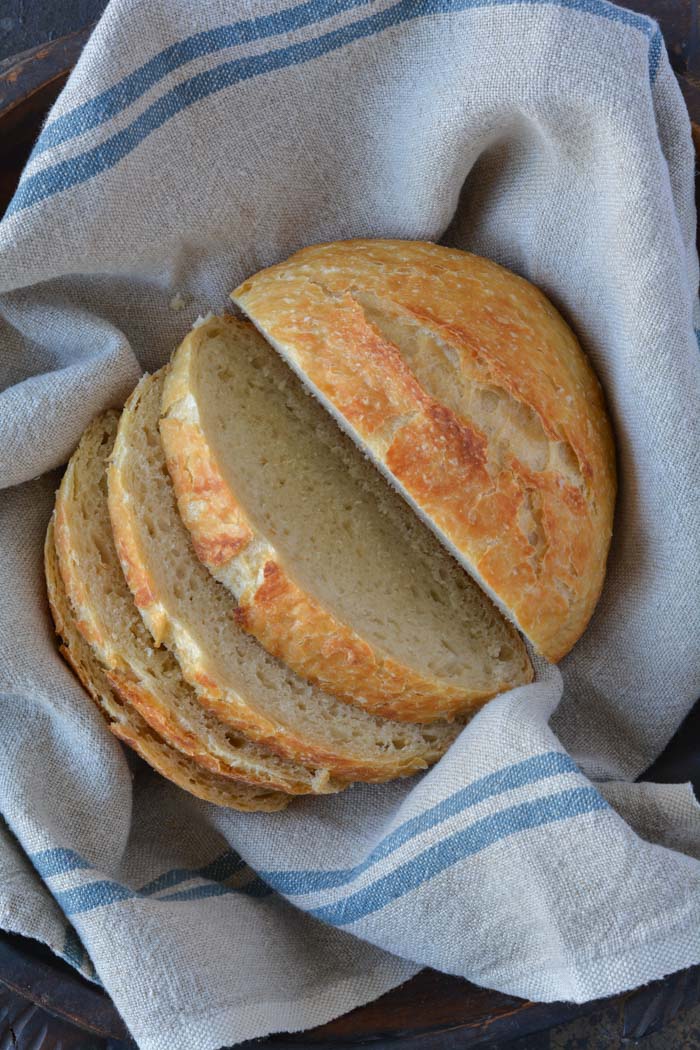
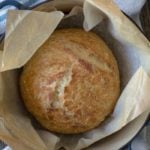
Holy cow! Can you believe how gorgeous that is? It’s best to wait for the bread to cool before slicing. Because I love warm bread I sliced it right away.
FAQ’s
Q: Do I have to use an enamel covered cast iron pan?
A: NO. You can use anything that can take the heat. The following have been used that I know of:
Clay pots with lids, Pizza stone with a bowl to cover the bread, insert from a crockpot, pyrex baking dish with a lid, stainless steel pot with a lid, baking dish covered with aluminum foil, old cast iron dutch oven.
Q: Do I have to use unbleached flour?
A: I always use unbleached flour. You can try bleached flour.
Q: Can I use self-rising flour?
A: I don’t know. I would just stick to all-purpose.
Q: What size is my pan?
A: My smallest pan is 5.5 quart. You can use as small as a 3 quart.
Q: What type of yeast do I use?
A: I use SAF instant yeast. Any yeast should work.
Q: Why is my bread turning out flat?
A: You could try using less 1/4 cup less liquid. Or add 1/4 cup additional flour. Make sure your dough appears to be dry when you first mix it. It will have more moisture during the rising time.
Q: Can my dough sit out longer than 18 hours? Does it HAVE to be between 12-18 hours?
A: I have let some dough sit as long as 24 hours and the bread was beautiful.
Q: Have you tried Gluten-free?
A: From what I hear the best GF is from King Arthur Flour https://shop.kingarthurflour.com/items/gluten-free-measure-for-measure-flour-3-lb
Q: Do I have to grease or oil the pan? Will my breadstick?
A: No you don’t need to grease the pan. I have never had the bread stick when using a cast iron pot. I haven’t tried anything else. The best way to be certain that the bread won’t stick is to form the loaf on a sheet of parchment paper and lift the bread into the pan using the sides of the parchment. Leave the paper in the pan. It’s won’t burn. When the bread has baked, just lift the sides of the parchment out of the pan. Voila! HOWEVER: Not all parchment paper is created equal. I use a silicone coated parchment paper. Regular parchment paper can stick something terrible. Don’t chance it.
No-Knead Crusty Bread
Wonderful yet easy artisan bread with a crisp crust. Prep takes just a few minutes with an overnight rise. Baked in a pot with a lid to create a steam oven. Bread can be made with many flavors and variations.
Ingredients
- 3 cups + 2 tablespoons unbleached all purpose flour (450 gr)
- 1 3/4 teaspoons Kosher salt (10 gr)
- 1/2 teaspoon Instant or Rapid-rise yeast (3 gr)
- 1 1/2 cups water cool (315 gr)
Instructions
-
In a large mixing bowl, whisk together flour, salt and yeast.
-
Add water and mix until a shaggy mixture forms.
-
Cover bowl with plastic wrap and set aside for 12 - 18 hours. Overnight works great.
-
Heat oven to 450 degrees. When the oven has reached 450 degrees place a cast iron pot with a lid in the oven and heat the pot for 30 minutes. OR pot can be placed in cold oven while oven is preheating leave in oven for 30 minutes.
-
Meanwhile, pour dough onto a heavily floured surface and shape into a ball. Cover with plastic wrap and let set while the pot is heating.
-
Remove hot pot from the oven and drop in the dough. Cover and return to oven for 30 minutes. After 30 minutes remove the lid and bake an additional 15 minutes. Remove bread from oven and place on a cooling rack to cool.
Recipe Video
Recipe Notes
FAQ's
Q: Do I have to use an enamel covered cast iron pan?
A: NO. You can use anything that can take the heat. The following have been used that I know of:
Clay pots with lids, Pizza stone with a bowl to cover the bread, insert from a crockpot, pyrex baking dish with a lid, stainless steel pot with a lid, baking dish covered with aluminum foil, old cast iron dutch oven.
Q: Do I have to use unbleached flour?
A: I always use unbleached flour. You can try bleached flour.
Q: Can I use self-rising flour?
A: I don't know. I would just stick to all-purpose.
Q: What size is my pan?
A: My smallest pan is 5.5 quart. You can use as small as a 3 quart.
Q: What type of yeast do I use?
A: I use SAF instant yeast. Any yeast should work.
Q: Why is my bread turning out flat?
A: You could try using less 1/4 cup less liquid. Or add 1/4 cup additional flour. Make sure your dough appears to be dry when you first mix it. It will have more moisture during the rising time.
Q: Can my dough sit out longer than 18 hours? Does it HAVE to be between 12-18 hours?
A: I have let some dough sit as long as 24 hours and the bread was beautiful.
Q: Have you tried Gluten-free?
A: No. I'm still waiting for someone to venture into the realm of Gluten-free. If you try it, let everyone know.
Q: Do I have to grease or oil the pan? Will my breadstick?
A: No you don't need to grease the pan. I have never had the bread stick when using a cast iron pot. I haven't tried anything else. The best way to be certain that the bread won't stick is to form the loaf on a sheet of parchment paper and lift the bread into the pan using the sides of the parchment. Leave the paper in the pan. It's won't burn. When the bread has baked, just lift the sides of the parchment out of the pan. Voila! HOWEVER: Not all parchment paper is created equal. I use a silicone coated parchment paper. Regular parchment paper can stick something terrible. Don't chance it.
More Notes:
Regular active yeast can be used in place of the instant or rapid-rise yeast. It will need to be activated in 1/4 cup warm water. Stir and let sit for 5-10 minutes. However, most of the comments I have received state that the rapid raise works the best. You choose. Whisk the flour, salt, and yeast together.


Thank you so much, I made this using freshly ground whole wheat and it turned out wonderfully crunchy on the outside and chewy on the inside. I wish I had 2 pots to make double recipes now!
Spectacular!!! I have to admit that I was skeptical, but this worked EXACTLY like you said it would and I used AP flour and an oval 4 quart corning ware dish because I don't have a cast iron dutch oven and I couldn't wait to try this out! I love to bake bread and this is the easiest recipe I have ever come across! Can't wait to try different ingredients! AND I will be purchasing some sort of Dutch oven just because I can see that I'll want to make more than one loaf at a time!! Thanks for passing this along!!
I only have pot so my question is, can I make a double batch and let the second loaf sit on the floured board while the other is cooking and then cook the second one?
The bread is fantastic!! Thank you for sharing the recipe and tutorial! Even my husband approves! 🙂
I have been searching for this bread recipe all my life it seems. Who knew it would turn out to be such a simple recipe?? This is fabulous. FYI, I bought a Loge cast iron pot with lid instead of the more pricey Le Creuset and it worked like a charm. While I would love to have the pretty Le Creuset pot, alas, my budget wouldn't allow it. I can't wait to make this bread again! Bye bye James Beard, hello Janet@simplysogood!!
Maybe this has already been suggested in the bazillion comments ahead of mine, but have you tried a Mr. Clean Magic Eraser to clean your 'babies'? 🙂
Hi,
Forgive me but I have not read each and every comment. You asked for advice on how to clean for lovely Le Creuset. We'll…I don't have to clean my blue Le Creuset after making bread like this. Why ? Because I place the freshly divided dough onto full sheets of parchment paper while they rise. Then when the pots are fully preheated, I lift my the paper corners and place paper and all into the pot. Voila. Place the lid on and don't worry too much about the paper edges. Then when the loaves come out all steamy and crisp, the paper looks pretty and peels right off. PS I used unbleached parchment from my local organic store. Bon appetite.
Just stumble on your recipe and I would love to try it but, my cast iron pot is rectangle. It's very old, works wonder but rectangular, so do you think it'll work or that the bread will spread too much???
It should work just great.
A healthier hope: I always use Saf-instant yeast, but any yeast will work just fine.
-You can use any type of a dutch oven. It doesn't have to be enamel covered.
Martha: You do not have to have Le Creuset to bake this bread. Read through a few of the comments. Pretty much anything will work.
Cast Iron is a lot cheaper and have always heard that if one chooses to cook with it that your body actually absorbs the iron nutrients. I can't afford Le Creuset so I may have no choice but to use cast iron. Wonder if the cooking time should be reduced since it is a dark pan?
Do you have to have a Le Creuset to bake these in?
can i use just a cast iron dutch oven?
I am so happy to find this recipe!Thanks.One question…I've 3 cast iron dutch ovens .They are NOT enamel,can I use them? Thanks,Theresa
I've never made bread before. Ever. What kind of yeast do you use?
I have never used vegetables or meats in my bread so I'm not an expert in that area. Hmmm broccoli I think I would leave it raw. There will be a quite a bit of steam action going on during the bread baking which should take care of cooking the broccoli. I think as far a bacon goes I would precook it then it should be ok sitting in the dough. I think someone out there had tried it, but they didn't specify when they added the meats. Sorry I'm not a ton of help here.
Hi
Just a quick couple of questions….1. if you use a vegetable such as broccoli
(with cheese), would you precook the broccoli first and then would it be okay sitting overnight? 2. what about pepperoni or bacon, would you put it in after it has set up or when first mixing flour, and etc.?
Going to try this.
I have been making this for years and a friend taught me one more clever trick she found – let the dough do the final raise on parchment paper and then just lift the parchment paper and place it in the pan – no more mess everywhere! It works so great. Love my LC pans – Costco had them for $79 one year and I got a couple – what a bargain. I can't wait to try some of your variations.
I am thinking about making batches of this and putting in ziploc bags or mason jars and pulling one out adding water when i need a loaf the next day. Sort of like a mix but just pre-mixed. Is there any problem adding the instant yeast to the other ingredients and storing, minus the water of course?
I only used unbleached flour. I'm sure bleached flour would work just great. Yes, you can use the unbleached on the counter to form your dough and Yes you can absolutely leave one on the counter while the other bakes. Remove the baked loaf and drop in the second dough. Works like a charm. Good luck.
I have loved making this bread!! Thank you so much!! Ive made it 3 times now and its fantastic. A few questions..why the unbleached flour? If I had to use bleached, would it work? If I used unbleached flour, but didnt have any left over for flouring my counter, could I use bleached flour for that? And lastly, I only have one pot, but want to double. Is it ok for the second loaf to sit on the counter shaped while the other cooks?
Penny – you should be just fine letting the bread set out until dinner time. The crust will soften ever so slightly, but it will be easier to cut. Enjoy!
It's so great to hear that Corning Ware works. Thanks for passing it on.
Stephanie – I have resorted to using parchment paper in the bottom of my pan. Works like a charm.
Sophia – I have not tried a baking sheet, but I think covering it with foil just might work. Make sure you crimp the sides down pretty good so that the steam doesn't escape. The steam creates the crisp crust.
Thanks for all the great ideas and helpful hints. It's so great to hear from everyone.
I have just found this blog (fantastic btw!) and I'm super jazzed – going to try it tonight and bake in the morning. I have 2 enamel cast iron dutch ovens and plenty of yeast & flour! I think I've read through a gazillion comments and hope I'm not asking something that's already been answered. Here's my question-if I let it sit out all night and bake in the morning will it still be fresh & delicious at dinner time?
I wanted to Thank you so much for posting this recipe, it was so delicious and wonderful. Seriously so simple to make.. My family loved it. I searched and tried to borrow a cast iron pot. Couldn't get my hands on one, so I simply used my Corning Ware bakeware set (the white ones with clear lid) and to my surprise… it worked just as great!
Thanks again!!! Happy Breading!
I am soooo making this bread…
Try mr clean magic sponge on pots… Works like a. Charm
Good luck
My first loaf came out great; I used half white & half white whole wheat. I
My second attempt was the rosemary/lemon/Gruyere. It tastes fabulous! But it stuck so badly the bottom is still on the pan. I did not preheat the pot this time because I read the care instructions for Le Creuset & it does not recommend an empty pot in a hot oven. I think that may be why it stuck. Next time I will preheat the pot for 10 minutes & see what happens.
Thanks for your recipe! We love it.
looks amazing!!! looking for breakfast ideas for next fathers day and I know he'll love this….
Don't have a le creuset… or a pot similar… can I do it in a baking tray and cover it with foil?
I made it to the end of the comments woohoo!! I will be trying this hopefully this weekend. My guys love pizza bread so I will be adding pepperoni and cheese to theirs. Then they can dip it in pizza sauce.
As far as a suggestion on how to clean your beautiful pots you may want to try a mixture of hydrogen peroxide ( about $1.00 a brown bottle at WalMart and some fresh baking soda. Make a paste on it . Let it sit a couple hours and scrub it off .It worked beautifully for me on a red enamel fry pan and an old baked on cookie sheet. Very inexpensive and no harsh chemicals.
I made this bread last night and i have to say that now this is my new favorite bread. It is the easiest bread to make. I used my Lodge cast iron pan and it came out perfectly and no sticking at all. Next time I make this which will be soon I may try a sundried tomato, garlic and fetta cheese bread….sounds yummy. You will love this bread I promise you that :-)) Enjoy !!!!
The best way I have found to really clean my pots is to put them in my oven through a self cleaning cycle. They were a mess and I was absolutely amazed at how new they looked when I took them out. I removed the knob first then put them in the oven. I was really scared that I would ruin my favorite pots. I have used this method on three of my Le Creuset. They look brand new.
Thanks for sharing your great ideas and bread flavors. I love hearing the success stories.
To the newlywed who used a crockpot to bake the bread – Genius. Way to go!
Donna – try adding 1/4 cup more flour. I hope that helps. I personally love the large holes. They make a great grilled cheese sandwich.
I made it for the first time today. It tastes great but I must have done something wrong but I can't figure out what. The bread is only about 1-1/2 – 2" high and full of holes. Not like your photos at all.
Donna
I didn't go through all the comments, but you can using baking soda on your Le Creuset pots to help clean them. I use it all the time and haven't had an issue with it yet, plus its not toxic which I really like.
OMG!!!! my bread came out of the oven PERFECT!!! Thank you sooo much!!! I love this and I used a corningware deep dish casserole dish with lid…it is GORGEOUS!!! AND DELISH!!! I added chedder cheese and Rosemary…Cant wait to try your lemon zest and cheese!!!! This is going to be soooo dangerous for me!!! I Love It!!! Thanks again!!!
I love hearing about your creations and your successes. Keep it up and happy baking.
haha, It's ok. If you've never tried it before how are you supposed to know how it'll turn out? 😛 I may give it a try and I'll have to let you know how it turns out!
My mom's advice for cleaning les creusets is to sprinkle a littl washing powder (the type used for clothes) on the pot-bottom, then pour boiling water on top of it. thanks for the recipe!
I used 1 cup of rye flour, 1 cup of spelt flour, and 1 cup of whole wheat flour. I also added sunflower seeds, flax seed and sesame. The dough was very runny and watery and I added quite a bit of flour after the dough rose, but now the bread is in the oven, only has a few minutes to go and looks and smells DELICIOUS!
Kelsey: I'm not sure on the bread flour. I would give it a try. Why not? The worse that could happen is that the bread would be too light. I just not a lot of help am I?
I don't have unbleached flour so I was wondering if I could use bread flour that I have on hand. Would that make a huge difference? I've never made bread before so I'm unsure of what to do! hah
I have only used unbleached flour, because I use it for all of my baking. You could try bleached…what they heck!
Well, I got over zealous on my first loaf -the Lemon Rosemary Gruyere, and put too much lemon zest in it. The bread looks beautiful, smells wonderful, is crusty, chewy and very good but the lemon gets overpowering real quick. I think it would be good with hot sweet tea, bringing the lemon taste to the tea. This is addictive!
how essential is it that i use unbleached flour?
What a great recipe! I made one plain loaf- perfect! The next night I added 1 cup cheddar cheese- perfect again except this one stuck to the pot. After we chiseled it out it was delicious, also! Thanks for sharing.
I had some problems moderating some comments and accidentally deleted them. I'm so sorry. Don't respond to comments when tired! I will try to anser the questions, but sorry I don't have the actually comment.
-Ivy, Thank you for you comment. It's so good to know a glass dish with a tight fitting lid works. This will help others trying to find a pot. I hope this recipe stands up to your dad's expertise.
-Susan, Yes large holes are normal. In fact you get extract credit for that. That's what I'm always trying to achieve. Some batches are better than others. Good luck on future loaves.
-Gail, I preheat the empty pan in a 450 degree oven for 30 minutes. THEN I add the dough and back an additional 30 minutes. Remove the lid and bake for 15 minutes. I hope this clarified things.
-I have not used bleached flour for this recipe. It's so forgiving that my guess is you can use bleached flour. Why not?
-Debbie,Don't give up. My dough may look stiffer, but it's pretty darn sticky. I find the dough that I add a lot of stuff into will be stiffer than a plain loaf with nothing in it. You may want to add 1/4 cup less water. That just might help. Let me know how your third loaf turns out. Keep trying.
-Thanks for all you comments and tips on cleaning out my pans. They are all so helpful.
INCREDIBLE **** THANKS [I think 😉 ]
Unfortunately I don't have a cast iron pot. But I have a glass pot with a close fitting lid, does that work? I really want to try it =)
Thanks in advance.
Fabulous tips and suggestions. Thank you so much.
I just finished making dried apricot/white choc. chip bread for some friends I'm having over in the morning. Can't wait.
I have tried different size pots and like the 3.5 oval the best. The dough fills the pot nicely and makes for a thicker loaf, plus I like the oval shape. The 5.5 round was pretty but the bread didn't have as much height…the same for the 7.5.
This looks like a recipe my Aunt has been searching for. To clean your Le Creuset pots, try "barkeepers friend", it's great stuff! It's the only way I can keep the inside of mine clean 🙂 You can find it in the cleaning isle at most grocery stores.
Love this! BTW, have you tried Le Creuset's Enameled Cast Iron cookware cleaner? http://cookware.lecreuset.com/cookware/product_Cast-Iron-Cookware-Cleaner_10151_-1_20002_10332__
oh my goodness … i'm in the last 15 minutes of open baking and can't stand how good it smells and looks. i may just have to do your happy dance 🙂
i too am using the set from Sam's … works beautifully. Made it with orange zest and walnuts (didnt have cranberries … oh well) … the options are amazing! i would not have believed it!!
thank you for sharing with such amazing pictures …
the one thing i needed emphasized was that it is NOT kneaded … I'm a long-time bread baker and it was hard to resist … but glad to see how the loaf is beautiful and crusty because of the extra moisture!
Aluminum foil will work great. You could even put a plate over the bowl. Whatever it takes to keep the dough from drying out. Best of luck to you. Your bread will be amazing.
Baked this tonight and it was amazing! So happy to have run across your blog.
I know this is a dumb dumb question….but I got this batter all mixed up…ready to cover…and I am out of plastic wrap. I covered my large glass bowl in aluminum foil. Will that work out okay?
Doodles: I purchased my spatulas from a local cooking store in Utah. I have seen them here and there is cooking shops. I love them and use them for most everything. This isn't much help. I'll check online to see if there is a source for ordering.
Mary Beth the lemon mint white chocolate sounds amazing. Are you using fresh mint? Sounds so refreshing.
Once again, thanks to everyone who is submitting advice and tips. Especially the bread variations you are creating. They all sound divine!
My friends all think I'm some kind of genius thanks to this recipe. I have very successfully made multiple plain loaves, as well as olive loaves, and one with walnuts and dried cherries. All exceptionally great. I'm planning to make a gruyere and thyme loaf too. Thank you for making me look like such a rock star! If you figure out how to make a wheat version, please do let us know. 🙂
I've got 2 loaves proofing right now…one lemon-mint-white chocolate and one cranberry-orange-walnut. Can't wait to bake these in the morning!!!
This is a reply for Jen with the Lodge casserole. I have one and put it in the oven when I turn iton to preheat…..when the temperature reaches 450 degrees, I take it out and add the bread dough. My bread turns out great and I have probably made 40 oaves so far. My family and friends all love the bread and I plan on never, ever having to buy bread again. Thank you Janet for posting such a great recipe. This is the easiest, best tasting bread I have ever made.
I just got a lodge enamel cast iron, and have only used it twice. I really want to try this bread, but the instructions that came with my pot say to never heat an empty pot. What should I do?
All I can say is…WOW! Thanks I've been searching for a crusty, chewy and soft interior bread. I'm on my second loaf now, double batch.
First loaf in the oven right now. Added chedder and sprinkled some corn meal on top. Using a clay pampered chef round pot with a glass lid that fit nicely on top. Hoping it works. If not I'll have to hit the store to find one that works. Have you done cinnamon and raisin?
BTW where did you find the spatulas? I have one and it needs a sister.
Ever since I pinned your blog to my Pinterest board I have wanted to try your no-knead bread recipe. But unfortunately I didn't have the dutch oven that I needed. SOOO, as a wonderful surprise my kids bought me the dutch oven from Costco for a Mother's Day/birthday present. I was so excited that I have made 6 double batches. I made cheese cloth bread sack's with "BREAD" embroidered on the side, it made wonderful gift's. I just made another double batch, it is raising as I type this. This time I am experimenting with oats, dried cranberries and cinnamon. Thank you for sharing this wonderful blog!!
I DID IT!!!! Came out just like the pictures!!!!!! YIPPIE!!!!!! Bread for everyone!!!!!
Love this recipe! Thank you for sharing! I add gluten as I saw it on the shelf at he store and thought why not. That said, I have one variation tht I add dried cranberries, slivered almonds and lemon oil, oh god I think I have gained five pounds as a result. I did one with sharp cheddar and salsa, and got rave reviews! I am now going to try black olives and feta. Thank you so much!
Janet,I followed your recipe and made the bread yesterday. It turned out so well that I don't think I'll ever buy bread again! Thanks so much for sharing this recipe with us!
This bread looks fantastic! Question though. Can you think of a way to make it gluten free? I have celiac disease and can't have wheat. I am hoping to find a fantastic bread recipe because I LOVE BREAD!!
Oh my goodness, I just love reading all of your comments. Thank you so much for all of the great ideas to are sending.
To answer the question regarding my pastry cloth. I purchased the cloth at a local cookware store. It's nothing more than a light canvas. I have purchased canvas at a fabric store, washed it, and used it. Works just great. The cloth holds in the flour. That way not as much goes into the food, but prevents sticking. I love it.
I am trying cheddar, basil and garlic tomorrow to go with my lasagna! Thanks!
I am so excited. I have baked bread for years, always trying to achieve the "artisan" bread that you see in bakeries. Always fell short one way or another. But I just pulled my first loaf from the oven and it looks just like your pictures. Have never used an easier recipe and the Le Creuset pot works beautifully. Have tried spraying my oven with water, using a steam pan in the bottom, etc. but never getting the exact results I hoped for. Now for the final taste test once the loaf has cooled. Thanks so much for sharing this awesome recipe. This will be my go-to recipe from here on out. Can't wait to try adding additional ingredients.
Hi there, Thanks a bunch for not only sharing this beautiful recipe and fantastically easy method but also accompanying it with crystal clear instructions and super photo's…. Impossible to go wrong!
On the topic of cleaning your babies, I think you have enough tips on how to KEEP them clean. But it's also dead easy to remove years of staining. Just get a bin liner and some ammonia and take those and your pan outside (for maximum ventilation). Place the pan inside the bin liner, add a couple of good slugs of ammonia and twist the liner to close. Leave this for 24 hours and when you take out your pan the next day, you will be able to clean off all stains with ease. No elbow grease or excessive rubbing involved, it will just flake of when you wash the pot.
In fact, this method reminds of the process of preparing the bread… Chuck things together, cover, wait a day and voilá, Bob´s your uncle….. hahahaha…..
Thanks again from a bread loving Dutch girl living in Spain. XX
Hi this looks great I cant wait to try it.Thanks for posting. I want to say that I have a Green pot like this that I got from TJ Maxx for $39.99. I LOVE it. I keep mine on the stove top all the time because it matches my kitchen and makes me happy! I clean it with a magic eraser sponge if i get a baked on brown mark. It hasn't hurt the outside paint. I dont have to scrub at all!!!!
I have several Le Creuset pots and pans and use Bar Keeper's Friend to clean them. It has gotten off stains from even the most intense braising (lamb shanks for 4 plus hours!)
I can't wait to try this recipe. Yay!
I am so excited for this recipe! I just made my first batch! Well…. its rising right now. I am going to let it sit out over night.
A few questions, if you dont mind. I just read all of the comments to see if they have already been answered.
– Do you use warm water? Do you ever need add more depending on what you mix in or does it still say the same amount 1 1/2 cups? Also, what are pastry cloths? I have been baking bread for awhile but havent ever heard of them!
Thanks so much for taking the time to share these awesome recipes. I found your blog via pinterest. I am off to look at more of your blog! : )
Shannon