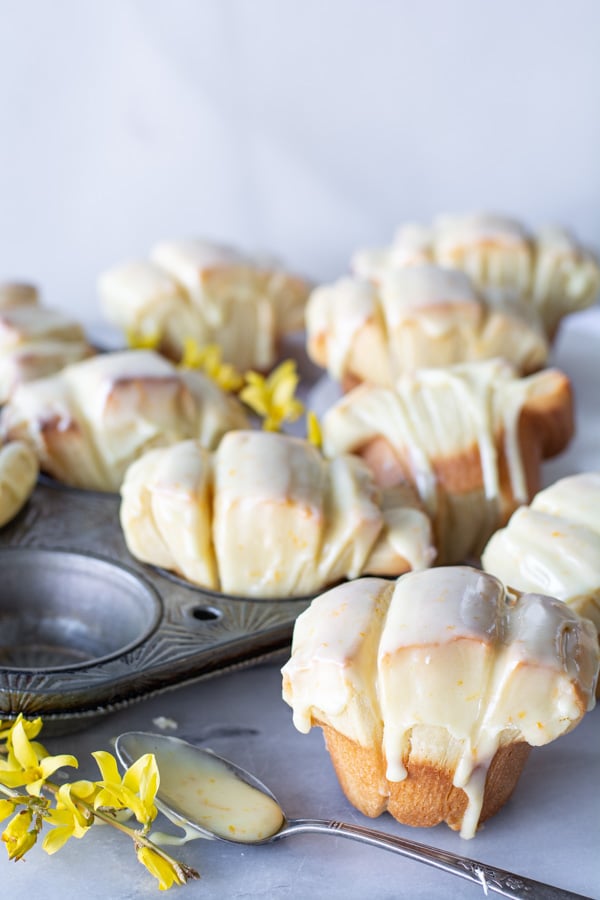
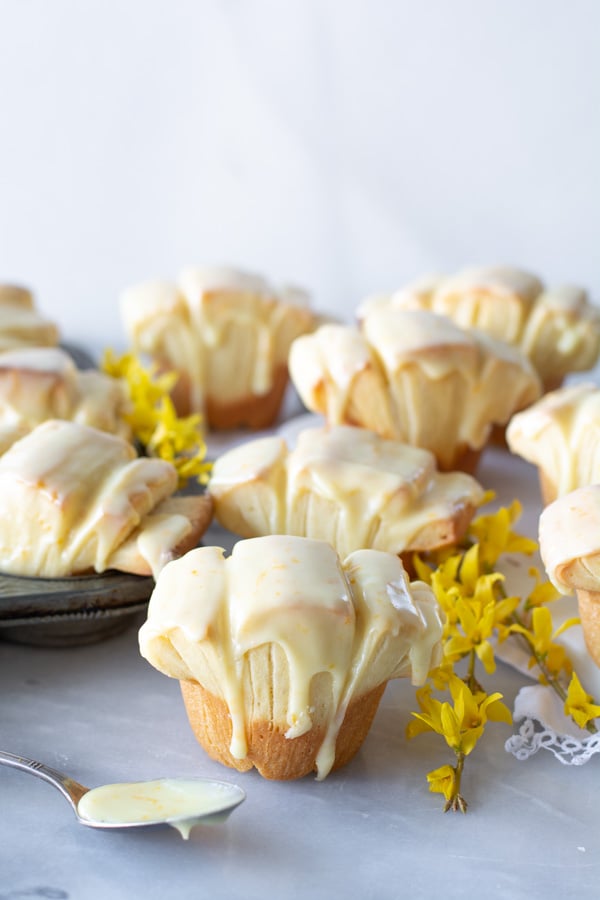
Fresh orange glazed butterflake rolls are so buttery and tender they’ll melt in your mouth. Make this classic butter flake roll recipe with a sweet citrus glaze for holiday breakfasts or brunch, or any morning gathering. They are always sure to brighten the day!
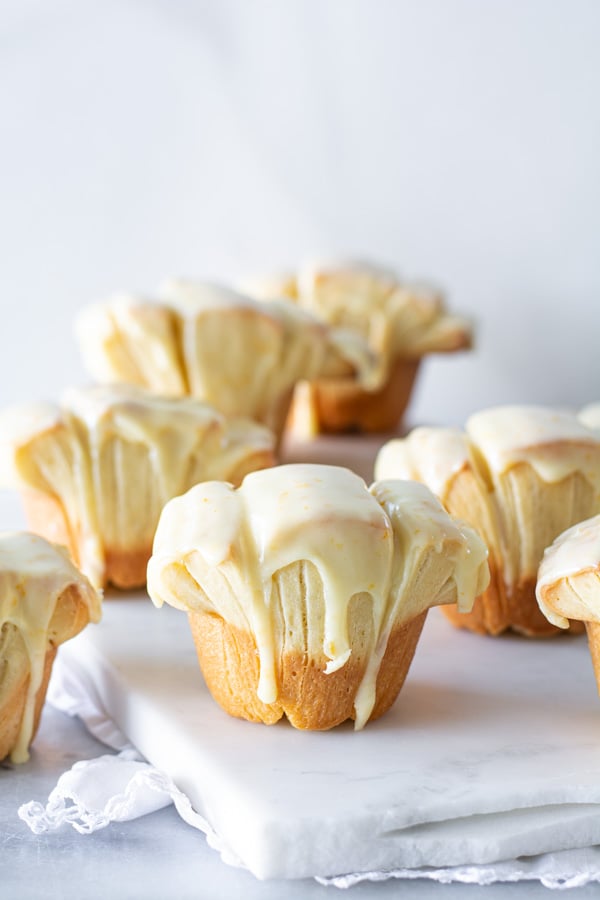
Springtime and citrus go so well together don’t you think? The fresh orange zest in the glaze brightens up these typical butterflake rolls. You’re going to love them.
Speaking of love… I love a dough that I can make a day in advance and refrigerate overnight because the chilled dough is so easy to roll out and fold. It’s just genius! Take a minute to read through these helpful recipe tips that will make your orange-glazed butterflake rolls a melt-in-your-mouth success.
Recipe Ingredients
For the Butter Flake Rolls
- Yeast
- Warm water
- Butter
- Sugar
- Salt
- Hot water AND cold water (I’ll explain later)
- Eggs
- All-purpose flour (unbleached)
For the Orange Glaze
- Confectioner’s sugar
- Orange rind
- Orange juice
Helpful Tips
- Don’t add too much flour. The recipe calls for 7-8 cups of all-purpose flour. Not all measuring cups measure exactly the same. That’s why it’s a good idea to add the flour 1 cup at a time. Watch your dough carefully and notice when the dough begins to pull away from the sides of the bowl. Touch the dough. If the dough is still really sticky then slowly add in more flour 1/4 cup at a time. Remember the dough has a lot of butter which will make the dough very soft and pliable and once refrigerated the butter will harden making the dough very easy to roll out.
- Not all flour is the same. Go for a good quality all-purpose flour such as King Arthur AP or Bob’s Redmill AP, if they are available in your area. If not, then select a flour that you trust and use often.
- The chilled dough is very soft and pliable and will roll out like a dream. If by chance the dough begins to soften too much and you find that it’s not so easy to work with, then just pop it back into the refrigerator for 20-30 minutes to chill a bit.
- This recipe has a LOT of yeast in it so I don’t recommend letting it refrigerate more than overnight. If the dough is left in the fridge longer, it will have a strong yeasty taste and smell. If you need to prepare the dough 2 days in advance, just cut the amount of yeast in half adding only 1 tablespoon.
- Leftover rolls (like there will be any) freeze very well in a covered container. Remove the lid from the container when ready to thaw so the icing doesn’t melt from the moisture and condensation.
- Yes, this recipe may be cut in half. This particular recipe makes 4 dozen rolls which may be more than you’d like.
How to Make Butterflake Rolls with Orange Glaze
First, Make the Dough
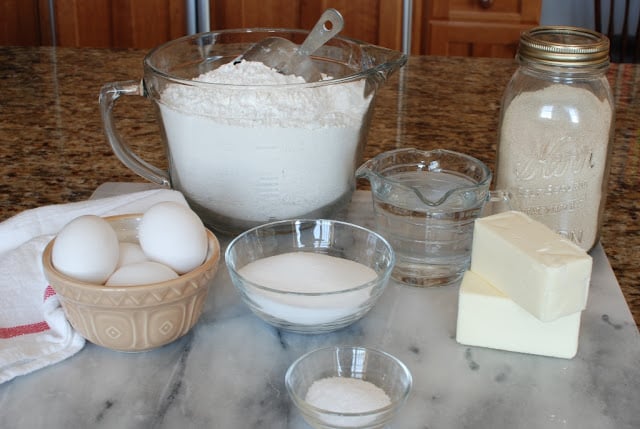
- Gather and measure the ingredients for this beautiful soft dough.
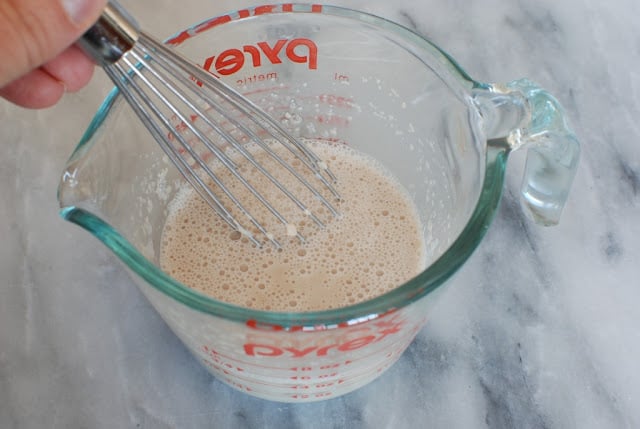
- Add 2 tablespoons of yeast to 1/2 cup warm water. Stir to dissolve and set the mixture aside.
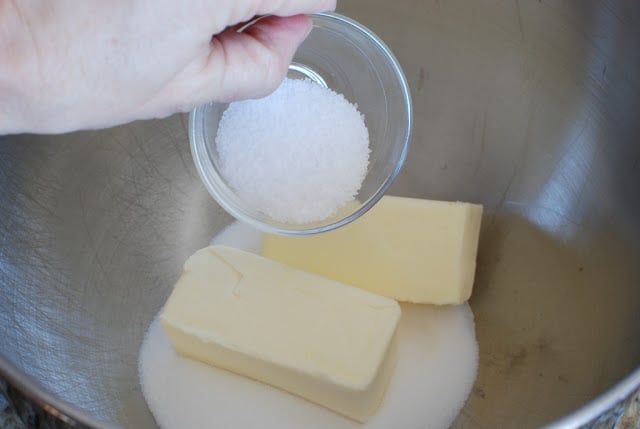
- In a large mixing bowl cream together the sugar, butter, and salt.
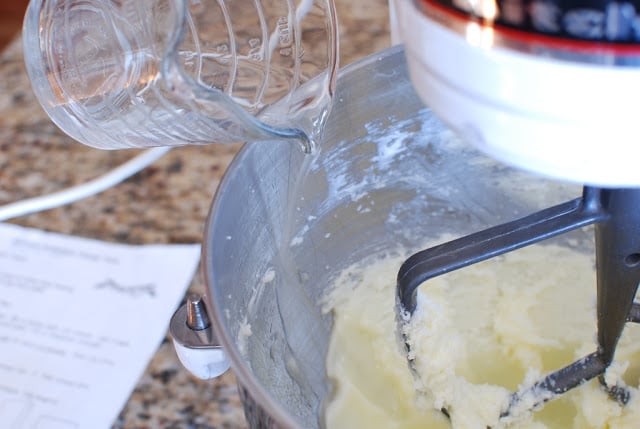
- Then add 1 cup of hot water.

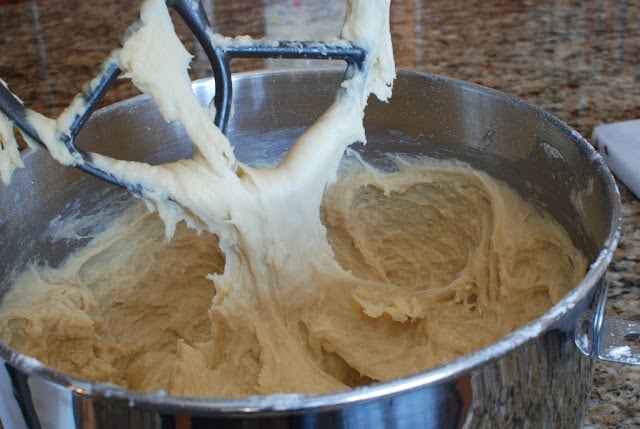
- Mix in the eggs.
- Now add the cold water. (I know that’s a weird way to mix)
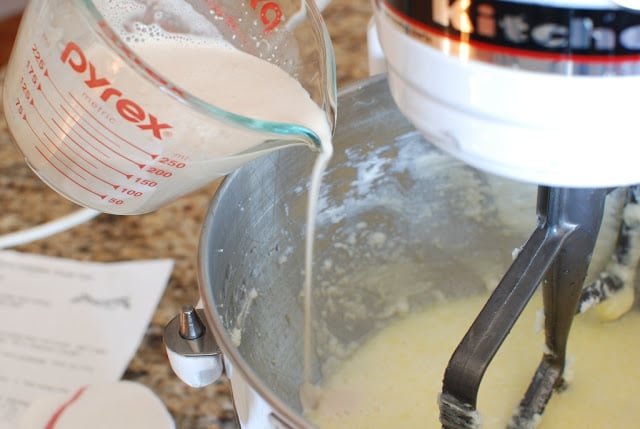
- Add the yeast mixture that was set aside.
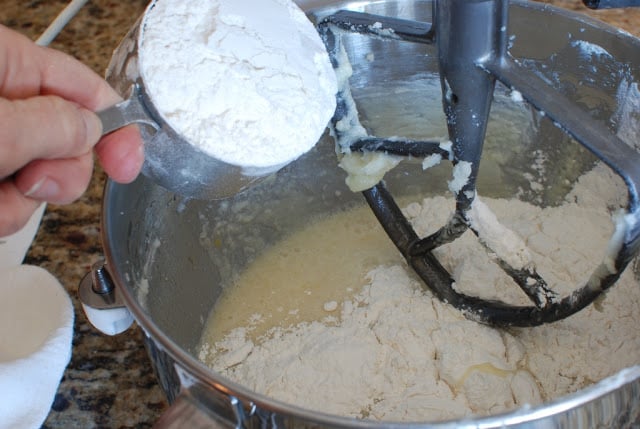
- Add the flour one cup at a time mixing well after each addition. Add flour until the dough pulls away from the sides of the bowl. Don’t add too much flour. The dough should be soft and a bit sticky.
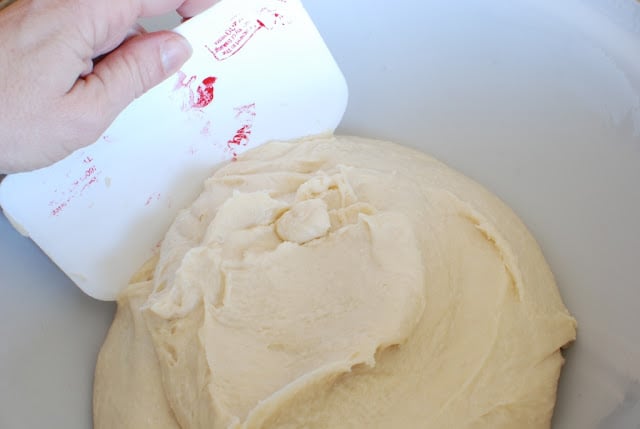
- Transfer the dough to a large clean bowl.
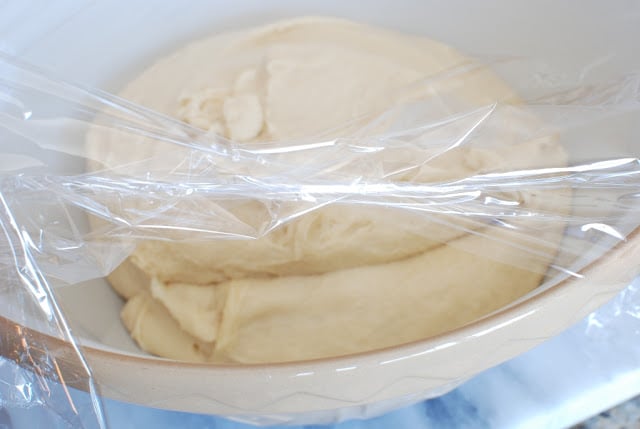
- Cover the dough with plastic wrap and place it in the refrigerator overnight.
Next, Laminate the Dough
Remove the dough from the refrigerator. The dough should be double in size and cold enough to make the rolling easy.
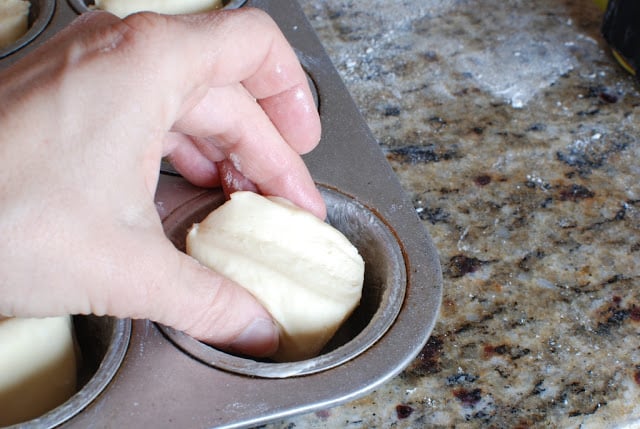
This recipe will make 4 dozen rolls. Butter the muffin tins well on the bottom and on the sides. Set aside.
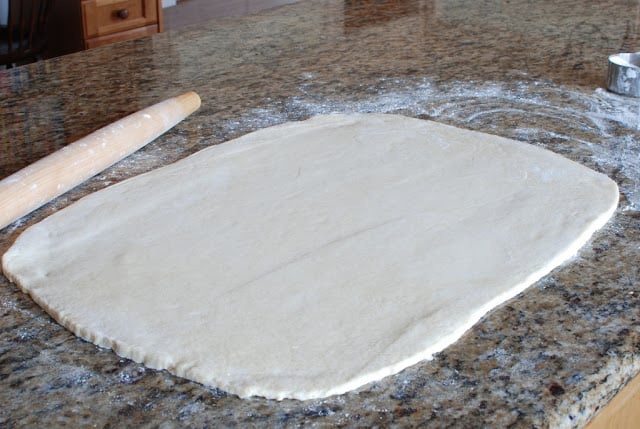
- Place the dough on a floured surface. Roll out the dough into an 18 x 24-inch rectangle. It’s very easy to roll out the chilled dough because the dough is soft and pliable.
Tip: Brush off any excess flour whenever possible. Extra flour will make the rolls dry.
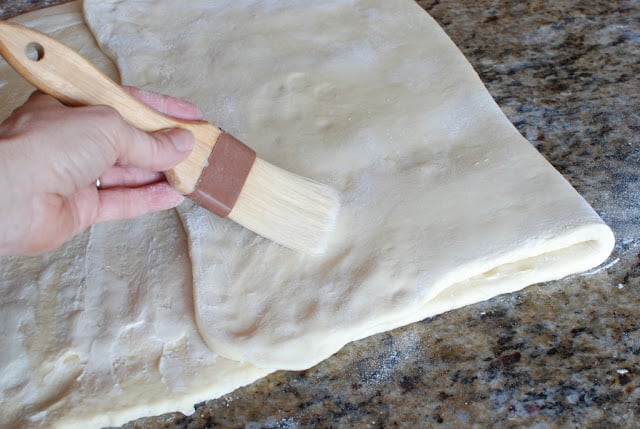
- Spread the softened 1/4 cup butter over 2/3 of the dough. Only 2/3 of the rectangle will be spread with the softened butter.
- Fold 1/3 of the rectangle that is NOT buttered over the 1/3 that has butter. Brush off excess flour.
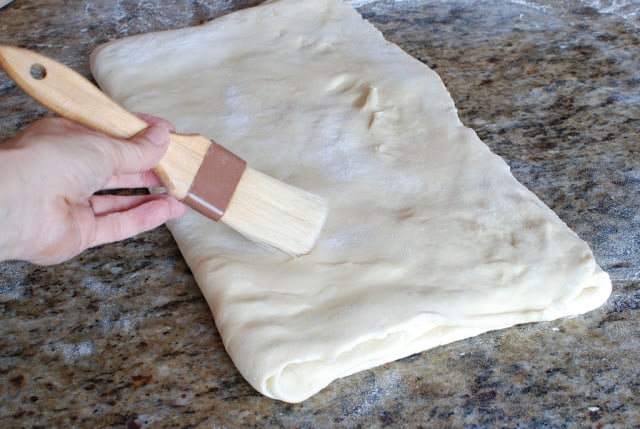
- Now lift the remaining 1/3 of the dough and fold it over the first 1/3. Brush off excess flour.
The 2-Book Fold Method
A two-book fold method creates more layers with less rolling. It’s so easy to do.

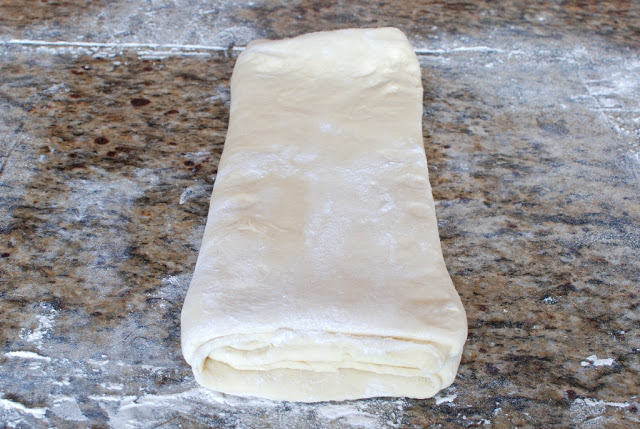
- Rotate the rectangle so the long end is facing you. Roll, once again, into an 18 x 24-inch rectangle.
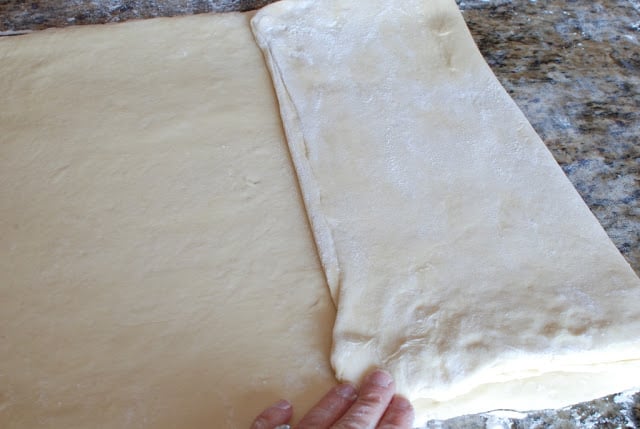
- Mark the center of the dough and fold on end over to meet the center.
- Fold the other end to meet in the center as well. Brush off excess flour.
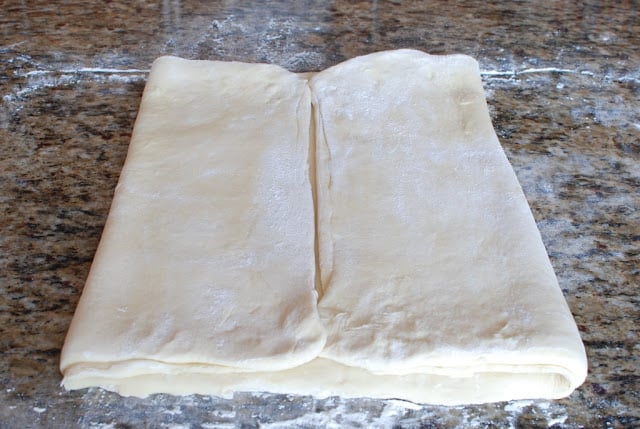
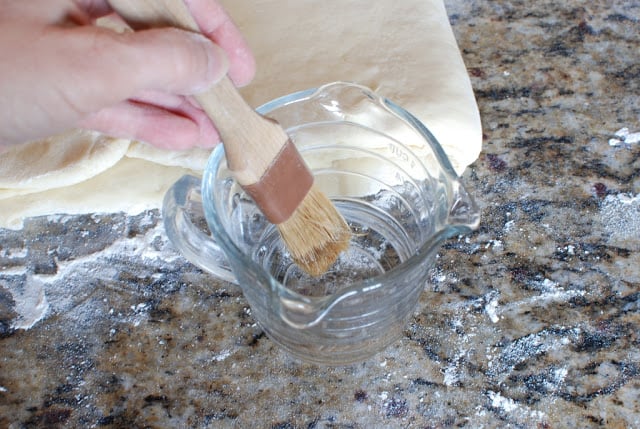
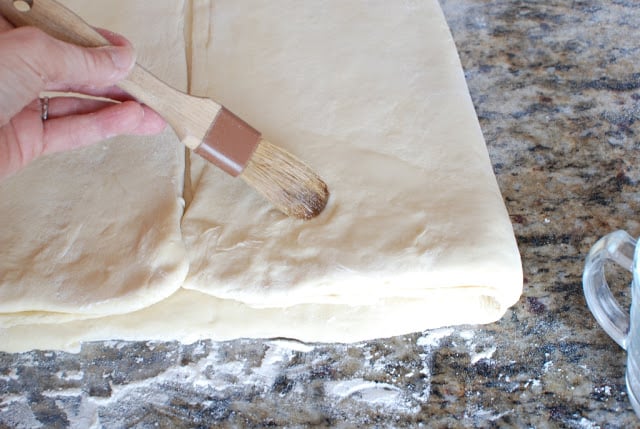
- Using a pastry brush and just a little bit of water.
- Brush only one side of the rectangle with water.
- Fold the end that does not have the water on it over top of the side that was brushed with water. Brush off excell flour.
Now Cut the Dough and Bake!

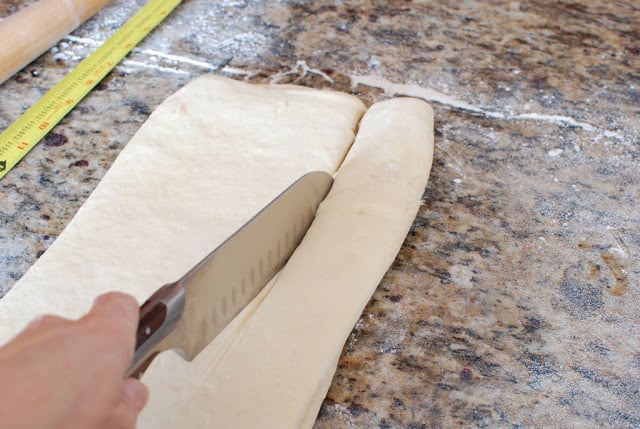
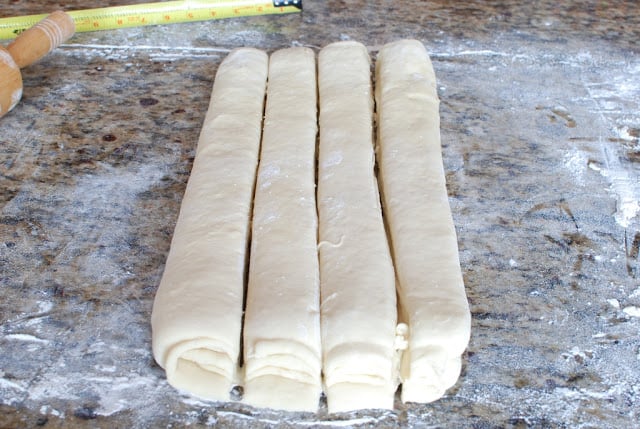

- Roll out the booked dough into an 18 x 8-inches rectangle.
- Cut dough into 2-inch strips.
- There will be 4 strips of dough that are 18-inches long.
- Cut each strip into 12 equal pieces.
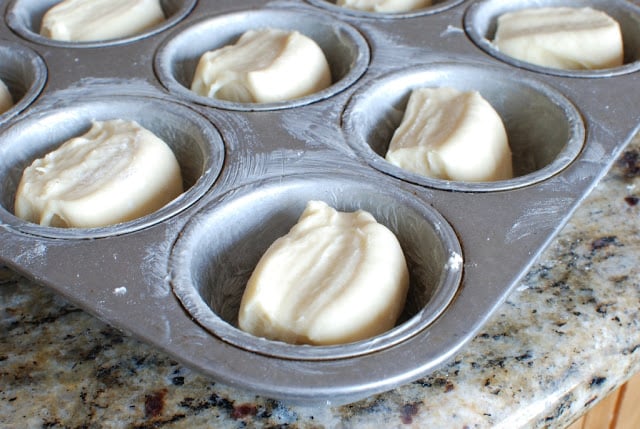
- Place each piece of dough, cut side up, into prepared muffin tins.
- The rolls are being placed on their side. The cut edge is what will fan out and create the flakes. Cover with a clean cloth and let rise for about 3 hours until they feel like a marshmallow when lightly pressed.
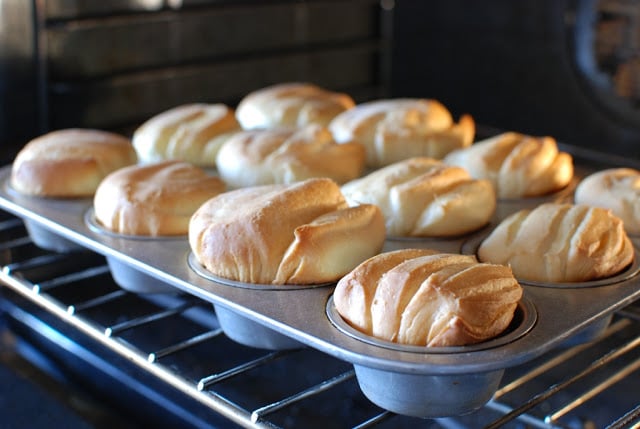
Bake in a preheated 350℉ oven for 20-25 minutes or until lightly golden brown. But be sure to keep a close eye on them so they don’t turn too brown.
Lastly, Make the Orange Glaze and Drizzle
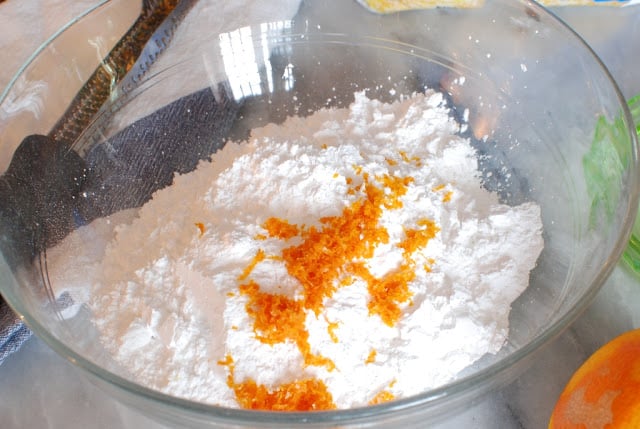
- While the rolls are rising, make the orange glaze. Place the confectioner’s sugar in a small mixing bowl. Add the zest from one orange.
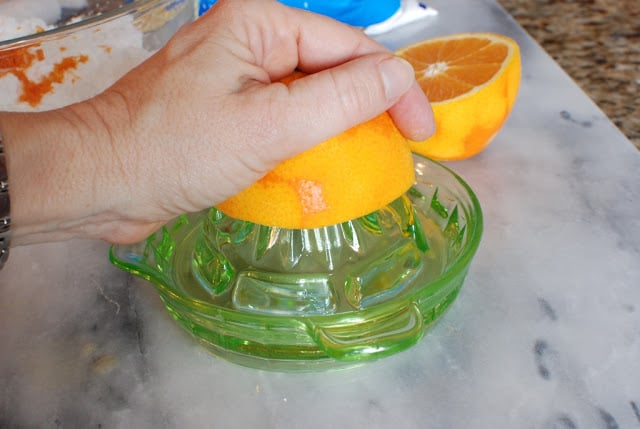
- Then juice the orange and reserve the juice.
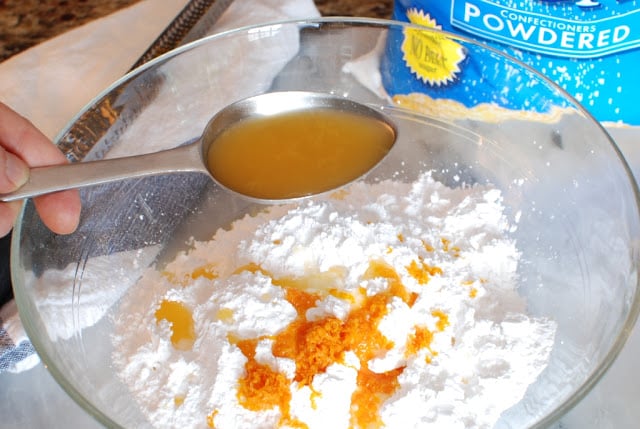
- Add 3-4 tablespoons of orange juice to the mixture.
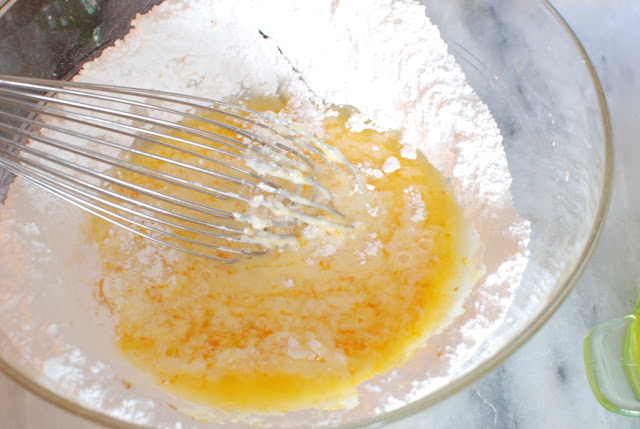
- Whisk until smooth and free of lumps. Set aside.
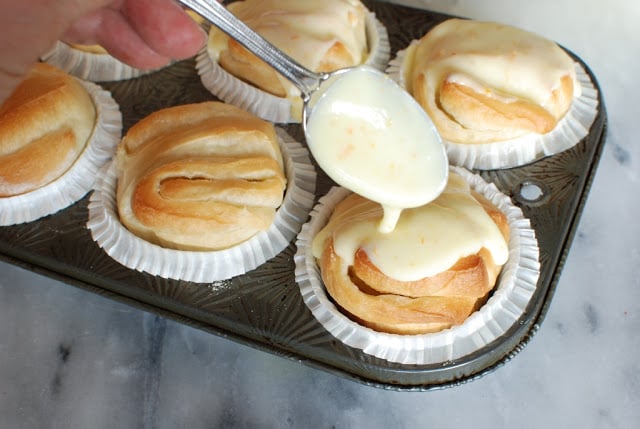
Drizzle with 1 teaspoon of the glaze over butter flake rolls while still warm.
Frequently Asked Questions
Typically you brush rolls with an egg wash before baking, and brush with butter after baking. However, in this easy recipe there is no need to use butter after the rolls are done. The orange glaze adds plenty of flavor!
The key to a successful butterflake roll recipe is to use just the right amount of flour and butter. Be sure to let the dough rest for the recommended amount of time, and not any longer.
Orange butterflake rolls will keep well at room temperature for up to 3 days. Store in a sealed container to keep them fresh.
Yes, they freeze quite well. Let the glazed rolls cool before transferring to a container with a lid that won’t touch the glaze. Freeze for up to a month. Thaw at room temperature.
If you plan to make them in advance to freeze, I suggest you leave off the orange glaze. Then make it fresh to add when ready to serve the rolls.
Heat them briefly in the microwave to warm them without completely melting the glaze. One or two short bursts of 10 seconds at 50% power will reheat them quickly.
To reheat in the oven, place on a baking sheet and bake in a 350°F for 5-10 minutes.
You May Also Love
- Malted Milk Chocolate Ice Cream
- Spring Leek and Asparagus Quiche
- Lemon Olive Oil Cake with Lemon Curd
- Jammy Tomato Ricotta Tart
- No-Knead Breakfast Bread
- Best Ever Blueberry Buttermilk Pancakes

Orange Glazed Butterflake Rolls
Fresh orange glazed butterflake rolls are so buttery and tender they'll melt in your mouth. Make this classic butter flake roll recipe with a sweet citrus glaze for holiday breakfasts or brunch, or any morning gathering.
Ingredients
- 2 tablespoons yeast
- 1/2 cup warm water
- 1 cup butter softened
- 3/4 cup sugar
- 1 tablespoon salt
- 1 cup very hot water
- 1 cup cold water
- 4 eggs
- 7 – 8 cups all-purpose unbleached flour
- 1/4 cup butter softened for the roll in
Glaze:
- 3 cups confectioner’s sugar
- grated orange rind from one orange
- 3-4 tablespoons orange juice
Instructions
-
Mix yeast and warm water together. Set aside.
-
In a stand mixing bowl with paddle attachment cream together butter, sugar and salt. Mix in hot water until smooth. Add eggs and cold water. Add dissolved yeast. Mix in flour 1 cup at a time. Continue to mix in flour until the dough pulls away from the sides of the mixing bowl.
-
Scrape down the sides of the bowl and cover plastic wrap. Refrigerate overnight.
-
Remove the dough from the refrigerator and roll dough out into an 18 x 24-inch rectangle. Spread 1/4 cup softened butter over 2/3 of the dough. Fold dough in thirds, bringing the unbuttered 1/3 over the buttered 1/3. Then fold the other third over the top of the unbuttered 1/3. Rotate the rectangle to have the long side towards you.
-
Now roll the folded dough into another rectangle once again 18 x 24-inches. Brush the dough lightly with a little water. Bring each end of the dough into the center of the rectangle to meet. Lightly brush one side with water and fold the dough in half again. Roll out to a rectangle that is 8 x 18-inches.
-
Cut the 8 x 18-inch rectangle into 4 long strips. Then cut each strip into 12 pieces. Place each piece into a well-greased muffin tin with the cut side up. Cover and let rise for about 3 hours or until the dough feels like a marshmallow when gently touched.
-
Bake in a preheated 350℉ oven for about 15-20 minutes or until golden brown. Drizzle with orange glaze while still warm.
To prepare the glaze:
-
In a small mixing bowl combine all ingredients. Mix until smooth.
Recipe Notes
- Don’t add too much flour. The recipe calls for 7-8 cups of all-purpose flour. Not all measuring cups measure exactly the same. That’s why it’s a good idea to add the flour 1 cup at a time. Watch your dough carefully and notice when the dough begins to pull away from the sides of the bowl. Touch the dough. If the dough is still really sticky then slowly add in more flour 1/4 cup at a time. Remember the dough has a lot of butter which will make the dough very soft and pliable and once refrigerated the butter will harden making the dough very easy to roll out.
- Not all flour is the same. Go for a good quality all-purpose flour such as King Arthur AP or Bob’s Redmill AP, if they are available in your area. If not, then select a flour that you trust and use often.
- The dough is very soft and pliable and will roll out like a dream. If by chance the dough begins to soften too much and you find that it’s not so easy to work with, then just pop it back into the refrigerator for 20-30 minutes to chill a bit.
- This recipe has a LOT of yeast in it so I don’t recommend letting it refrigerate more than overnight. If the dough is left in the fridge longer, it will have a strong yeasty taste and smell. If you need to prepare the dough 2 days in advance, just cut the amount of yeast in half adding only 1 tablespoon.
- Leftover rolls (like there will be any) freeze very well in a covered container. Remove the lid from the container when ready to thaw so the icing doesn’t melt from the moisture and condensation.
- Yes, this recipe may be cut in half. This particular recipe makes 4 dozen rolls which may be more than you’d like.
More Recipes for You to Try
Originally posted in 2013. A new recipe card, nutrition, and photos have been added.
can I use dairy free butter as a substitute?
I’m so sorry for the late response. I have never tried a butter substitute but I’m sure it would work well.
I think I like them best buttering the tins over liners. There really isn't much difference. I don't butter the liners. You can, however, give them a spritz of non-stick spray and the paper peels off much easier. They are delicious either way.
Your photos show the muffin tins buttered and also show the finished muffins in muffin tin pans that are lined with cupcake liners.Do you prefer buttering the muffin tins for the rolls, or do you prefer using the muffin cupcake liners? (I assume you don't butter the liners, right?) Thanks! I love the photo step-by-step instructions! So helpful!
How did you know that I wanted this recipe? At Shawn's Grandma's funeral we had this and I knew I had to have the recipe. Luckily, you have them right here on your website. Thank you 🙂
I'm sorry to hear about Shawn's grandma. I hear she was quite the amazing woman. You have to try these rolls. You will love them. Just call me if you have any questions. Love you…and Ellery Jane (almost named after me)
Beauty!Thanks!!!
Wow just came accross your amazing blog wow everything looks amazing.
Can't wait to start trying your recipes especially the orange butter flake rolls.keep getting your potholders messed up and hope new ones keep arriving.thanks. Elaine
Great idea, Elaine. I'll just make sure I keep the beat up pot holders in every photo I take. Thank you so much for your fun comment. I hope you'll be back.
The recipe calls for 1/4 cup butter for the roll in, but in the directions it says 1/2 cup. Which is it? I just stuck the dough in the fridge and am bringing these to our St. Patrick's day dinner tomorrow! They look delish!
Sorry for the confusion. The amount is 1/4 cup. I have corrected the typo.
It looks again so great! I have to bake! Greetings from Germany
Hermann
Once again I thank you, Hermann. It's always a good day when I receive a comment from Germany.
These rolls sound fantastic! I wish I can have some for breakfast now. These will be so good to bring to co-workers or in-laws. I can't wait to try them.
I wish I could bring you some over right now! Thanks for the comment.
Beautiful and fairly easy! Thrilled to see someone shared the love by giving you new potholders. Handmade?
Quick question: Last night I prepared your Panne Cotte (first time) for family. It was delicious, but there was a thin "clearish" layer on the bottom of the ramekin. My grand daughter said, "oh there's a layer of jello on the bottom." Did I do something wrong? Should it all have been creamy?
Hi Polly, It should have been creamy clear through. Make sure you leave the gelatin for a good 5 minutes or longer to soften before you heat the gelatin to dissolve it. Make sure the gelatin appears to be completely dissolved before adding the buttermilk. That should do the trick. I can't think of anything else that could have gone wrong. Pot holders were not homemade, btw.
Yum Yum YUM! I cannot tell you how much I love this recipe!
My mother in law is coming into town and I think these would be so fun to make for breakfast!!
These look AMAZING!! So delicious!!
After the glazed bacon recipe I swore that as soon as I recovered from eating a pound of bacon in one sitting that I would never come back to this blog again. As soon as I finishing wolfing down these wonderful rolls, I'm going to swear that again.
I love your great recipes and your step by step demonstrations. All the ones I've made for myself have been delicious!
~ Cassandra from Renaissance Women
Bahhhhh! Stay away from the bacon. I really need to post more healthy recipes. I'll work on that…for our hips and thighs.
WOW, they look amazing! Can I freeze them? Once cooked and before putting on the glaze?
Mine are in the freezer at this moment. I even froze them with the glaze. Just make sure they are uncovered when you thaw them. That way the glaze won't get sticky.
Thanks!