What I love about this bread
- It’s so easy to make. This dough can be made in less than 5 minutes.
- The basic dough recipe can be enhanced with many different flavor varieties.
- Very little hands-on time.
- Crusty bread never ceases to impress family and friends.
- My 12-year-old grandson can make it.
Let’s make No-knead crusty bread:


- In a large mixing bowl, add flour, kosher salt, and yeast. Whisk together.
- Add water. Mix just until all of the flour has combined with the water. The dough will look like a shaggy mess. That’s ok.
- Cover the bowl with plastic wrap and let it sit for 12 – 18 hours on the countertop. DO NOT REFRIGERATE. This is not optional. It takes that much time to proof the dough. The reason why you need a large bowl is that the dough will start to rise.
- After 12 hours the dough will look like this. It’s pretty sticky, but that’s ok it’s supposed to be.
Shaping and baking the bread:


- Preheat oven to 450 degrees. As soon as it has heated to 450 degrees place your pot with the lid in the oven and preheat the pot for 30 minutes.
-
Right after you put the pan in the oven to pre-heat, dump the dough out onto a HEAVILY floured surface. Shape it into a round ball and place on a sheet of parchment paper. Parchment makes it so easy to transfer the dough into a hot pot and then remove it after baking. The parchment paper stays in the pot. This will rest for 30 minutes while the pan is heating. Cover with plastic wrap. Note: Use silicone coated parchment paper. The regular non-coated paper will stick terribly. Don’t chance it.


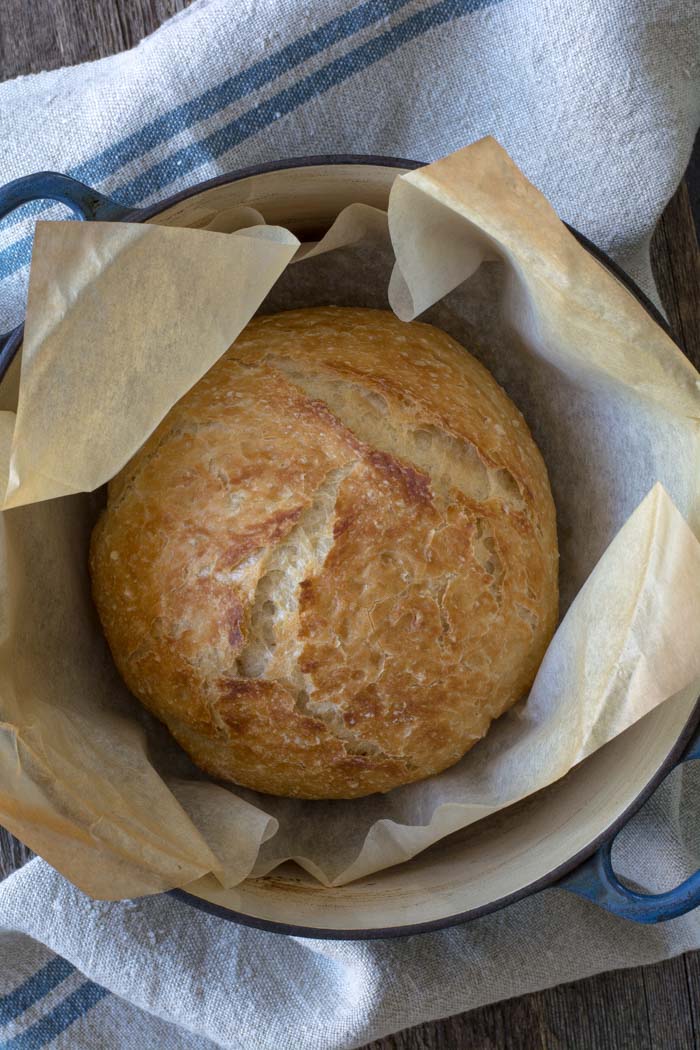
- Remove pot from the oven and carefully pick up the parchment and drop dough into the pot. Be careful the pan is HOT. Put the lid on the pot and return it to the oven for 30 minutes.
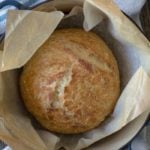
- After 30 minutes remove the lid from the pan. Bake for an additional 15 minutes or until nicely browned. You can test with an instant-read thermometer to make sure the bread is fully cooked on the inside. The temp should be between 190F and 200F degrees. Remove from the oven and carefully remove bread from the pot by lifting the edges of the parchment paper.
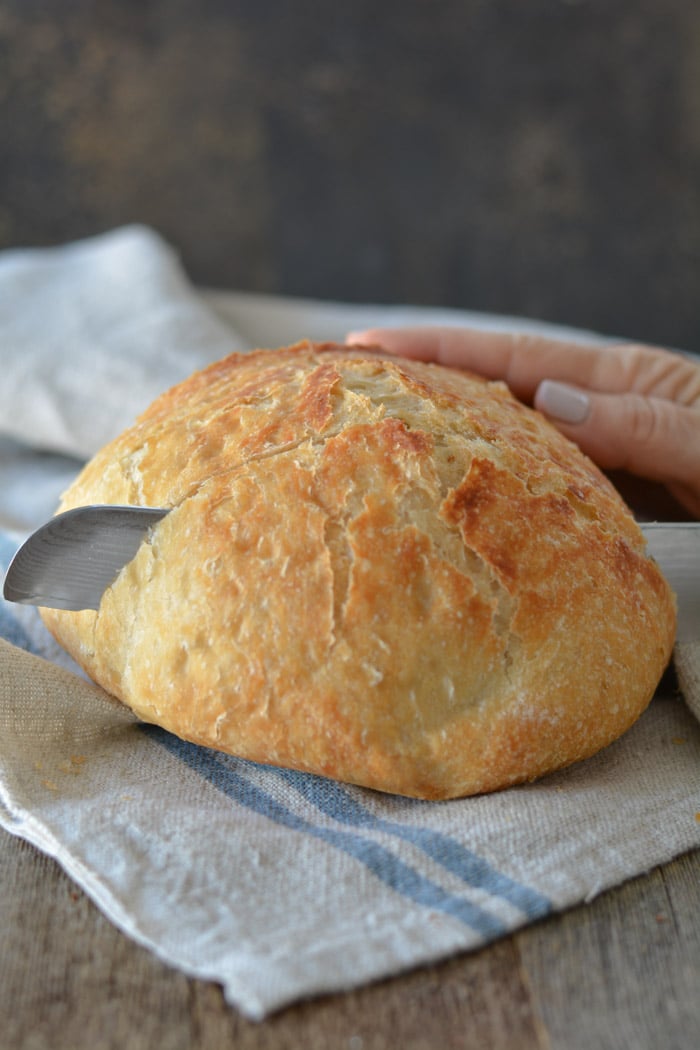
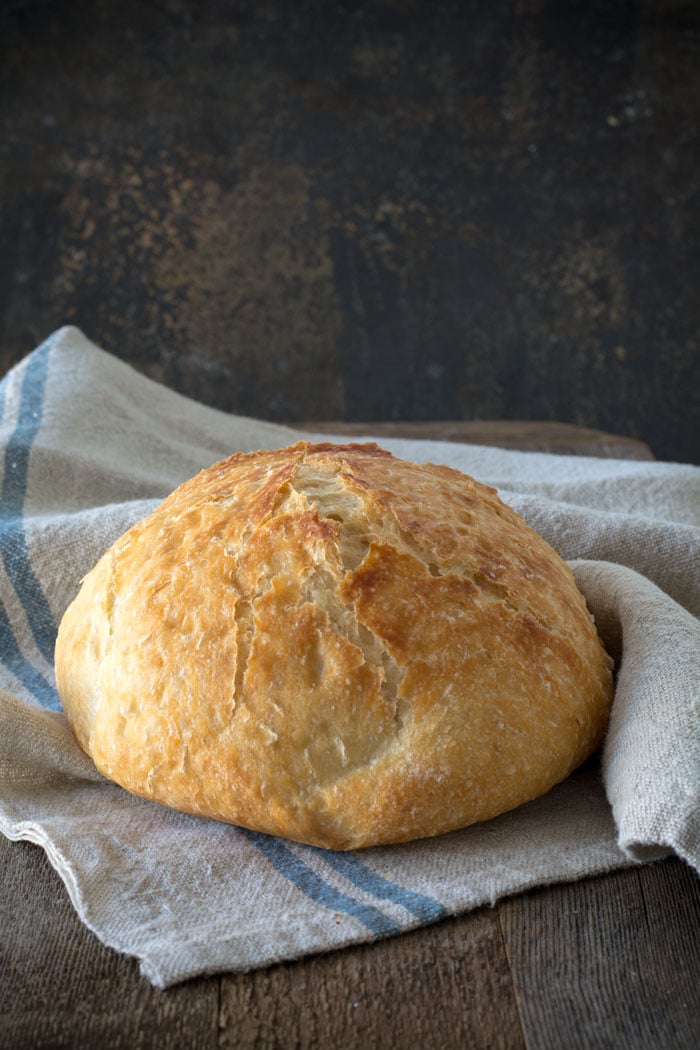
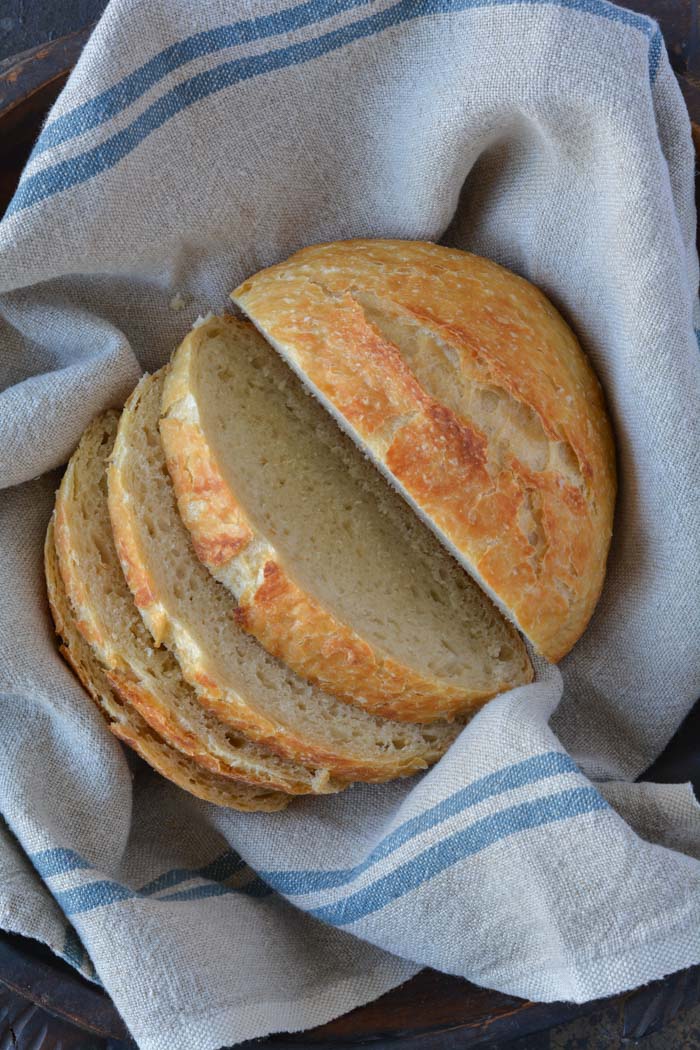
Holy cow! Can you believe how gorgeous that is? It’s best to wait for the bread to cool before slicing. Because I love warm bread I sliced it right away.
FAQ’s
Q: Do I have to use an enamel covered cast iron pan?
A: NO. You can use anything that can take the heat. The following have been used that I know of:
Clay pots with lids, Pizza stone with a bowl to cover the bread, insert from a crockpot, pyrex baking dish with a lid, stainless steel pot with a lid, baking dish covered with aluminum foil, old cast iron dutch oven.
Q: Do I have to use unbleached flour?
A: I always use unbleached flour. You can try bleached flour.
Q: Can I use self-rising flour?
A: I don’t know. I would just stick to all-purpose.
Q: What size is my pan?
A: My smallest pan is 5.5 quart. You can use as small as a 3 quart.
Q: What type of yeast do I use?
A: I use SAF instant yeast. Any yeast should work.
Q: Why is my bread turning out flat?
A: You could try using less 1/4 cup less liquid. Or add 1/4 cup additional flour. Make sure your dough appears to be dry when you first mix it. It will have more moisture during the rising time.
Q: Can my dough sit out longer than 18 hours? Does it HAVE to be between 12-18 hours?
A: I have let some dough sit as long as 24 hours and the bread was beautiful.
Q: Have you tried Gluten-free?
A: From what I hear the best GF is from King Arthur Flour https://shop.kingarthurflour.com/items/gluten-free-measure-for-measure-flour-3-lb
Q: Do I have to grease or oil the pan? Will my breadstick?
A: No you don’t need to grease the pan. I have never had the bread stick when using a cast iron pot. I haven’t tried anything else. The best way to be certain that the bread won’t stick is to form the loaf on a sheet of parchment paper and lift the bread into the pan using the sides of the parchment. Leave the paper in the pan. It’s won’t burn. When the bread has baked, just lift the sides of the parchment out of the pan. Voila! HOWEVER: Not all parchment paper is created equal. I use a silicone coated parchment paper. Regular parchment paper can stick something terrible. Don’t chance it.
No-Knead Crusty Bread
Wonderful yet easy artisan bread with a crisp crust. Prep takes just a few minutes with an overnight rise. Baked in a pot with a lid to create a steam oven. Bread can be made with many flavors and variations.
Ingredients
- 3 cups + 2 tablespoons unbleached all purpose flour (450 gr)
- 1 3/4 teaspoons Kosher salt (10 gr)
- 1/2 teaspoon Instant or Rapid-rise yeast (3 gr)
- 1 1/2 cups water cool (315 gr)
Instructions
-
In a large mixing bowl, whisk together flour, salt and yeast.
-
Add water and mix until a shaggy mixture forms.
-
Cover bowl with plastic wrap and set aside for 12 - 18 hours. Overnight works great.
-
Heat oven to 450 degrees. When the oven has reached 450 degrees place a cast iron pot with a lid in the oven and heat the pot for 30 minutes. OR pot can be placed in cold oven while oven is preheating leave in oven for 30 minutes.
-
Meanwhile, pour dough onto a heavily floured surface and shape into a ball. Cover with plastic wrap and let set while the pot is heating.
-
Remove hot pot from the oven and drop in the dough. Cover and return to oven for 30 minutes. After 30 minutes remove the lid and bake an additional 15 minutes. Remove bread from oven and place on a cooling rack to cool.
Recipe Video
Recipe Notes
FAQ's
Q: Do I have to use an enamel covered cast iron pan?
A: NO. You can use anything that can take the heat. The following have been used that I know of:
Clay pots with lids, Pizza stone with a bowl to cover the bread, insert from a crockpot, pyrex baking dish with a lid, stainless steel pot with a lid, baking dish covered with aluminum foil, old cast iron dutch oven.
Q: Do I have to use unbleached flour?
A: I always use unbleached flour. You can try bleached flour.
Q: Can I use self-rising flour?
A: I don't know. I would just stick to all-purpose.
Q: What size is my pan?
A: My smallest pan is 5.5 quart. You can use as small as a 3 quart.
Q: What type of yeast do I use?
A: I use SAF instant yeast. Any yeast should work.
Q: Why is my bread turning out flat?
A: You could try using less 1/4 cup less liquid. Or add 1/4 cup additional flour. Make sure your dough appears to be dry when you first mix it. It will have more moisture during the rising time.
Q: Can my dough sit out longer than 18 hours? Does it HAVE to be between 12-18 hours?
A: I have let some dough sit as long as 24 hours and the bread was beautiful.
Q: Have you tried Gluten-free?
A: No. I'm still waiting for someone to venture into the realm of Gluten-free. If you try it, let everyone know.
Q: Do I have to grease or oil the pan? Will my breadstick?
A: No you don't need to grease the pan. I have never had the bread stick when using a cast iron pot. I haven't tried anything else. The best way to be certain that the bread won't stick is to form the loaf on a sheet of parchment paper and lift the bread into the pan using the sides of the parchment. Leave the paper in the pan. It's won't burn. When the bread has baked, just lift the sides of the parchment out of the pan. Voila! HOWEVER: Not all parchment paper is created equal. I use a silicone coated parchment paper. Regular parchment paper can stick something terrible. Don't chance it.
More Notes:
Regular active yeast can be used in place of the instant or rapid-rise yeast. It will need to be activated in 1/4 cup warm water. Stir and let sit for 5-10 minutes. However, most of the comments I have received state that the rapid raise works the best. You choose. Whisk the flour, salt, and yeast together.


Looks wonderful!! Can't wait to try it!! Do you grease the pan?
Nope. I don't grease the pan. Bread does not stick…so far.
Wow…holy cow. I love to cook and this was so easy and beautiful I can't wait to use my own 100lbs of flour!! I used my le crueset 5.5 and I had a round covered casserole dish..rachel ray..from Kohl's…not cast iron. The rachel ray turned out better than the other (I'm really glad since I use it for nothing and my le crueset for EVERYTHING. Thanks again…best post ever!
Great tip.
Thanks so much for the info on the Rachael Ray Covered Casseround.I just bought one the other day at Kohl's so I could make this bread:(safe up to 500 degrees). I found the answer to my 1st question regarding to oil or not oil the pan first.I was really pleased with the info re: the Rachael Ray Casseround. You have made my day here! Now the next problem I have is I found out I don't have any yeast. However, I do have a couple boxes of sourdough bread mix for my bread machine. Can I use the sourdough bread mix for my loaf? If that is not an option I will just postpone my bread making until I have the proper yeast & ingredients. Thanks for the recipe though, I can hardly wait to try it!
omg, just ate the best bread! soak 1/3 cup of 10 grain cereal in h20 (about 3/4 cps water) for a couple hours. Mix 2 cps sprouted wheat flour, 1 cp white unbleached flour, and the rest of the regular bread recipe above. When adding the water, add the cereal at the same tine, with 1/4 cp molasses. Might not need as much water since the water in the grain cereal adds moisture. Follow as usual. WOW, this is so good my husband and I are chowing as we speak! Enjoy!
Now that's what I like to see. Creativity in the kitchen. Way to be daring. This mixture looks amazing. I'll give it a shot. Thanks for sharing the recipe. Happy baking.
I put together 4 breads. They ended up having 20-22 hr sitting time before I got them in. I used orange juice in one and the wheat almost 1/2 and 1/2. Taste wise they were all great. I was disappointed that they didn't raise up as high as my previous try (more flat and no peak in the middle).
Do you think it might be because they sat for so long?
I don't think so. It could be the mixture of a heavier flour or the orange juice. You just have to play with it and see what works best. Sometimes my bread doesn't rise as much either. I don't stress over it.
A small bowl filled with 1/2 cup of ammonia and placed on the bottom of your oven with Le Creuset in the oven and the oven door closed overnight will also clean your pans up. And your ovens too!
Can't wait to try this bread. My cast iron dutch oven isn't enamel coated so we'll see how it works! Have you tried with whole wheat flour yet?
I don't have any thing that is cast iron. Would the Pampered Chef Stoneware: Deep Covered Baker work?
I think it does work. Read up on a few comments. As long as it has a lid, give it a try.
I have that exact blue pot. I am totally going to try this!!
Do it!
Wow I too found the recipe on pinterest and it was exactly as you said….perfect….mine just came out of the oven.
Just like your picture ….and yummy…. Can't wait to make it again with some additions ….
Thank you so much for the recipe! I will be buying a pan for my daughter that is getting married in June so that she too can make some bread …. I did have the exact pan …well I have 2 and will be ale to double my recipes and really look forward to having fun with this recipe now…. So easy.
Wahoo. I'm so glad your bread was a success. My college students have pans to bake bread in. My son has become quite the bread baker…but he still doesn't have wife???
I'm excited to make this! I do have a suggestion for your pots and how to clean them. Have you heard of Norwex? If not – YOU NEED TO! Their cleaning paste would work wonders on your pot – inside and out of it. I have used it on my sterling silver pots I thought were 'burned' on the bottom forever – and it make it like new! Seriously try it. I have a friend who sells it and if needed, she can order you some and ship it to your door – wherever you are.
I have not heard of Norwex. I'll read up on it. What product did you use?
Since she didn't reply, I'll tell you that you should truly check out Norwex for your cleaning. I found it in October and am hooked! (And I've been homemaking almost 40 year!) – I was so impressed that I became a consultant that very night, so you can contact me if you'd like more info.
I mistakenly used bleached flour and I think that did make a small difference in overall quality (slightly gummy center, instead of a chewy crumb), and the crust was super crusty – difficult to slice – I'll wait until it cools more next time – but otherwise this is the best bread recipe I've ever tried!
That's good to know. I don't ever purchased bleach flour, but there might be some followers that will need that information. Thank you so much for sharing. Let me know if start creating flavors.
Made my first loaf yesterday!! Awesome, awesome, awesome! Can't wait to try variations!
i found this recipe on pinterest. i made it in my pampered chef's deep covered stoneware baker. it turned out perfect! gonna start another loaf tonight!
Fabulous information. Thank you for sharing.
Thank you for posting about the baker! I have one and we were trying to think of another pan to use besides the Creuset! Perfect!
Two attempts now it's just not rising. It's yummy, but very dense. Any suggestions as to why? I am in Colorado at about 4,700 feet, so maybe I should change something to adjust for the high altitude? 🙁
My altitude is about 5500 feet. What about your yeast? Is is new. You can check in by mixing it with some water and letting it stand for about 10 minutes. If it foams that means its still alive and kicking. If it doesn't you may need more yeast. Also, try being very gentle with the dough while taking it out of the bowl. Don't knead or fuss with it. It is a heavy dense bread. It's not light and fluffy. I hope this helps.
I'm at about 6500ft and didn't change the recipe a bit (besides adding tasty things like garlic and herbs. I don't think you should need to alter it a bit. I use regular (not rapid rise yeast activated in 1/4 c warm water and it is perfect.
I'm in Colorado at about 6200 ft. Followed the recipe as-is and it turned out perfectly!
Oh, wait, one difference: I used "better for bread" blend flour
I live in Colorado, as well, and am unable to make this recipe here. This was a go-to recipe of mine in Austin – it always blew people away, but little did they know it was so easy. It definitely does not turn out anywhere close to how it is supposed to at this altitude. Did you ever figure out how to make it work?
I don't have a cast iron pot. Would my Pampered Chef Stone roasting pan would work? Has anyone tried that?
Does it have a lid? You just need a tight fitting lid. The pot becomes a steam oven. The steam creates the crisp crust. If it has a lid, I'd try it. Why not? Let me know if it works.
I used my pampered chef today. We had a glass lid that fit tight. It worked beautifully.
Yes, it works perfectly!
I just used my Pampered Chef deep covered baker and it worked beautifully!
I use the Pampered Chef roasting pan without any problems and my bread comes out fantastic!
I don't have a cast iron pot. I'm really anxious to try this out but I'm scared of what I can and can't put in the oven. Can you put a crock pot insert with the lid in the oven without any problems? Help….
Yummmm. I love this. Today's batch, cranberries, orange zest and sunflower seeds.
That sounds amazing! Keep it up.
Stupid question, but would I use fresh, uncooked cranberries? It seems as if they would be too firm, but I've never cooked cranberries. Thanks.
My plain version is sitting on the counter as I type this! Can't wait to bake it and taste it tomorrow! One question: how do you know how much extra ingredients to add for different varieties? I want to try a cinnamon raisin but I don't know how much to add! Thanks
Oh geez, I just guessed. I usually add about 1 cup cheese when I use it. With raisins about 1/2 cup. Depends on how much you want studded into you bread. I probably added 1 tsp. cinnamon. You can just play around with the ingredients. The dough may look loaded when you first mix it, but as it rises and bakes the add-ins spread out.
I soaked some raisins in water with some cinnamon mixed in. Then I made the dough and let it rise. When it was done rising, I spread the dough out as flat as I could without handling it too much, sprinkled it with cinnamon and brown sugar and the raisins patted dry. Then I rolled it up and squooshed it into a ball. Bake as usual. Oh. My. Sweet. Jumping. Jehosephat. The smell of it baking brought three different neighbors knocking on my door!
I have a recipe for bread and they claim too much garlic or cinnamon can affect the rising of the bread, it interacts with the yeast, is this true
I've used a similar recipe for years, that can store in the frig for up to a week. THIS one sounds great.. I'll be trying it really soon as I love a good Bread. Love the various flavorings folks are using. Cast iron is good for everything!
I'm anxious to hear how you like this. Thanks for your comment.
Tried this the other day in my cast iron Lodge dutch oven and it tasted awesome! The only thing is it rose perfectly in the covered bowl (sat on counter for about 17 or more hours)and when I took it out of the bowl and laid it on the flour it deflated. I covered it while the pot was heating and after it cooked it still didn't rise. Maybe I should've added more yeast? I did as instructed except I added sharp cheddar cheese a little garlic powder and some dried basil. You think that could've affected the rising? Even though it didn't rise it still tasted great. Any tips would be greatly appreciated! Thanks for sharing such an easy and delicious recipe!
~Bonni
I have not had that problem. Be careful not to work the dough too much after removing from the bowl. I just gently scrape it out of the bowl onto a flour surface and gently form into…something that resembles bread. Don't knead or work the dough after the rising time. I hope this helps.
Garlic is an antimicrobial. Antimicrobials kill or inhibit the growth of microorganisms such as bacteria, fungi and protozoans; in this case-the yeast.
I baked my first batch today and it came out perfect so I decided to make one with some parmesan cheese. It's been rising for about 8 hourse and I noticed it has some discolored spots and flecks. I'm concerned that it could be mold. Have you ever had this happen? I had it covered tightly with plastic wrap so I don't know if that caused the problem.
Ya know…that does happen when I mix in things. I really don't think that it's mold. I think it's just the flour. It is like when you put pancake batter in the refrigerator overnight and it darkens a bit??? Have you ever had that happen? I'm sorry that I don't know exactly what it is, but it does go away during baking. I haven't worried about it. I hope this helps????
Can't wait to try this recipe. I do have a LaCruset French oven so will be perfect. My friend has the same kind of pot that she got at Sams and it would work really well too The cost is a fraction of the laCruset. Both are enameled coated cast iron and both have a life-time warranty.
Another fabulous tip. Thank you so much.
I have been reading some of the posts but have not seen if you grease your pans. So do you? This looks amazing!!!
I do not grease or oil the pan. I have not had any trouble with the bread sticking.
Incredible recipe! Thanks for sharing.
Thank you, Tiffany. I have a Tiffany and she is as sweet as the name. I greatly appreciate your comment.
I made this bread today and I just HAD to share with you how I made it! I used my slow cooker, and it turned out BEAUTIFUL. Being a newlywed, I don't have a full collection of all the fun fancy kitchen gadgets, so reading through these comments got me thinking. I was dying to try this out, but didn't want to splurge on a dutch oven. So, I made the dough as you directed (so easy, I'm in love!!!!). Instead of putting it in a dutch oven to bake, I placed a piece of parchment paper inside my crock pot, placed the dough on top, and turned my crock pot on high. It baked for about 2 hrs. The crock pot gave the same effect as a dutch oven would. Once it felt "done" I took it out. The top crust is soft, but the bottom is nice and crispy. I guess if you wanted a nice soft bread, you could stop here. But I am all about that crispy crunchy crust. I put it under the broiler in my oven for 2-3 min (don't do any longer! I made the mistake of walking away and burned it by leaving it in to long!). It is delicious, and doesn't heat up my tiny apartment like the oven would.
Thank you for this recipe! I am so inspired, I now have 3 loaves rising on my counter as I type. A delicious smelling garlic and parsley loaf, and two tomato basil loaves. Hooray!
Found a great way to get the dough into the pot alot easier! Put the dough on parchment paper and then drop the paper with the dough right into the pot. Love this recipe, Thank you sooo much.
Viola! There you have it. The best tip so far. I can't tell you how many times I have ruined a beautiful loaf by lifting it into that hot pan. thank you so much for sharing.
So you LEAVE the parchment paper in the pot when you cook the bread? Just trying to be sure I understand because I REALLY want to try this…
So you LEAVE the parchment paper in the pot when you cook the bread? Just want to make sure I'm understanding because I REALLY want to try this!!!
I think they make a special cleaner for Le Creuset. I love mine looking used though 🙂 This bread is fabulous! Thank you so much for sharing!
Oh yum, yes let us know about rye. Baked this yesterday and it is, by far, the best bread I have ever made. Will definitely be making again and again. Thanks for sharing.
I will work on that rye recipe. Uggh wanted to today, but had a dr. appt. Foot in a boot for 4-6 weeks…cried while eating carrot cake. I'll get on that Rye.
kswinarski@nc.rr.com I am a total lover of baking breads. I have tried many many recipes and I do have to say this was the best flavored bread, and easiest bread to make. Thank you for sharing this and your other great recipes with us.
Thank you so much for your kind comment. That just made my day.
Thank you so much for sharing this recipe! I tried the basic loaf last night (lasted about 10 minutes between 3 of us) and have two more going today–fig/walnut/bleu cheese and swiss/tarragon/cracked pepper. I can't wait to try some of the other suggestions!
Fig! Walnut! Blue Cheese! You win!!!!!! That sounds amazing. I love anything with cracked pepper. Thanks for sharing. Let me know what eles you create.
First of all, Janet, I think you are the best blogger I have ever experienced. You are so thoughtful to respond to almost every comment even when it's been a repeat question! I don't have the right pan w/lid to make this delicious looking bread but I will start looking.
P.S. it also tickles me that I've found a soul-sister who still says "holy cow". 🙂
Hahaha. Well, I can't type what I'm really thinking. I've thought about it, but the church ladies would have a hissy fit! Thanks for such a kind comment.
me too, me too, me too! Holy Cow, whod-a-thunk? I cook for our Cursillo weekends for about 85-100 people and this recipe for bread does the trick. Several women bake and bring 2-4 loaves, it's a bonding thing. Of course we could buy some, but why??!!
me too, me too, me too! Whod-a-thunk? holy cow is part of my norm talk. Holy Cow Is This Bread Good!
Janet, I love the beauty of this bread and am already craving a loaf! I recently baked a loaf with kalamata olives & pine nuts at a friend's house, but it took a ton of prep, a grain grinder and a dough kneader! What you've just posted is every bit as beautiful and I can tell from the comments delicious, too! I haven't broken in my new Le Creuset dutch oven, yet – my friend just got it for me on sale with a coupon at Macy's for $25 – so this is the perfect debut! 🙂 P.S. I also admire how you respond to each comment. Few bloggers do that and it's so helpful to actually see all of the answers to questions I now won't have to ask!
Oh yes!!! This looks awesome! I will definitely be making this asap!!! I love homemade bread and I have never tried it this way. I am so excited to try it…my family will devour it!
I just saw this recipe on Pinterest, so I'm a little late to comment, but I think you should be citing your sources. It seems implied that this is your brainchild, but your repeated use of the word "shaggy" is a dead giveaway. YouTube "no knead bread" and you'll find the original baker who developed the recipe as it was run years ago in The New York Times.
I don't think there was any suggestion that she came up with this bread recipe by herself.
Furthermore, "shaggy" is a phrase that's frequently used in dough-making. Here's a link to America's Test Kitchen. I performed a search for "shaggy dough" and 647 results came up.
Just sayin'……
Dear ANONYMOUS, I find it rather humorous that you accuse Janet of taking claim to this recipe (which I never assumed that she created this bread recipe) when you sign your name as "anonymous."
Reading most of this page I never had the impression that you, Janet, were taking all the glory of creating the recipe. I find it quite humorous that the person accusing you signs in as "ANONYMOUS."
Yummy
She says she got this recipe from Le Creuset right at the beginning. I never got the idea that she was impling this was here "brainchild." Great ideas Janet!!
I think you need to read a little more carefully Anon March 2…because the blogger clearly states at the top she clearly underlines that the recipe is from Le Creuset – plus I'm not a fan of your in-your-face posting. This is a fun arena where fun people share their thoughts – go be Debbie Downer somewhere else, ok?
If you'd learn to read, she states in the second sentence of the post that she is using a recipe from a Le Creuset book.
She cites it as a recipe from Le Creuset actually… in the first paragraph of the blog 🙂
She actually cites it as a Le Creuset recipe in the first paragraph 🙂
I think she clearly cited her sources at the beginning of this blog post when she said "That all changed when I found this recipe from Le Creuset." Can't get much clearer than that.
Had you been paying attention, you would note that at the top of the blog post Janet says she had all but given up on making artisan breads when she found THIS recipe from Le Creuset.
Yours is a disparaging, snotty comment that contributes nothing to the conversation and makes you, not Janet, look bad.
She did state that this wasn't her recipe… She says in the 'intro' that this is a recipe she got from Le Creuset.
It's ok Janet… I've got your back! 😉
" As far as I know the recipe for "No-Knead" bread dough was printed in the New York times. I don't know what month, day, or year. The originator is Jim Lahey of Sullivan Street Bakery. That's all I know. I found the recipe in a booklet using enamel cast iron pots. At the time I posted the recipe I had no Jim Lahey even existed or I would have definitely given the man full credit for this wonderful bread and idea." – copied and pasted from the top of Janet's blog post.
She does mention this in the begining
The first paragraph of the page is the disclaimer that she is not the originator of the recipe… she's just passing on the great info.
That being said… I, too, found this on Pinterest… I can't wait to try this! I need to see if my stainless steel pot has a lid! (Although Christmas is coming up… maybe I'll ask my hubby for an enameled pot! LOL)
serious? who cares where it came from. I'm pretty sure most everyone on this forum would agree that it's fabulous for Janet to share/pass on the recipe. There are so many recipe snobs who don't want to. I say Thank You Janet for sharing!:)
She does give credit 🙂
Even the NYT article explains that this is a tried and true technique (versus a recipe)- it is all over the web- but not with such purty pics!
Plus "shaggy" is a VERY common word for making doughs- I have way too many bread books and many use that word.
If you read the entire page, you will find, right under the first bread picture,that she gives credit to the originator of the recipe.
She DOES say exactly where it originated if you read from the beginning!
Don't be so quick to judge!
I believe that she did cite sources in the beginning of the post. Sentence #3 and sentence #5 to be exact.
She states that at the beginning. Says it was published in the New York Times. She even credits a person. Perhaps you should read more carefully.
If everybody had to find the *source* of every recipe out there nobody would ever cook…or post for that matter…anything. Geez, what are you the recipe nazi?
For some reason Anonymous your comment isn't posting. I'm not sure how watery your dough is. It's pretty sticky and doesn't hold it's shape much. Every time I lift the dough to put it in the pan, I make a big mess. It's sticks to my hands and so I plop the dough in the pan and it somehow always works. Let me know if your bread turns out. Next time add 1/4 more flour and see if that helps. Good luck.
Le Creuset pots are so expensive, but love them. I have purchased Martha Stewart enamel cast iron pots at a fraction of the price and they work just as well. My sister uses a "Lodge" cast iron dutch oven for camping and it works great. It is a rough exterior. The dough is extremely sticky and really isn't kneaded at all. Looks rough, but tastes fabulous. I just made a loaf filled with chunks of pepper jack cheese last night. It was fabulous. Good luck.
I had both Martha Stewart and Le Creuset pots and I found that the Martha Stewart ones chipped very easily. I don't think they are worth the cost. My advice is spend the extra money on the LeCreuset (I get them at an outlet store) and they will last forever.
wonderful! I can stop myself from reading your recipes. I admires how crusty your bread look.Also I would love to have your 'le creuset pots'. I'm going to buy one, but I think the bread look kind of rough, may be because you dont knead them before baking them. Thanks anyway!!!!!!!!!!!!!!!!!!
Hmmm…that's interesting. I'm glad it worked for you.
Hi Janet!
Sorry for the long lag in my response.
I did a little bit more reading and found that I should have been allowing my bread to rise another two hours after removing the dough from the bowl and shaping it into the ball. I did this and OMG was it delicious! My family absolutely loved it. So the key was an additional two hours on the counter before going into the hot Dutch Oven.
YUMMY!
nan
I'm so sorry Nan. Ok let's go through some of your steps. It does rise quite a bit during the 12-18 hour rising time. THEN I remove it from the bowl onto a heavily floured surface and form the dough into a ball. It DOES deflate. Cover the dough with the plastic wrap that was originally on the dough while the oven is heating. Put the dutch oven in the oven and heat for 30 minutes. Then remove the hot pan from the oven and carefully lift the dough and drop into the hot pan. Don't burn yourself. At this point my dough looks like a mess. Because it is so sticky, it just doesn't hold the same shape once dropped into the pan. Put the lid on and place in oven for 30 minutes. Remove lid cook another 15 minutes. When you remove the lid the bread should have risen. It should look beautiful. It is a more dense bread with a thick crust. ???? Let me know if this helps.
Possibly the flour and/or the yeast was old or out of date?
hi whats a dutch oven???? I love your bread fab x
Oh man…………. I'm so not happy:( I put my first batch of this easy bread into my oven and it is on it's last leg of the journey…. the last fifteen mins…… I can tell though that it's not looking good for the home team! LOL
The loaf is looking very small and dense. What did I do? It looked GORGEOUS while "rising" nice and bubbly……. light.
But when I went to take it out of the bowl, boy did it shrink up…… what did I do wrong?
Oh and BTW, the Wagner Dutch Oven is a very old cast Iron Dutch Oven like the good old days, like Grandma used to cook with:):)
Have any ideas of what I possibly did wrong?
thanks!
Nan
Hi Nan, I so glad you found my site. I really don't think you will need the oil. I'm not familiar with a Wagner Dutch oven. The bread bakes beautifully in a Lodge dutch oven without oil. Let me know how it works.
Janet,
I LOVE your site. How wonderful of you to create this for others! I "had" a recipe for Artisan bread from a group I belonged to for Cast Iron collectors. I have a Wagner Dutch oven that I am going to try this with. I wonder though, should I put a wee bit of oil on the bottom? I also have a LC, but it's SO big, oval.
CANNOT wait to try your recipe!!!
Thank you so much. BEAUTIFUL site!
Nan
I always use the brand SAF instant yeast. You could use normal dried yeast as well. You will completely impressed yourself when you take this bread out of the oven. Enjoy.
This bread looks absolutely beautiful! Looking forward to trying it. Can you please confirm whether you used fast-acting yeast (ie, the type for bread machines) or just normal dried yeast that you normally reactivate in water? I assume the former but wanted to check. Thanks a lot, Lauren
Regular yeast works just fine. I just activated it in about 1/4 c warm water and subtracted 1/4 c from the total amount of water in the recipe. Perfect. Made it with roasted garlic and heaps of fresh rosemary. Outta sight.
I have a round 5.5 quart and 2 oval 7 quart pans. 6 quart would work great. You can use as small as a 5 quart.
I always use a clear glass 2 qt casserole dish with a lid and it comes out great everytime! And it doesn't stick! Thanks so much for the recipe, my 6 yr old son calls it "famous bread"!
What size of pot are you using? 6 quart?
I have never had problems with the bread sticking in any enamel coated dutch oven.
I used a recipe similar to this in the past that called for the use of a typical stainless steel stock pot and lid… I had a BIG problem with the dough sticking to the pan. Do I need to worry about that with the Le Creuset?
Hmmmm. Not sure. I've never used magnalite. You could give it a try. It just might work. As long as you have a tight fitting lid. It just might work. I know you need a heavy bottom pan or the bottom of the bread turns pretty dark.
Would magnalite cookware work too? Or does it have to be straight cast iron?
I have used magnalite and it worked really well.
Oh yes, my son makes the best pizza dough. I have wanted to blog pizza's for a while. I'll get on that. However, I have used this recipe for pizza dough. It is very sticky, but I just use a lot of flour to roll it out. It makes a very crisp crust, which I love. I hope to get on the pizza blog soon.
Hi Janet,
can you send me the pizza dough recipe?
thanks,
amy
sorry I have not responded promptly, I have been out of town. You do not have to have a Le Creuset pot, but you do need a cast iron pot with a well fitting lid. The recipe will make one loaf of bread. Good luck. It seriously is so easy. My college son bakes this all the time. It's a no brainer. Good luck.
Hi Janet,
This was an awesome post- thank you for making
my husband believe that I am truly a domestic goddess- lol!!
Would you please share the pizza dough recipe?
Or post a link?
Many thanks, sheila
Hi Janet,
I absolutely adored your blog, they are so detailed in all the step- by – step.
I am a attempting in bread making at the moment (crossing my fingers and toes every time when it goes into the oven) 😛
2 questions:
– Can I still bake this bread without Le Creuset pot?
– the recipe you provided is it for 1 or 2 portions?
Yes you can use a different pot and this recipe only makes one loaf but feel free to double it, triple it, etc..
I just bought an enameled cast iron pot specifically for this recipe. It was manufactured by "LODGE". Reasonably priced AND "Made in America". Can't beat that!
Thanks Amy. I didn't think of a magic eraser. I'll do it.
Don't forget that magic erasers are seriously toxic! Make sure you wash your pan very very well afterwards. They are banned in Canada from being used in daycare facilities because they are so toxic …
to clean the le crueset – try a magic eraser. that's what i use on mine and it works great. love this recipe and all the variations! thanks
Glad I read further down – this is what I was going to suggest too – it really works on my Le Creuset beautifully.
Thanks for the AMAZING idea, and thanks to whomever added it to Stumble Upon! 😀
Crazy Amy – is there ANYTHING that a magic eraser does not do a great job on? I love those things ! Don't know how we lived without them! 🙂
Janet- When can we get the grilled pizza recipes and directions? I hear it was a hit with everyone!
Heck no! I think the skies the limit on flavors. I'd love to hear how your bread turns out. The males in my house are bacon lovers…I just didn't even think to add it to the bread. Ooo how about bacon/cheddar???
did bacon cheddar and my grandson tried to claim the whole loaf…..the favorite here so far is the basil,garlic,parmasean we had it with home made creamy tomato soup YUM
(apologies for the all caps, I can’t seem to change this) FOr the Bacon, did you cook the bacon and crumble this in with the cheddar cheese? How much bacon did you use (and how much cheddar)? Thanks!
I actually did not make the bread with bacon. I believe that was sent in a comment. I believe you can either crumble for slice. I think I’d prefer the crumble, my self. No sure I want to chew on a slice of bacon with my bread. Personal opinion…for what it’s worth. Do what you would prefer. Please let me know what you decide and how the bread turns out.
Janet,
We LOVE Bacon and or Puncetta i our household.
When making the with Rosemary would it harm the bread by adding the chopped bacon or puncetta ?
Thanks for the tip Julie. I think I'll try a little oj.
I also tried with much success and people were impressed with the orange juice cranberry one I tried. basically I am trying different liquids other than water. the oj did bring out a slightly sourdough taste to it too. I am thinking it is because of the citric interacting with the yeast. not sure though.
IT WORKED, IT WORKED!! I needed more flour. I have made an Italian spiced one, original, cranberry, orange and nut. I'm so excited. I'm going to try a maple nut one next. now I want another pot, thanks 🙂
Hi Amber, you will LOVE the rosemary lemon! I'm so glad you tried it.
Hi Amy, I'm glad I'm not the only one that has to lock up the bread. When I made the cranberry/orange/almond, I ate the entire loaf!! Hey wouldn't that be so great with left over turkey and cranberries! I'm so doing it!
I can't wait. I just mixed up some rosemary lemon and will bake it tomorrow. Thanks for the great pictures and recipe.
Hi Mysterysinc, Yes you do add the addtional ingredients with the flour and yes it does sit out for 12 hours+. I have not had a problem doing that with the cheese. If you are uncomfortable letting it sit out, you could try to stir it in before baking. I've done that and it is more difficult to get the cheese incorporated in. The Gruyere, rosemary and roasted garlic sounds FABULOUS! Good luck.
I am so happy I found this recipe. I have several enamel cast iron pots and also wanted to make bread.
I do have one question. I am unsure as to when you add the additional ingredients. It seems that it is before you let it sit for the 12 hours, but then what about the cheese sitting out all night.
I did buy Gruyere for another recipe and am not too fond of it as a cheese, but I don't mind it if it is in a recipe. I would love to use it up before it goes bad.
I was thinking about do0ing a Gruyere, rosemary, and roasted garlic loaf.
this comment makes me wonder if people know how cheese is made. the best cheeses sit out for years, some for months, uncovered, at less than 55 degrees F so that they can ferment.
I've been looking for variations on the no-knead recipe. Thank you for not including one but two! I can't wait to give them both a try.
I just tried a no knead bread in my dutch oven and was so excited with how beautiful it came out. Your variations and flavors look delicious, can't wait to try them. As far as cleaning your Le Creuset, the company sells special cleaner just for their pots.
"Please notice how used my Le Creuset pots are. Everything is my kitchen is heavily used. If you have any advice as to how I can clean my babies, please let me know."
You might try Bar Keeper's Friend (the liquid formula, not the powder). 'Works well on mine.
I use bar keepers friend powder formula and I like it.
Le Creuset sells a product that cleans the pots. I worked the outlet store over the holidays a couple of years ago. (great way to get pots for WAY CHEAP)
I use a magic eraser on mine and it works great! Love the flavors you have combined!
Also, Le Creuset makes their own liquid cleaner which is very similar to Bar Keeper's. Has worked well for marks on the inside of pan.
Janet, try making a paste of soda and hydrogen pyroxide. I used this to clean my ceramic stove top and it worked beautifully! Even used my fingertips to do it! Should clean most everything. The left over paste I cleaned my dirty oven door!! I could not believe what it did!
A paste of baking soda and water cleans them very well and is less likely to damage than Bar Keeper's Friend.
We have used Bon Ami (powder) on our Le Creusets for years and it works great.
Le Creuset sells their own enameled cast iron cleaner. It works well on the inside and outside of mine.
Cream of tarter a sponge and some elbow grease work well
Dawn makes a product called "Power Dissolver." Very difficult to find but my Ace Hardware ordered it for me. Works wonderfully on baked on, dried on stains. Spray it on dry pan and then be patient. Should scrub right off after 15 to 20 minutes
i've heard the magic erasers also might work.
I use weimans glass stove top cleaner and lightly buff.
I found that a Mr Clean Eraser works wonderfully on cookware! It even takes marks off of the inside of non-stick pans!
I use a Mr Clean Eraser on my cookware, it even works on the insides of non-stick cookware.
I use my Mr Clean Magic Eraser
My mother had an entire set of enameled cast iron and we used bar keeper's friend on it.
Try baking soda (1/2c) mixed w/ 1/2c vinegar and about 1tsp dawn. It will foam like crazy. I just mix it in my sink then add some hot water. Soak 15 minutes or longer. You will be shocked with the results!! Good luck
I use the powdered Bar Keeper's friend on my Le Creuset pots, and it works better than anything I've tried. (I don't think the liquid formula works as well –on pots or anything else–and the dry one is not too abrasive. (It can be bad on the hands though.)
Thanks for the recipe – am going to try it today!
Get some Krud Kutter and spray it on, then let it sit for about 15 minutes or so, then use a Mr. Clean Magic sponge and the pot will look brand spanking new!
I use a Mr. Clean magic eraser and it works so well.
I was going to post about the Bar Keeper's Friend also, 🙂 that stuff is amazing! I had OLD copper bottomed pots that belonged to my gran back in the day and now are mine. When I first got them you really could not tell they had copper bottoms but one .99 cent can of Bar Keeper's Friend and now ALL my pots and pans look new, well except for the dings.
Baking soda and just enough water to make a paste. Use a sponge to apply and rub rub scrub!
I don't know if this would work for your pots but the coated cast iron burners on my stove were gross, and I put them in a garbage bag outside on the porch and poured in about a cup of ammonia and let them set sealed in the bag overnight and the gunk wiped right off. I don't think it would hurt your cookware.
Barkeeper's Friend is a terrific cleaner. It's one of only three cleaners I use in the kitchen and bath. It returns my Le Creuset and AllClad to like-new condition every time.
Arm & Hammer Baking Soda. My go to product. Sprinkle on a damp cloth and scrub away the gunk! I have even used it to remove bugs and tar from my car! I swear by this stuff!
I use baking soda for EVERYTHING in my kitchen as well as my bathrooms! Simply make a dry paste with a dab of water – takes a little elbow grease but I have no burn marks on any of my pans. 🙂
I have had my Le Creuset for 30year and they still look like new. I currently clean the dirty ones with a combination of Dawn dish detergent, Oxyclean and a touch of Clorox. I would worry about scratching with Bar Keepers friend-though I do use that on my stainless cookwear.
Oven cleaner works when barkeepers doesn't.
To clean your pots mix baking soda with hydrogen peroxide just enough to make a paste spread it on pot then rub off
Just baking soda on a damp cloth. It's amazing!
Please DO NOT use bar keepers friend on your Le Creuset pots. It will dull the finish…no more shine…EVER! I use baking soda and make a simple paste and good ol' elbow grease. Le Creuset might even make a cleaner…
use Vim in the green bottle, and some muscle power. It has worked on my pots.
you can also try miracle eraser on pots. I used it on an old kitchen aid found at a yard sale, it worked perfect.
I've had good luck with a paste of scouring powder and water…must use a paper towel to scrub with!
To clean all of my pots and pans I make a paste with baking soda and peroxide. It works really well!
I've used salt mixed with oil, like olive, and used a green scrubby pad to scrub the burned yuck off. I then washed with dishsoap, and in the rinse sink half i had vinegar water to degrease it. You could also use scrubbing bubbles bathroom cleaner only on the outside. Spray it on, let it sit 20 mins, then scrub. Be sure to rinse really good. I even use the scrubbing bubbles on my glass top stove and it always looks like new. I wash with the cleaner, then rinse with a tea towel drenched with vinegar water then dry with paper towels.
I have cleaned a lot of glass oven dishes with oven cleaner. Just spray and let them set for recommended time. Don't know how that would work on yours.
Hi, I tried the Bar keepers Friend the spray formula as well as the powdered kind and nothing budged that Loved affect on my pot.. So I say, it's not there for looks it's there to show how well used and loved it is…
I was going to recommend the same! I use the powder and it's awesome. I'm sure the liquid is great, too. You can't go wrong!
Thanks for sharing this wonderful recipe — I haven't tasted mine yet, but it sure looks gorgeous!
You may want to try Mr. Clean Magic Erasers (non-name brand work just as well) to clean the outside of the pots. I would NOT use on the inside and be sure to rinse well. For the magic they do, I can't help but think they could be bad for your health if ingested….
Bon Ami (powder) is similar to Barkeepers Friend – I use Bon Ami on my Le Creuset as well as stainless, glass, corningware, everything, and it's awesome. Cuts straight thru all kinds of grease and crud.
Baking Soda and elbow grease works well, too!
Barkeeper's friend works miracles! 🙂
i just read on Pinterest to make a paste of baking soda and 3%hydrogen peroxide…let it sit on stain for a while then wipe clean. I'm going to try it on my cookie sheets.
I also use bar keepers friend powder and it works for me!
make a paste with baking soda and white vinegar or hydrogen peroxide… those combos get pretty much EVERYTHING clean
I like the Le Creuset brand of cleaner made especially for the pots. I've used it and Bar Keepers Friend, but prefer the Le Creuset brand.
if you have a self cleaning oven you could put it through the cleaning cycle with any of your pots if they can withstand the heat..whatever is cooked on will turn to ashes and wipe clean! works great for cookie sheets, pizza pans, cake pans…etc.
I use oven cleaner on my regular pots; have always just use a pot scrubber immediately after seeing spots on my Le Creuset
you might also try using baking soda
I've had some luck with soft scrub.
You also might try a paste made of baking soda and water. Very mildly abrasive
Couldn't you use oven cleaner on the outside? I use that on the bottom of some skillets. Just besure it is cleaned thoroughly before using.
I clean mine with a baking soda paste & it cleans up beautifully.
While the dish is still warm use a scrubby sponge to apply a baking soda paste (just baking soda and water). Don't rinse but let sit (overnight) to dry, then the next day use warm water and a scrubby.
I have heard that magic erasers will clean them.
go to dollar tree & get awesome cleaner,best stuff since bread
Bon Ami is made specifically for this — it is silica based and doesn't scratch. Read Bar-Keeper's Friend powder before use. It is generally used to shine stainless steel and may scratch.
For the lady with flat bread – most likely the yeast is bad, or your house is too cold and damp.
ditto. I use Bar Keepers both inside and out – keeps my le Creuset looking new
I use Scrub Daddy scour sponges I bought from QVC. They do not scratch and my Dutch oven is spotless. I just use dish soap.
Try a wet used drier sheet
Consult a Norwex sales person. (Don't buy it on Amazon. That's not the real thing.) It's a home based business and they sell wonderful cloths and cleaning items. Your pans will not be scratched and will look new again.
I use easy off oven cleaner on my la crueset pots and it removes everything! They look like new
Hi Julie,
I'm so jealous you have an outlet store for Le Creuset. You'll love the bread. I seriously went through 100 lbs. of flour trying out new breads during the winter.
Let me know how your bread turns out and what flavors you use. I'm so excited for you!
Hey Janet!!
I just bought myself a couple things from Le Creuset- I found the outlet store in CT 🙂
I am making this right now and am so excited to see how it turns out!!
I just found a 5 qt pot on eBay! $50.00! Plus shipping= $100.00. The bottom is very browned… I think that is just seasoned, yes?
could you give location for Le Cruset store in Ct PLEASE??
WAY TO GO, Courtney! I'm so glad the whole grain was finally figured out. I'm on it. I'm thinking whole wheat with walnuts and raisins. I really like nuts!
I am wondering about adding gluten… Would that help counter the heaviness of the whole wheat?
I love to add nuts as well. I made a chocolate chip, walnut and dryed cranberry… it was AWESOME! In fact I have made several Loaves of this bread. I have made them back to back. I mean to say, I took one loaf out of the pan. Returned the pan with the cover to heat up for 20 min and added another loaf to bake. Also my Ceramic Cast Iron dutch oven, Looks just as your does Janet. Well Used and Well Loved…
I did it! I used wheat flour, but I made a few changes. I used 1/4 cup flour less and 1/2 cup more water and cooked it 5 less minutes. But it perfecct! I feel like such a cook! Thanks my husband will be so proud! -COurtney ENgland
i had to add a bit more water too. It just looked too dry when mixed.
Has anyone ever tried making this without salt?
I used wheat pastry flour and added more water also. Mine didn't rise enough and tasted awful. Any suggestions?
yes. don’t use pastry flour. it will not rise.
Thank you Courtney. I wanted to try it with wheat, too, but was afraid it wouldn't turn out. I tried 2 1/4 c. white and 3/4 cup wheat and it did work well. But I will try your tips. Thanks!! Lehne
Steve, I have let the dough proof during the night as well as all day. No difference. Just let it sit on your counter for 12-18 hours. It just works. It seriously is amazing. Follow all of the other directions. It also rises differently depending on what additions you throw in. No matter – it just works!
So what are we talking about for home temperatures during the long rising stage? I've read recipes which require a long rising, but actually stipulate proofing the dough in the refrigerator! And I would think that whether the proofing takes place during the cooler night hours or during the warmer day hours would make a difference.
Well, I made my bread–who'd've thought you could recreate a steam oven in cast iron. The bread is gorgeous. My first attempt failed, but it was a fault of a very dry batch of flour. For the second attempt, I used 2 1/2 cups water instead of 1 1/2 cups. I could probably do with 2 to 2 1/4 next time, but the dough held its shape just fine. Next up, flavors! Personally, I'm thinking roasted garlic and herbes de Provence.The first loaf is making vanilla bean French toast tonight… YUM. Thanks for the great recipe. This will undoubtedly be a keeper. Gorgeous stuff, Janet! Thanks for sharing!
Thanks for mentioning the fail, I just pulled my loaf out and it looks more like a biscotti 🙁 I noticed it didn't look like it had risen very well. Not exactly sure what I did wrong. I used instant rise yeast, and regarding the flour, I am not exactly sure which I used, could have been a white wheat, i forgot to label my jars and they look the same….wondering if these are the culprits or if I needed more water?? Frustrated 🙁
Check the date on your Yeast. This happened to me once when i used expired yeast.
(sORRY FOR ALL CAPS – IT WONT LET ME change it) after letting the dough rise for about 24 hours, it was very runny. I don’t know what I did wrong. I didn’t want to add too much flour so I put the sticky blob in the oven. By the way, it was a pretty warm day. I want to try it again. Any suggest a solution?
Try adding 1/4 cup additional flour. That should solve your problem. 24 hours of rise time should not cause the problem. Many factors can cause the problem, humidity, altitude….
Wow! My bread is beautiful! Can't believe how easy!
If Janet can do it, anyone can do it!
Hey Janet this is great! Just bought some freshly milled local flour and I'm going to use your recipe this next week. I'm not a big bread person but your cheesy bread at grandpa's house was just so good that I have to try it myself. Hope you're doing well!
Hi Janet,
I have a question if I wanted to make this into a poppy seed bread, what would you
suggest as a sweetener? The lemon zest will be great, but I think the bread is usually
sweet. I have never had it so I'm not sure. My husband lo es bread. I'm so excited to make
it
Thank you,
Darlene
very nice article, I am very happy to read it and I thank you very much for share article, Greetings and success always
Janet I found this recipe last night , just had to try it. I didn't have fast raising yeast so I put a tsp of regular yeast in the water with a tsp of sugar to help it raise. Also I used regular flour. I only had a corning wear pot, I was scared to use the glass cover so I used my cast iron skillet to put on top for a cover, I just removed the skillet bread looks heavenly .Now waiting to eat it.
THIS BREAD IS SENSATIONAL! I have yet to figure out how to post.. I can access "Reply As"… but where to post is eluding me! I inverted a cast iron frying pan over a cast iron chicken fryer pan and produced an beautiful loaf of Artisan like bread! I'd love to share pictures… but.. I have to figure it out. Janet.. save me…lol