What I love about this bread
- It’s so easy to make. This dough can be made in less than 5 minutes.
- The basic dough recipe can be enhanced with many different flavor varieties.
- Very little hands-on time.
- Crusty bread never ceases to impress family and friends.
- My 12-year-old grandson can make it.
Let’s make No-knead crusty bread:


- In a large mixing bowl, add flour, kosher salt, and yeast. Whisk together.
- Add water. Mix just until all of the flour has combined with the water. The dough will look like a shaggy mess. That’s ok.
- Cover the bowl with plastic wrap and let it sit for 12 – 18 hours on the countertop. DO NOT REFRIGERATE. This is not optional. It takes that much time to proof the dough. The reason why you need a large bowl is that the dough will start to rise.
- After 12 hours the dough will look like this. It’s pretty sticky, but that’s ok it’s supposed to be.
Shaping and baking the bread:


- Preheat oven to 450 degrees. As soon as it has heated to 450 degrees place your pot with the lid in the oven and preheat the pot for 30 minutes.
-
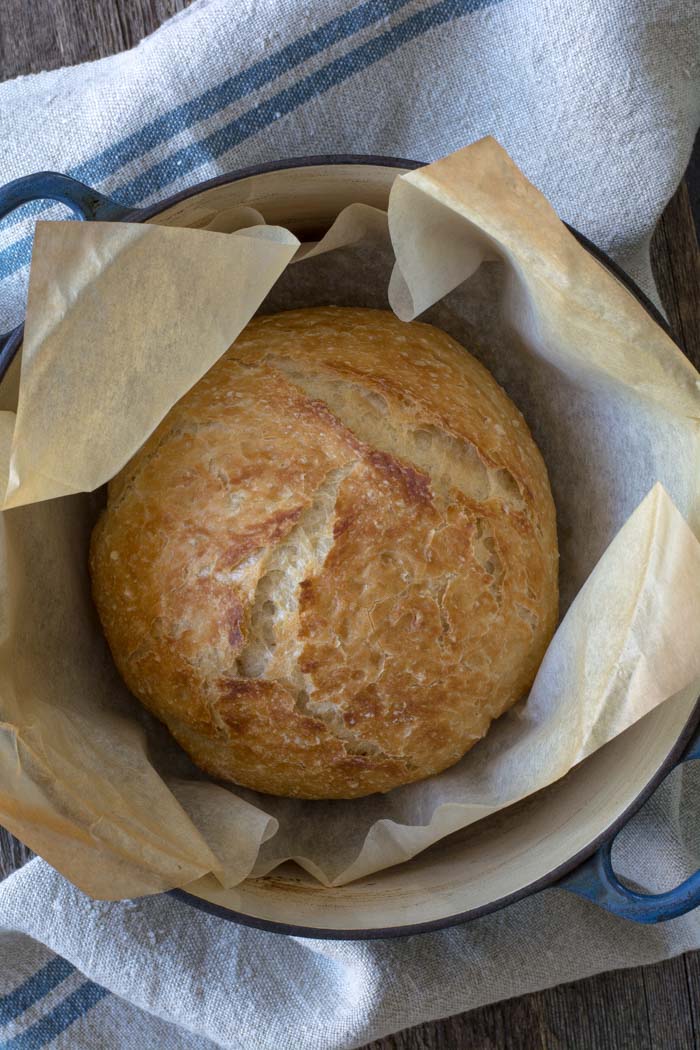
Right after you put the pan in the oven to pre-heat, dump the dough out onto a HEAVILY floured surface. Shape it into a round ball and place on a sheet of parchment paper. Parchment makes it so easy to transfer the dough into a hot pot and then remove it after baking. The parchment paper stays in the pot. This will rest for 30 minutes while the pan is heating. Cover with plastic wrap. Note: Use silicone coated parchment paper. The regular non-coated paper will stick terribly. Don’t chance it.


- Remove pot from the oven and carefully pick up the parchment and drop dough into the pot. Be careful the pan is HOT. Put the lid on the pot and return it to the oven for 30 minutes.
- After 30 minutes remove the lid from the pan. Bake for an additional 15 minutes or until nicely browned. You can test with an instant-read thermometer to make sure the bread is fully cooked on the inside. The temp should be between 190F and 200F degrees. Remove from the oven and carefully remove bread from the pot by lifting the edges of the parchment paper.

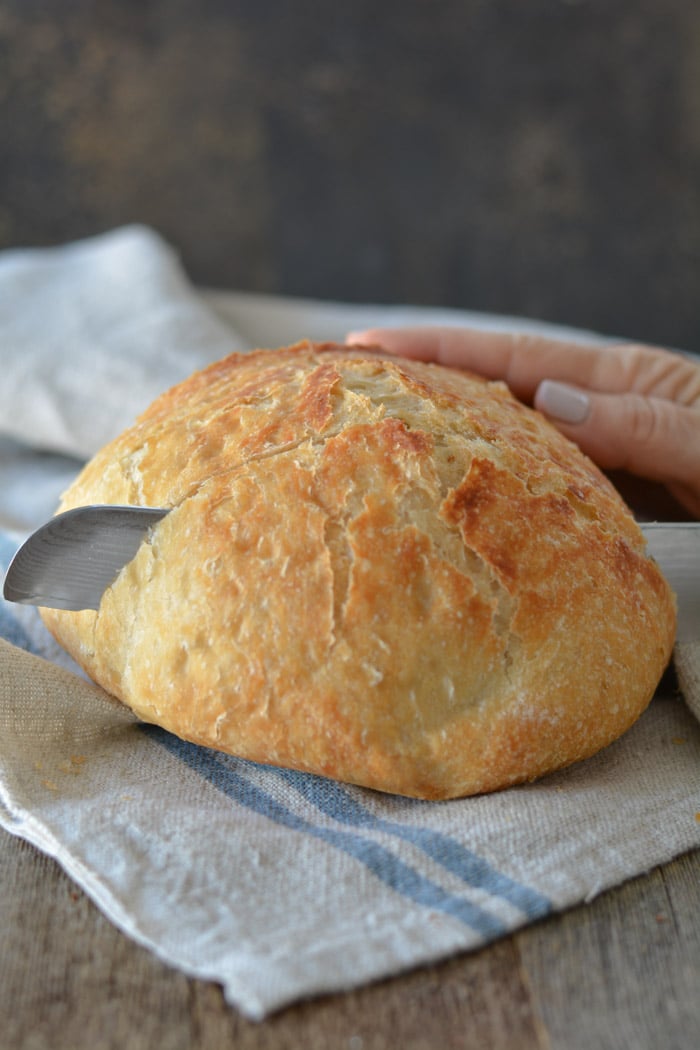
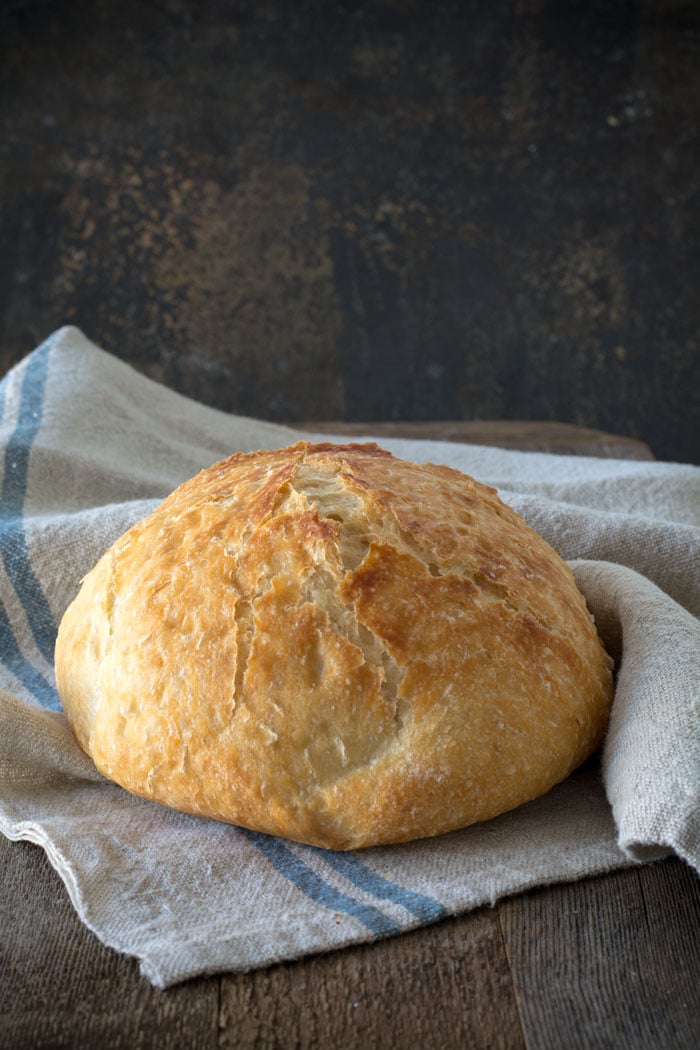
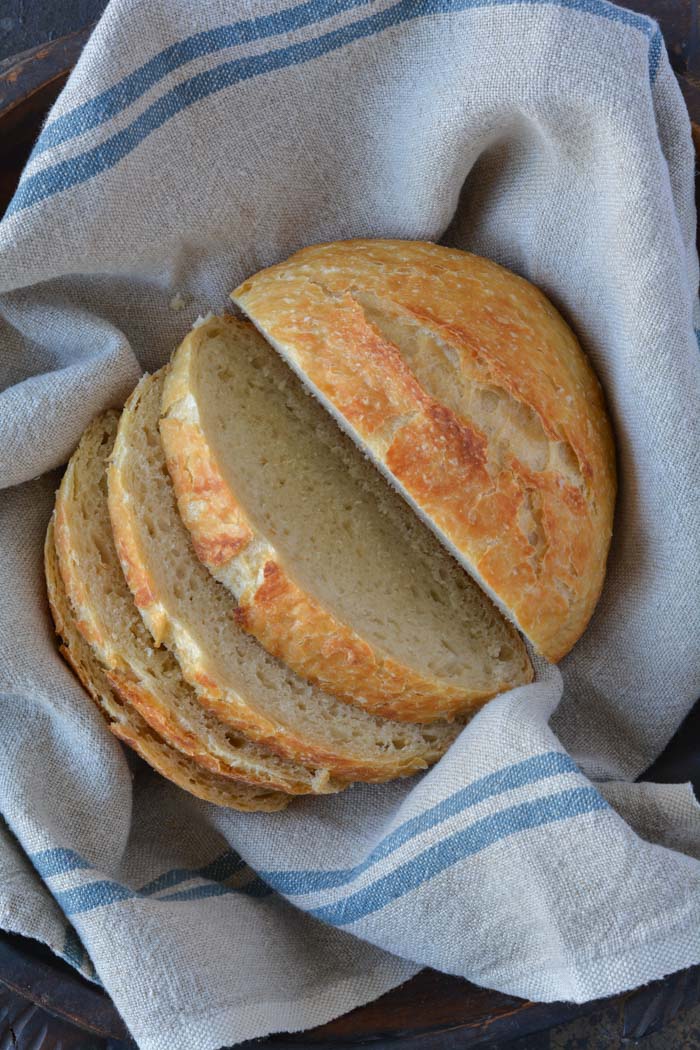
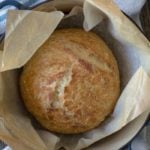
Holy cow! Can you believe how gorgeous that is? It’s best to wait for the bread to cool before slicing. Because I love warm bread I sliced it right away.
FAQ’s
Q: Do I have to use an enamel covered cast iron pan?
A: NO. You can use anything that can take the heat. The following have been used that I know of:
Clay pots with lids, Pizza stone with a bowl to cover the bread, insert from a crockpot, pyrex baking dish with a lid, stainless steel pot with a lid, baking dish covered with aluminum foil, old cast iron dutch oven.
Q: Do I have to use unbleached flour?
A: I always use unbleached flour. You can try bleached flour.
Q: Can I use self-rising flour?
A: I don’t know. I would just stick to all-purpose.
Q: What size is my pan?
A: My smallest pan is 5.5 quart. You can use as small as a 3 quart.
Q: What type of yeast do I use?
A: I use SAF instant yeast. Any yeast should work.
Q: Why is my bread turning out flat?
A: You could try using less 1/4 cup less liquid. Or add 1/4 cup additional flour. Make sure your dough appears to be dry when you first mix it. It will have more moisture during the rising time.
Q: Can my dough sit out longer than 18 hours? Does it HAVE to be between 12-18 hours?
A: I have let some dough sit as long as 24 hours and the bread was beautiful.
Q: Have you tried Gluten-free?
A: From what I hear the best GF is from King Arthur Flour https://shop.kingarthurflour.com/items/gluten-free-measure-for-measure-flour-3-lb
Q: Do I have to grease or oil the pan? Will my breadstick?
A: No you don’t need to grease the pan. I have never had the bread stick when using a cast iron pot. I haven’t tried anything else. The best way to be certain that the bread won’t stick is to form the loaf on a sheet of parchment paper and lift the bread into the pan using the sides of the parchment. Leave the paper in the pan. It’s won’t burn. When the bread has baked, just lift the sides of the parchment out of the pan. Voila! HOWEVER: Not all parchment paper is created equal. I use a silicone coated parchment paper. Regular parchment paper can stick something terrible. Don’t chance it.
No-Knead Crusty Bread
Wonderful yet easy artisan bread with a crisp crust. Prep takes just a few minutes with an overnight rise. Baked in a pot with a lid to create a steam oven. Bread can be made with many flavors and variations.
Ingredients
- 3 cups + 2 tablespoons unbleached all purpose flour (450 gr)
- 1 3/4 teaspoons Kosher salt (10 gr)
- 1/2 teaspoon Instant or Rapid-rise yeast (3 gr)
- 1 1/2 cups water cool (315 gr)
Instructions
-
In a large mixing bowl, whisk together flour, salt and yeast.
-
Add water and mix until a shaggy mixture forms.
-
Cover bowl with plastic wrap and set aside for 12 - 18 hours. Overnight works great.
-
Heat oven to 450 degrees. When the oven has reached 450 degrees place a cast iron pot with a lid in the oven and heat the pot for 30 minutes. OR pot can be placed in cold oven while oven is preheating leave in oven for 30 minutes.
-
Meanwhile, pour dough onto a heavily floured surface and shape into a ball. Cover with plastic wrap and let set while the pot is heating.
-
Remove hot pot from the oven and drop in the dough. Cover and return to oven for 30 minutes. After 30 minutes remove the lid and bake an additional 15 minutes. Remove bread from oven and place on a cooling rack to cool.
Recipe Video
Recipe Notes
FAQ's
Q: Do I have to use an enamel covered cast iron pan?
A: NO. You can use anything that can take the heat. The following have been used that I know of:
Clay pots with lids, Pizza stone with a bowl to cover the bread, insert from a crockpot, pyrex baking dish with a lid, stainless steel pot with a lid, baking dish covered with aluminum foil, old cast iron dutch oven.
Q: Do I have to use unbleached flour?
A: I always use unbleached flour. You can try bleached flour.
Q: Can I use self-rising flour?
A: I don't know. I would just stick to all-purpose.
Q: What size is my pan?
A: My smallest pan is 5.5 quart. You can use as small as a 3 quart.
Q: What type of yeast do I use?
A: I use SAF instant yeast. Any yeast should work.
Q: Why is my bread turning out flat?
A: You could try using less 1/4 cup less liquid. Or add 1/4 cup additional flour. Make sure your dough appears to be dry when you first mix it. It will have more moisture during the rising time.
Q: Can my dough sit out longer than 18 hours? Does it HAVE to be between 12-18 hours?
A: I have let some dough sit as long as 24 hours and the bread was beautiful.
Q: Have you tried Gluten-free?
A: No. I'm still waiting for someone to venture into the realm of Gluten-free. If you try it, let everyone know.
Q: Do I have to grease or oil the pan? Will my breadstick?
A: No you don't need to grease the pan. I have never had the bread stick when using a cast iron pot. I haven't tried anything else. The best way to be certain that the bread won't stick is to form the loaf on a sheet of parchment paper and lift the bread into the pan using the sides of the parchment. Leave the paper in the pan. It's won't burn. When the bread has baked, just lift the sides of the parchment out of the pan. Voila! HOWEVER: Not all parchment paper is created equal. I use a silicone coated parchment paper. Regular parchment paper can stick something terrible. Don't chance it.
More Notes:
Regular active yeast can be used in place of the instant or rapid-rise yeast. It will need to be activated in 1/4 cup warm water. Stir and let sit for 5-10 minutes. However, most of the comments I have received state that the rapid raise works the best. You choose. Whisk the flour, salt, and yeast together.


Good morning, I have asked you questions before so I hope you see this. I wish I had time to go through all the comments maybe this winter! I love your crusty bread recipe I have two on my cupboard to make up now this morning. But I’m wondering if there’s a way I can get it to rise a little bit more and how do you get like the cool crusty look to it mine ends up pretty equal on the whole round loaf I don’t know if you understand what I mean like the pictures of your bread mine looks more smooth. I just used the regular crusty bread recipe 3 cups of flour salt yeast and 1 and 1/2 cups of water I did add jalapeno and some cheddar cheese. Mine just comes out heavy and dense and I was wondering if there was something I’m doing to cause this anyway hope you understand this and I appreciate your help!
Scroll way down and get my tips (Anna). You can slash with an ‘X’ or you can cut on a 45 degree angle along one side with a lame to get an ear.
Look at the Recipe notes/FAQs. One question is “Why is my bread turning out flat?” The answer mentions adding less liquid or more flour. Maybe the jalapeno you added adds to the moisture in the dough? You might try it plain and see if you get the result you want, then do your jalapeno/cheese version with an adjustment to the water or flour amounts to make up for the moisture in the jalapeno.
I’ve commented before but had to come back to say that your recipe is really going the rounds here. I recently made it twice for small gatherings connected to my church and got requests for the recipe both times. I couldn’t remember everyone who asked for it so I printed out 30 copies (thanks for the easy print button) and took them to the women’s meeting last Sunday and nearly every copy was taken. Then I had a friend call and ask me for a copy because she realized after she got home that she’d been so engaged in conversation as she left the meeting that she forgot to grab a copy. It’s so good and so easy to make! I do recommend getting an electric knife if you’re going to make this for a crowd. Last time I made 3 loaves, should have made 4, and went to the store just for an electric knife. I have a good quality bread knife but didn’t relish the thought of cutting manually through that much crusty deliciousness. The electric knife was definitely worth the $25 and the trip to the store. I’ll use it from now on no matter how much I need to cut.
I’m thrilled you love the no-knead bread recipe. It’s a keeper for sure! Not to mention it’s so simple and love that crust. Thanks for sharing with your church lady friends. I love your knife story. Electric knives really come in handy for slicing this bread. Happy Baking! xo-Janet
My absolute favorite bread recipe – make it constantly! My sister is trying to make it in Colorado and every attempt the dough has failed to rise. would altitude make a difference? (I’ve walked her thru the process & she seems to be doing everything right.)
I’m sorry you sister is having problems with the recipe. My daughter lives in the Denver area and has not had any trouble. My grandson was making it on his own at the age of 10! Does she live at an altitude higher than Denver?
If the bread isn’t rising, I would think it could be a yeast issue or even temperature.
Any thoughts about using freshly milled flour? I grind my own red or white hard wheat berries… I do not get much of a rise.. or nice holey texture. I follow the instructions you offered. Trying to figure out what is going wrong. I have used vital wheat gluten thiniibg that might be the problem… a T of that per cup of flour. … that was not it. Thank you for your time and consideration of my question.
Therese
I have not had great success with whole wheat no-knead bread getting large holes in it. All wheat flour requires using less liquid. I found the wheat flour just didn’t absorb all of the water and I was left with a soupy dough. I have noticed several recipes online for whole wheat flour no-knead bread. However, the photos did not show large holes. This is the standard recipe is:
4 cups whole wheat flour
2 1/4 teaspoons active dry yeast
1 1/2 teaspoons salt
2 cups warm water
Let me know if you try this recipe and how it works compared to my recipe using white flour. I have had a so/so result.
I Have tried to bake so many tiMes and came up with failures eveRy time. i am proud to say i made this bread and It is fantastic. My husBand ate half of it already and i am mixing another batch. Thank you for sharing this recipe. 😍
I’m so glad your loaf turned out fantastic! It’s definitely addicting!
Do you think this dough would freeze well? I was going to use it to make your potato rosemary pizza, but the recipe says it will make 2 and i’m never going To be able to eat that. Was thinking of making the dough, letting it rise, then freezing the half i don’t use For another Time. Thoughts?
I have never tried freezing the dough, however, I think it will freeze quite well. You can always 1/2 the recipe and bake a smaller loaf without having leftover dough.
Hi, thank you for the recipe. This text comes out in all caps- it is not my intention to yell 😀
How big is the cast iron you are using? I always wanted to buy one with this recope in mind and now I‘m Finally going for it.
All the best from germany, julia
I hope you love the bread recipe. It’s so versatile and so easy.
I’ve tried making this bred with several different flour ALTERNATIVES. No luck. Today i tried it with jovial einkorn flour amd So far it is flat (runny almost) and looks like pizza dough. I am currently heating up my oven. We’ll see. Maybe more flour or less water?
I have not tried other flour products. But I did find this recipe on the Jovial Einkorn flour site. They have made some adjustments to the recipe that I have posted.
https://jovialfoods.com/recipes/slow-rise-einkorn-bread/ I hope this helps.
I’ll be honest. I was a bit skepticak. Where was the flavor coming from? No sugar? Cooking it in a dutch oven? No kneeding? This was one of the easiest, crustiest, most flavorful bread I’ve ever made. No need to break out the Kitchenaid Mixer and have all the cleaning up to do. This will be my go to fresh bread. Next up, Paninis.
I completely understand. It’s just too easy to work…right? I’m so glad you had great success. It’s really hard to mess up this recipe. Happy baking!
nope, I did not try the variation for high altitude baking because i tried the recipe (as is) before your reply was posted, and i had no issues or problems. so thank you anyway for the tip. great bread, and it is my all time favourite now.
I cant seem to get the hOles in my bread like some of the pictures.
My bread comes out too dense.
Any suggestions?
Thanks
The long rise time generally allows for air bubbles/pockets to form. It’s possible the bubbles and air pockets are deflated while you are shaping the dough. Be very gentle with the dough after you have tipped it out of the bowl. You may need to allow extra rise time to reform the air pockets after shaping the dough for another 1-2 hours. I hope this helps please let me know if you have any further questions.
This was the first time I have ever tried making bread and it came out perfect! I was so close to buying a bread maker. Thank you! We have Reynolds unbleached parchment paper and that worked fine. Lifted right into and out of the pan and didn’t stick at all! I am guessing that the flower helps with that as well. I can’t wait to try some flavor variations!
When I’m typing this it is all in caps and I’m not sure why. Sorry about that.
I’m thrilled your bread was a success. It’s such a simple recipe and works every time. Thank you so much for commenting and for your 5-star review.
any changes for high altitude baking? I live at 6000 feet high.
My elevation is 5,000 ft above sea level and I add an additional 2 tablespoons of flour. I hope this helps. Please let me know if you try the variation for high altitude baking.
This is the best ever recipe. Thank you for all tHe deTaIled steps. I have been making thiS For seVeral yeArs aNd get so Many compliments.
I was When pUtting the Dough into a ball to rest should i brush floUr off before baking?
Also what is the best way tO STORE the breaD. I have been wrapping in waxed paper and Leaving on the counteR. I was thinking a freezer bag the bread Migjt gEt moist and not stay crunChy. And if giving it as a gift how Long does it stay fresh For? Like should you shAre it the Same day it was made. I was just wOndering I what you do. Thanks.
You can dust the dough with flour. If the flour is heavy on the dough, brushing it off is a good idea. The baked bread will go soft when stored in a plastic bag. If I have bread leftover, I will cover it with a cloth and place it cut side down on a cutting board. I hope this answeres your question.
Hi Janet, this is my absolute favorite bread recipe, I’ve been using it since you 1st posted it. However, today I am up against a time limit and was wondering if there is a way to have a shorter amount of time for it to develop? Perhaps 6 or 8 hours sitting in a turned off gas oven? Thanks for any help.
Yes, you can add 1 teaspoon of yeast and sugar. The sugar will feed the yeast and get the dough rising quicker. Just cover and place in a warm spot. Your oven is a great idea. Please let me know how the bread turns out.
This is a wonderful easy recipe. I have a question for colder months ahead. is there a temperature range for the dough to rise overnight? My house gets down to 60’s in the colder months. Will there be a problem with the rising of the dough?
You made to add some extra time with the cooler temps or add a 1/4 tsp more yeast. That should do the trick. Please let me know if you have a problem or have any other questions.
Im trYing this recipe right now. I have convection option on my oven. UsuAlly set for 25 degrees less than recipe calls for. Should i bake at 425 or still do it at 450? Thanks
Hi Janet. Mine came out dark (almsot burnt) on the bottom. I do don’t have a convection oven. I Used the tray in oven that was Hihighest it could be without the lid touching the top. NeNext time, do you think it would cook OK at 400°? Thanks!
Your oven could be cooking hot. I would definitely turn your oven down to 400℉. Great idea. Also, you could try putting your pot on a baking sheet to give it another layer on the bottom. What type of pot are you using?
I can’t find silicone coated parchment paper; should I spray my regular with oil? Also: have you tried mixing any flavors/herbs in with this bread? Does it work?
Yes, you can spray your regular parchment with oil. Do over saturate because the heat of the pan will cause the oil to smoke. That could be the only downside. Also, you really don’t need the parchment paper. It just makes it easier to add and remove the bread from the hot pot. I have never had the bread stick to my enamel-coated pot or my cast iron pot. I have added 1 cup chopped fresh herbs to this bread and it is heavenly!! The aroma, while it is baking, is amazing. I hope you love it!! Please let me know if you have any other questions. xJanet
p.s. i was so excited about baking this bread the next morning that i got up nearly every hour throughout the night to watch the progress of the rise. of course it was perfect, and i already have another shaggy dough on the counter destined to be a gift for a neighbor tomorrow.
So funny! You are the best neighbor ever!!! Thank you so much for commenting. You just made my day.
yOUR RECIPE IS A WINNER! i USED TO BE A BREAD MAKER IN MY YOUNGER DAYS BUT HAVEN’T FOR SO LONG, i THOUGHT i’D LIKELY LOST THE TOUCH. tHIS CRISPY CRUST ARTISAN LOAF IS A BEAUTY BOTH INSIDE AND OUT. aND SO EASY! (wELL, IT WAS HARD TO WAIT THE HOUR OR SO BEFORE CUTTING INTO IT AND WHEN i DID, WAS IT EVER WORTH IT!)
tHANK YOU SO MUCH FOR SHARING THIS GIFT!
Wahoo!! I’m so thrilled you loved the bread. It’s a keeper for sure!
Hi I am wondering if the dough can be made in the bread machine to the dough stage then let it sit overnight baking the next day Will it haver the same result I have been making this bread for sometim now and have some good results with a couple not so good Not complaing as it is a great bread.
Wendy in Qld Australia
Hi Wendy, To be honest with you I have never used a bread machine. It’s definitely worth a try. The difference would be that you would not be putting it into a screaming hot oven.
I’d love to know the results.
Absolutely fantastic bread! So good that non-bread lovers in my family raved about it. My new go to. Thank you for sharing!
Thank you so much! I’m thrilled your non-bread lovers are on board with great bread!!
I just got my bread out this morning after leaving it to rise overnight and it had a very sour almost alchoholic smell with no trace of that warm yeasty smell I’m used to. I’ve never done an overnight rise before… is this normal?
The dough should smell yeasty but not an alcoholic smell. Perhaps you should try using just 1/4 teaspoon of yeast. It’s worth baking the dough you have already made. It just might bake up just great.
Made this bread. Baked off this morning. Great simple crusted bread. My first time making bread. Delish . Next time i will add olives.
I’m so thrilled to hear you love the bread. Bravo! Olives are a great addition!
OH MY GOODNESS!!! I Did it!!! It looks AHMAZING! Thank you for sharing your recipe 🍞♥️♥️♥️
Bravo! 👏 Thank you so much for your response. I’m thrilled you loved the bread.
i noticed today that the weight measuRements are Not accurate to the Cups measurements as listed. do you usually weigh or measure your ingredients? TryinG to make sure this works for my daughter! (Example 1 1/2 cups Water Equals 355 grams, and 1 cup of flour weighs 120 grams according To King arthur or 142 according to cook’s illustrated.). Thanks!
This is a good question. I assume that not everyone uses the exact same measuring cups and spoons that I use in my kitchen. So, using MY measuring cups and spoons I weighed each of the ingredients. It’s possible that King Arthur flour has
different measuring cups than I do. Therefore, they would possibly have less or more flour in their measure. So I weighed the flour and other ingredients based on my measuring cups. Basically, if you use the weights I have on my recipe, your bread should turn out like the bread I made. If you use King Arthur flour’s weights then your bread will turn out like their bread. Is this making sense? Not all measuring utensils are exact and precise like using weights in grams.
I find that the bottom cooks too fast and the bottom crust gets tough when I have the oven rack set on the second from bottom position. There are 5 positions in my oven. I am concerned if I use the middle position that the pot will be too high – just inches from the top of the oven. what position do you have the oven rack set at?
I have been using the upper third of my oven to bake the crusty bread. Check the internal temperature of your bread as soon as you remove the lid. If the internal temp is over 190℉, the bread is baked and you can remove it from the oven and the pot. Each pot seems to vary in thickness and internal temperature. An instant-read thermometer is very valuable in baking bread. Please let me know if this helps.
Can i adapt this using Whole wheat Flour?
Thank you!
Yes, you can use whole wheat flour. However, you do need to reduce the amount of water because whole wheat flour just doesn’t absorb the water as all-purpose flour does. The bread works best when adding whole wheat flour as well as bread flour. Using 2 1/4 cups bread flour + 3/4 cup whole wheat flour. Please let me know if you have any other quesions.
I aI apologize if somebody already asked this question. I have traditional active dry yeast. It Is not instant yeast. WoUld thIs be OK for the recipe?
Yes, you can use the active dry yeast. Just dissolve the yeast in 1/4 cup of the water and let it sit for about 5 minutes before adding it to the flour mixture. I hope you love the bread. Please let me know if you have any more questions.
Thank You! I will be trying your recipe very soon
I love this recipe and make it all the time for gifts. The neighbor thinks I’m awesome. Lol. (why is this all caps…?) I was wondering though, if you’ve ever tried substituting almond flour or something for part of the flour? I don’t care about gluten, I just want to lower my carb intake. I was thinking the long rise, and perhaps adding some vital wheat gluten, would still have a good rise. thoughts?
I’m sorry about all CAPs. The caps do not come through on the comment. 🤷🏼♀️ The bread does make awesome gifts!
I have not tried adding almond flour. My guess is it could be quite dense. I generally use vital wheat gluten when I make whole wheat bread. I have received comments using gluten-free, but not using almond flour. I’m sorry I’m not much help. Let me know if you have any other questions. Happy baking.
Do you have any suggestions for adapting this bread to gluten-free flour? I tried my usual gluten-free blend (cup For Cup) and it didn’t come together or rise properly.
I personally have never attempted a GF loaf. I do trust King Arthur Flour and they have a post making GF Crusty Bread. Here is a link: https://www.kingarthurbaking.com/recipes/no-knead-crusty-white-bread-recipe. I sure hope this helps. I have received comments that GF bakers have had great success using King Arthur GF Flour or Bob Redmill GF. Please let me know if you have any luck.
Thank you for your advice and insights. I will be trying the recipe with King Arthur GF flour, and i will let you know the results.
Thank you so much. Good luck!
Can you bake more than 1 loaf at a time? (I’m assuming if you have 3 Dutch Ovens)
Absolutely! You do need to bake them in individual dutch ovens. So if your oven will fit more than one dutch oven, you’re in luck. I have used the same dutch oven to bake multiple loaves. I just remove the cooked bread and drop in another one and bake in that same dutch oven. I do leave the lid in the oven while the first loaf is baking with the lid removed. I hope I’m making sense. Please let me know if you have more questions.
I’ve been making a variation of this recipe for several years now. From my experience, i can add a few tips.
Use a 3 quart or 3 litre dutch oven. Your loaf will take on a perfectly round shape.
Next, you should shape the dough more so it’s not a sticky mess that you need to put onto parchment paper. To do this, generously cover your counter with flour and flour your hands. Pull a chunk of the dough up from the back and push into the centre of the loaf, turn a quarter turn, and repeat. Keep on doing this at least 8 or 10 times, turning each time until you have a loaf that has formed a tight skin on it. Flip the seam side down and leave it under a towel while the oven is warming (at least 30 minutes) with dutch oven inside. After the 30 minutes, uncover the loaf, give a very quick slash (X) with a sharp knife. I like to add coarse salt on top so next I would spritz the loaf with water and then sprinkle on salt. Salt, of course, is optional. The water spritz makes for a crunchier crust. I take the dutch oven out of the oven and using a bench scraper, I loosen the loaf from the counter. NOW HERE’S THE TRICKY PART: Then I quickly pick it up and drop it into the hot pot (no parchment paper, it will not stick!), put it back in the oven and put the lid on. Be very careful. I generally drop the bread from a good height so I don’t accidently touch the hot pot and burn myself. It doesn’t matter if it goes in crooked, it will be fine! Don’t try to straighten it! Bake for 30 minutes, remove the lid and bake for an additional 15 minutes. Wait at least a ½ hour to cut into it. It needs to rest. If you cut into it too soon, the crumb will be gummy.
Enjoy!
Fabulous tips! Thank you so much.
No problem. I’ve been tweaking this recipe all along. I once happened upon a video on how to shape a loaf from a high hydration dough and everything clicked. Not that it was bad before, but it’s just so much easier this way and yields a nicer looking loaf.
WOndering if you could SUBSTITUTE kefir for the water to make it like a Sourdough Loaf?
It’s worth a try! I think it sounds delcious. Please let me know if you try it.
Do i need to sift the flour?
Nope! I never do.
QUESTION..WHEN PUTTING A COLD POT IN THE OVEN, DO YOU KEEP IT IN THERE 30 MIN AFTER THE OVEN IS PREHEATED OR DO YOU SET A 30 MIN TIMER WHEN YOU PUT THE POT IN COLD? tHANKS!
The oven is generally preheated to 450℉ then the cold pot is put into the oven and preheated for 30 minutes. I have had many comments stating that they just put the cold pot in the cold oven and preheat the pot with the oven at the same time to save on energy. Either way will give the same results. I always do the first method preheat the oven to 450 then add the cold pot and heat for another 30 min. I hope this helps. Please let me know if you have any other questions.
So far k have lnly accom a fully cooked bread with only white flour, it always seems pretty dry when i am mix it. I really want to add white wheat flour but even af a longer cooking time it is still mot tot cooked inside! HELP! 😊
Any sugg please!!!
Perhaps you need less flour?? I have found that not all brands of flour perform equally. After your first initial stir, if the dough seems too stiff, add a bit more water. The water should absorb the flour as it sits overnight and generally looks quite wet. Try baking the bread with the lid ON the pot for an additional 5-7 minutes then remove the lid. Raise the rack in your oven to the upper third. This will help so the crust doesn’t get so hard on the bottom.
An instant-read thermometer is quite valuable when baking bread. The internal temperature for the bread should be 195-200℉. If it’s lower than that, your bread isn’t fully baked. I hope this helps. Please let me know if you have any other questions.
Can you use sour dough starter rather than yeast? Maybe less water is needed then?
Yes, you can use a sourdough starter. I have never tried it but there are comments that have been left saying that they used 1/2 cup starter. Let me know if it works out for you.
i’M NOT SURE WHY THIS IS ALL CAPS! bUT i’VE MADE THIS RECIPE PROBABLY 10 TIMES NOW. aLWAYS GONE IN A DAY! cAUGHT MYSELF A BOYFRIEND WITH THIS RECIPE! HAHAHA.
oNLY COMMENT (AND SORRY TO BE SHOUTING!) IS THAT 3 G OF YEAST IS 1 CLOSER TO 1 FULL TSP. wHICH HAS ALWAYS BEEN FINE, BUT i DID WONDER WHY i WAS GOING THROUGH YEAST SO MUCH FASTER WHEN i STARTED WEIGHING ALL MY INGREDIENTS.
I have no idea why the type appears in all caps but comes through in lower case. I have no idea why. I’ll see if I can fix it. So sorry about that. Thanks for letting me know the measurement for the yeast. You can decrease that by a gram if you’d like. I’m so happy your boyfriend had the recipe!
Ive never made bread before this recipe. I always Assumed I need a bread machine! I made this bread and added sesame seeds to the Crust before baking. It turned Out beautifully! It’s gone in one day so next time I’ll try sunflower seed crust!
Bravo! Sesame seed crusted sounds AMAZING!
Can you use wax paper instead of parchment paper?
No, I’m sorry you can’t. That would end up being a disaster. The wax would melt and stick to your pan and the bread. You are better off just dropping the dough into the pot. The parchment just makes it easier to lift in and out of the hot pot. I hope this helps. Let me know if you have any other questions.
Is it possible to split this recie into two small loaves? If so, what would be the time required for baking?
Absolutely! Bake the small loaves for 20 minutes with the lid on the the pot them remove the lid and bake until the loaf is golden.
This is fabulous!! So super easy! I just made a loaf with 1.5 + 2T bread flour and 1.5 cc King Arthur 1:1 flour and it turned out perfect! So yummy and aromatic adding rosemary and shredded asiago cheese! Thank you for sharing this recipe!
Thank you so much for sharing your comment. You’ll love the asiago and rosemary.