Indian Paratha is a flakey, tender flatbread made with flour, milk, salt, and ghee. Paratha flatbread has a flaky, chewy texture achieved through a series of folds layered with ghee then rolled flat and cooked on a hot griddle. The result is a beautiful crisp flatbread that is wonderful dipped into thick curries.
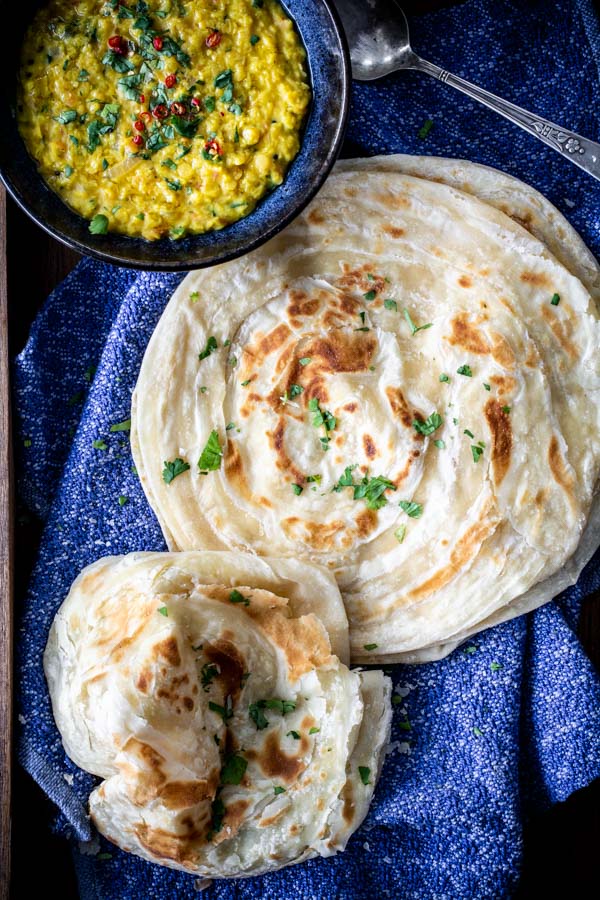
There are many different recipes and techniques used for making Indian Paratha. I’m sharing the recipe that I have used for years and this is how I was taught to make this amazing layered flatbread. It’s fun to make and completely addicting. Promise me you will take the time to make this truly wonderful bread at least once in your life!
The recipe ingredients are pretty simple. Milk, salt, sugar (optional), and ghee. If you are vegan, just use water and oil in place of milk and ghee. Don’t panic by the number of photos and instructions below! I have tried to make the recipe and instructions as complete as possible so everyone can have success making Paratha.
Making Paratha Dough
 1
1 3
3 2
2 4
4- Gather and measure ingredients. You will need 2 1/2 cups of flour, 1 tsp. salt, a pinch of sugar, 1 1/4 cups of warm milk, ghee, or oil. Place all of the dry ingredients in a large bowl.
- Stir or sift all of the dry ingredients together. Add Ghee or oil and mix in with your hands or a spoon. (An electric stand mixer may be used also using a dough hook for kneading)
- Slowly add in 1 cup of the milk.
- Begin to mix with your hands. Add more milk only if the dough feels too stiff. You may use all of the milk or you may only use an additional 2 tablespoons. It really depends on how the flour is measured and the brand of flour used.
Kneading the Dough
 5
5 7
7 6
6 8
8- Once the dough feels soft and workable, begin to knead the dough.
- The dough can be kneaded on a countertop or on a wood cutting board. If the dough feels too stiff add a bit more milk by dipping your fingers into some milk or water.
- Continue to knead until the dough is very soft and pliable.
- Form the dough into a round ball and place it in a bowl. Lightly oil your fingers and rub the top of the dough. Cover with plastic wrap pressing the wrap snuggly around the dough so the dough will not dry out.
The Secret to Success
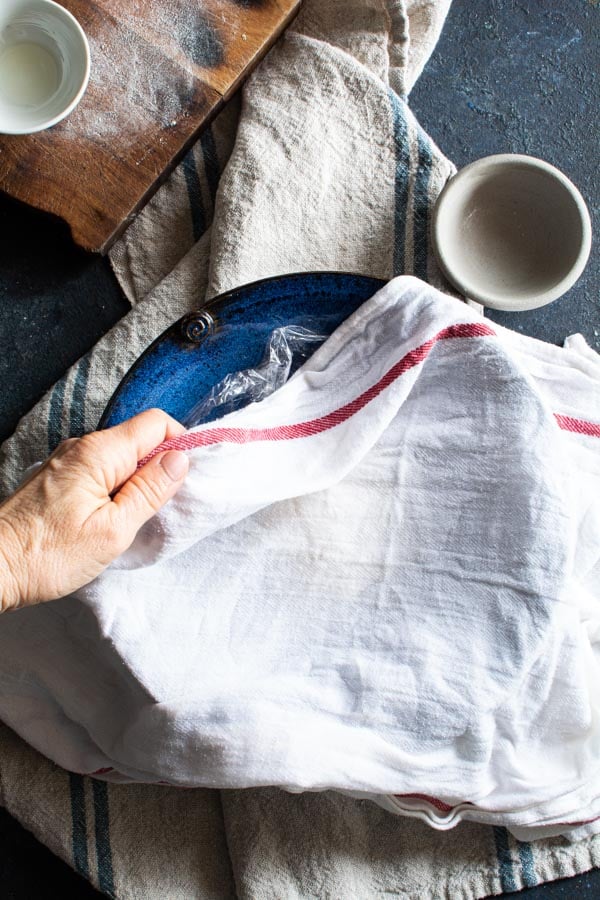
The secret to success in making Paratha is allowing the dough to rest! Let the dough rest for at least 1-2 hours. Longer is better. The dough can be made earlier in the day or even the night before. If the dough is made earlier, I cover it with plastic wrap and cover it with a damp cloth. This will ensure the dough will not dry out. A plate can be rested on top of the bowl as well. Just don’t let the dough dry out.
Shaping Paratha Dough
 1
1 3
3 2
2 4
4- Once the dough has rested it will be a bit more spread out in the bowl. Gently remove the dough onto a lightly floured surface.
- Divide the dough into 8 equal pieces. If you’re a perfectionist, you can weigh the dough on a scale and measure it in grams to be extra precise.
- Shape each piece into a nice, firm ball.
- Place each ball onto a lightly oiled or lined baking sheet. Cover with plastic wrap and let it rest…AGAIN! The dough will roll out easier if you let it rest for another hour. This, too, can be done earlier in the day.
Rolling and Folding the Paratha
 1
1 2
2 3
3 4
4 5
5 6
6- Take one of the balls of dough and flatten with your fingers. Dip both sides of the dough disk into flour.
- Using a floured rolling pin, roll out the dough into a large 9 to 10-inch circle. Continue to dust with flour as needed. The dough will roll out nicely if it doesn’t stick to the surface or the rolling pin.
- Brush the top of the dough with a teaspoon of melted ghee then sprinkle the top with flour. The flour sprinkle is a very important step.
- Now begin to fold the dough just like you would fold a piece of paper to make a fan. Back and forth, back and forth pressing the dough together each time.
- Here is a side view of how the dough should look.
- With the dough laying flat on the floured surface, Press down on the layers firmly.
Shaping
 1
1 2
2 3
3 4
4 5
5 6
6- Holding on to each end stretch the dough into a long 12-13 inch strip of dough. Don’t rip the dough. Handle the dough gently.
- Lay the strip of dough flat on the surface and at one end to roll the strip of dough.
- It should look like a cinnamon roll shape.
- Take the end piece of the strip and pull and tuck it under the roll into the center of the roll.
- Lay the roll flat and tap to flatten into a disk.
- Here is a picture of how the strip of dough should be shaped.
Final Resting
 1
1 2
2 3
3- Here is another side view of the layers.
- Press the layers down more to compress them.
- Return each rolled-up Paratha to the lined baking sheet. Cover with plastic wrap or a damp cloth. Allow them to rest once again while repeating the process for each ball of dough.
Final Roll
By the time all of the dough balls have been rolled, folded, and shaped they should have rested long enough for the final roll. Wahoo! Hot, flakey Paratha is almost here!
 1
1 3
3 2
2 4
4- The first ball of dough that was rolled and folded should have rested long enough to roll out. Place on a floured surface and flour with the rolled dough.
- Gently press the dough with your hand to flatten.
- Gently roll the dough back and forth until it is as thin and round as you can make it.
- Approximately 9-inches or bigger. Set the round aside on a floured surface. Cover until ready to cook. Repeat the process with each remaining rolled dough.
Cooking the Paratha
Finally, it’s time to cook the Paratha! Yes! This is totally worth it!


- Heat a large skillet or griddle. Gently place the rolled Paratha onto the hot griddle or pan. Spoon 1/2 teaspoon ghee over the top and spread it with the back of the spoon. Cook until the dough begins to bubble.
- Gently turn the Paratha over. I use a large off-set metal spatula. Once again spoon 1/2 teaspoon of the ghee over the top and spread it with the back of the spoon. Place the hot Paratha on a large plate and cover with a clean cloth. Repeat until all of the Pratha has been cooked.
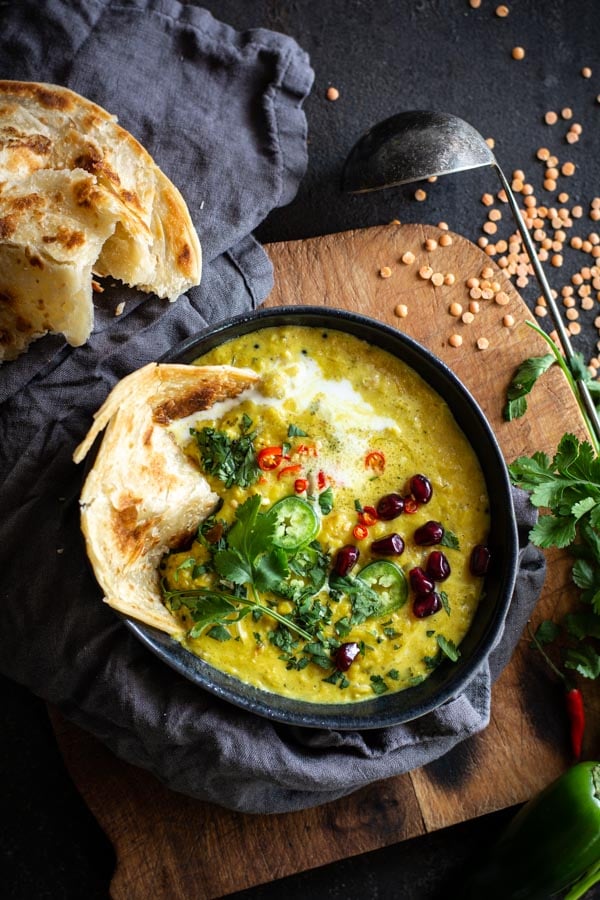
Just look at all the layers!


Definitely Serve With 30 Minute Coconut Lentils

Paratha Flatbread
Flakey Indian flat bread. Rolled thin and layered with nutty ghee.
Ingredients
Paratha dough
- 2 1/2 cups all-purpose flour (330 g)
- 1 tsp kosher salt (10 g)
- pinch sugar
- 1 tbsp oil
- 1 1/4 cups milk warm
Rolling out the Paratha
- 1/2 cup all-purpose flour
- 1/4 cup ghee or melted butter for brushing
Instructions
Making Pratha Dough
-
Add flour to a large mixing bowl. Stir in salt and sugar. Mix in oil. Using your hands or a stand mixer fitted with a dough hook. Slowly add just 1 cup of the warm milk. Knead the dough and add more milk as needed to make a very smooth and silky dough.
-
Form dough into a small ball and place in a bowl. Rub the top of the dough with a bit of oil. Press a plastic wrap to the top of the dough or cover with a damp cloth OR both! This dough needs to rest for a good 1-2 hours. Sometimes I make it the night before for a very long resting time.
Preparing the Paratha dough
-
Divide dough into 8 equal pieces. You can either eye it or weigh each ball of dough. Place each ball onto a parchment or lightly oiled baking sheet. Cover well with plastic wrap and let rest for 1 hour.
Rolling and shaping the layers
-
Take one of the balls of dough and dust with flour. Press flat with fingertips, then with a rolling pin or dowel roll into a 9-10 inch circle. Using your fingertips or a pastry brush, lightly coat with ghee. Sprinkle with flour (very important!). Beginning at one end begin to fold the large round like you would fold a fan. Press each fold down with fingertips. Once the round is completely folded begin to gently stretch the dough to make a long 12-14 inch rope of dough. Then roll up the dough like a jelly roll or cinnamon roll. Take the end piece and tuck it under the roll into the center hole. Gently press the dough to flatten slightly and return to the lined baking sheet. Repeat until all of the round dough balls have been layered and rolled. Cover with plastic wrap and let rest for another hour or so. Resting will allow the dough to relax making it easy to roll out thin.
Final rolling
-
Heat a large skillet or griddle until hot. Roll out each of the cinnamon rolls shaped pieces of dough into another 12-14 inch thin round. Place on the hot griddle. When bubbles begin to form and the bottom is just lightly browned, spoon about 1/2 tsp or more of ghee on top of the paratha. Use the back of a spoon to spread ghee over the top of the paratha. Gently flip the paratha over and spoon another 1/2 tsp of ghee over the top using the back of the spoon to spread. Lift gently onto a clean platter. Repeat until all of the 8 paratha's have been cooked.
Recipe Notes
- The secret to rolling out the Paratha is to allow the dough to rest between rollings. Just let it relax for 30-60 minutes. Then rolling out the dough will be smooth and easy.
- Some cooks like to press down or spank the bubbles that form while the paratha is cooking. I don't like spanking my paratha. I like to leave the air bubbles or spaces. I like the layers they create.
- Don't flip too many times or the paratha will become tough and chewy.
You May Also Like


Hello Janet
I just love your bLOg.I have made quite a few recipes; each one of them turned out to be absolutely delicious. I HAVE been a silent viewer for MANY YEARS now,but this One you nailed it. trust me on this because I come from the land of Parottas. Much love, God bless you.
Thank you so much!! You just made my day. I love this recipe for Paratha. I’m so happy you approve.
Janet they were just delicious and really not that difficult, but i have many years of experience but even a beginner if they follow your detailed instructions should do just fine. i could just Eat these things on their own. Thank you.
Hooray! Thank you so much for your comment. I’m thrilled you liked them. I think I ate 2 in a row right off the griddle the first time I made them.
oh thank you so much for finding what looks like a really good recipe for these delicious flat breads. your attention to detail takes any guesswork or uncertainty out. they look so flaky and delicious, can’t wait to try them.
Thank you so much. I’d love your feedback when you try them. They are so delicious. Make sure you eat the first one hot of the griddle. It’s payment for all of your hard work in making the Paratha. Freshly baked is crazy delicious.