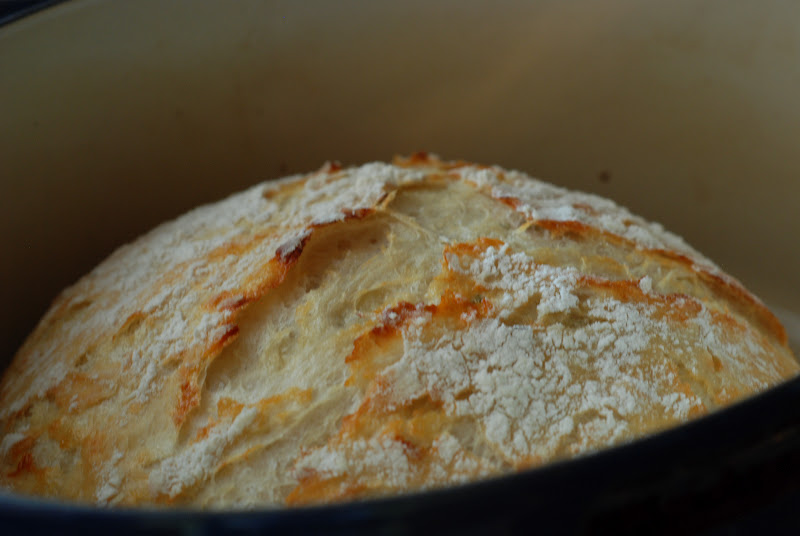
I realize that asking a question and trying to get or even FIND the answer is getting a bit ridiculous on the Crusty Bread page. This is by far the most popular post I have with over 1.2 MILLION page views. Who knew???? Oh my gosh. I knew the first time that I made this bread that I had to share it with the world. It’s so easy, yet so delicious and has SO many possibilities. Here is your turn to share, ask, comment, complain, or rave about your bread success.
Q: Do I have to use an enamel covered cast iron pan?
A: NO. You can use anything that can take the heat. The following have been used that I know of:
Clay pots with lids, Pizza stone with a bowl to cover the bread, insert from a crockpot, pyrex baking dish with a lid, stainless steel pot with a lid, baking dish covered with aluminum foil, old cast iron dutch oven.
Q: Do I have to use unbleached flour?
A: I always use unbleached flour. You can try bleached flour.
Q: Can I use self rising flour?
A: I don’t know. I would just stick to all-purpose.
Q: What size is my pan?
A: My smallest pan is 5.5 quart and the loaf barely fits.
Q: What type of yeast do I use?
A: I use SAF instant yeast. Any yeast should work.
Q: Why is my bread turning out flat?
A: I don’t know. You could try using less 1/4 cup less liquid. Or add a bit more flour. Make sure your dough appears to be dry when you first mix it. It will have more moisture during the rising time. There are many determining factors when bread making. Is your flour old? It does make a difference. Sometimes store brand, sale flour isn’t so great and should probably be left on the store shelf. Make sure your flour is fresh and a good quality brand and make sure your yeast is fresh and active.
Q: Can my dough sit out longer than 18 hours? Does it HAVE to be between 12-18 hours?
A: No. I have let some dough sit as long as 24 hours and the bread was beautiful.
Q: Have you tried Gluten-free?
A: No. I’m still waiting for someone to venture into the realm of Gluten-free. If you try it, let everyone know.
Q: Do I have to grease or oil the pan? Will my bread stick?
A: No you don’t need to grease the pan. I have never had the bread stick when using a cast iron pot. I haven’t tried anything else. The best way to be certain that the bread won’t stick is to form the loaf on a sheet of parchment paper and lift the bread into the pan using the sides of the parchment. Leave the paper in the pan. It’s won’t burn. When the bread has baked, just lift the sides of the parchment out of the pan. Voila!
Q: What temperature should my water be?
A: I just use cool water straight from the tap.
Q: Can I add sugar?
A: Sure.
My most recipe comment that will be so helpful to all of you. Thank you so much, Cory – Falling Star Lane:
Hi! Me again! I have some input – mostly add in ideas that have been huge hits! I found that using the parchment makes all the difference – to any loaf, it makes it easy to put in and take out and never burns.
Also, I reduced the baking time by 5 minutes for each step – more tender bred, and just as crispy crust.
I also add 1 T of raw sugar to each loaf – they rise higher for me.
As to add ins –
1. Turkey bacon and cheddar – huge hit
2. Rosemary, feta and sundried tomatoes – i found the ones in oil to bring a fantastic flavor
3. Jalapeno, and pepper jack – wow!!! used canned peppers – small can
4. Chocolate and cranberry
5. Rosemary and sharp cheddar
6. Chocolate chip and orange infused cranberries
7. Apricot, cranberry, and chocolate – I put too much in – so i had very dense bread – but it got eaten!!
8. Rosemary and Feta
9. Marinated artichokes and raw garlic – sliced 6 cloves very thinly – oh boy!
10. Orange infused cranberry, almond and orange zest
11. Lemon zest, feta, and rosemary
S0 far, none have been rejected, and I have become something of a bread baker to my friends – I bring a couple varieties to potluck, and they are very nicely received! I still need a 2nd dutch oven – days i bake 3-5 loaves it gets pretty hot around here! 🙂
I hope listing these is ok – i spent soooo long scrolling thru to see other peoples ideas, it seemed like this would be a good thing – found a few to try, and in fact making a pistachio and cranberry tonite, and an olive mozerella – new is good – but i get asked for the Jalapeno one most often!!
Thanks again for this blog post!
Most of the comments I receive are pretty fabulous like this comment. Keep them coming.

Baking at 6500
Feet second time added 1/4 c more flour and 1 tbsp sugar. After initial 30 minutes bread had risen beautifully and was nice and brown. Took of lid and baked for only 10 minutes more and bread was very dark maybe burned. My question is can I eliminate the last part with the lid removed completely?
Has anyone let the dough rise for over 24 hours? If so, have you experienced any problems? I have a batch ready that I couldn't get to baking today.
I just came upon this recipe so I'm a little late to the game but it looked so easy, I wanted to try it. I mixed it up yesterday afternoon and baked it this morning. Turned out just like I hoped it would. No add-ins this time around. I used my Rockcrok Dutch oven from Pampered Chef but covered it with foil as the lid is only oven-safe to 400 degrees. It worked great. Can't wait to cut into it at dinner time. Thanks for this great recipe.
Thanks so much for the recipe! Just took my first loaf from the oven, and it was PERFECT! Definitely trying your orange zest, craisin, and almond for Thanksgiving. I did not have a dutch oven, so just took the insert from my crockpot and covered it with my pizza stone and also used bleached flour. No trouble at all. 😉 Thanks again!
Made Gouda Caraway seed bread. MAN WAS IT GOOD. 😀
HI Marylou, Thank you for sharing your success story. I think I screamed when I took the lid off of my first bread. Isn't it amazing? It just works!
Hi Carrie, I so happy to hear you have had success with the bread. Bravo!
You have made me a bread baker!!!! I was searching for an easy bread recipe. With 5
children (3 teenagers!!), we go through a lot of bread. Living in Plaestine, sliced bread is expensive (even the "cheap" stuff!), and artisan bread costs about $5 a loaf! But I am no baker, so bread scared me. I was dubious about your recipe, so I made my husband stay in the kitchen for advice (he is the pieman and general family baker!). It turned out perfectly!! I have since made many loaves and tried the cranberry orange one, which was delicious! I always double the batch, and hope to try a few other flavor a. I have even gifted a loaf and it was well received. I plan to give more this
Christmas! Thank you for giving me a no -scary bread recipe!!
The first time I made this, i just about cried when i took the lid off the pot…so beautiful! And now with all the ideas for add-ins, I'm going to go crazy with this. Thank you all for your input.
I am addicted to this bread! Baked my first two loaves last night. One I used my jar of yeast (a little older and stored in the freezer) with bleached flour, and the other I used the packet of rapid rise yeast and the unbleached flour. They both taste delicious, but the rapid rise yeast definitely made the bread turn our better. The other loaf looks more like a focaccia bread. Presently am warming my oven to try the next two loaves that I prepped last night. Roasted some yummy garlic and will add that to one loaf. Have the gruyere cheese that I think I will use for the other loaf. Can't wait!
I store the bread by placing it cut side down on a cutting board and covering with a clean cloth. This only works for 24 hours of storage. If the bread hasn't been eaten by then, I place in a plastic bag, but the crust will go soft.
You do not need to use plastic wrap. Just cover with a damp cloth.
Hi, Do I have to use plastic wrap. I'm trying to reduce it's use in the house. Does it have to have an air tight seal or can I just cover it.
Thanks
Didn't have a lid for my cast iron pan, used aluminum foil and turned out wonderfully! thanks so much
Peggy from MN
Have made your bread multiple times and absolutely love it. The only problem I have is that the bottom crust is very tough. I've only made your basic recipe, so I'm not sure what I'm doing wrong. I'm making it in a cast iron Dutch oven. I just watched your video and saw that you use parchment paper. Would that take care of the tough crust issue? Thanks so much for the recipe and your help.
I found that using the smallest bowl I can fit ingredients in (and allow a rise0 makes a much higher rise and better baking results. I bought a big pyrex bowl to make the bread and found each time that the dough was much wetter and that the loaves did not rise (made side-by-side with my "old bowl" 3 times) maybe because more surface area? If your bread is not coming out the way you want maybe give a smaller bowl a try!
Caveat to the 'just use whatever comes out of the tap' regarding water – i've been successfully baking this bread weekly for a over a year while i lived in an apartment. I moved into a newly built home five months ago…one with a very deep well. I learned after two mostly unsuccessful loaves that I need to draw the water (from the non-softened-water tap in my kitchen) at least two hours prior to using…in order for the bread to rise properly:)
Has anyone made 2 smaller loafs out of the single recipe? Also, are you able to put 2 smaller loafs in the same dutch oven?
Crishelle: You can try this method: Place the pot in the oven when preheating the oven. Once the temp reaches 450 degrees place the dough into the heated pot. This should help.
I looove this recipe. Thanks so much. My only issue is the bottom gets too hard. Like, not even worth attempting to chew hard. Any tips on making the bottom edible? I live in high altitude, like 4600 ft. not sure if that makes any difference. Thx!
Thanks for the awesome recipe!!! How do you store this bread? I made a bunch at once and plan to eat it within a few days. I have it in plastic bags in the pantry now. Or should I do fridge? Or paper bags? Thanks!!
Ok, you know the saying that if something sounds to good to be true, it usually is. Well, that is not the case here. This bread recipe sounds to good to be true, but it is true!! Made it last night for 10 ladies in a Gourmet Supper Club. Everyone wanted the recipe!! Can't wait to make this for my family for Thanksgiving. Thanks for sharing the recipe and this blog. I learned so much from other comments and your answers to their questions. I especially love the pictures you posted during the entire process. That let me know what the dough is suppose to look like before baking. My dough was ready after 13 hours.
Try adding an additional 1/4 cup flour. That should help the dough to be less sticky and form a ball.
just baked this bread – it did not turn out like yours at all – it was flatter, it did have a nice crust but was soggy inside – any idea what went wrong?
Just tried this recipe and it came out awesome! No flavors yet but I'm already planning a few. My only problem was that the inside seemed just slightly under done – just a tiny bit sticky. Maybe cooking for a couple extra minutes before taking off the lid? Thanks for this great recipe!!! so tasty
Suzanne: You can make this dough up in the morning using 1 teaspoon yeast and allowing it to rise at least 6 hours. I have had some comments that a bit of sugar has been added to get the yeast rising more quickly and the rise time was around 2 hours. I hope this helps.
This recipe sounds easy & delicious! I was just wondering if there is a similar recipe that can be done in a day instead of overnight? Thanks!
I skipped the step of putting the dough out on a floured surface and just poured it right into the hot bowl; worked great and no floury loaf when it was done! I also made raisin bread once – very good!!
I just have to say that I absolutely love this bread, and so thankful that I found your site 2 years ago. Thank you thank you thank you!
I cannot tell you how much this recipe has changed my life. People actually think that I am a genius in the kitchen because of this oh so easy recipe. Thanks for making me look good! I love adding rosemary and a bit of garlic powder.
Comment from Kitty: I writing because though I have been making No Knead Bread for about 6 years, tonight I sat and read through your blog…so much interesting information, and great ideas for add ins! The recipe I used for a long time was the one from Cook's Illustrated and it included 3 oz. of a flavorful beer and 1 T of white vinegar as part of the liquid. I started up a batch of dough one evening before realizing I didn't have any beer so I just made up the difference with water and went on my way. I've never bothered with beer again.
I watched the video with Mark Bittman and Jim Lahey a couple of years ago and then tweaked my basic recipe again (I think you have to adapt the recipe a bit to suit your particular kitchen environment…I need to use a little less water) This is the basic recipe I use in my kitchen.
15 oz. Unbleached All Purpose Flour (approx. 3 cups)
¼ tsp SAF Instant Yeast
1 ½ tsp salt
10.5 oz water
½ tsp red wine vinegar
I put the dry ingredients in the bowl of my Kitchenaid (because I can!), give it a brief whirl, add in the liquid with motor running and scrap the soft dough into a container to rise. Perhaps this ratio of flour to water might work for people who are finding that 1 ½ cup (12 oz) water makes a dough that is too wet.
After dinner tonight I mixed up a batch of dough using your ratios and including the ½ tsp of vinegar and I just peeked under the towel…it has risen so much that it is almost touching the top of the container…in my house your method will be a 4 hour rise method! Every kitchen is different. Thanks for all the wonderful information, Janet, and for tirelessly reading and posting all of the wonderful ideas from you and your subscribers.
Have made the regular version, loved it, and am now experimenting – using dried fruit soaked in apple juice, added a little extra yeast in case the fruit is too heavy. Accidentally used too much liquid (water and apple juice), so it'll be interesting to see how it turns out. Divided it into one loaf, and eight individual servings made in a muffin tin. Since its supposed to be a sweet bread, I'm thinking about drizzling with a glaze. It's in the oven right now….
Hi JIm, I have not tried adding wheat germ. I would substitute some of the flour for the wheat germ. You may need to add an additional 1/4 cup flour because that wheat doesn't like to absorb the liquid. I hope this helps because I could use a new best friend.
I've made quite a few loaves of the no knead bread, and have only run into problems recently; adding seeds seems to be my undoing. Maybe someone could offer some advice?
I'm making wheat bread, 2 parts white flour to one part wheat. I would like to add (more or less) 3 Tbls flax seeds, 3 Tbls sunflower seeds, and a couple more different, or what I have laying around, seeds for the crust.
I would also like to sneak in some wheat germ, but have no idea how much.
Do I change flour/water/yeast/ measurements?
If anyone could help me, I'll be your friend for life.
Thanks,
jim
comment from a fellow baker: For those concerned about sticking…I plopped my dough from the bowl onto a piece of parchment paper. Put the parchment paper and dough into the heated cast iron pot and put the lid on. When it was time to remove it from the pot I lifted it out on the parchment paper and set it to cool on a rack. No burns, no extra flour on my counter to clean, and lovely bread to show for it!
Hi Monica, Yes you can use sourdough start. There are a couple of comments regarding sourdough among the thousands of comments. I'm thinking 1/2 cup starter was used.
hi I made this bread a few times now and it always come out great. I was wondering if I could use my sourdough starter instead of yeast not sure how much I would need or would it work? can you help please
I don't have a dutch oven. I just use my crock pot inserts and cover with tin foil. bake 2 at a time. Crusty Bread is awesome!!!
I've just made this for the 4th time adding cinnamon chips and this time I added a few sprinkles of ground cinnamon when you dump it out to sit the 2nd time. Ohhhh. Myyyy Goshhhh….I just ate half the load myself using Kerrygold butter and local honey on it. YOU ARE THE BEST- THANK YOU THANK YOU!!! If I could figure out how to post a photo on here I would!! Kim
Unknown: I'm sorry to hear about your bread troubles. It's possible that your bread is just raising too long. Sometimes after rising for a long period of time the dough begins to deflate leaving a lot of liquid. I have not had this happen even after rising for over 24 hours. But it does happen. Try letting it rise for about 8 hours. That might do the trick.
Hi Annon: I use dried cranberries and dried blueberries would work great as well. I'm not sure what problems you are having. If you could explain to me what your bread looks like, I'll try to troubleshoot.
I have tried to make bread so many times and to date really bad results and I am a good cook for most things. I am up for trying again because this bread looks so good. For the cranberry orange almond are you using fresh or frozen cranberries or dried? Also, could you use fruit like blueberries?
Q: Why is my bread turning out flat?
A: I don't know. You could try using less 1/4 cup less liquid. Or add a bit more flour. Make sure your dough appears to be dry when you first mix it. It will have more moisture during the rising time. There are many determining factors when bread making. Is your flour old? It does make a difference. Sometimes store brand, sale flour isn't so great and should probably be left on the store shelf. Make sure your flour is fresh and a good quality brand and make sure your yeast is fresh and active.
I wish I had seen this before trying it. I am pre-heating my pot now as the dough sits as a blob on a silicone baking sheet. Too wet. 1 1/2 cups of water is a lot for 3 cups of flour for the flour I usually use. I'm having trouble "shaping" the dough into anything at all. I am going to have to pour it off the silicone baking sheet into the pot as there will be no other way to get it in there. Oh well. Will let you know how it turns out.
Tip from a fellow baker: I found a baking vessel for my "No Knead Bread"
A brown clay planter from Home Depot, 14 x 4 x 5.
My loaf was superb.
I baked the straight, plain recipe in a 2 qt. stainless steel pot with a lid. Bread came out great, nice round boule. Thanks for the forum. People gave great ideas and tips.
Gill: I'm just sick about your knob. This is a first comment with problems of melting knobs. I know that the knobs will melt on a crockpot lid. I'm so sorry. I hope you find a solution.
This bread is more dense than normal bread. You can create larger holes in the bread by not working the dough too much when shaping and allowing for the dough to look like it's bubbling during the later end of rise time.
I am wondering if anyone has any suggestions for making my loaf of bread a little less dense. I would love it to be lighter.
HI EC: I'm not much help in slicing the bread. The first slice works great, but the second isn't as easy. I have been know to destroy a hot loaf. I think I need a new bread knife. Thanks for the comment.
Anon: I have never cooked the bread in a crockpot. I'm not sure that would work. I don't think the crockpot would get hot enough. You could put the crockpot insert into the oven and bake your bread. That works great.
Could I make this bread in the crock pot on high temp. setting?
I just made this bread, I followed the recipe exactly, however in the dough-making process I found the dough to be too dry. Using the pictures on your site to navigate the texture, I added a little more water, about 1/4 cup at a time, until it was the right consistency and texture. I also used a huge stainless steel mixing bowl for the entire process, and used tin foil for the oven. It came out perfect! THANK YOU FOR THIS RECIPE! I would also like to know if there is a good technique to slicing the bread as it's very crusty on the outside and my bread knives fall short of getting through. I had to turn the bread on the side to get into it! Much appreciation, ~EC
Thanks for this recipe. I have been making variations on it for a few months now and wanted to add one of my successes… Loaded Baked Potato! Delish comments from all who tried it.
I took out 1/4 cup of the flour and added that amount of potato flour (It gave a hint of flavor and nice crumb!)
As the add-ins I used: 1 Tablespoon of (dried) chive, 1 1/4 cups of crumbled sharp cheddar, 4 strips of crisp bacon (roughly chopped), and 2 tablespoons of sour cream (I took 2 T of water out and then swirled the sour cream into the water so it was well distributed throughout the loaf.
Rave reviews from all who tried it!
A magic eraser should clean your dutch oven. I have not tried it on mine yet b/c I have not used it enough, but I have used it on other enamel cookware. Hopefully this bread will turn out great (its baking now) and I will need to clean mine soon. 🙂
I tried this recipe, great hit with everyone! Gave one as a gift to a neighbour, now we do a swap once a week 🙂 She gives me eggs for her chicken, I make them bread 🙂 Your recipe is travelling around the globe, definitely getting popular here in the UK, but some of our friends living in Hungary have also started making the 🙂 Thanks!
Anon: Try baking the bread longer with the lid ON for about 5-7 minutes. Remove lid and continue to bake until golden. This should help. The bread dough is wetter than normal homemade or store bought bread.
I just made my 1st loaf and had a couple of questions. My bread turned out "doughy". I followed the bake time exactly. The crust was golden brown. Also, I had too much flour on top of the baked bread. When forming the bread, I think I rolled it in the flour too much! Please help me to get the "perfect" loaf like everyone else. I'm so very anxious! Thank you.
Pumpkin Pie Crusty Bread
2 cups unbleached flour
1 cup whole wheat flour
1 3/4 cups pumpkin puree
1/2 cup water
your preferred spices for 1 pumpkin pie
1/3 cup sugar
1/2 tsp salt
1/2 tsp yeast
3 tsp wheat gluten
Mix the water with the whole wheat and allow to sit for 30 minutes.
After 30 minutes, mix the remaining ingredients and follow the rest of the Crusty Bread instructions.
This bread will be very moist and the smell of pumpkin pie will be stronger than the actual taste, but oh, so yummy for something very different.
I have gotten much better results lowering the temp to 425 degrees (even for preheating the water filled pan) and prefer to place corn meal in the bottom of my pan prior to adding the bread.
In keeping with home made is best, I use pie pumpkins grown in my garden that have been cleaned, baked, pureed and frozen.
Thank you for the excellent blog! I have learned so much!
Jeanette
Can this recipe be made into rolls? And if so how long should I bake them?
Janie
Laura, in regards to adding meat and cheese to the bread: The cheese can stay out on the counter top no problem. I have not tried meats. The dough probably would raise sufficiently, if the dough was refrigerated. I have had comments stating that pepperoni had been used. Your choice. Personally, I would leave the meat out of my bread.
I discovered this recipe and immediately made two batches of it… it's awesome!
In regards to adding meats and cheeses to the bread, if those are added, should the dough rise in the fridge? Will the meat spoil or does it not matter because it's baked at 450 for 45 minutes?
Thank you!
-Laura
I discovered this recipe and immediately whipped up two batches, it's so good! I think I need to increase my baking time because the middle does seem a bit doughy, but that didn't stop my husband and me from eating two loaves in two days.
In regards to adding ingredients for flavoring, if you're adding a meat or cheese, should the dough rise in the fridge? Will the meat/cheese spoil? Or does it not matter because you're baking it at 450 for at least 45 minutes?
Thank you!
Just read through all hundred million comments! You are a popular lady, and for good reason! Okay, I tried GF! In fact, I've been making them and selling them at our Farmer's Market for the past 4 weeks. I sell out every time! They are beautiful, but not quite as round and smooth as yours. Can't wait to try leaving it on the parchment paper, what a gooey mess!
I have to increase the water by 50% so I use 2 1/4 C water. I have tried Pamela's Bread Mix and Better Batter Bread Mix, they get pretty close to the same results. The only other alteration that I've had to make is I throw it in my stand mixer and let it go on low for 5 to 10 minutes. When it's GOOD AND BLENDED, I add the extras! The one that I came up with that sells out fastest is the "No Thyme" loaf. It has parsley, sage, rosemary and …. oregano?
WaaLa! Thanks for making "That Gluten Free Lady" look like she knows what she's doin'!
Here is one GF recipe:
Just read through all hundred million comments! You are a popular lady, and for good reason! Okay, I tried GF! In fact, I've been making them and selling them at our Farmer's Market for the past 4 weeks. I sell out every time! They are beautiful, but not quite as round and smooth as yours. Can't wait to try leaving it on the parchment paper, what a gooey mess!
I have to increase the water by 50% so I use 2 1/4 C water. I have tried Pamela's Bread Mix and Better Batter Bread Mix, they get pretty close to the same results. The only other alteration that I've had to make is I throw it in my stand mixer and let it go on low for 5 to 10 minutes. When it's GOOD AND BLENDED, I add the extras! The one that I came up with that sells out fastest is the "No Thyme" loaf. It has parsley, sage, rosemary and …. oregano?
WaaLa! Thanks for making "That Gluten Free Lady" look like she knows what she's doin'!
There have been a few successful GF recipes posted in the comments. It's just finding them. I'll keep looking….
I have made countless loaves of this wonderful bread. My grandson, who adores this bread (he brings it to school as his snack), is gluten intollerant. I have made a loaf with gluten free flour and it is the consistency of a cake mix batter–nothing like my regular dough. I'm wondering if I should add more gluten free flour? HELP!!
WOW!! I am very fond of baking, and even followed a course in baking bread when I was a student. This is the first time I've ever had a fantastic crust like this, so I'm extremely grateful for this wonderful recipe. I just followed the recipe step by step and it turned out exactly like the picture, which almost never happens 😉 I see all kinds of possibilities: olives, cheeses, sundried tomatoes…. Thanks! Wish I could show you a picture of my beautiful bread!
Love love love making this bread. I am so not a chef in the kitchen but making this bread makes me feel like one. Going with that I am not a "chef" this May be a silly question. Would it be possible to do a sourdough bread with this recipe?? Thanks!
I added 1/2 cup broken walnuts and 1 tsp. cinnamon to the dry ingredients. I used 1/2 cup of raisins, but I put them in a pyrex cup with 1/4 cup of water and put them in the microwave for 1 minute to "plump" them up. Let them sit and cool before adding with the other liquid and IMPORTANT now only use 1 1/4 cup of water because you already have 1/4 cup of water with the raisins. (I did end up adding about 1 TBS more water though because my dough looked too dry.) Bread was great and raisins were very juicy and good! I also find that my bread is already pretty brown when the first 30 minutes of baking is done, so I don't bake this loaf the other 15 minutes. Not sure if my oven is just very hot, or if it is because the heating element for my oven is in the top instead of bottom. Don't know!
Sharon, I'm pretty sure someone has made this bread with beer. You could totally replace part of the liquid with beer. I have never baked with beer so…. But why not?
I wanted to share a flavor idea: Cranberry Chipotle Cheddar (from Whole Foods) and chives! CCCC, if you will.
Would love to make a beer bread?
I would like to add beer… has anyone done this?
LOVE this bread/
I moved from philadelphia to W.Va.2 years ago and very much missed the crusty bread/ rolls that are sold at almost every corner store.I tried this recipe yesterday and we devoured the entire loaf that evening. Needless to say I started 2 more loaves last night and baked them today for a neighbor and a dear friend.Cant wait to hear their comments on it. I will no longer have to dream of the idea of crusty bread any longer, (I will make my own) whenever i please. Thank you
You asked how to clean your pots! Barkeepers Friend! The most amazing, non abrasive, miracle cleanser! Depending on water temp and how much BF you use, it will clean any and everything. It whitens whites in the laundry to. I believe they have a web page. Just checked and they do have a web page at http://www.barkeepersfriend.com Buy the dry cleanser, not the soft cleanser. Hope this helps you. I have NO doubt it will.