Just released Jan. 1, 2015 and instructional video for the Crusty Bread recipe:
Click on the link here: Crusty Bread Video
Let me clarify that the recipe originated with Jim Lahey of Sullivan Street Bakery. Please do not send me a comment stating that I make it appear to be my brainchild. I’m not. I’m just helping everyone through the process.
I have received THOUSANDS of questions and responses to this recipe. I have received helpful hints on how to clean my pots, which are sparkling at the moment. Thank you very much. Many of you have sent in your fabulous creations. From classy fig, walnut, and bleu cheese to less classy pepperoni and sausage.
I have had more fun reading about how successful bread baking experiences. I have scratched my head over questions that completely puzzle me. Oh, how I wish I could just pop into a few kitchens to help solve a dilemma. I have answered the same stickin’ questions OVER and OVER again. I have literally answered some questions HUNDREDS of times! I have to admit I don’t mind. Keep them coming. I love hearing from you.
I would like to go over this simple recipe once again.
My starting advice:
- Be chill. It’s only yeast. It won’t hurt you. Just follow the instructions the best you can.
- Play in your kitchen and play with your food. Especially this bread. CREATE!
- Take a deep breath. You can do this.
- The recipe is VERY forgiving.

Simple. Don’t complicate the ingredients.
You will need:
3 cups of all-purpose flour
1/2 teaspoon instant or rapid-rise yeast


IF you do not have instant or Rapid-rise and you only have regular active dry yeast, THEN proof the yeast before you use it by mixing the yeast with 1/4 cup warm water. Let it set for 5 minutes then mix the yeast in with the water. BAM! It will work.


I’m using a dough whisk also found at King Arthur flour. (they are not paying me to promote their products. I just wanted to give you a source for purchasing if you want one more kitchen toy)
You can use a wooden spoon, rubber spatula, whatever you have to mix the dough.


Cover the bowl with plastic wrap.
Let the dough sit for 12-18 hours.
If the dough only sits for 11 hours, it’s ok. Don’t sweat the fact that it needs another hour. If the dough sits for 24 hours, it’s ok. Don’t stress. It will all be good in the end.


Once the oven has heated to 450 put your pots with the lids into the oven to preheat for 30 minutes
VERY IMPORTANT NOTE:
You do not HAVE to have a enamel coated cast iron pot. They are awesome and I can’t live without mine, but it’s not completely necessary.
Here is a list of what many people have used with great success:
Old camping dutch oven
A crockpot insert. If the knob on the lid is plastic, it must be removed or it will melt)
The idea is to create a steam oven inside the pan. The steam is what produces a nice crisp crust. What ever the container is that you use, just make sure it can take temperatures up to 450 degrees F. I have some Emile Henry covered dishes, but they don’t like an oven hotter than 400 degrees. They will crackle like crazy if you put them in a 450 degree oven (experience).
Oh! Your pot will need to be hold at least 3 quarts. 5 – 6 quarts is ideal, but the smaller will work, just be careful not to burn yourself putting the bread in or removing it. I received at least 500 questions about the size of my pots. I hope I answered that question well enough.
MEANWHILE…

Heavily flour a surface. I’m using a pastry cloth, which is nothing more than canvas with the edges surged. You can use your counter top, a bread board, whatever works. Just flour the daylights out of it.
If you have a dough scraper, use it.

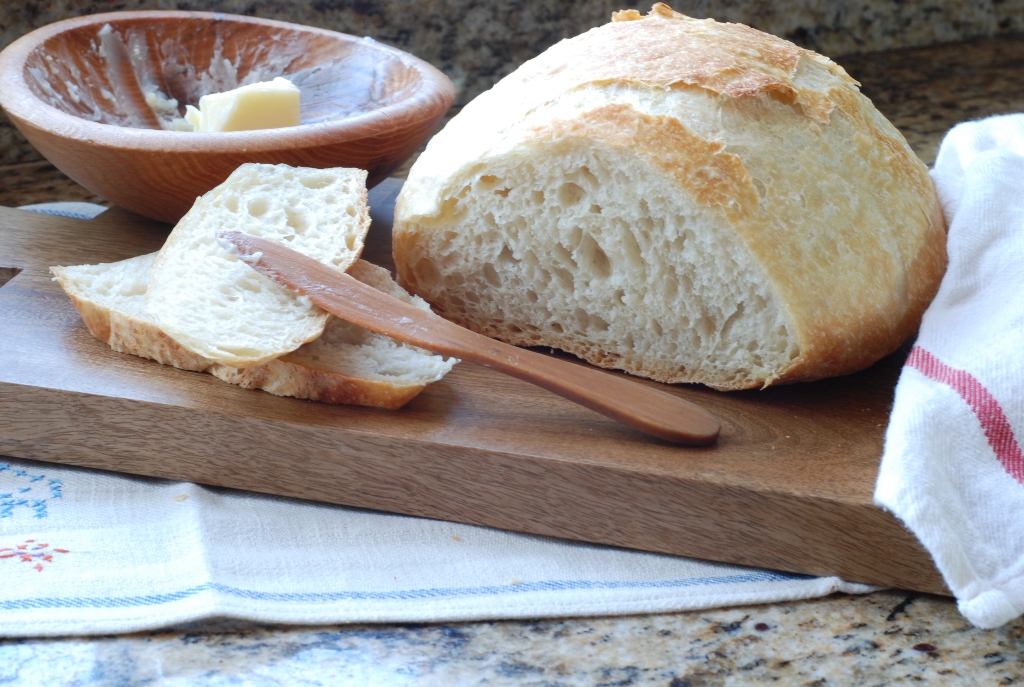
Gently form the sticky mass of dough into a round ball. Look closely at the dough and you will be able to see a large air bubble in the lower right side of the dough. That’s good. I don’t want to knead out the large air holes. We are making artisan bread and want many large air holes.


Place the lid on the pot. Remember we are creating a steam oven. If you are using aluminum foil, crimp it around the edges as tight as you can. Please don’t burn yourself.
Bake covered for 30 minutes.
I know what you are thinking. If I don’t use parchment paper, do I need to grease or oil the pan. NO! NO! I have never had the bread stick to the enamel covered pot. Oil or grease in this hot pot will smoke like crazy. If you are worried about the dough sticking, invest in parchment paper.

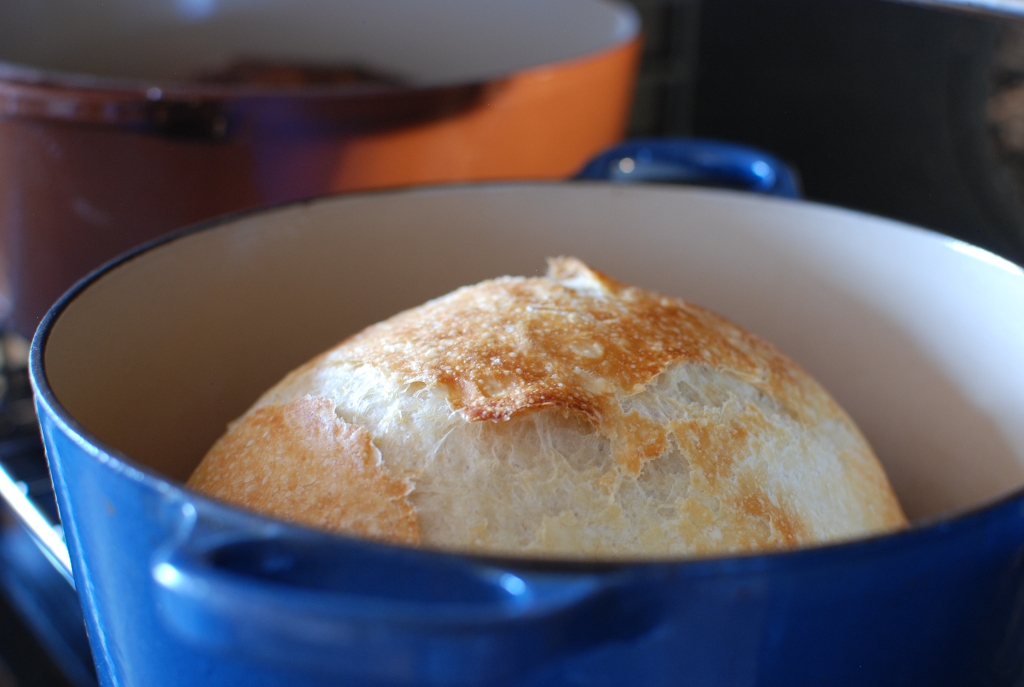
Ta da! Isn’t that just amazing. It’s so pretty I get all giddy inside.
Bake an additional 15 minutes with the lid OFF.
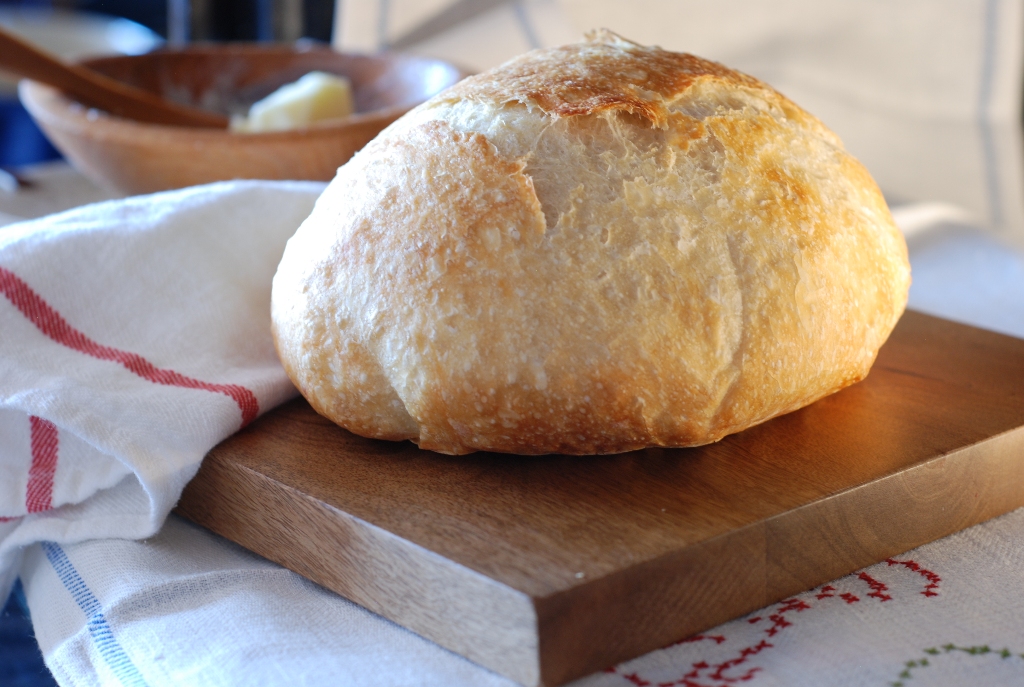
After 15 minutes, remove the pot from the oven and place the bread on a cooling rack. Chances are you are going to be cutting into the bread immediately. I did. Why not. It’s amazing.
If you have the will power to let it sit until it’s cool, it will be much easier to cut. Who cares? The bread is amazing right out of the oven.
You did it. Pat yourself on the back. You are one amazing bread baker.
Crusty Bread
Learn to make this crusty artisan bread, and then you can add any flavors and mixins your heart desires.
Ingredients
- 3 cups unbleached all purpose flour
- 1 3/4 teaspoons salt
- 1/2 teaspoon yeast
- 1 1/2 cups water
Instructions
-
In a large mixing bowl, whisk together flour, salt and yeast. Add water and mix until a shaggy mixture forms. Cover bowl with plastic wrap and set aside for 12 - 18 hours. Overnight works great.
-
Heat oven to 450 degrees. When the oven has reached 450 degrees place a cast iron pot with a lid in the oven and heat the pot for 30 minutes. Meanwhile, pour dough onto a heavily floured surface and shape into a ball. Cover with plastic wrap and let set while the pot is heating.
-
Remove hot pot from the oven and drop in the dough. Cover and return to oven for 30 minutes. After 30 minutes remove the lid and bake an additional 15 minutes. Remove bread from oven and place on a cooling rack to cool.
Hi it may seem dumb but do you leave it out on counter all those hours or in fridge? also can i add little sugar ? thanks
Yes, I leave the bread dough out on the counter overnight. Adding sugar will feed the yeast and cause the dough to rise quicker. It will, also, cause the bread to brown more. Just be aware that an overnight rise time may be too long with sugar added to the dough.
I know this post haas been around for awhile, or if you even read the comments anymore, but I just had to add that this recipe is beyond amazing! I’ve made countless loaves over the years, with every possible kind of flour.I’ve even used blends of whatever I had on hand and needed to use up. I’ve made it plain, added onion, garic, olives, fruit, nuts and seeds. I’ve let it sit for almost two days and also baked after just a few hours. I have never, ever had a bad loaf. This is hands-down, my favorite recipe of all time. Thank you so much for posting, and keeping it up!
Thank you so much, Izzi. It’s a great recipe and very forgiving. I love your comment!
I could have written a review just like Izzy’s. I’m not allowed to show up at certain GATHERINGS unless i have “my” crusty bread with me! I have used this recipe probably a HUNDRED times, and it only turned out less-than-perfect once. The furnace went out during the dead of winter, so the dough didn’t rise (too cold!) I baked it anyway because i wanted to warm the house. It was still quite yummy! Thank you for sharing this simple and delicious treasure of a recipe.
Thank you so much!! I’m thrilled you love the bread. It’s a keeper!
I just made this. I used bread flour but my dough was really dry & not sticky like it shows in the picture picture. I’m waiting to put it in the over now & see how it c omes out. But do you know what would cause that? It’s been rising 16 + hours. ANy help would be appreciated.
Hi Liz, It could be possible that your flour may have been packed into the measuring cup a bit. I stir my flour then lightly spoon into the measuring cup. Perhaps the flour amount was a bit off. I guess that’s why weighing instead of measuring is a more precise method for recipes.
450 gr flour
10 gr salt (kosher)
3 gr rapid rise yeast
315 gr water
It came out good. NOt many air bubbles though. I think I’ll retry it & weigh my ingredients this time. Will also use regular flour just to see if there’s a difference. Really easy though. Thanks for the info.
Thanks for commenting. It’s a pretty forgiving recipe. I use regular flour all the time with great success.
Love this rec recipe!! If i were making a roasted garlic cheddar about how much cheese and garlic shoukd i Add?
I like to add a cup of 1/2-inch cubed cheddar to the flour/yeast mixture before adding the water. I’ve never tried adding roasted garlic. What a brilliant combination. Do you want to add the roasted garlic whole or chop it up? Add the roasted garlic with the cheddar and toss it with the flour mixture before adding water. Please let me know how your bread turns out. Sounds amazing!
Great bread , great recipe, very VERSATILE, if you’re in doubt try it, all it costs is three cups of FLOUR and some time…..
You’re so right. Just three cups of flour!
MY LOAF WAS NOT QUITE AS PRETTY BUT i HAVE TO SAY IT LOOKED PRETTY TO ME. iT WAS LITERALLY THE FIRST LOAF OF BREAD i HAVE EVER MADE. mY FAMILY AND i LOVED IT. i USED UNBLEACHED AND SUBSTITUTED HIMALAYAN SALT FOR SEA SALT AND i USED THE CROCK FROM THE CROCKPOT AS MY DUTCH OVEN NEEDS TO BE REASONED- THIS WORKED PERFECTLY IN ALL RESPECTS AND i AM GOING TO REPEAT THIS RECIPE OFTEN. aS A GUY- WHEN SOMETHING “AIN’T BROKE” i DON’T FIX IT AND THIS RECIPE DOESN’T NEED THE SLIGHTEST FIX! dELICIOUS!
Bravo! I love that you used your crockpot insert! Keep it up. Happy baking.
Hello,
Any tips for gluten free flour mIXes? Baking time adjustments? Thanks!
I have received comments that this recipe does work well with GF flour without adjustments. I would suggest you refer to King Arthur flour for their instructions. Here is the link: https://www.kingarthurflour.com/recipes/no-knead-crusty-white-bread-recipe
King Arthur GF flour works as well as Bob’s Redmill GF Blend
Hi, I love This bread so much! in the event that My family doesN’t consume the entire loaf 😉 what is the best way to store the leftover? Thank you!
I turn the loaf cut side down on a cutting board, then cover the loaf with a dishtowel. This will keep well overnight. The crust will go soft if placed in a plastic bag but can be re-crisped by putting in a 300℉ oven for 5-7 minutes.
This recipe is a classic from the new yor times website from years ago. We have been making it fOrever.
Yep! It’s a keeper.
Hi 1st time and it turned out great.
I used a terracotta pot with a lid at 200° uk temp.
30min lid on and 15min lid off.
It did seem too sloppy but I just went with it and It came out crispy on the outside and light and fluffy inside.
Just wondering though at which stage is it best to add other ingredients? Things like cheese and jalapenos?
Also which stage is best for adding dry spices and herbs? Thank you x
Hi Tina, I’m so thrilled your bed turned out great. You can add any additions, like cheese, jalapenos, herbs, and spices before adding the water to the flour mixture. Simply mix the flour, yeast, and salt then add any ingredients you like. Stir to coat with flour, then add the water. Let rise and bake and usual.
Thank you for your quick reply.
I’ve just made some with cheddar and JALAPENOs……cant wait to bake it in the morning!
How would you say is best to store the bread ?
I stored mine cut side down in the terracotta pot that I originally cooked it in but found that it lost the crisp on the outside.
Maby because the pot isnt breathable? Xx
Hi, is it possible to divide the dough and bake two loaves? my pot is small… Shall i in this case reduce the time?
Absolutely! Just bake for less time. I’d remove the lid after about 20 minutes of baking and see how it looks. If it’s beginning to brown, remove the lid and bake until golden. 5-10 minutes…about.
Thank you! I’ve done it and it turned out great!
Awesome!
I love this bread, but i have a terrible time SlIcing it because thE top and bottom crests are so hard. Once i finally break through the top crusT, the middle is fine, and then i have to “saw” the bottom crust, too. It is very moist so i donT think im over cooking it. Suggestions?
Hi Carol, A gummy interior can be a problem for sure. Try adding 1/4 cup MORE flour and bake 5 minutes longer with the lid on and cooling completely before slicing. This might help. Sometimes the crust can be hard to get through. Try putting your pot in the oven when you first turn it on. As soon as the oven temp reaches 450 drop the dough in at that point and bake according to directions. To clarify don’t preheat oven to 450 and THEN put the pot in the oven for 30 minutes to preheat. Let me know if this doesn’t work.
Hi! Someone in my Myspace group shared this site with uus so I came to
check it out. I’m definiteely loving the information.
I’m bookmarking and will be tweeting this to my followers!
Superb blog and amazing style and design.
will my roll be soft, tender like ordinary bread? i don’t want to have crust on my roll,
and if i use bread flour, do i need to add more water? i’m afraid the consistency of the dough will be differrnt?
thanks for the conversion anyway
if i make it into roll, will it be soft, tender, light ordinary knead bread/roll/buns? or it will havr crust outside of the bread?
Thanks for thr conversion anyway
Can i make this into dinner roll and bake it in 8″ pan?
and would you please tell me the measurement in gram? every site has different weigh conversion so i’m a bit lost. please help me thanks
try leaving the top on the whole time, or may just a minu or two uncovered at the end., that might help, and after it cools, store it in an air tight container, or plastic bag., good luck.👍🏽😎
This has become a traditional part of all family holiday meals. I also take it as hostess gifts. I usually do a savory bread with nuts, parmesan lemon zest and chopped fresh rosemary. Today I added chopped roasted garlic, CHOPPED roasted walnuts, pepitas, grated parmesan, a bit of lemon juice. I will sprinkle the top with flour and some pepita before baking.
I have even had people order loaves from me at work! I think I will try adding kalamata olives next time :).
Thanks again for sharing this fabulous recipe, people are always so impressed!!
Hi Kitty, I love your flavor combinations. Wow no wonder you have special orders. I’m compiling different recipe combinations for this bread. Would you be ok if I use your savory combination in my collection? Kalamata olives are fabulous in the bread. Keep on baking. xoxo Janet
i am a long time bread maker, i have made many different kinds, from my grand mother, mother and mother in law. this recipe which i have used now for many, many bakingS, is by far the easiest bread to make and never fails to turn out perfectly. the crust is outstanding and the crumb is perfect.
i recommend everyone try this, you will never ever buy a loaf of bread for $3.00 again, it is so simple and SO IN EXPENSIVE AND THE NICE PART IS does not mess up the entire kitchen with flour dust and keeps well in the freezer. i have shared this with many people and they think it is OUTSTANDING.
Yep, it’s a keeper. Thank you so much for your positive feed back.
Agreed!!
I followed the recipe directions spot on. I did this three times. When the 18 hours is up, I can literally pour my dough out of the bowl. Changed yeast, changed flour. I couldn’t form this into a ball if I was Mandrake.
Try adding 1/4 cup more flour. If the dough is still too wet, add an additional 2 tbls. But the 1/4 cup should do the trick.
Thanx Janet, I’ll try it.
i love this recipe! I made it twice last year around christmas time and now twice in the past month and we love it. It’a So nice and crusty but has always seemed a luttle doughy in the center and i’m Just wondering if others have noticed this or if i am doing something wrong. I think my oven is a little hotter than it should be so perhaps i should bake it at a lower temp for a longer time. Also, does your parchment paper get relly brown and burnt looking? Any advice would be appreciated and thank you so much for the recipe and the video.
Hi Mary Jane, Try baking the bread longer with the lid ON. I think this helps a lot. You could, also, try adding 2 tablespoons more flour, lowering your oven temp by 25F degrees and baking a little longer with the lid on. I Think this helps.
Thank you soooo much for this recipe! IT’S so easy that when i made it the other day, it came out perfectly even though I’ve never attempted to make bread before in my life. I wanted to make it more of a herb crusted loaf, so I mixed some olive oil with herbs, brushed it on the loaf, and sprinkled some coarse salt on top. It was a huge hit with my neighbours and husband, they absolutely loved it. This is now my go-to bread recipe! I currently have 3 more batches rising in my kitchen to bake TOMORROW ?
Thank you so much for sending me your success story and another great idea for heab crusted loaf. Welcome to the obsession.
in your pictures there are two loaves in two pots but in your instructions it doesn’t say to divide the dough in two and put in two pots. is this something you didn’t mention or did you double the recipe.
*I’m making it for the first time
Sorry for the confusion. I was actually baking a loaf of cheddar bread at the same time I took the photo. I wanted to bake them together so I didn’t have to keep my oven on for another baking. The recipe makes just one loaf. However, you can easily double the dough and split it in half for two loaves.
Thank you. I figured it out though once the dough ball was ready to put in the oven.
Btw, I really loved this bread. It turned out perfect- golden and crispy on the outside, soft on the inside. SO good! Will def be making this bread again. And again. And again…
This recipe is definitely a keeper.
Hello, I used for my no-knead-bread from Tupperware UltraPro dishes. They have a lid so they bake very well.
Love this bread!
I make this bread regularly and this works for me . Let the dough mix self knead for 12hrs+, Flour a board gently flour it a fold it up or mix it gently then put it in a bread tin and leave to rise 1 – 2 hours.. preheat casserole tin for 20 minutes oven flat out . Put bread tin in casserole tin and put the lid on. Take lid off after 40 minutes and further cook for 15 minutes . this works for me a shapes your bread . Thanks BILL / UK
Thank you, thank you, thank you☺️ This is the most amazing bread that has turned out fabulously each time of baking. It's a huge hit with family and will be my go to recipe in future. Grateful for you sharing this ??
Thank you so much for this amazing bread recipe����It's the best artisan bread I've ever had and it's increadible to be able to cook it at home. Again thank you.
I am putting my loaves into the oven momentarily, Merry Christmas everyone!! This bread is a standard fare at all of my family holiday meals now, so good everyone goes nuts over it!! I have found beautiful cast iron dutch ovens at thrift stores for as little as $8-$10. TJ Maxx has them for half of regular retail if you want new. You can't miss with this bread, it's AMAZING!! Thank you!!
I made this a few months ago, and forgot to come back to comment.
Loved this bread. Lovely and simple!
I did sprinkle the cast iron pot with polenta instead of lining it though. Worked a treat and little to no waste as most of it just stuck to the bread 😀
Excellent recipe. I used regular dry yeast and 4 different kinds of flour + some bran. Thank you so much for taking your time sharing the recipe with us. Love your writing style too!
The dough came out smelling delicious, so I know the yeast was working. My problem is trying to work with the dough after it was on the heavily floured surface. No matter how much I floured the surface and my hands, I could not get it to form into a ball. My natural instinct was to start kneading it was the bench scraper, but I can't do it with this recipe. How did everybody else manage to make this work?
Also, adding feta cheese (kinda crushed up with your hands) and cut up sun dried tomatoes, a little bit of oregano and about 3 tbsp olive oil, will give this (perfect as is!) recipe,a great tasting twist!
BY FAR, THE MOST PERFECT BREAD RECIPE!!! The things you can add to it are endkess. My favorite is: Add a couple of handfuls of brown, lightly packed sugar, 1 tbs (or a bit more!) cinammon, 1/2 tbsp melted butter . WAfter the first rise, when you pour it in the floured surface, add in a handful of raisins and simply fold them in. Follow the rest of the recipe as is. You have just created a super delicious raisin bread, which is quite popular for breakfast here in Greece!!!
I have made this recipe so many times in a covered iron dutch oven. It comes out perfectly every time. I don't even have to use parchment paper. It never sticks. Great recipe!
Yay, I have just baked this bread (in my slow cooker insert with tin foil) and it has turned out perfectly. I will be experimenting next time with different flour/herbs etc. Also a perfect bread for my Mum who has trouble with her hands. Kneading is too much for her. I will pass this recipe on. Thank you all the way from New Zealand!
This bread is amazing! It rivals any great, crusty French bread that I've eaten in France. Sometimes I add Rosemary or oil cured chopped black olives to it. Today I'm going to add garlic. It is so delicious! It's best right out of the oven or toasted in my opinion.
Dear Anon: I'm sorry you are having problems with sticky dough. Try adding 1/4-1/2 cup more flour to the recipe. I find this helps solve most sticky dough problems. Proceed as per recipe. You can do this!
It never seems to work. Dough too sticky, even when I use a lot less water. It does not hold a ball shape, and then bakes to a hard, flat, airless lump. It's certianly NOT foolproof – with baking, there are too many variables to claim this.
I really liked the run-down and tone of this recipe… and gave it a try over the weekend with very favorable results… I was excited to finally be able to make some homemade bread that actually worked! Only difference in my approach is that I used a cast-iron dutch over which I think may have cooked the bread faster as by the time it came to remove the lid for the final 15 mins, it looked as if the bread was done already based on the pics you provide in your recipe. Either way, this is a super easy recipe with great results!!
My bread is about to go to oven now. 🙂 I am wondering if you tried to let bread to rise for more then 30 mins and if it made a difference? Thank you for wonderful recipes 🙂
I made this bread and my family was competing for the last piece of the loaf. Thank you for such a beautiful recipe!!
If the dough seems too wet you can always add 1/4 cup more flour at the beginning. The bread will be easier to shape and will still bake beautifully.
I've made this 4-5 times, it's always wetter than yours…no, I do not bloom my yeast so no, I don't add extra water…BUT, even though it's wetter, it turns out amazingly delicious. I use cast aluminum pots, and I do use the parchment paper, it's way too wet to pick up with bare hands. Oh, and I don't flour it, I use cornmeal.
This is the best bread I've made. I added fresh jalapeño and sharp cheddar and it was perfect and gone in 60 seconds! Tonight trying roasted garlic. I was worried at first as the dough was so sticky, but patience and flour were a virtue. Thanks for sharing this recipe. I'm never going to pay 6 plus dollars a loaf for artisan bread again!
I've been making this bread for about a year now and absolutely loving it! But lately, when making the dough is very chunky. It has little chunks of hard dough in it. It normally tastes fine, but doesn't look appealing because I can't get the little chunks out. The dough isn't as bubbly/sticky as it is in the tutorial, anymore. Does anyone know why that might be? Thanks!
Mom2ec Thank you for your fun comment. I'm so happy to hear your son is baking bread. My son became a college room mate favorite because he baked fresh bread daily for his apartment.
Thank you for this bread recipe. I think I have got the hang of it now! My son loves it so much, he wants me to teach him how to make it so he can have homemade bread while away at college! We now make a double loaf, and it is usually gone within 24 hours! This makes the best toast as well (if you have the patience to wait for it)! I must say this is the closest bread to my grandmother's homemade bread I have had since she has passed away. No one seems to be able to duplicate it. I am so happy with this recipe. Thanks so much!
Hi Warren, Yes you can bake at 225 celsius. Just bake an additional 5 minutes with the lid on before you take the it off.
Hi Janet I have never tried a no knead bread recipe before and I am about to give yours a whirl. However the highest setting on my oven is 225 degrees celsius. Should I alter your covered and uncovered baking times?
Looking forward to the results.
Thanks,
Wazza
Hi Janet, You should not have to sift your bread before measuring. Try adding 1/4 – 1/2 cup more flour. That should do the trick,
I've read through a lot of the comments and questions trying to find an answer to my problem. Like many others, my dough was flat and almost runny coming out of the bowl. It never did ball up. I sifted my flour before measuring it. Was that my problem? Too much water and not enough flour? I baked it, but the loaf was flat and doughy and really moist in the middle.