Just released Jan. 1, 2015 and instructional video for the Crusty Bread recipe:
Click on the link here: Crusty Bread Video
Let me clarify that the recipe originated with Jim Lahey of Sullivan Street Bakery. Please do not send me a comment stating that I make it appear to be my brainchild. I’m not. I’m just helping everyone through the process.
I have received THOUSANDS of questions and responses to this recipe. I have received helpful hints on how to clean my pots, which are sparkling at the moment. Thank you very much. Many of you have sent in your fabulous creations. From classy fig, walnut, and bleu cheese to less classy pepperoni and sausage.
I have had more fun reading about how successful bread baking experiences. I have scratched my head over questions that completely puzzle me. Oh, how I wish I could just pop into a few kitchens to help solve a dilemma. I have answered the same stickin’ questions OVER and OVER again. I have literally answered some questions HUNDREDS of times! I have to admit I don’t mind. Keep them coming. I love hearing from you.
I would like to go over this simple recipe once again.
My starting advice:
- Be chill. It’s only yeast. It won’t hurt you. Just follow the instructions the best you can.
- Play in your kitchen and play with your food. Especially this bread. CREATE!
- Take a deep breath. You can do this.
- The recipe is VERY forgiving.

Simple. Don’t complicate the ingredients.
You will need:
3 cups of all-purpose flour
1/2 teaspoon instant or rapid-rise yeast


IF you do not have instant or Rapid-rise and you only have regular active dry yeast, THEN proof the yeast before you use it by mixing the yeast with 1/4 cup warm water. Let it set for 5 minutes then mix the yeast in with the water. BAM! It will work.


I’m using a dough whisk also found at King Arthur flour. (they are not paying me to promote their products. I just wanted to give you a source for purchasing if you want one more kitchen toy)
You can use a wooden spoon, rubber spatula, whatever you have to mix the dough.


Cover the bowl with plastic wrap.
Let the dough sit for 12-18 hours.
If the dough only sits for 11 hours, it’s ok. Don’t sweat the fact that it needs another hour. If the dough sits for 24 hours, it’s ok. Don’t stress. It will all be good in the end.


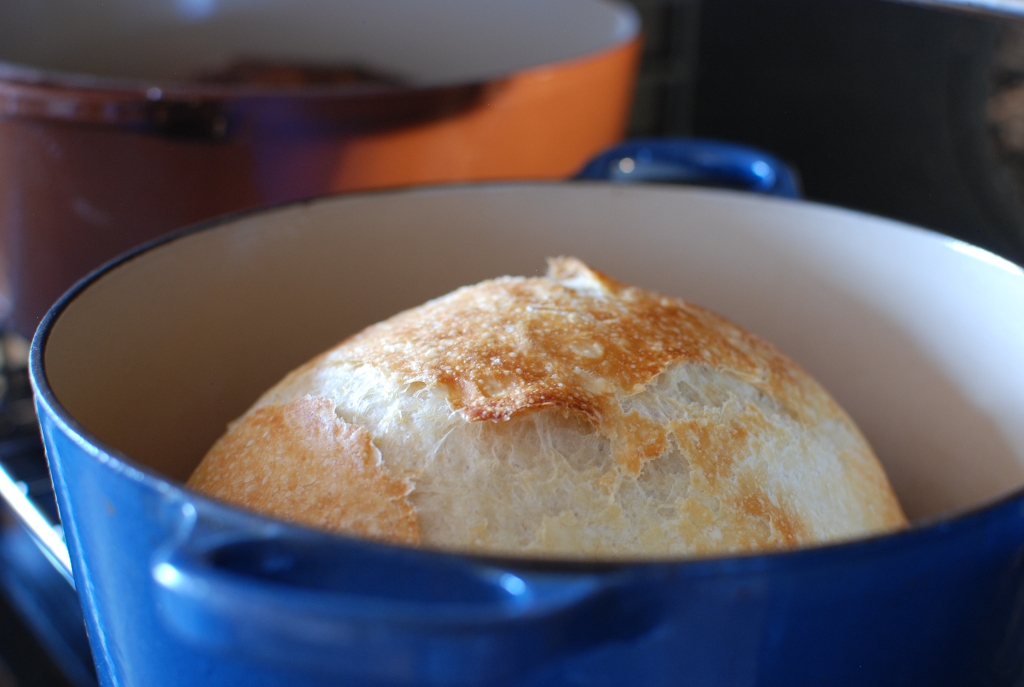
Once the oven has heated to 450 put your pots with the lids into the oven to preheat for 30 minutes
VERY IMPORTANT NOTE:
You do not HAVE to have a enamel coated cast iron pot. They are awesome and I can’t live without mine, but it’s not completely necessary.
Here is a list of what many people have used with great success:
Old camping dutch oven
A crockpot insert. If the knob on the lid is plastic, it must be removed or it will melt)
The idea is to create a steam oven inside the pan. The steam is what produces a nice crisp crust. What ever the container is that you use, just make sure it can take temperatures up to 450 degrees F. I have some Emile Henry covered dishes, but they don’t like an oven hotter than 400 degrees. They will crackle like crazy if you put them in a 450 degree oven (experience).
Oh! Your pot will need to be hold at least 3 quarts. 5 – 6 quarts is ideal, but the smaller will work, just be careful not to burn yourself putting the bread in or removing it. I received at least 500 questions about the size of my pots. I hope I answered that question well enough.
MEANWHILE…

Heavily flour a surface. I’m using a pastry cloth, which is nothing more than canvas with the edges surged. You can use your counter top, a bread board, whatever works. Just flour the daylights out of it.
If you have a dough scraper, use it.

Gently form the sticky mass of dough into a round ball. Look closely at the dough and you will be able to see a large air bubble in the lower right side of the dough. That’s good. I don’t want to knead out the large air holes. We are making artisan bread and want many large air holes.


Place the lid on the pot. Remember we are creating a steam oven. If you are using aluminum foil, crimp it around the edges as tight as you can. Please don’t burn yourself.
Bake covered for 30 minutes.
I know what you are thinking. If I don’t use parchment paper, do I need to grease or oil the pan. NO! NO! I have never had the bread stick to the enamel covered pot. Oil or grease in this hot pot will smoke like crazy. If you are worried about the dough sticking, invest in parchment paper.

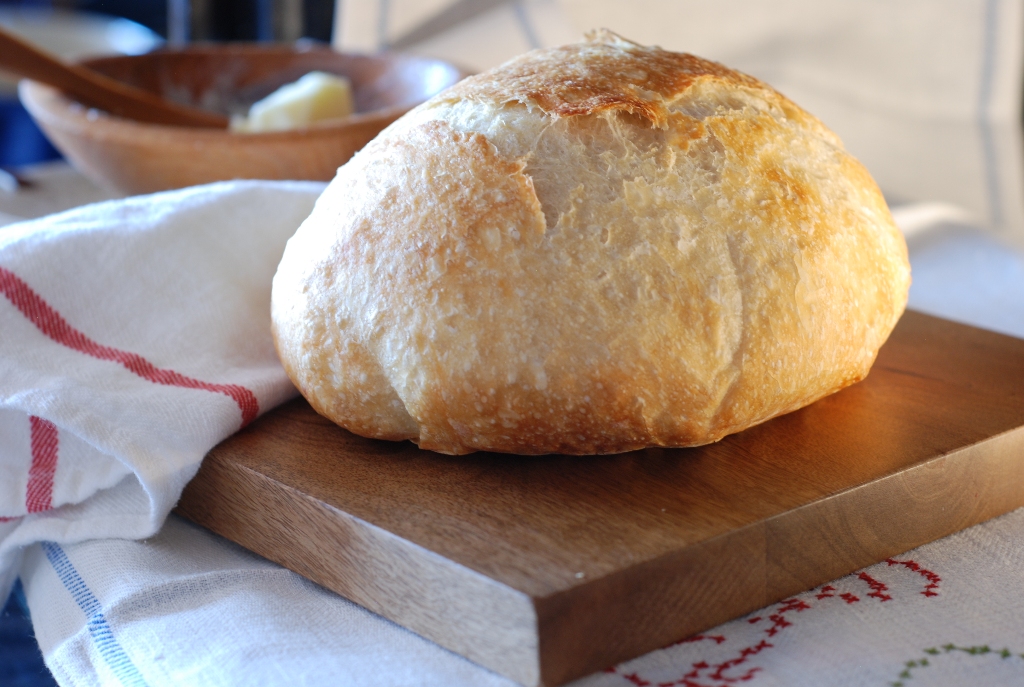
Ta da! Isn’t that just amazing. It’s so pretty I get all giddy inside.
Bake an additional 15 minutes with the lid OFF.
After 15 minutes, remove the pot from the oven and place the bread on a cooling rack. Chances are you are going to be cutting into the bread immediately. I did. Why not. It’s amazing.
If you have the will power to let it sit until it’s cool, it will be much easier to cut. Who cares? The bread is amazing right out of the oven.
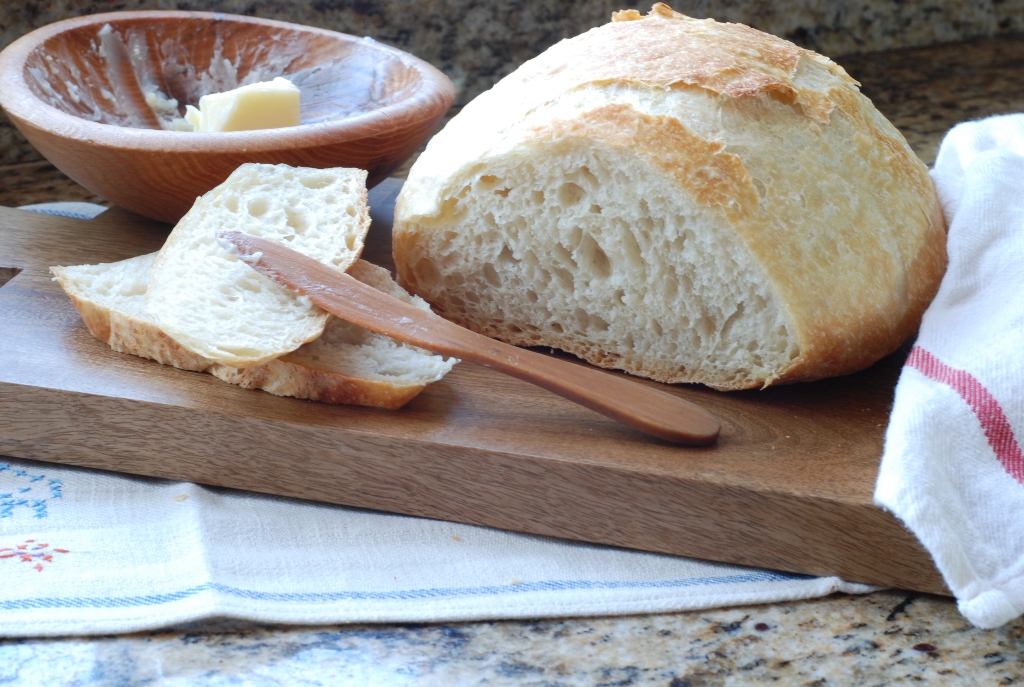
You did it. Pat yourself on the back. You are one amazing bread baker.
Crusty Bread
Learn to make this crusty artisan bread, and then you can add any flavors and mixins your heart desires.
Ingredients
- 3 cups unbleached all purpose flour
- 1 3/4 teaspoons salt
- 1/2 teaspoon yeast
- 1 1/2 cups water
Instructions
-
In a large mixing bowl, whisk together flour, salt and yeast. Add water and mix until a shaggy mixture forms. Cover bowl with plastic wrap and set aside for 12 - 18 hours. Overnight works great.
-
Heat oven to 450 degrees. When the oven has reached 450 degrees place a cast iron pot with a lid in the oven and heat the pot for 30 minutes. Meanwhile, pour dough onto a heavily floured surface and shape into a ball. Cover with plastic wrap and let set while the pot is heating.
-
Remove hot pot from the oven and drop in the dough. Cover and return to oven for 30 minutes. After 30 minutes remove the lid and bake an additional 15 minutes. Remove bread from oven and place on a cooling rack to cool.
Thank you so much, we love this bread!! super simple to make and better than any bread we have made, this is our go to for bread weekly from now on. We are stoked.
I have never thought one day I would make my own bread. This recipe is so easy, simple and requires very little attended time that I had to try it. The bread came out beautifully with a healthy European style crust and it is super delicious. I may never ever have to buy grocery store bread again.
Thanks
I'm eating a slice of freshly baked artisan bread with chopped sun dried tomatoes, and I've got another in the oven with hazelnuts and walnuts.
Hands down the best recipe for bread I've ever tried!
I've passed it on to lots of friends 🙂 Thank you so much
I love your bread recipe! This is the easiest no fail crusty bread ever. TY!!!
Anon: Yes, this recipe can be doubled easily. I have not baked a double size loaf, but I have received comments from others that have with great success. I believe the bread needs to be baked with the lid ON an additional 5 minutes. Remove the lid and bake until golden. Good luck!
Made your artisan bread only complaint is we need more. Can I double everything and bake in a 8 qt lodge ci dutch oven
I am probably slow in discovering this bread but boy am I glad I did! I already made two in the first week of trying out this recipe! Question though – what can I do to make it less crunchy (thinking of more crispy than tough crunch)?
Janet, I never comment on recipes, even ones that I love (which is terrible because I rely on others' comments so much!)… but I just had to come back to your page to comment on this recipe. Since discovering it a few months ago, I make this bread at least once or twice a week, and have shared it with multiple friends. So easy, so delicious, and so "forgiving" as you say. I have made several different variations (beer instead of water; rosemary; cinnamon raisin, etc.) and they have all been delicious as well as the original. I will never buy "artisan" bread in a store again. Thank you so much for sharing it, and for your detailed descriptions, photos, and explanations. Other than the fact that I eat WAY too much of it, there is nothing about this bread that I don't like. Thanks again.
Wow, that looks amazing, and not as hard to make as I would have thought!
Any special instructions for high altitude baking? We are at 6000+ in the mountains of Utah!
Caveat to my October 2013 post about this marvelous bread recipe. I moved into a newly built home last summer. One with a new and very deep well. I learned after two most unsuccessful attempts to bake this bread (puny rises and overly moist interiors no matter what I did) that 'just use whatever comes out of the tap' doesn't work with the ice cold water direct from the well. Now I draw water from the well-water-only-tap (the rest of my home's water comes through a water softener system) at least two hours before prepping bread so it's cool not icy! And I am back to once again baking beautiful loaves of bread.
I am really enjoying reading your well written articles. It looks like you spend a lot of effort and time on your blog.
Salut, je tiens à vous dire que votre opinion de ce thème est vraiment intéressante, et je souhaite vous remercier pour cet article riche en informations. En tout cas, je repasserai certainement plus tard Et si vous envisagez de voir mon site, n’hésitez pas. A très bientôt et longue vie à cette page
Irene: For a whole grain bread I would start with 50/50. all-purpose flour/whole wheat. 100% whole wheat will work, but it's pretty dense and doesn't absorb the water well.
I love this bread and have made it several times with success. Also made it in an oblong pot which gave the bread a different shape. Any suggestions on measurements t make it with whole grain/wheat flour?
Can anyone speak to this bread always turning out very dense / heavy. Appreciate any suggestions on getting a more soft texture.
Can anyone speak to this bread always turning out very dense / heavy. Appreciate any suggestions on getting a more soft texture.
Denise: I have had trouble, also, with some brands of parchment sticking to the bread and it's pretty much impossible to remove. I'd just drop the dough into the preheated pot. I have never had trouble with the bread sticking to the pot.
I found this recipe yesterday and after having read this one as well as a similar one (shorter rise time) p, I had to give this a go. What a surprise! When I pulled the bread out of the oven, I was so happy to finally have a crusty loaf (I don't get that from my bread machine)!!! I'll be using this technique for some German rolls that I have been craving. My only issue was the paper. Mine stuck to the bread. I'm not sure if it was the type of paper, I used greaseproof because that is all I had on hand (not sure if it's the same as parchment, I live in England so maybe?). I'll be trying it again without the paper. I'm also going to try some different flavours, can't wait!!!
I have made this bread 8 times now, hands down, best recipe ever!
Dear Anon: I'm sorry your bread stuck. I have had others comment with the same problem. I have never had that happen. The best option is to try parchment paper, but get one that has a silicone coating or the dough will stick to the parchment…and that's a bigger mess than the bottom of the pan.
Dear Anon: If you want to have more shape to your bread, try adding 1/4 cup more flour. The dough will be stiffer, but you may like the way the dough holds up better.
My cast iron dutch oven is well seasoned but the bread wasstuck to the DO so much that I could not remove it. I let it cool in the DO and then it fell right out but the bottom was soggy. The top remained nice and crunchy. Any idea why it stuck? Everything else was perfect.
Anon: Regarding your wet dough: I would try adding an additional 1/4 cup flour. This will make a stiffer dough and you should be able to handle it to shape.
Hi, I have made this bread a couple of times and my family is loving fresh crusty loaves, and it is pretty awesome to be able to bake something like this at home in my Le Crueset! My question is that about the shaping the dough into a smooth round ball step-exactly how am I suppose to do that? I know you say to gently form it, but it is quite a wet sticky dough (as you know) and each time I have made the bread I'm pretty much baking a blob of dough that is not shaped into a ball at all because I'm not sure how to form it…and because of this my end result is just not as tall and round as it should be :(, I would really appreciate your help, thank you!
Just made this and it was amazing. I have no patience for recipes needing double and tripe rises and this was so easy. After it rose I had a hard time getting it out of the bowl without it deflating, so it looked flatter than yours, but rose just fine in the oven. I put sesame seeds on top and brushed with olive oil after removing the lid and it was beautiful. Bottom was slightly burned so I'll turn it down to 425 next time, I already shortened the cooking time by. 5 min in each stage (gas oven). Keep the easy and delicious recipes coming! Also love your stories about meals with the kids and special family memories.
To Good: Some readers have filled the pot with water during the preheating time. This will solve any issues or concerns with damaging the pan. Le Creuset is too beautiful and fabulous to ruin.
Wow that's a lot of comments. Everybody loves nice bread!! I have to say, I'm so worried about putting my dearly loved le creuset, empty in an oven..for 30 min!! I learned that you should never heat it up when it's empty (manufacturers tip) I'm worried it might get damaged. I have to research some more
Hi Liz, Thank you for your comment. I would LOVE to make my own phyllo and would love my recipes myself. Send me an email at simplysogood@hotmail.com and I'll respond with more info.
I just want to tell you that you are an inspiration.
I discovered your crusty bread recipe a few months back, and have made it religiously since. Everyone loves it and I've spread the word. Just a question-can you make a loaf version? How would it work without the dutch oven?
Also, do you have any homemade phyllo recipes? I make a Balkan style Burek pastry, filled with cheese with the super stretchy homemade phyllo dough-I'd love if you have any recipes using phyllo!!
I have spent my whole day today going through your recipes. I've printed nearly all of them. THANKYOU Janet!!!!
I made the bread for dinner tonight, and it was the best bread ever. The kids loved it. The husband loved it. The downside of such good food is that we eat too much of it. Thank you so much for posting such an easy-to-follow recipe. Your recipe made us all very happy tonight.
My family loves this fantastic recipe. Thanks so much.
Anon in Colorado: My daughter moved to Denver last year and she said that she has to add 1 teaspoon of yeast. Everything else is the same and the bread turns out great.
Just pulled this out of the oven (and ate a slice!), this is soooo good!
I'm always trying to add fiber, so I did half all purpose and half white wheat + 1T wheat gluten. It was a little dense, but I will play around with the amounts.
Definitely a keeper, can't wait for soup weather!
This was a go-to recipe that I used in Austin, but now that I live in Colorado, I can't get it to rise. Any high altitude suggestions?
Wow…just WOW! I have tried making bread many many times and it has always turned out like a brick. This recipe is so simple and makes the best bread. Thanks you so much for putting this up here. I will be subscribing.
I'm thrilled you love the bread. It' a keeper.
I can not stop thinking about the dough that I stirred up last night and has had all day to get all nice and happy and how happy it's going to make me when I get home! Chicken is cooked and just needs to be pulled off the bone, tomatoes are in the windowsill, all I need to do is to fry up some bacon while the pans are in the oven, so I can have one awesome sandwich later on tonight. Thanks for sharing such an easy and wonderful recipe! Rhonda
So where do you live? I'm coming for dinner. You are AMAZING!
There's really 'No knead' to worry with this amazing recipe! (I'm sorry, that was awful)
Great recipe! Now to tweak it with your help. Used exact measurements. 1) was very bland and I prefer a yeast-y taste to homemade bread so how do I get that taste? 2) My rise time was 16 hrs. 3) crust was very crunchy out of oven but lost that crunch with an hour. Thanks so much!
You could add more yeast or add about a tablespoon of vinegar. That will give it a stronger yeasty flavor. I have found that if I cut a bit of the end off of the bread it allows the steam to escape through the end instead of around the entire bread, which can make the crust less crunchy. Just a thought??? As the bread cools it seems to crunch up. I leave my bread cut side down on a cutting board and just cover it with a towel once it has cooled. A plastic bag will soften the crust. I hope this helps.
Greetings from Irekand. Thanxs for this wonderful recipe, made it today & my kids & my husband loved it, the bread came out very nice & the crispy crust topped it all & we actually finished the whole bread within an hour from coming out of the oven. What should I do to stop the yeasty taste & smell other than that thank you so much for sharing the recipe
You can reduce the yeast by 1/2 and/or lessen the rise time. That should do the trick. I'm so glad the family loved your bread.
Thanks for the info if you don't have a dutch oven!
Hi there… Maybe someone asked this question before, but I followed your directions perfectly and have made the bread five times and every time it has come out perfect. However I find myself having to add about 1/2 cup more water than is required. Am I doing something wrong?
You're not doing anything wrong. It's interesting you are adding more liquid because most readers end up adding 1/4 cup more flour. Flour's differ as well as the moisture in the air, etc. Do what works best for you. If adding 1/2 cup more liquid is working, stick with it as long as your bread is working out and you are loving it.
Tried this recipe because we were out of bread and I had no money for store bread. Knowing I had all the ingredients to make my own I went hunting on the Internet and found this recipe. This bread is so tasty that I don't think I will go back to store bought bread (my kids agree)! I did grease my Pyrex (have to wait for funds so I can order enamel cookware) with coconut oil which has a very high scorch temp so there was no smoking.
My kids lived off this bread while in college. It costs only pennies to make. I'm so glad you found my blog and the recipe. No need for enamel cookware when pyrex will create the same loaf of bread. Best of luck and happy baking.
Great tip. Thanks.
A hint for letting it rise if your kitchen is cold BTW is to put a cup of water in the microwave, run it for 3 mins. Take out the cup and then put the bowl with the dough in the microwave. It makes it nice and toasty for the yeast to rise.
I live in Brazil, and for some strange reason is way easier to find fresh yeast than dry one over here. I used that (one 15gr tablet) and it worked! I really though I had messed it up, because my dough looked more watery than the picture, even though I followed the measures precisely. So I came back and added more flour (even though the dough was already growing for some ten minutes then) until the consistency were more like the one showed here. In the morning some of the dough sticked to the bowl, and the bread itself looked more pasta-like (stringy) than bubbly. I almost gave up at this point, but I figured that since I had already used the ingredients, I could at least give it a try. And all ended well!! The bread was delicious, with a thick crust and very soft interior, with lots of air pockets. Since I used fresh yeast the fermentation taste was on the strong side. It's ok to me, I like it more this way. I'll make it again tonight, this time with more flour from the begining.
I'm jealous that you have fresh yeast. It is pretty much impossible to purchase in my town. I would try adding 1/2 the amount of yeast that you are adding now. That might help with how yeasty the bread tastes. Due to the fact that the rise time is so long, a little yeast goes a long way. Let me know if this helps.
I'm a total newbie to baking. I've made this bread 3 times. Every time, the appearance and texture come out stunning. But my bread always tastes very dense and the flavor is overly and distractingly "yeast-y". Am I doing something wrong? Any advice? Thanks!
My guess is that because this is basically a quick bread using yeast (no kneading, no working of the yeast) and a long rise time (time to ferment) it turns out a more flavorful (yeast-y) bread. If you can do a quicker rise (or a shorter rise), and bake sooner, I think this would reduce the yeast flavor.
Comment from Kitty: I writing because though I have been making No Knead Bread for about 6 years, tonight I sat and read through your blog…so much interesting information, and great ideas for add ins! The recipe I used for a long time was the one from Cook's Illustrated and it included 3 oz. of a flavorful beer and 1 T of white vinegar as part of the liquid. I started up a batch of dough one evening before realizing I didn't have any beer so I just made up the difference with water and went on my way. I've never bothered with beer again.
I watched the video with Mark Bittman and Jim Lahey a couple of years ago and then tweaked my basic recipe again (I think you have to adapt the recipe a bit to suit your particular kitchen environment…I need to use a little less water) This is the basic recipe I use in my kitchen.
15 oz. Unbleached All Purpose Flour (approx. 3 cups)
¼ tsp SAF Instant Yeast
1 ½ tsp salt
10.5 oz water
½ tsp red wine vinegar
I put the dry ingredients in the bowl of my Kitchenaid (because I can!), give it a brief whirl, add in the liquid with motor running and scrap the soft dough into a container to rise. Perhaps this ratio of flour to water might work for people who are finding that 1 ½ cup (12 oz) water makes a dough that is too wet.
After dinner tonight I mixed up a batch of dough using your ratios and including the ½ tsp of vinegar and I just peeked under the towel…it has risen so much that it is almost touching the top of the container…in my house your method will be a 4 hour rise method! Every kitchen is different. Thanks for all the wonderful information, Janet, and for tirelessly reading and posting all of the wonderful ideas from you and your subscribers.
So i had to proof my yeast because i only at the active dry yeast so the dough seemed a bit more watery. 12 hours later it looks like it has done something but it is still flat and loose looking. I figure I'll wait the whole 19 and see what happens. Anyone have any experience with this?
Next time you make the bread try adding 1/4 cup additional flour. It's possible that your dough may be too watery. If it still seems too thin after 19 hours just turn the dough into focaccia. You can find my recipe in the index. No need to waste the dough. Let me know if it works.
For those concerned about sticking…I plopped my dough from the bowl onto a piece of parchment paper. Put the parchment paper and dough into the heated cast iron pot and put the lid on. When it was time to remove it from the pot I lifted it out on the parchment paper and set it to cool on a rack. No burns, no extra flour on my counter to clean, and lovely bread to show for it!
Ok! Hold the front page! Change of tactics!
I revised the method to include the 2-hour re-rise, and used a Pyrex casserole dish. The lid got broken ages ago, but I used the Japanese pot lid, with an added layer of tin-foil…and the Pyrex casserole worked like magic! It doesn't even need washing, just a wipe out with a clean cloth! And the bread is AMAZING!! This is it from now on!
Fabulous! Thanks for sharing. Pretty much anything works…right?
Wow, what a long thread of Q &A's! I tried Searching through for an answer to my query, but the length defeated me.
I use a Japanese Cast-iron cooking pot, called a 'Tetsunabe'; it has a wooden lid, but I wrap this in aluminium foil before covering the dough. It works brilliantly, and my initially -sceptical husband now eats no other bread.
My ONLY problem, is that as the dough spreads in the pot, it enfold the creases of the parchment paper. The result is that when I remove the loaf from the oven (Mmmmm! Yummy!) the parchment has irremovably stuck in the folds.
Not enough flour? Could I risk baking WITHOUT the parchment, and just tumble the dough into the heated pot, with loads of flour, rather than any parchment?
What would you suggest?
ALEX, Bedford, UK.
Great recipe! Amazing results every time!
Hi! I'm planning to make this as party favors for my Mum's birthday party, along with jam and coffee/tea. I'm making around 50 pieces, so I thought that making a mini version of this is a good idea. Any suggestions on how to make mini bread rolls out of this recipe? I could probably use muffin tins but I have no idea what to cover it with.
You can cover the muffin tins with foil and crimp the foil around the edges of the pan. I have never tried this before. I'm not sure if they would stick or not? I have only baked individual rolls on a pizza stone. I would experiment first.
Tip for keeping hands clean: I turned this out onto the center of a very well floured cloth bandanna and then pulled in the outer corners of the cloth to turn the dough into the circular shape and smooth it without having to use my hands. There was so much flour on the cloth that I had no problems with the dough sticking and I kept my hands clean.
Hello, GREAT!!! 1 question though….is there anyway to make this bread in little french style rolls for sandwiches?
Yes, I have baked them on a pizza stone. You could bake them in a pot as well. You may want to watch them so they don't over bake. Check out this post: https://www.simplysgood.com/another-use-for-no-knead-bread-dough/
Mine turned out like a bowl of slop,no where near enough flour and I used the rapid rise yeast
Well, start with reducing the amount of water. I'm not sure how much to tell you without seeing your dough. Try 1/4 cup. If it still seems to wet, throw in more flour. Just play with it. Read the above comments and you may find something that clicks that might help.
I've been making this for a while now. Thank you for posting this recipe; I know it originated with Jim Lahey, but I was introduced to it via your website, from a friend who's a fan, so I wanted to thank you for popularizing it. Before this, I had never given serious thought to baking bread. The first time I pulled a loaf out of the oven I stared at it dubiously for a few moments, confused that the rough glob of dough I'd shoved into the dutch oven could come out looking like something from a cooking magazine. I cut off a hunk of it and tried it and promptly started laughing at how amazing it was. I've been hooked on it since then, and make it at least once a week.
Each time I make a loaf of this bread, I try to alter some part of the recipe to see how it changes the finished results. I figure that way, I learn something new from each loaf. Here are some of the things I've stumbled across so far, for anybody who is inclined to care.
1) Throwing in a tablespoon of instant yeast will cause the bread to rise sufficiently in two to three hours, instead of eleven to eighteen. I know that as a consequence the gluten is not as strongly developed and have seen the difference in the texture of the bread, but this hasn't impacted my enjoyment of the finished loaf at all. In fact, I find it makes for more solid and substantial grilled sandwiches and toast. I've tried Mr. Lahey's rapid rise version (same amount of yeast as the normal recipe, with 1/4 tsp of red wine vinegar added) and I still prefer increasing the yeast. Basically, if any reader wants to give the extra yeast a shot, I don't think they should be afraid that they'll "break" the recipe.
2) Yeast bloomed in warm water smells like childhood memories and happiness. I'm on the cusp of turning 30 and have just now become aware of this fact. Thanks for helping me discover it.
3) King Arthur all-purpose flour produces a loaf that rises better than store brand all-purpose flour, probably due to the higher gluten content, although I'm new to this so I can't say for sure. If what I've seen is right, though, store brand bread flour should have about the same gluten content as King Arthur all-purpose, so I'll be giving that a shot in the near future to see if it produces a comparable loaf at a cheaper price.
4) The water to flour ratio in this bread is 80%. I used that basic understanding to make a larger loaf, so I could use it for larger sandwiches. I've stopped using measuring cups now and I just use a scale to measure out 600g of flour and 480g of water. I throw in about two teaspoons of salt and tablespoon and a half of yeast and the end result is still wonderful enough to make me want to steal it and hide it from everyone else.
5) I just tried a flavor variation; I used beef broth instead of water, and threw in a pack of Lipton Onion Soup Mix. The end result was a bit too salty for me, but I'll be trying it again with just the broth because I think it adds some strong flavor undertones which would make this ideal for serving with stew or something equally hearty.
Fabulous ideas, suggestions and helpful hints. Thank you so much for posting this!!!
Unfortunately it came out doughy for me. I was using a thin stainless steel pot, and I don't think it retains heat well enough. Next time I'll let my nose be the timer.
Thanks for posting your recipe. My dough was really dry and seemed dry even when I was ready to bake it. I didn't have to use much flour to get rid of the stickiness, and then when I baked it my bread was really dense and almost doughy in the middle. It was still good, but I'd like to get an airier, lighter bread. Any advice?
Thanks! Beth
Hi Beth. First of all you need to know that this bread is not light and airy. It is rather dense and moist in texture. You may want to add 2-4 tablespoons of water so that the mixture isn't so dry. Try baking the bread 5 minutes more with the lid on. Then remove the lid and bake until golden. This should help the center cook more. I hope this helps.
Here is the original recipe that mentions the additional 2 hr rise
http://www.nytimes.com/2006/11/08/dining/081mrex.html
A few answers: to those who find the (finished) bread doesn't rise much, the original recipe says to let it rise a second time for 2 hours after the initial 12-18 hr.
I also use parchment paper as my Lodge is not enameled. But here's my difference: after the first 12-18 hr, pour the reeeealy sticky dough onto the parchment paper (no flour dusting is required). Then lift the whole thing into a slightly smaller bowl (I have a set of 4 Pyrex nesting bowls) and let that sit (covered) for the two hours.
After the first hour, turn the oven (with the C.I.pot/lid inside the oven) to 500o so the oven and pot get thoroughly hot.
When the 2nd hour is up, lift the dough by the paper and place all in the pot.
Put the covered pot back into the oven, turn DOWN the temp to 450/475o (your preference) and bake covered for 30 minutes. Then uncover and bake for another 10-15 minutes etc etc.
The extra 2 hr kind of got lost having been repeated so many times. Even the video makes no mention of it (but the written instructions do).
The extra 2 hr should help with your finished product. Be as gentle as possible with the dough. Do NOT punch it down after the second rise.
Thank you so much Pitmaster for your most helpful suggestions and comments. I'm sure there will be many readers that find this post a great resource. Now I just need to all of your knowledge in BBQ. I'd love to master myself. Love BBQ.
I almost got it right. I followed the instructions. After forming the ball, should it immediately go on the parchment? I let it rest on the floured board, and had a very heavy crust on bottom. Also, your bread looks nice and white, mine was very off-white. It did rise pretty well in my Cornflower Corningware. It was very hard to slice–maybe because I brushed with butter after baking. Would that make the crust harder to cut through? I do plan to try it again. Kneading is hard for me because of rheumatoid arthritis, but I DO love homemade bread! Thanks for this recipe!!!
Wow. I've never baked anything from scratch. When I took the lid off, I brushed some butter on the bread and that turned it a bit more golden brown. This went great with Chipotle stuffed meatballs. This will be my to go staple recipe for bread.
Hey Janet, I would like to mix roasted hot pepper, onions, tomatoes and cheese. However, I am not sure if the vegetables are too moist to mix into the dough. Do you have any suggestions on how i can mix this? I've had this from a bakery in So California and I moved to the East, so I'd love to make this bread.
First of all your meatballs sound AMAZING! I have never mixed vegetables in with the bread. I think the only one you could have trouble with would be the tomatoes if they are fresh. If they are sundried, it shouldn't be a problem. You could reduce the water by 2 tbl. to see if that helps with any additional moisture. This bread sounds delicious. let me know if this works.
Tip from a fellow baker: I found a baking vessel for my "No Knead Bread"
A brown clay planter from Home Depot, 14 x 4 x 5.
My loaf was superb.
Can I split the dough and makebthesebinto rolls? How would I adjust the baking time?
Yes you can. I would bake them covered for 20 minutes, then uncover and bake until golden. If the rolls are quite close together, you may need to bake them covered for 25 minutes. Good luck.
Hi Janet,
I have tried this loaf now about 10 times and just cant get it to work perfectly? I have read everyone of your forums and q and a's about it.. It just wont rise up high like yours do.. it stays about 6-7cm high each time i bake it.. I have tried adding a 1/4-1/2 cup extra flour.. have tried several different types of flour.. even tried different types of instant yeast.. have changed proofing times from 12, 14, 20, 18 hours.. have literally tried everything.. I just cant seem to get it to work and Im starting to get frustrated because I have tried everything I can think of haha.. any suggestions?
Thanks Timothy
Ok Timothy, let's try to help you out. It's hard for me to know what's going on when I'm not in your kitchen to see the dough. If all else fails, turn the dough into focaccia that way your 6-7 cm height would be perfect. I'm perplexed as to what can be wrong since you have tried so many different solutions. Be sure not to handle the dough very much after the rising time. That will help maintain the large holes. Hmmm…you could try adding 1 teaspoon sugar. This will feed the yeast, but the rise time will be shortened. Sometimes if the bread rises too long it will deflate while baking. However, I have let this rise for 24 hours before without any problems. You were right to add more flour. This bread is supposed to be a "no brainer". With simple mixing, long rise time and plopped into the pan with an amazing loaf at the end. I'm sorry you are struggling. Does the dough seem to be bubbling after the long rise time? Sometimes my dough looks like it is beginning to bubble and boil. You could try this: instead of trying to form the dough into a ball just carefully dump into the preheated pan. Perhaps not working the dough at all will work??? I'm sorry to be so vague, but I'm not quite sure what to tell you.
OMG…why have I been making Bread the other way all of these years? My Husband even commented on how crispy the crust was . We had it while it was still warm and the butter seeped in to it!..Awesomeness in a bite! I will make this over and over again! Thanks so much!!
Michele
Success! Thanks for sharing.
I just made this bread – followed the recipe exactly except used a steel heavy base 7 quart dutch oven with lid. Experienced one major problem – the lower 1/3 of the bread was very compact, dense and tight crumb with no air spaces, while the upper 2/3 was just right with very large holes about 1" diameter. Also the bottom crust while light colored, was as hard as leather! The top crust was perfect. I could not cut the slices through with a bread knife – when I got to the bottom crust, I had to switch to a cleaver. But the bread tasted very good. What did I do wrong?
You could try heating the pan while you heat the oven. When the oven temp reaches 450 add the dough to the pot. This should help with the dark crust. Handle the dough as little at possible. This well help keep the large holes. I'm not sure why the lower 1/3 was so dense.
If you have a loaf pan that will fit inside your dutch oven, then you can easily have a regular loaf and still have it steam cooked.
Great tip! Thank you.
Success!I am a bread baker now! Thank you, I am so grateful , but my waistline isn't ;-). Can'twait to make loaves for special occasions (love the "wrapped in a seasonal dishcloth idea). I read the posts here, and no mention of storage (not that this is lasting on the counter, uneaten). Brown bag or plastic bag?
You can do a brown bag overnight, but it will keep longer in plastic. I have rewarmed and recrisped the bread by placing in a 300 degree oven until warm and crisp.
I just made this with white whole wheat flour. It is very good. The crust doesn't crack as much but the color is beautiful and there is a lot of crunch. I baked in a pyrex casserole which worked well. I did have to adjust the water amount quite a bit. I ended up using two cups of water. I possibly could have used a tad less. But it is good none the less. 🙂
Hi, I found your blog and couldn't wait to make the recipe in my new Dutch oven. Alas, the top part of the knob flew off as soon as I opened the oven door. The knob basically split in half! My husband tells me that the lid is not made to go in the oven, but this is not stated on the box. Have you had any problems with the knobs on your pot? I have the Sandra Lee pot from K-mart, it looks exactly like your blue one. I am so disappointed 🙁
So sorry to hear about your knob. Many knobs can't take the heat. I have had people comment that they purchased a heat proof knob from Amazon. I believe you knob can be replaced. Check Amazon.
Wow! I have made this bread and my family went nuts for it! Tonight we are having your chicken pot pie recipe. I am so glad that I have found this blog. The pictures are fantastic and your directions are easy to follow. Thank you for taking the time to post such lovely recipes!
Merci 🙂
This is my first time baking bread & I have made two loaves in the last two days & I LOVE this bread. Thank you so much for sharing. I would love to be able to make this as more of a "loaf" to make sandwiches for my family. Would this recipe work in a loaf pan & if so could someone suggest a pan to purchase for this?
The purpose of placing a lid on the pot is to create a steam oven. This makes the the bread so crusty. You could try placing a loaf pan inside a large pot. That might work. You could cover the pan with foil, but I'm not sure if you would get the same results.
You can use a regular pan and get crispy bread. The key is using a pan below it. You put the pan in while you're preheating the oven, and when you put in the bread, pour some water in the pan. Close the oven in a timely manner to keep the steam in. 🙂
Late to the game, but I made this in a loaf pan today, with no cover, and it turned out quite crispy – delicious! I was unable to "shape" the loaf, due to it's wetness, but did my best, and ended up pouring it (more or less) into my porcelain loaf pan. First time I tried the recipe, so am very pleased.
I discovered this recipe a few months ago, and have been making it a couple of times a week ever since. My Italian husband LOVES it (his grandmother called store-bought bread "poor man's bread"). I add sesame seeds on top, and have started making 3 slashes across the top just before putting it in the oven. Makes it rise a little higher. It is beautiful and delicious! Much better than $4 per loaf "artisan" from the store. Thanks, Janet
Thank you for sharing your ideas and success, Susan. I will try making the 3 slashes in my bread. Great tip!