Several years ago I entered a cake flour contest at the Utah State Fair. I won a blue ribbon, silver platter, boxes of cake flour and $100. How about that?
I wanted to create a cake using my Grandmothers sponge cake recipe. I thought that a Tiramisu cake would be fabulous. Problem: I live it Utah. Coffee, Kahlua and Irish Cream could be an issue. I need to create a Tiramisu that is not against The Plan.
Nailed it!
I think I would call this a “special occasion” dessert.

Let’s start with making my Grandma’s sponge cake.
You will need the following:
4 eggs, separated
2 tablespoons cold water
1 1/4 cups sugar
1/2 cup boiling water
1 1/2 cups cake flour, sifted
1/2 teaspoon cream of tartar
1 teaspoon vanilla
1/4 teaspoon almond extract

Prep the pans first. I’m using 8-inch rounds, but you can certainly use 9-inch. The cake won’t be as high if you use the 9-inch. You can spray the pans with a nonstick spray or lightly grease and lightly flour the pans.

Place a parchment sheet round int he bottom of the pan then lightly give it a spray with the nonstick spray.

Set aside.

Sift the cake flour. The flour really seems to settle in the box. I light to sift it before measuring.


Lightly spoon the flour back into the measuring cup.

Level off the measuring cup.

Look at the extra flour I have. If I had not sifted, I would have put too much flour into the cake. That would have created a “brick”.

Put the egg yolks into a large mixing bowl.

Add two tablespoons cold water.

Slowly add sugar into the egg yolks while beating.

Beat until the egg yolks are a pale yellow.

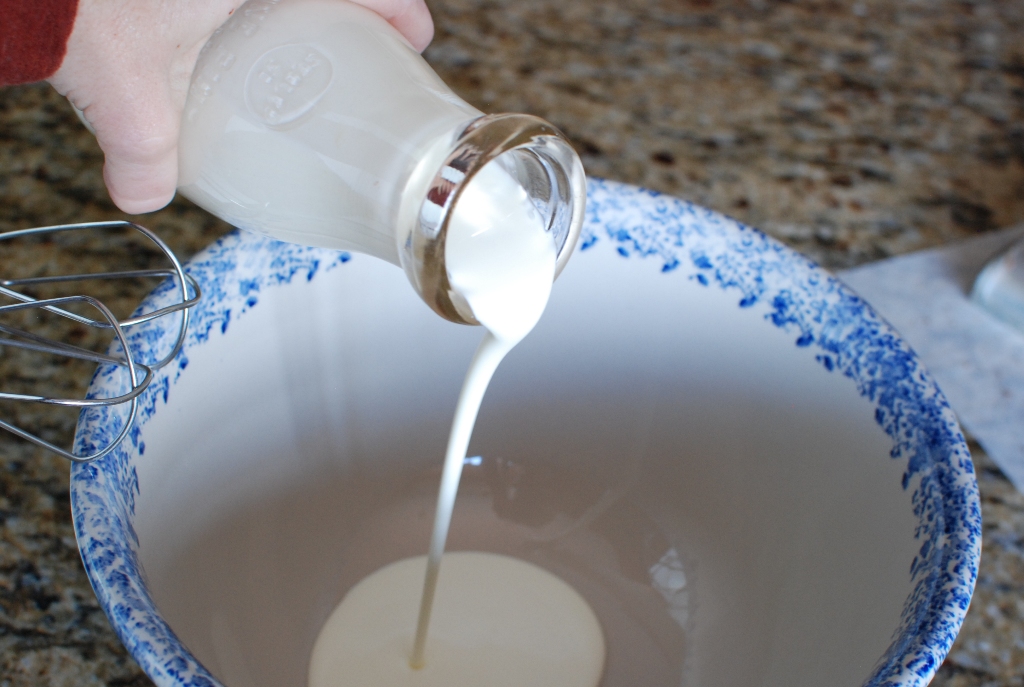
With the mixer running, slowly add the boiling water.

Add the salt the to sifted flour.

Sift the flour into the egg mixture.

Gently fold in the flour. Be very careful not to deflate the egg mixture. Don’t be rough with the batter.

Can you see the air bubbles in the batter? That’s good a good thing.

Put the egg whites in a medium size mixing bowl. Add the cream of tartar.
Beat.

Your altitude will determine how long your beat the egg whites.

I live in the foothills of Salt Lake City, which is close to 5,000 feet above sea level. I only beat my egg whites until soft peaks form. If you live lower than 3,000 feet, beat the egg whites until stiff peaks form.
This is baking and it DOES make a difference.

Gently, very gently, fold in half of the egg whites into the egg yolk flour mixture.

Add the vanilla.


And almond extract.


and the remaining egg whites.
Gently fold into the egg yolk mixture. Using over and under motions with a rubber spatula.

Divide batter evenly between the two prepared pans.
Bake in an oven that has been preheated to 325 degrees.

Bake for 30 minutes or until the edges of the cake pull away from the pan.

Turn the cake out onto a wire cooling rack. Remove the parchment.

Repeat with the second cake layer.
After the cakes have completely cooled, you can wrap and freeze for up to a week.

For the Tiramisu filling you will need:
2 cups heavy cream
3 egg yolks
1/4 cup sugar
1 teaspoon vanilla
1 lb mascarpone cheese
1/2 cupTorani Tiramisu flavoring
3/4 cup grated semi-sweet chocolate
Lady fingers
fresh berries (optional)
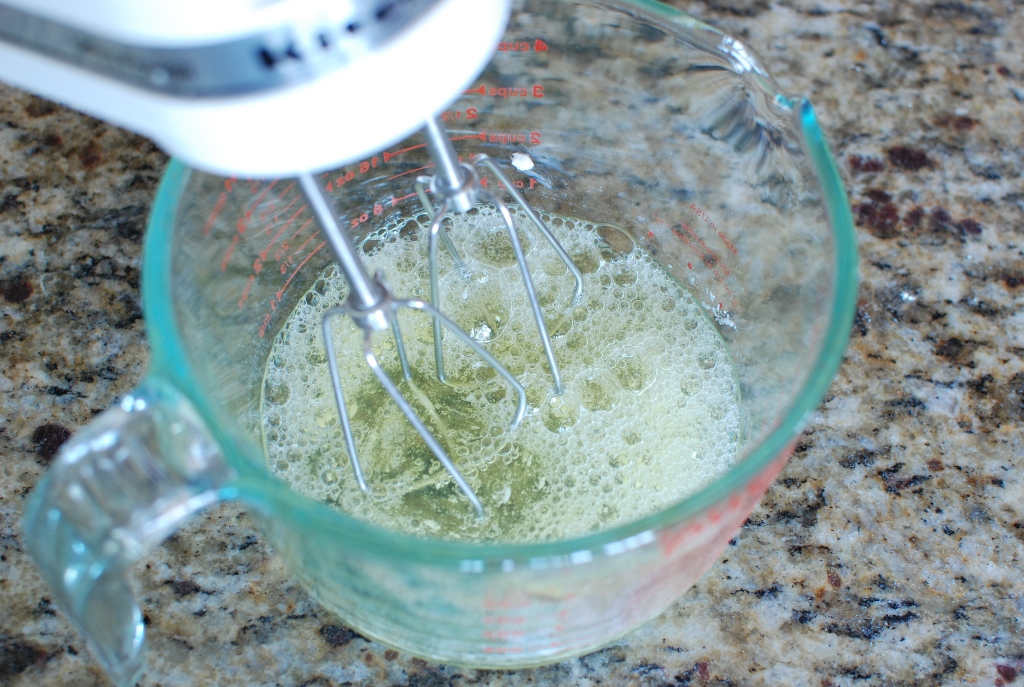
In a large bowl, add cold heavy whipping cream.

Beat until thick.

Set aside.

In medium size bowl, beat egg yolks.

While beating, slowly add the sugar.

When egg mixture is pale yellow and thick add the vanilla and continue beating.


Add mascarpone. I like to bring the cheese to room temperature.
If you are wondering if you can substitute mascarpone with cream cheese, NO!

Gently fold in the mascarpone. Do not beat too much.

For some reason when you whip the mascarpone, it turns grainy. So just fold it in with a spatula.

Add the mascarpone mixture to the whipped cream.

Gently fold in.

Set aside, if you are ready to assemble the cake. If you are not quite ready, please refrigerate until ready to use.

Slice the cake layers in half.

You will have four thin layers.

Grate the semi-sweet chocolate. This can be done in advance.

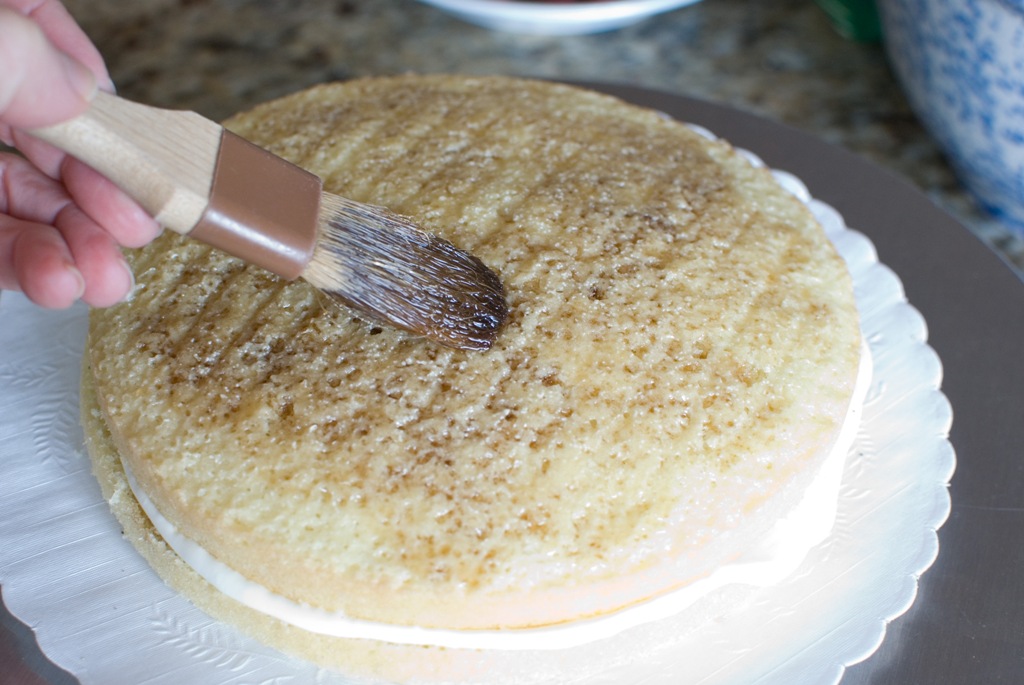
Pour 1/2 cup Tiramisu syrup. I use this as a soaking solution.

Brush 2 tablespoons of Tiramisu syrup over each cake layer.

Then spread a 1/2-inch layer of whipped cream mixture.


Sprinkle with about 1/4 cup grated chocolate.

Repeat.


Fourth and final layer.

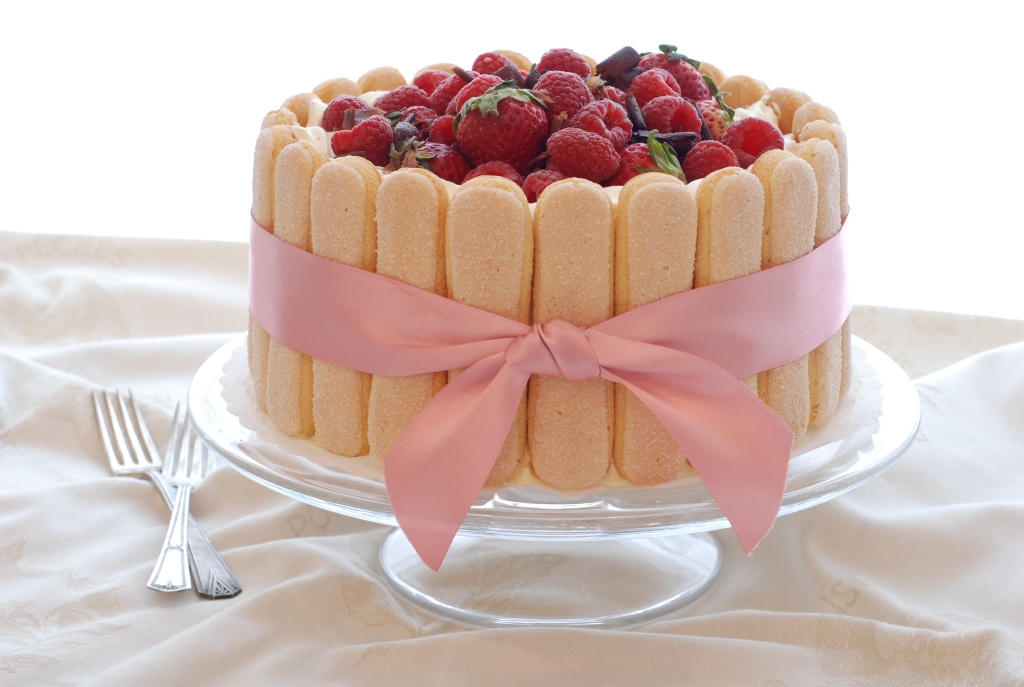
Ice the side of the cake.


I am using hard lady fingers. You can use soft lady fingers, if you’d prefer. I like the length of the hard lady fingers. They work well with the height of the cake.

Press the lady fingers against the side of the cake. Place them all the way around the cake. Press firmly to make sure the lady fingers adhere to the cake.

I like to hold the lady fingers on with a strip of ribbon.


You can tie a big bow or just a knot.


Fill a pastry bag with cream mixture.


Pipe a thick border of the whipped cream mixture.

Fill center with berries. You could also use large chocolate curls.


I’m just using a vegetable peeler to grate some chocolate on the top of my cake.

Small chocolate curls.

Yes. I agree that was a lot of work.

Definitely a special occasion cake.
Tiramisu Cake
Sponge Cake:
4 eggs, separated
2 tablespoons cold water
1 1/4 cups sugar
1/2 cup boiling water
1 1/2 cups cake flour
1/2 teaspoons cream of tartar
1/2 teaspoons salt
1 teaspoon vanilla
1/4 teaspoons almond extract
Soaking Solution:
1/2 cup Tiramisu flavored Torani Syrup
Tiramisu filling:
2 cups heavy cream
3 egg yolks
1/4 cup sugar
1 teaspoons vanilla
1 lb. mascarpone cheese
3/4 cup grated semi-sweet chocolate
ladyfingers
fresh berries, if desired
For the Sponge Cake:
Preheat oven to 325 degrees. Sift the cake flour and salt then lightly scoop into a measuring cup to measure 1 1/2 cups. Set aside. Lightly grease and flour a 8-inch cake pan (or spray with non-stick cooking spray). Set aside. In a large mixing bowl, on low speed beat egg yolks and cold water until light yellow in color. Slowly add sugar and continue beating until thick ribbons form. While the mixer is still running, slowly add boiling water. Sift the flour once again over the egg yolk mixture and gently fold in. Set aside. In a medium size mixing bowl beat the egg whites and cream of tartar until soft peaks form for high altitude. If you live at a lower altitude under 2,500 feet, beat until stiff peaks form. Fold half of the egg white mixture into the flour and egg yolk mixture. Gently folding in the egg whites with an under and over motion. Fold in remaining egg whites and the vanilla and almond extracts. Once again gently folding in with an under and over motion. Do not beat or whisk in the egg whites. You want to keep the batter light and the air bubbles intact. Pour into prepared pans and place in preheated oven for 30 minutes or until the cake begins to pull away from the sides of the pan. Remove from oven. Turn cakes out onto a cooling rack and cook completely.
To make the Tiramisu filling:
In a large mixing bowl, beat the cream until soft peaks form. Set aside. In another large mixing bowl beat egg yolks, sugar and vanilla until light in color. Fold in mascarpone cheese. Do not over mix. Using a rubber spatula, fold in the whipped cream into the mascarpone mixture.
To assemble the cake:
Slice each cake layer in half. You will have four cake layers. Brush each layer with 2 tablespoons of the Torani Tiramisu flavor. Spread with 1/4-inch thick layer of the mascarpone cream and sprinkle with 1/4 cup of the grated chocolate. Repeat on all layers. Ice sides and top of cake with remaining mascarpone mixture. Garnish with lady finders around sides of cake and top with berries. Refrigerate at least 4 hours or overnight to allow the flavors to marry.
Oh wow thank you so much Janet for posting this detailed recipe. Finally I have been able to make a sponge cake successfully thanks to you! I made the sponge tonight and refrigerated then will finish the rest tomorrow for tomorrow night's dessert. My husband cannot wait! Keep you posted..?
My fingers are crossed. I hope you love the cake.
OMG! It is awesome! Only thing I altered is I added 2 tbsp kahlua to a cup of brewed coffee and soaked the cake with it instead of the tiramisu syrup. Also for the mascarpone frosting, I omitted the egg yolks because I didn't want it to smell of egg. I only beat the mascarpone cheese with confectioners sugar and 2 tbsp kahlua and folded in the whipped cream. Otherwise I love it and this goes to my favorites. Thanks!
What delicious ingredients. Thanks for an easy way to make this yummy dessert!
Thank you, Rachel. I hope you try it someday. Thanks for stopping by xoxo
Hi 🙂 I was wondering if I could replace some of the boiling water for coffee to make it into more of a coffee cake. Do you think that's possible? And if it is, how much water do you recommend I replace? Thanks!
I would think you could replace the entire 1/2 cup depending on how strong of a coffee flavor you want. You could do 1/4 cup coffee and 1/4 cup water. Let me know about your results and how strong you make it. I'm very curious. Good luck.
I absolutely love the look of this cake and need to make one for a birthday party. I am wondering if you have ever increased the quantities to make a larger cake?
I have doubled this recipe before without any problems. Doubling the recipe will give you thicker 9-inch round cakes. Let me know if you have any more questions. Best of luck.
Delicious! !! The best cake I ever made, I tried many recipes before and nothing compared with this, absolutely the best
Oh what great news!! I'm so happy you loved it. You are the one that made it delicious. Way to go!
Hi Janet, just wondering. Is your grandma's spongecake the dry type or the 'wet', velvety type? Which one is better?
And one more thing, did you simply eyeball on how much filling to put as layers and how much to put to ice the whole cake? Cos most of the time, the recipes I follow, I end up making another batch.. LOL
-Yati-
I'm not quite sure what you mean by wet or dry. It's similar to an angel food cake. It's not dry…it's…spongy. Yes I just eyeballed the amount. I just spread about 1/2-inch thick layer. I hope this helps. The lady fingers around the cake are dry and hard, but after sitting overnight they soften up.
Hi! I really want to make this for my friend's birthday and your cake looks so beautiful in the pictures. I was wondering how long did it took for you to make the whole cake?
This can be time consuming. I usually bake my cake in advance and freeze it. It's best made a day before serving so the flavors can marry and it tastes so much better. I would say if you were to make it in one day it would be a at least four hours due to baking time and cooling time. Good luck. It's so delicious.
You can ask me as many questions as you want. I love getting them. I'm not sure about the chocolate sponge. I would add 1/4 cup cocoa powder. I think I would add it with the egg yolks. Let me know if that works. You sound like an experience baker. Keep it up.
I have made a batch and found that by adding the flour in 2-3 (I did with 2) batches, it helps. The cake is very soft and delicate. Love it! Also, the frosting doesn't hold well in warm weather so I added some gelatine mixture to the cream AND work the frosting at night helps if you're from a warm weather climate 🙂
By the way, I have one more question. Promise it'll be the last 🙂 How do you suggest if I want to turn this into a chocolate sponge cake?
Hi Janet
I absolutely love every bit of making this. The sponge colors, the lightness handling them etc. Beautiful, and delicate. However, how do you know when the cake is done? Mine never seems to pull away from the sides (I've experimented few times). Also, my flour almost always does not incorporate properly – little tiny balls of flour here and there.
Any suggestions?
Mia
You can tell if the cake is done by gently pressing on the top of the cake. If the cake springs back up, it's done. I have had the same problem with bits of flour left in the batter. Try adding more flour at a time or add all of the flour at once and let's see if that helps. It is a very thin batter. If there are just a few lumps left in the batter, they should dissolve during baking time. Let me know if this helps. I hope it does.
very detail steps and i enjoyed reading this!
actually i'm looking for tiramisu cake for my lil brother's birthday soon,
and i stuck here seeing your very nice tiramisu…
much love from Malaysia… ^_^
Happy birthday to your brother. I hope he loves your cake. Thank you for comment from Malaysia!
What is this???A great,awesome,delicious cake…i made fo ma birthday,i couldnt stop eating…just the best.Love it…
I posted on my blog and,off course,i mentioned you,just cause i love everything in here…i want to make just like you with the raspberries,but i forgot to buy,so i used te strawberries that i have home,and came out nice,not like yours,but…come and check it out if you can…
Thanks for share this beautiful cake with us.
XOXO
Sharon
http://viramexeefaz.blogspot.com/2013/01/bolo-tiramisu-tiramiu-cake-e-mais-um.html
OMG…this is a awesome cake..
I was looking for a recipe like that…and this one is the best,plus,all the pic,very nice.Thanks for share!
I just have a question (if you can answer soon,i'm planning to make it on friday for my birthday)…the size of the pan,how much batter it will make.First you show on pic two pans,on the recipe bellow you said one of 8 inch.COuld you please let me know?Thanks again
Sharon
shapalmas@gmail.com
viramexeefaz.blogspot.com
Really mouthwatering cake …Nice way to explain…
Very well done! Thank you! A few notes as I am in the middle of the recipe as we speak. I found the marscapone/cream to be too loose initially. I disregarded your warning not to overmix and ran it through the kitchenaid on high with a wire whip and it set up fine for me with no texture issues. Not sure if the fact that I am at sea level had anything to do with it. Also the filling seemed not quite sweet enough so I added about 1/4 c of powdered sugar which also helped with consistency.
When mixing the cake batter I goofed and used anise extract 1/4 t by mistake instead of almond. We'll see how that goes over. Also, is the salt omitted from the recipe steps?
Well done. thank you for your notes this really helps other bakers. Merry Christmas.
What icing tip did you use?
I used a large Aztec tip #828. I hope that helps. Any large star tip would work.
This will last at least 4-5 days and still be great.
How long can it last in the fridge? 🙂
Hi Janet
Just wondering if the frosting can be put in the freezer?
Hmmm…I wouldn't.
wao..didn't know that this kind of cake exist lol.. but its awsum..n u showed each n every step … simply loved it..
This cake looks remarkable. I would love to try making it, but I am also concerned about the raw egg yolk. Could you cook the egg yolk with the sugar in a double broiler on a low heat first?
Hi! This is simply beautiful. Are there any replacements available for the tiramisu syrup??
You could substitute with a traditional soaking solution of 1 1/2 cups espresso mixed with 2 teaspoons of dark rum. Hope this helps. Thanks for stopping by.
So there aren't any non-alcoholic substitutes?
The only thing I can think of is to make a simple syrup with 1/2 cup sugar to 1 cup water. Bring to a boil. Remove from heat then add rum and/or coffee flavoring. I hope this helps.
Thanks so much Janet!! I am going to give this a go for my own birthday party next weekend. I really appreciate the effort you have gone to with the individual step by step photos, it is very much appreciated!!!
Happy Birthday! You will love this cake. I usually bake my own birthday cake as well. After all, we deserve the best. Thank you for your kind comment.
Your cake looks lovely, I made a similar cake with strawberries and strawberry mousse for a special occasion a few years ago, with the lady fingers and also the ribbon! I have been looking for a recipe for an elegant tiramisu cake and yours seem to fit the bill, I just have one question. The egg yolks are uncooked when added to the cream and mascarpone mixture, wouldn't salmonella be an issue if the case? I am a bit leery because of the raw yolks as I will be baking this for an order.
If you are concerned you can definitely omit the egg yolks.
Wow!!! That cake looks fan fabulous and you've motivated me to attempt making this for my hubby's bday. Thank you so much for the great instructions:)
you are so welcome. I hope your husband loves it.
Hi, thanks for the recipe. How long in advance can you make the cake and arrange it?
Two days works really well for the flavors to blend. The lady fingers around the sides will begin to soften, but that makes it easier to slice.
Hi,
I was wondering if there was a substitute for the tiramisu syrup? That is a gorgeous cake!
Most recipes call for 1 1/2 cups espresso mixed with 2 teaspoons of dark rum. That's an option.
Beautiful!
Thank you so much. It's delicious.
I too believe and follow "the plan". So nice to see that I can have my cake and eat it too now!
🙂
I am the lucky one that got to eat this cake!!! It is as wondeful as it looks!!! Thanks so much Janet!!!
Happy Birthday Ellery Jane!
This is a work of art! I am new to your blog and was so taken with this post that I decided to browse through your earlier entries. I'm so glad I did that. I really like the food and recipes you share with your readers and I'll definitely be back. I hope you have a great day. Blessings…Mary
Thank you, Mary. I'm so glad you found me and hope you'll come back. Feedback like yours just touches my heart.
Wow!!! This is one beautiful cake!!!
Thank you so much.
It just looks so amazing! And I love that you found substitutes since I too, stick with "the Plan"! 🙂 By the way, I've read through your entire blog this week and am inspired by you! Thanks for taking the time to document your steps along the way. I hope to try some of your recipes soon. Wish me luck!
Thank you Elizabeth. That's a lot of reading. I hope I didn't bore you to death with too many details. Happy Cooking!
Janet, Greetings from Kerala, India…thanks a bunch for hopping over and for the lovely inspiring thought and for the follow. I have never had a tiramisu cake though I have seen and read about this wonderful cake in blogs….mascarpone is very difficult to find at this part of the world…..your clicks are sooooo tempting, thank you once again.
Wow! Thank you so much for the kind comments. I wish I could send you all a slice. REALLY! I have a whole cake to eat with nobody home to share it with.
Beautiful. My husband is Italian and we follow "The Plan" so he has adjusted his tiramisu over the years as well. I like your tiramisu syrup idea – a lot! Amazing cake.
🙂 I hope my recipe compares to your husbands authentic Italian Tiramisu. Thanks for stopping by.
Absolutely stunning cake! LOVE its appearance!! Love love love!
Will have to try….
Hy Janet,
chanced upon your space while blog hopping..glad I stopped by..
amazing space you have..tiramisu looks picture perfect with lovely step by step cliks..
excellent presentation..
Am your happy follower now..;)
do stop by mine sometime..
Tasty Appetite
I just checked out your blog, Jay. I will be visiting you for fabulous Indian recipes. My family loves Indian food.
Thank you for letting me know you exist.
That was amazing. Your step by step guide with photos made me want to try this difficult cake. It's very nice of you to post photos of every step and incredibly helpful. Thanks a million. 🙂
Superb…Awesome looking cake..
impresionante la manera de presentar y explicar – felicidades
surelia
wow wow wow wow wow wow wow wow….There is nothing i can say about this….Awesome job janet..
Wow. Wow. I don't usually like frilly cakes, but this cake is fantastic. You worked so hard, and it was worth it. I don't live in Utah, but I don't drink alcohol, so I like your adjustments.
Thank you for your kind comments.