
My number two son is known for his fabulous pizza’s and especially for his pizza crust. I’m still working on perfecting his crust. I came pretty close this time. I think.
We have such a great time gathering together as a family and having a pizza night. Ryan makes his pizza dough and we put together several bowls of toppings. I’m not going to lie when I say that it is a TON of work. You will see how time consuming just this one recipe can be. So when the husband that sometimes reads this blog (whoops found that one out not too long ago. I was so busted) says why don’t you do something easy like pizza’s, he has NO idea just how long it takes me. Then I totally trash my kitchen in the process. It is a great family activity/dinner and sometimes worth it.
This Thai Chicken Pizza recipe came from the CPK Recipe book. We have tweaked it here and there, but it’s pretty close to what is in the book.

Let’s start with the pizza dough. I like to make this a day in advance. I like to refrigerate the dough because I think it helps create the chewy crust that everyone loves.
You will need: 2 cups warm water
2 tablespoons instant yeast
2 tablespoons sugar
2 tablespoons honey
2 tablespoons olive oil
1 tablespoon kosher salt and
5 1/2 – 6 cups all purpose flour
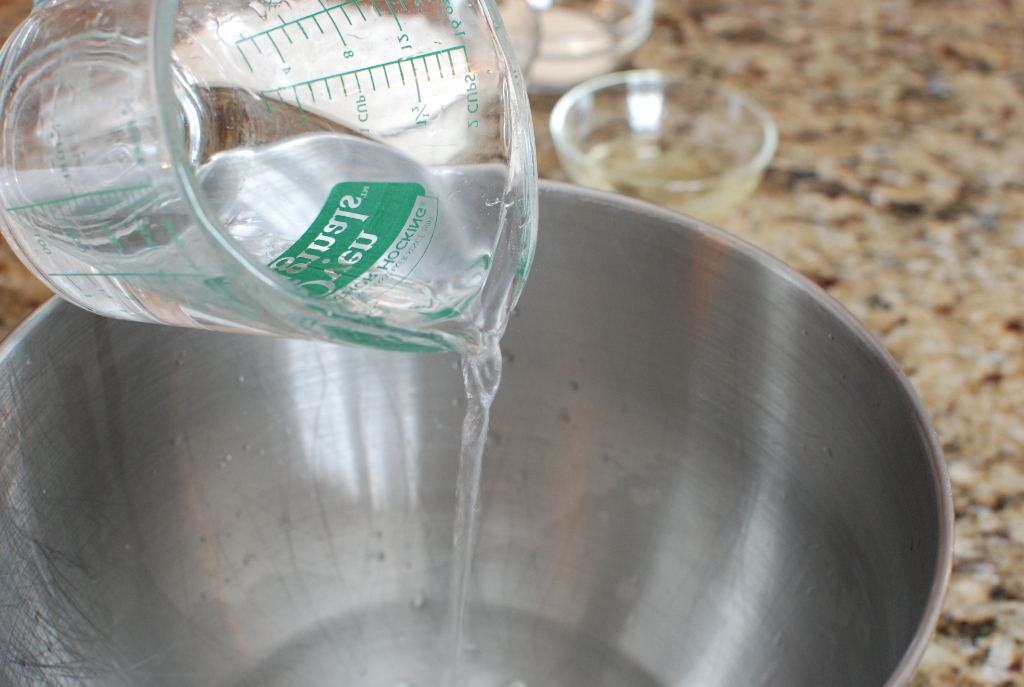
In a large mixing bowl, add the warm water.

Sprinkle on the yeast.
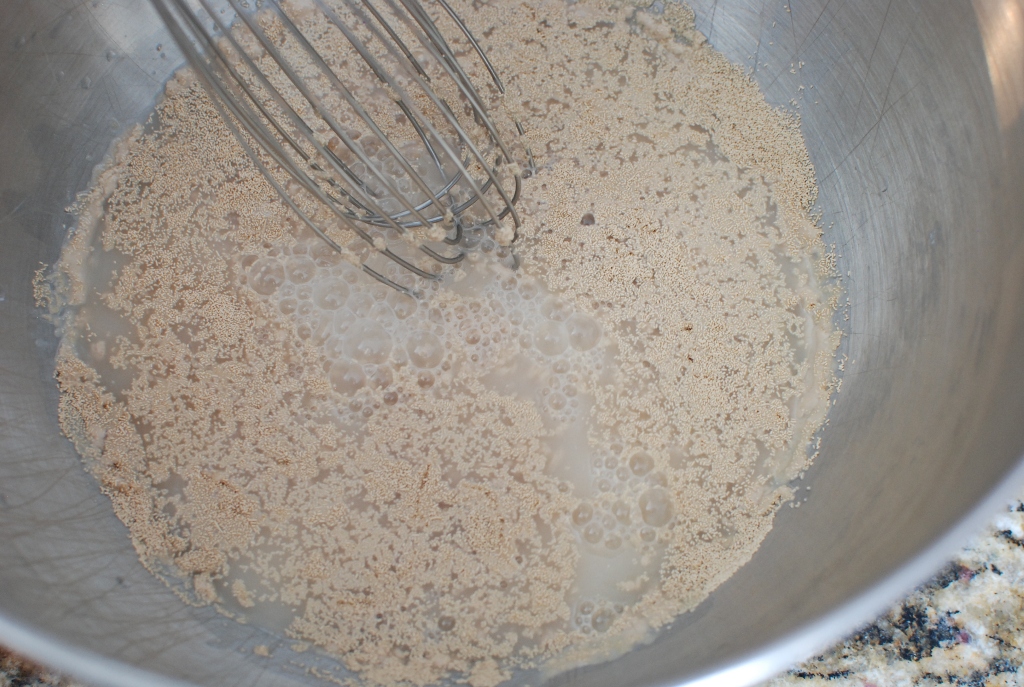
Whisk in the yeast then let it sit for just a couple of minutes to dissolve a bit.

Add the sugar.

Oil.

And honey. Note: Sometimes Ryan will add a bit of vanilla and more honey because he likes a sweet dough and I really like it with this particular pizza.

Add 2 cups flour.

Beat until smooth.

Add the salt. I like to add the salt after I have added some of the flour because the salt can kill yeast and we really need that yeast to live!

Add the remaining flour one cup at a time mixing well after each addition.
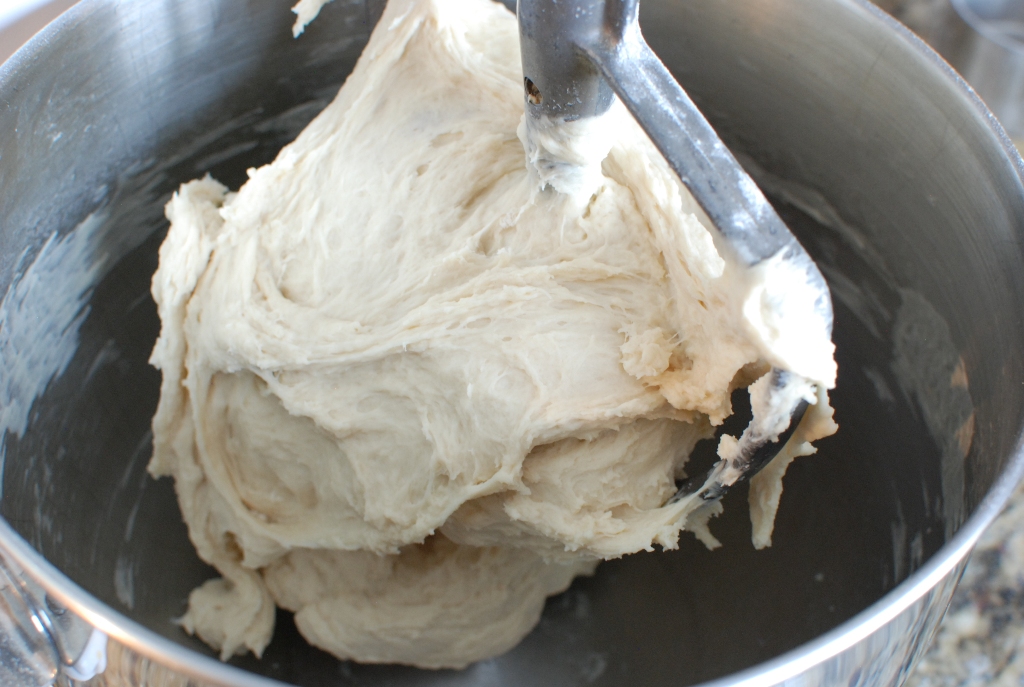
Keep adding flour until the dough just won’t suck up any more. The dough is quite stiff and I have found that this helps with THIS particular crust to roll out easier.

Pour in 1-2 tablespoons of oil into a very large bowl.
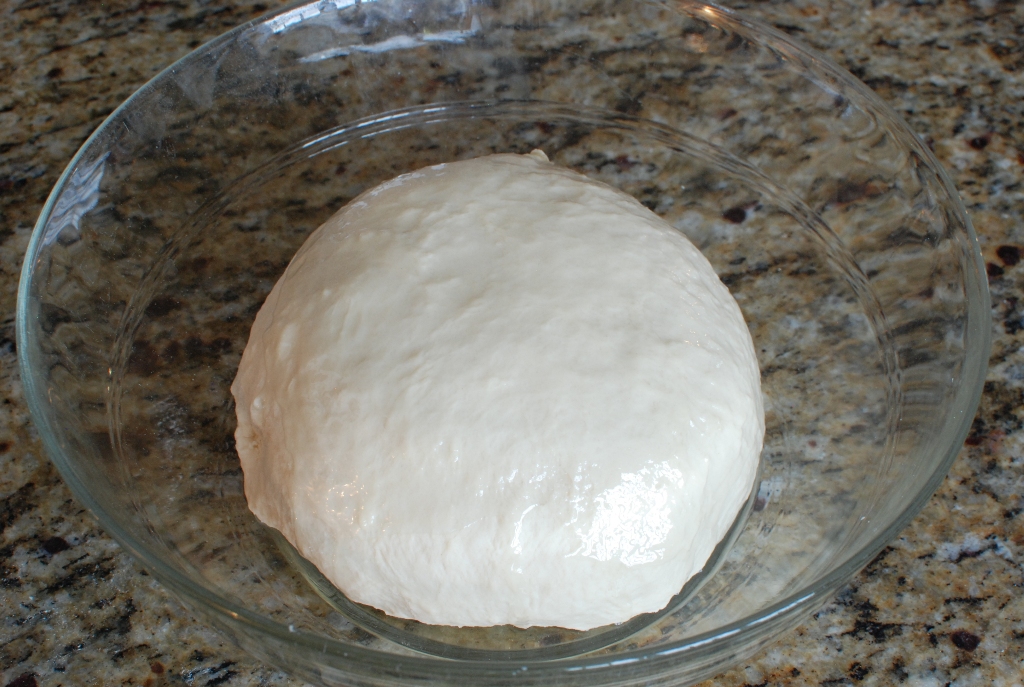
Add the dough and roll it around in the oil so that the entire ball of dough is covered with oil.

Cover with plastic wrap and refrigerate over night. OR you can just cover and let rise for about 1-2 hours.

If you have refrigerated your dough remember that you MUST bring the dough to room temperature and let it continue to rise. This means the dough must be removed about 5-6 hours before you are ready to use.

After the dough has risen and is room temperature, flour a baking sheet.

Divide the dough in half.
STOP: This is where I blew it! I thought that this recipe only made two pizzas. I wasn’t totally wrong. It will make two HUGE pizzas about 14-inch round. So I should have divided the dough into three sections or even four would have been nice for individual size pizzas. There you have it. It’s your choice depending on what size you want to your pizza’s to be.

Place how ever many balls of dough you want on the flour baking sheet.

Cover with a towel and let them rest until you are ready to roll them out. At least 30 minutes.

If you are using a pizza stone, you will need to put it in the oven and heat the stone at 500 degrees for one hour. Got that? One hour.
You can also just use a baking sheet or pizza pan. In that case you do not need to preheat the pan. Just oil it very well so the crust does not stick.

This is the recipe for the sauce. You basically empty all of your cupboards with any Asian ingredients you make have. You will need:
1/2 cup peanut butter
1/2 cup hoisin sauce
1 tablespoon honey
2 teaspoons Rice Vinegar or Red Wine Vinegar
2 teaspoons minced ginger
2 tablespoons roasted sesame oil
2 teaspoons soy sauce
1 teaspoon Vietnamese chili sauce (or dried chili flakes)
1 tablespoon oyster sauce
2 tablespoons water

In a medium size sauce pan add the peanut butter.

Hoisin sauce.

Honey

Vinegar

Sesame oil

Soy sauce

Chili sauce or dried pepper flakes

Oyster sauce

Water


Fresh minced ginger

Place over medium heat and whisk. It will become easier to whisk once the ingredients begin to warm.

Just heat until the ingredients are well blended. Remove from heat and transfer to a bowl.
The sauce can be made in advance and covered and refrigerated.

This is what you will need to assemble the pizza:
8 oz boneless, skinless chicken, chopped
Spicy peanut sauce (recipe above)
2 cups mozzarella cheese, shredded
1/4 cup shredded carrot
1/4 cup white bean sprouts (not shown because I forgot to buy some)
4 scallions, slice on a diagonal
2 tablespoons chopped roasted peanuts
2 tablespoons chopped cilantro
**This will be enough to make two pizzas

Just lightly saute the chicken in one tablespoon oil.

Do not cook all the way through because it will continue to cook on the pizza.

Add a heaping spoonful of the spicy peanut sauce.

Stir to coat chicken. Remove from heat and refrigerate until ready to use.

Let’s assemble this dang thing.
If you are using a pizza stone, you will need a pizza peel. Sprinkle the peel with corn meal, semolina or something like Cream of Wheat. This is to help the pizza just slide right off onto the pizza stone. Flour just doesn’t work so well.

Don’t over work the dough. Gently lift the dough from the baking sheet and place on a floured surface. Roll the dough into a large circle using a rolling pin or gently form with your hands.

As you can see I made a GIANT circle. Notice how nicely round it is. Are you proud of me Ry?

Slice the pizza dough onto the pizza peel. Do this before adding the toppings. Trust me and just do it.

I like to brush the dough with a little olive oil.


Spread half of the spicy peanut sauce over the dough.

Sprinkle with mozzarella cheese.

Top with half of the chicken.

Sprinkle with half of the carrots.

Half of the scallions.
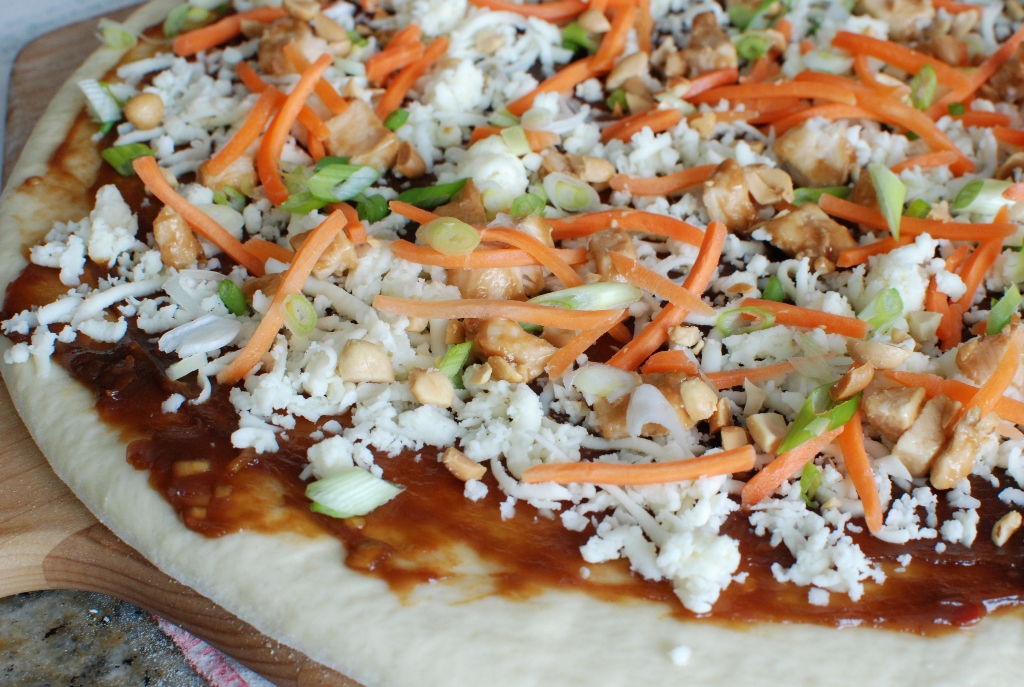
and half of the chopped peanuts and bean sprouts that I forgot to purchase.

Carefully slide the pizza onto the preheated stone. Be careful it’s hot!

Bake for 10-15 minutes. Depending on how large and thick the dough is.

Meanwhile, I’m going to chop the cilantro. I like to drizzle the pizza with sweet Red Chili sauce.


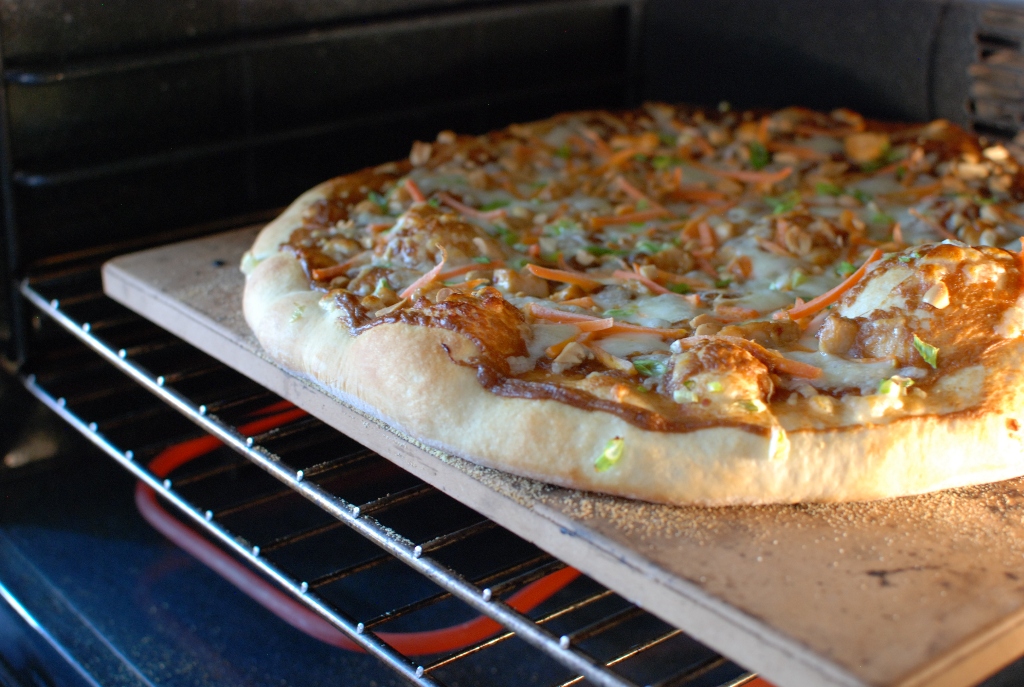
When the crust is turning a nice brown color and when the toppings are bubbling, remove from the oven with the pizza peel.


I like to drizzle about 2 tablespoons of the Sweet Red Chili Sauce on the hot pizza.


Cut the pizza before adding the cilantro…BECAUSE if you don’t cut the pizza first all the cilantro will stick to the pizza wheel and that’s a pain.


There you have it. Thai Chicken Pizza.
Thai Chicken Pizza
Pizza Dough:
2 cups warm water
2 tablespoons instant yeast
2 tablespoons sugar
2 tablespoons honey
2 tablespoons olive oil
1 tablespoon kosher salt
Spicy Peanut Sauce:
1/2 cup peanut butter
1/2 cup hoisin sauce
1 tablespoon honey
2 teaspoons rice vinegar or red wine vinegar
2 teaspoons minced ginger
2 tablespoons roasted sesame oil
2 teaspoons soy sauce
teaspoon Vietnamese chili sauce (or dried chili flakes)
1 tablespoon oyster sauce
2 tablespoons water
Pizza Toppings:
1 tablespoon olive oil
8 ounces boneless/skinless chicken breasts, chopped
2 cups shredded mozzarella cheese
4 scallions, slivered diagonally
1/4 cup white bean sprouts
1/4 cup shredded carrot
2 tablespoons roasted peanuts, chopped
2 tablespoon Sweet Red Chili Sauce
2 tablespoons fresh cilantro, chopped
Additional ingredients:
Olive oil
Corn meal or semolina to dusting pizza peel
Sweet Red Chili sauce
For the Pizza dough:
Pour 2 cups warm water into a large mixing bowl. Add yeast and stir in. Allow to sit for a minute to dissolve. Add sugar, honey, and oil. Add 2 cups of flour and beat until smooth. Add salt. Add remaining flour 1 cup at a time. Beating well after each addition. Mix until a firm dough is formed. Place in a large oiled bowl. Cover with plastic wrap and refrigerate overnight OR cover and let rise for 1-2 hours.
For the Spicy Peanut Sauce:
Combine sauce ingredients in a saucepan over medium heat. Whisking until the ingredients are well blended and cook slightly. Remove from heat. Cover and refrigerate until ready to use.
To assemble the pizzas:
Preheat oven and pizza stone to 500 degrees. Divide the dough into 2-4 balls of dough. Place on a floured baking sheet, cover and let sit for 30 minutes.
Roll out pizza dough to form a circle. Slice the pizza onto a pizza peel that has been dusted with cornmeal. Brush the top of the dough with about 1 tablespoon of olive oil. Spread with half of the spicy peanut sauce. Layer with half of the topping ingredients, if planning on making two pizzas. Adjust to amount of toppings by how many pizzas you plan to make and their size.
Carefully slide the pizza off the peel and onto the heated pizza stone. Bake for 10-15 minutes or until crust is golden and cheese is beginning to bubble.
Remove from oven and drizzle with Red Chili Sauce. Cut pizza then sprinkle with chopped cilantro. Makes 2-4 pizzas.
Number two son is a great cook. Pizzas are just one of his specialties. He’s single…26…just so you know.
Thanks for the great recipe ! Gonna try it soon since my family and I always enjoy what ever reminds us gorgeous Italy !!!
I am making your pizza dough recipe tonight, but I don't have a pizza stone (much to my shame :o( Will a greased cookie sheet work? Do I need to change the time and/or oven temp?
Yes, you can use an oiled cookie sheet. Sprinkling the pan with a bit of cornmeal will help give it a crunch. I have purchased inexpensive clay tiles from a hardware store and lined my oven with them. They worked great. Good luck.
Would this work in a bread machine?
To be honest with you, I have never ever used a bread machine. I suppose it's worth a try…why not? If I had a bread machine I think I would try making the dough in it. Let me know if you do try it.
I didn't start an actual pizza blog, but I did post a recipe using a different recipe for a crust, which I love because it's so easy and becomes so crisp. Here are the links: http://simplysogood.blogspot.com/2012/02/potato-rosemary-pizza.html http://simplysogood.blogspot.com/2012/05/another-use-for-no-knead-bread-dough.html
I hope this helps. Best of luck to you.
I have two questions.
1) Did you ever get a pizza blog started?
2) What is on your pizza peel to make the dough simply slide from peel onto the stone?
I got real excited several months ago about making my own pizza. Although the recipe I made was great, I could not perfect the step of sliding my dough from pizza peel to stone. Perhaps it was my dough (in that it was too sticky, etc.) We love THIN crust and I am looking for a great dough recipe. Is this the one to use for a thin crust?
Love your recipes. Can't wait to give pizza another try!
This looks amazing! I'll let you know how mine turns out! Now, let's talk about this son of yours… ;]
Hahaha…he is still available!
Ha! My husband says the same thing every time I ask him if there's anything in particular he wants for supper. "Oh, I don't know, just something simple and light, like pizza." (My pizzas are a *little* lighter than take-out, so he thinks it's good for him.) So I make pizza a lot, and was looking for new flavours. This looks yummy and cilantro is going on my grocery list right now. By the way, I never pan fry my chicken in advance. If you cut it in thin strips, instead of chunks, it cooks through, quite easily. I've never had it come out raw. And one less pan to wash!
Thanks for the tip on the chicken. I will try it next time. I hope you husband enjoys this simple easy to make pizza:). I love hear such positive comments. thanks you so much.
Big hit with the hubby. Actually I didn't find it to be that much work, and when I made the sauce I just poured the ingredients directly into a 2-cup measuring cup, so saved another pan. I didn't have trouble mixing it at all. Thanks for the idea!
Great idea. Thanks for the comment. I love getting great advice.
that is too good…i want that right now..janet you are making me to crave pizza now…
This looks so good! Ryan has always been good in the kitchen- he used to make these rolo cookies that I've tried to duplicate with no luck! This pizza looks so good!
Oh, I have that rolo cookie recipe somewhere. I'll try to find it. They are so good. You'll have to try his pizza.