• Skip to primary navigation
  • Skip to main content
  • Skip to primary sidebar
  • Skip to footer

Simply So Good

  • Home
  • About
  • Recipes
  • Contact
You are here: Home / Recipes / Cakes and Cupcakes / Dark Chocolate Crepe Cake Step # 2 Hazelnut Filling

Dark Chocolate Crepe Cake Step # 2 Hazelnut Filling

March 26, 2010 Updated July 18, 2017 9 Comments

61 shares
  • Share
  • Tweet
I hope you have completed your chocolate crepes by now.  It’s time to start with the next step.  The hazelnut filling.  First make sure you have taken your crepes out of the freezer, if you froze them.  Make sure they are nice and thawed before beginning the hazelnut filling.  Once the filling is complete, you can start to spread the layers between crepes.
Before you begin to make the hazelnut filling read the instructions thoroughly.  Make sure you have all of the ingredients that you will need.  Remember the phrase “mise en place”?  French for putting everything in place and ready to go. 
Ingredients you will need are heavy cream, egg whites, sugar, unsalted butter (softened), vanilla, hazelnut paste or cream, and a pinch of salt.  When you first open your hazelnut paste, you will see that it has separated and there is a layer of oil on top.  Just like almond butter or natural peanut butter.  Take the time to stir the hazelnut paste.  The sediment at the bottom can be difficult to mix in.  Be patient and stir until it is creamy.
Begin by pouring the heaving cream into a small mixing bowl.
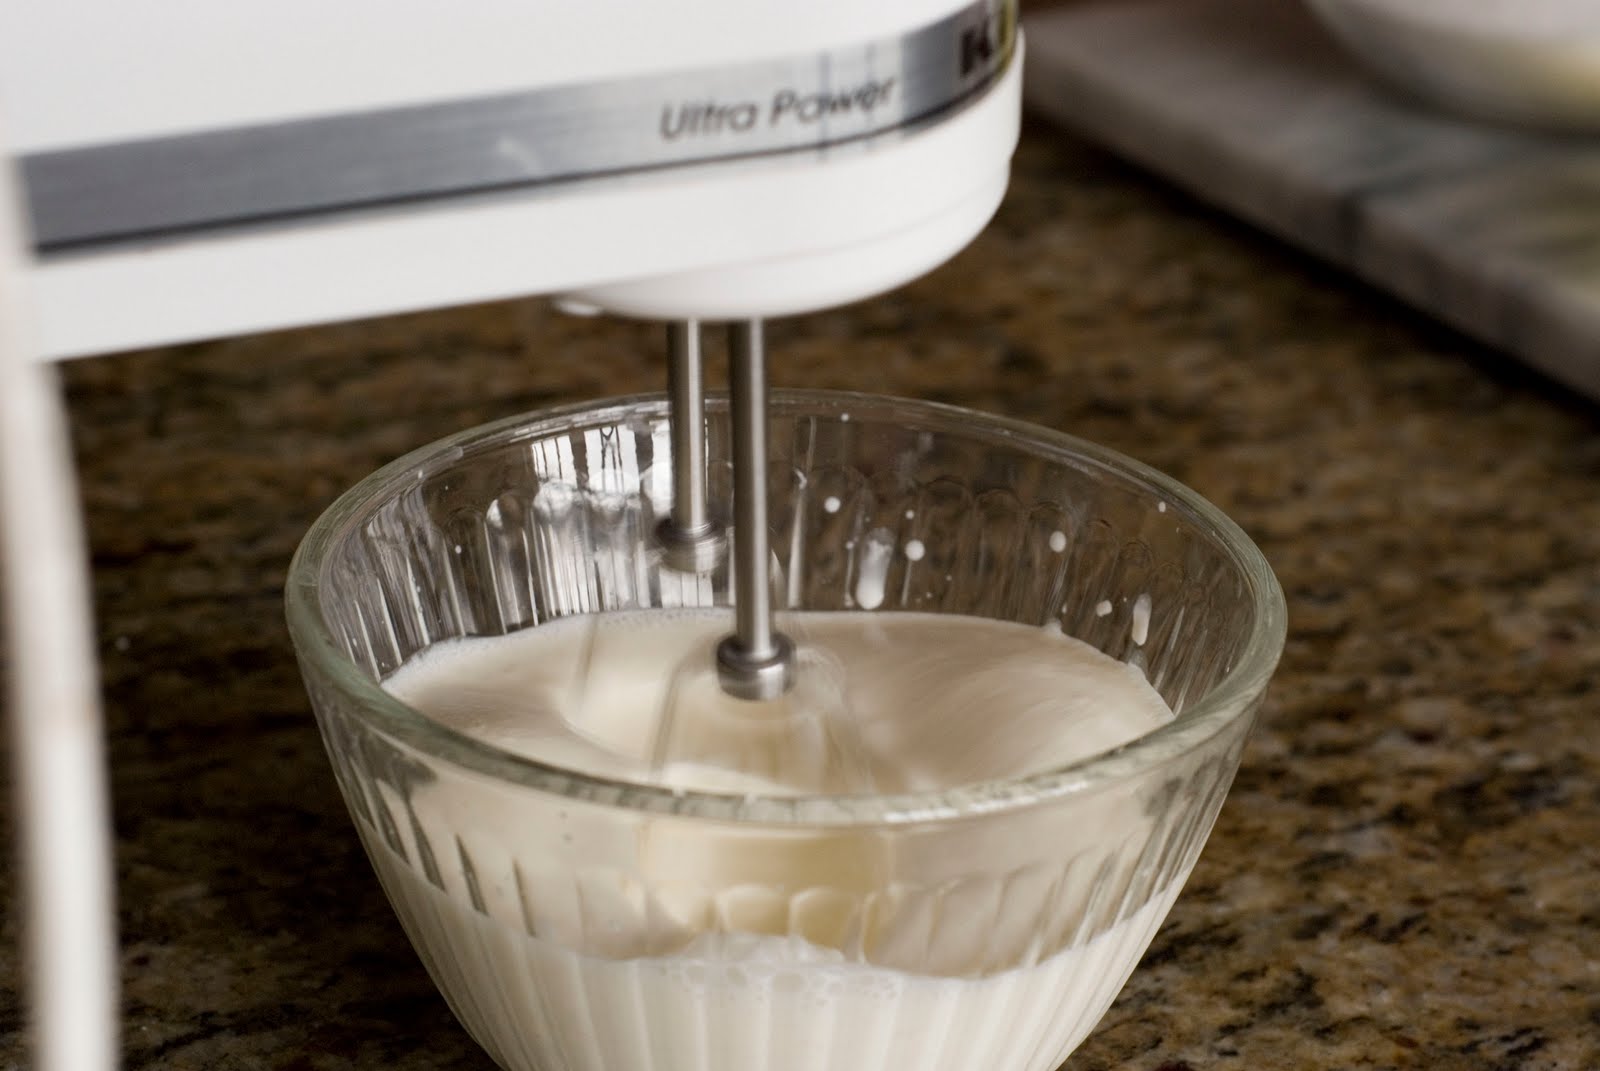
Mix until soft peaks form.  I just use a hand held mixer.  It’s fast and easy.
Like this.  Put this whipped cream in the refrigerator until you need it later.
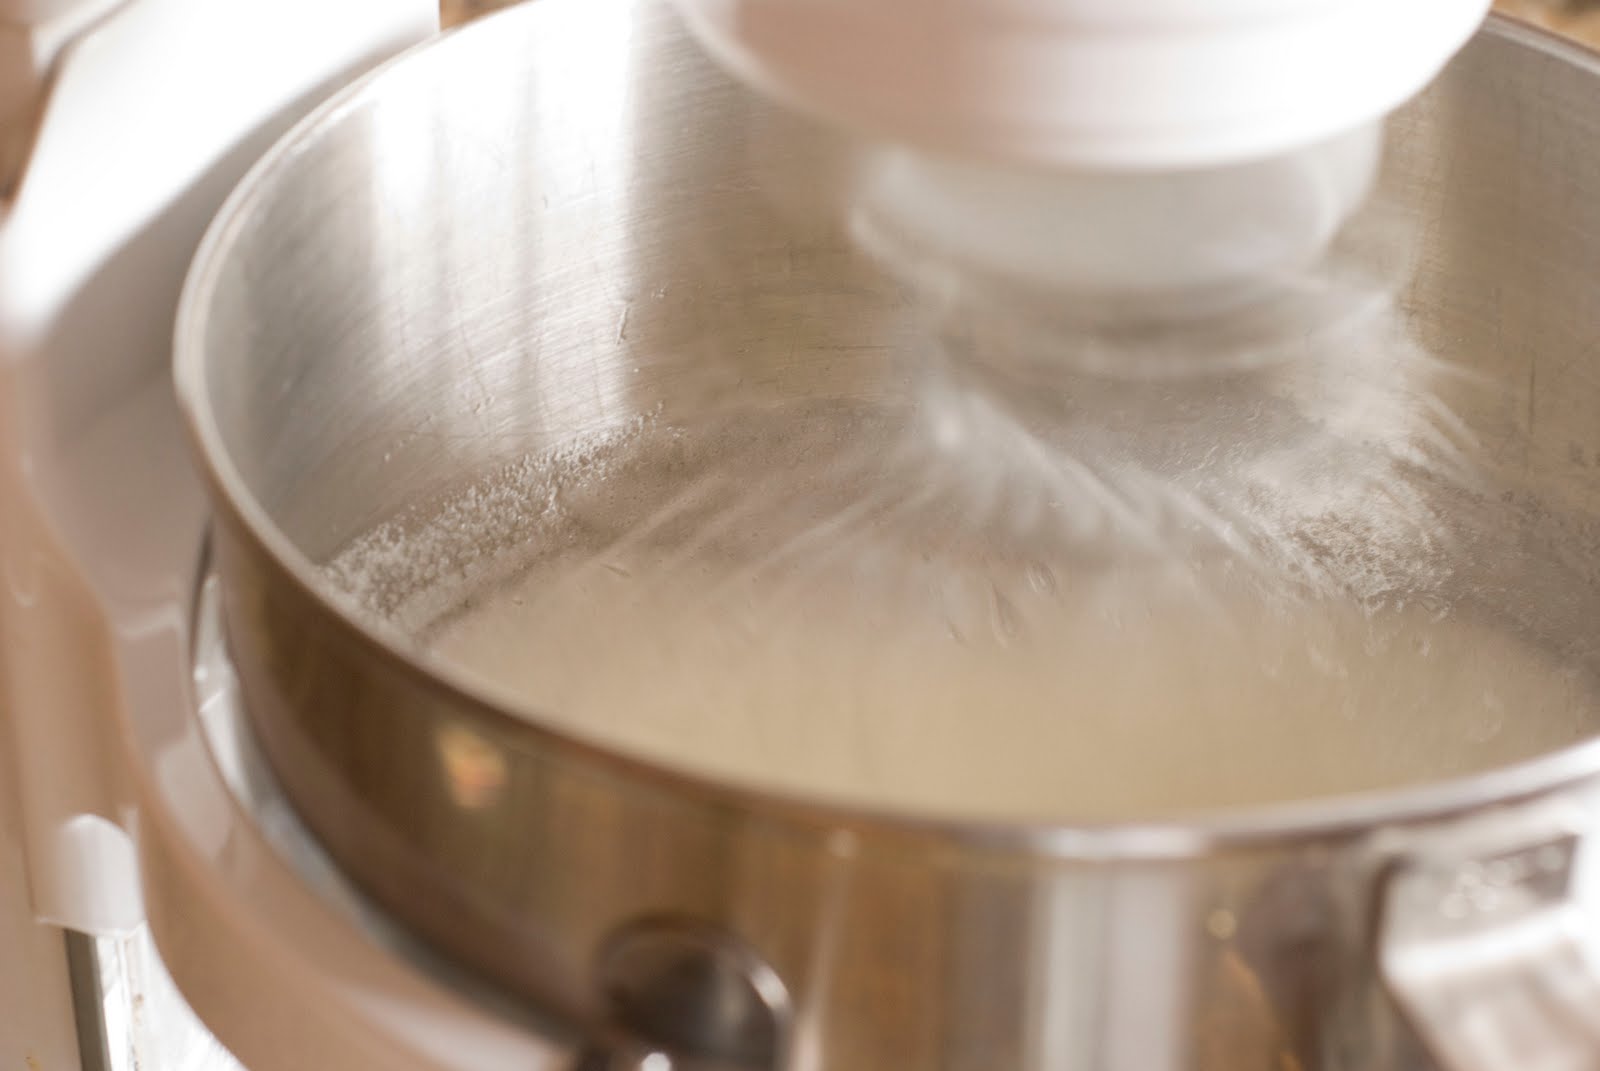
In the bowl of a mixer add the egg whites.  Be VERY careful when separating the egg yolks from the whites.  If you have even an iddy biddy speck of egg yolk mixed in the egg whites, they will not beat into fluffy egg whites.  It doesn’t matter how long you beat the egg whites they will never get thick and fluffy.  So remove any trace of egg yolk. 
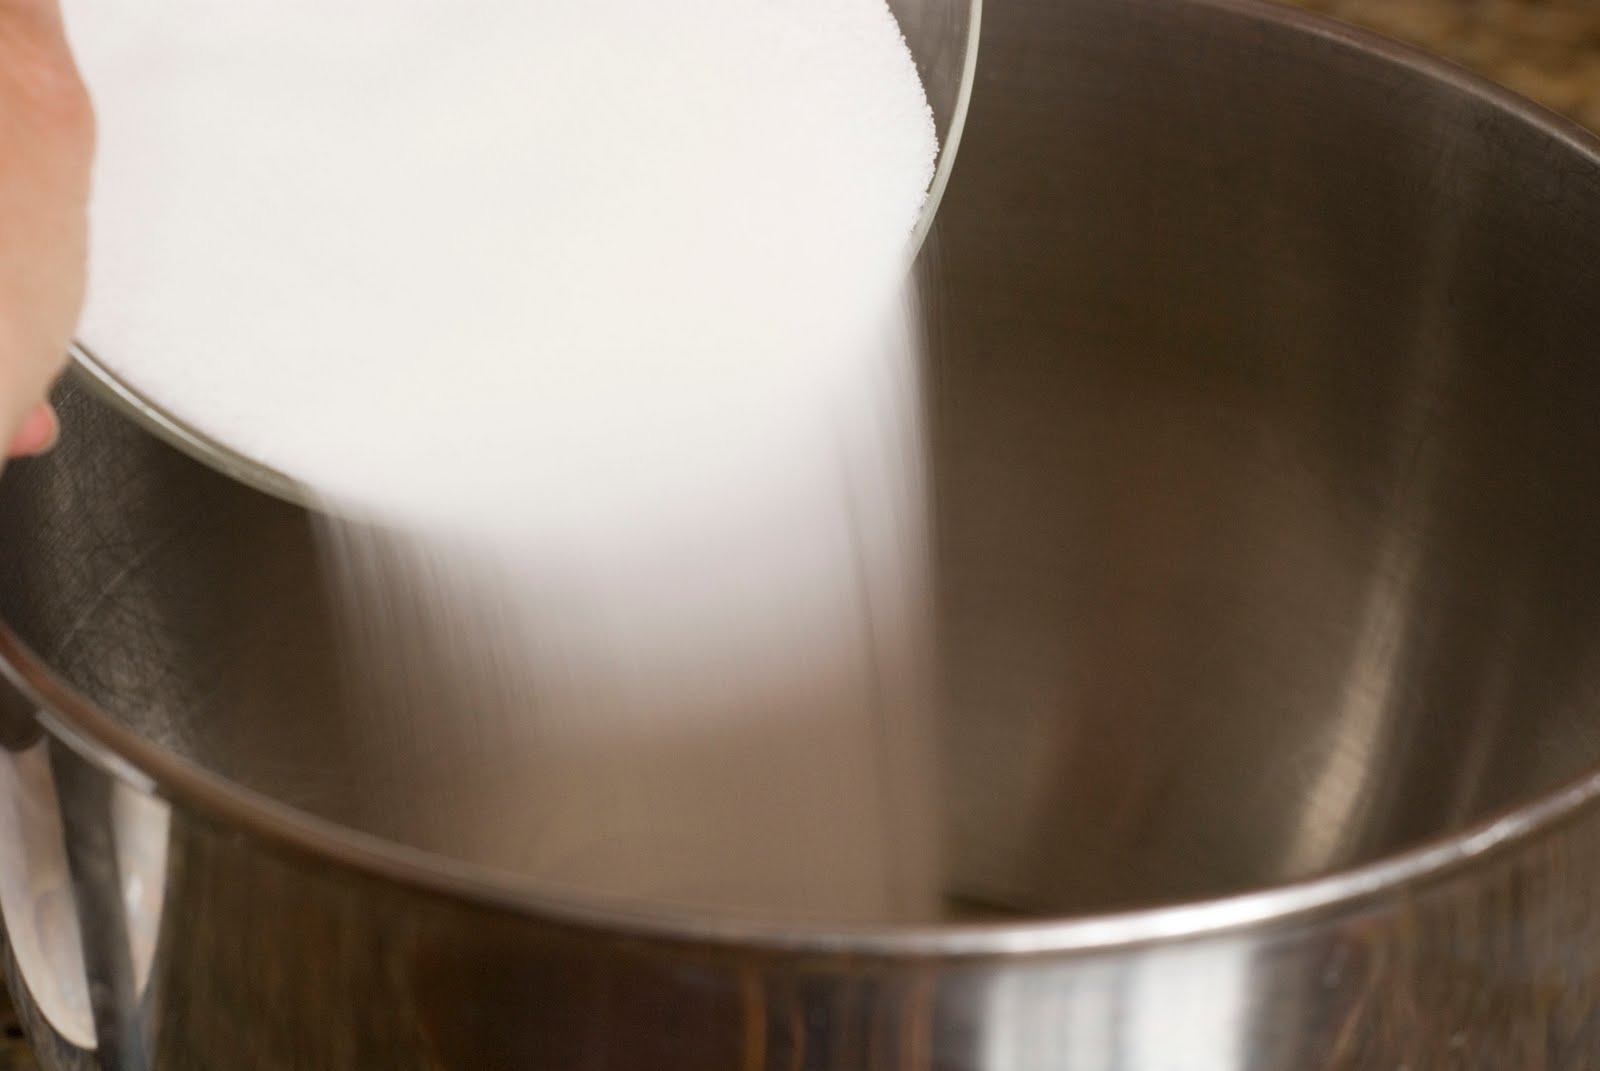
Add the sugar into the egg whites.
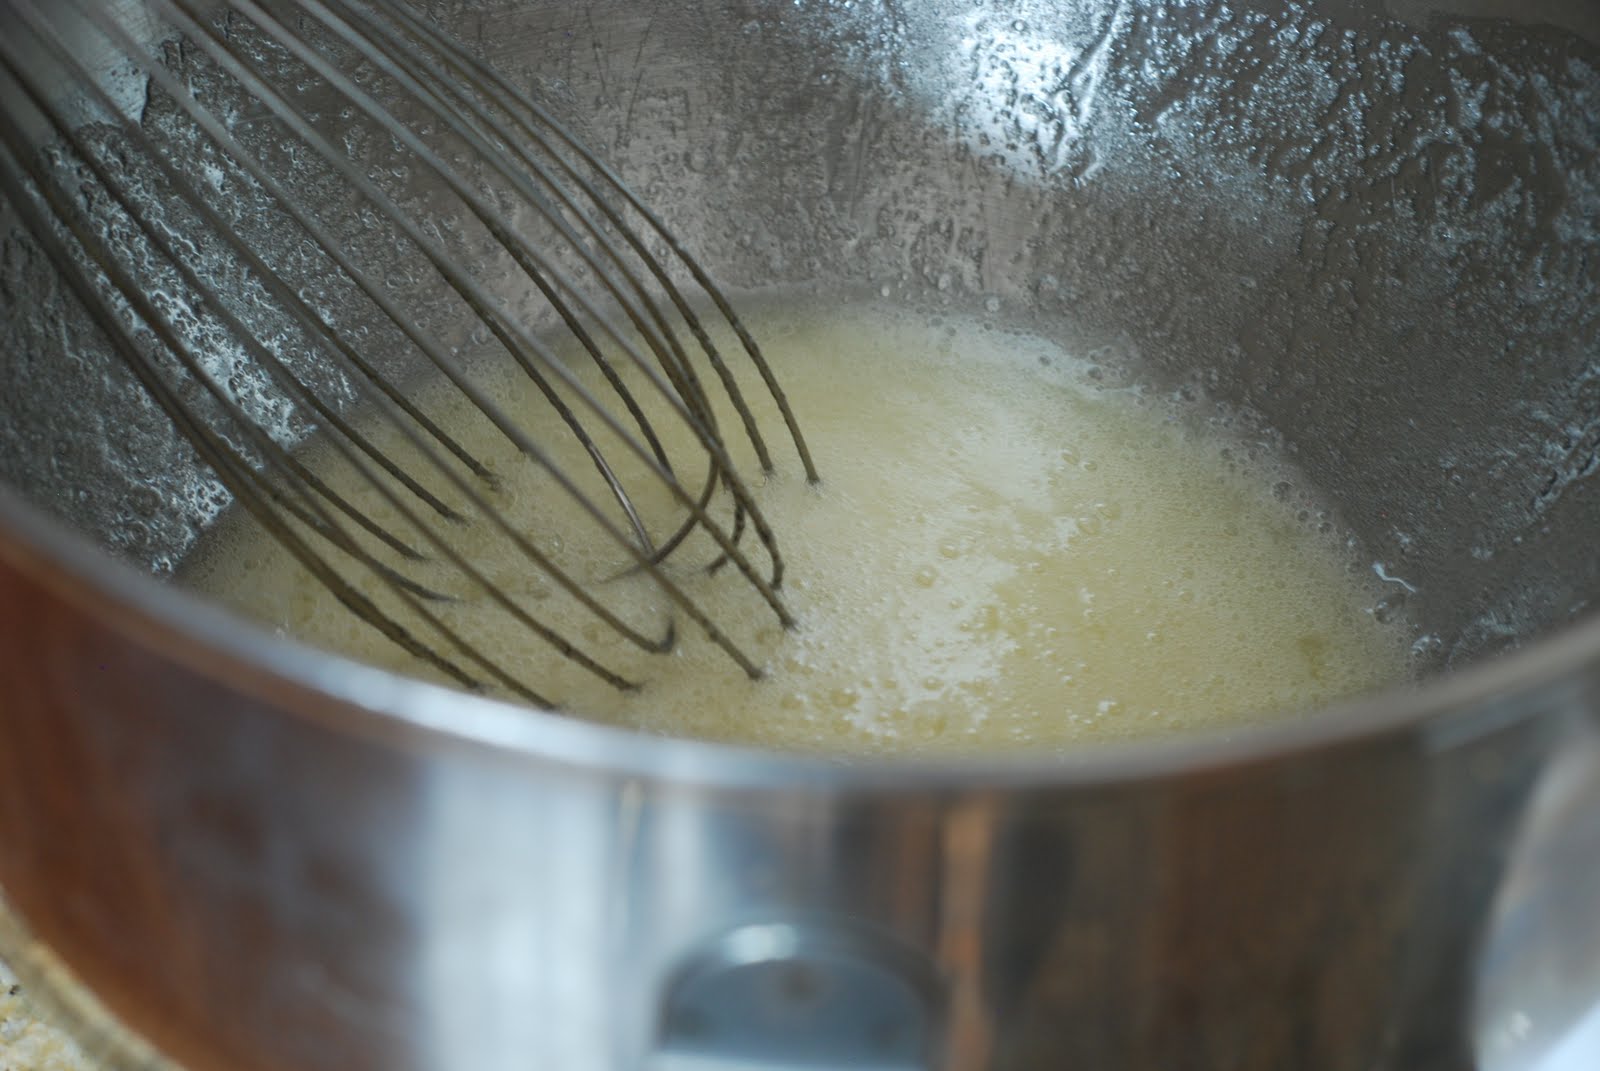
Whisk them together.
Place the bowl over a pan with simmering water.  DO NOT let the bowl touch the water.  You want the steam to slowly heat the egg whites and sugar mixture.  If the water is boiling and gets too hot, you will have scrambled egg whites with sugar in them.  Stir constantly over the simmering water.
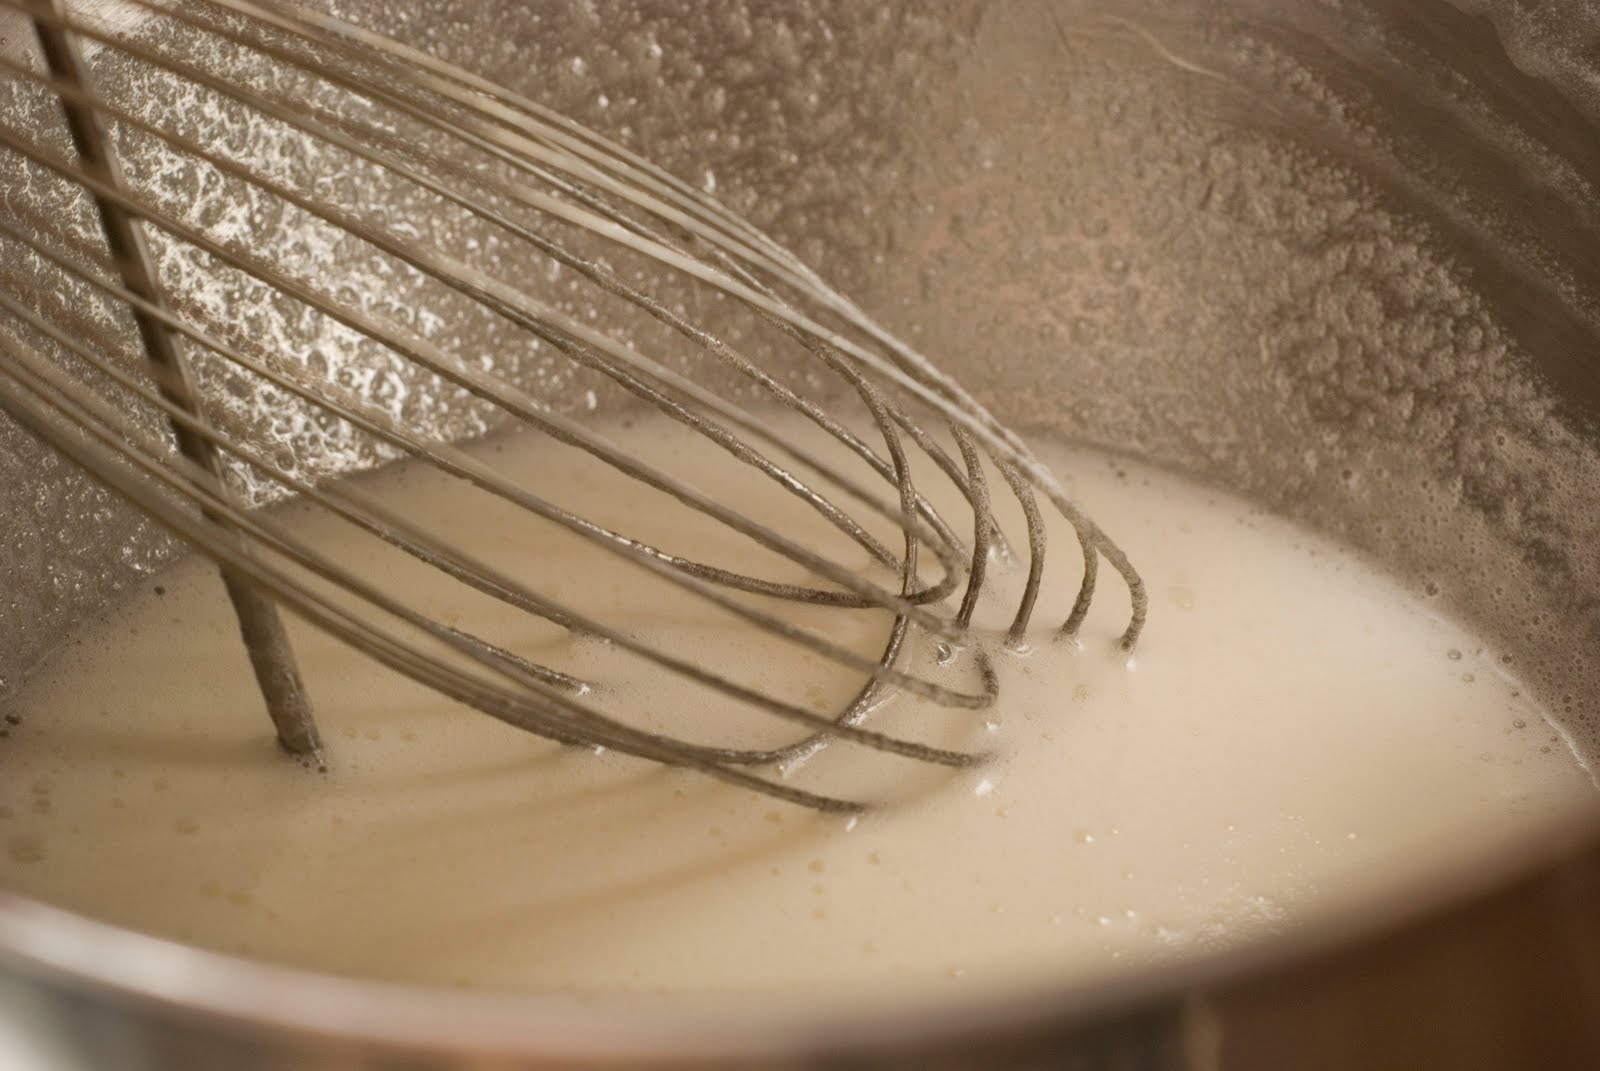
The sugar will start to dissolve as the mixture heats.  Keep whisking.
Clip on a candy thermometer to the edge of the bowl.  Make sure the thermometer isn’t touching the bottom of the pan.  Cook the mixture until it reaches 160 degrees.  This will pasturize the egg whites and dissolve the sugar.  This is a great candy thermometer.  I purchased it through Williams Sonoma.
This is what the mixture will look like.  It will be foamy.  Remove the bowl from the heat and place it onto the mixer.
Attach the whisk attachment and turn the mixer onto medium high speed.
Beat the mixture like crazy!  It should take 5-8 minutes. 
Look how pretty that looks.  You should have soft peaks form.  Remove the whisk attachment and put on the paddle attachment.
Feel the bottom of the bowl.  It should NOT feel warm.  It should be completely cooled.  If it still feels somewhat warm, let it cool longer before you go on to the next step.
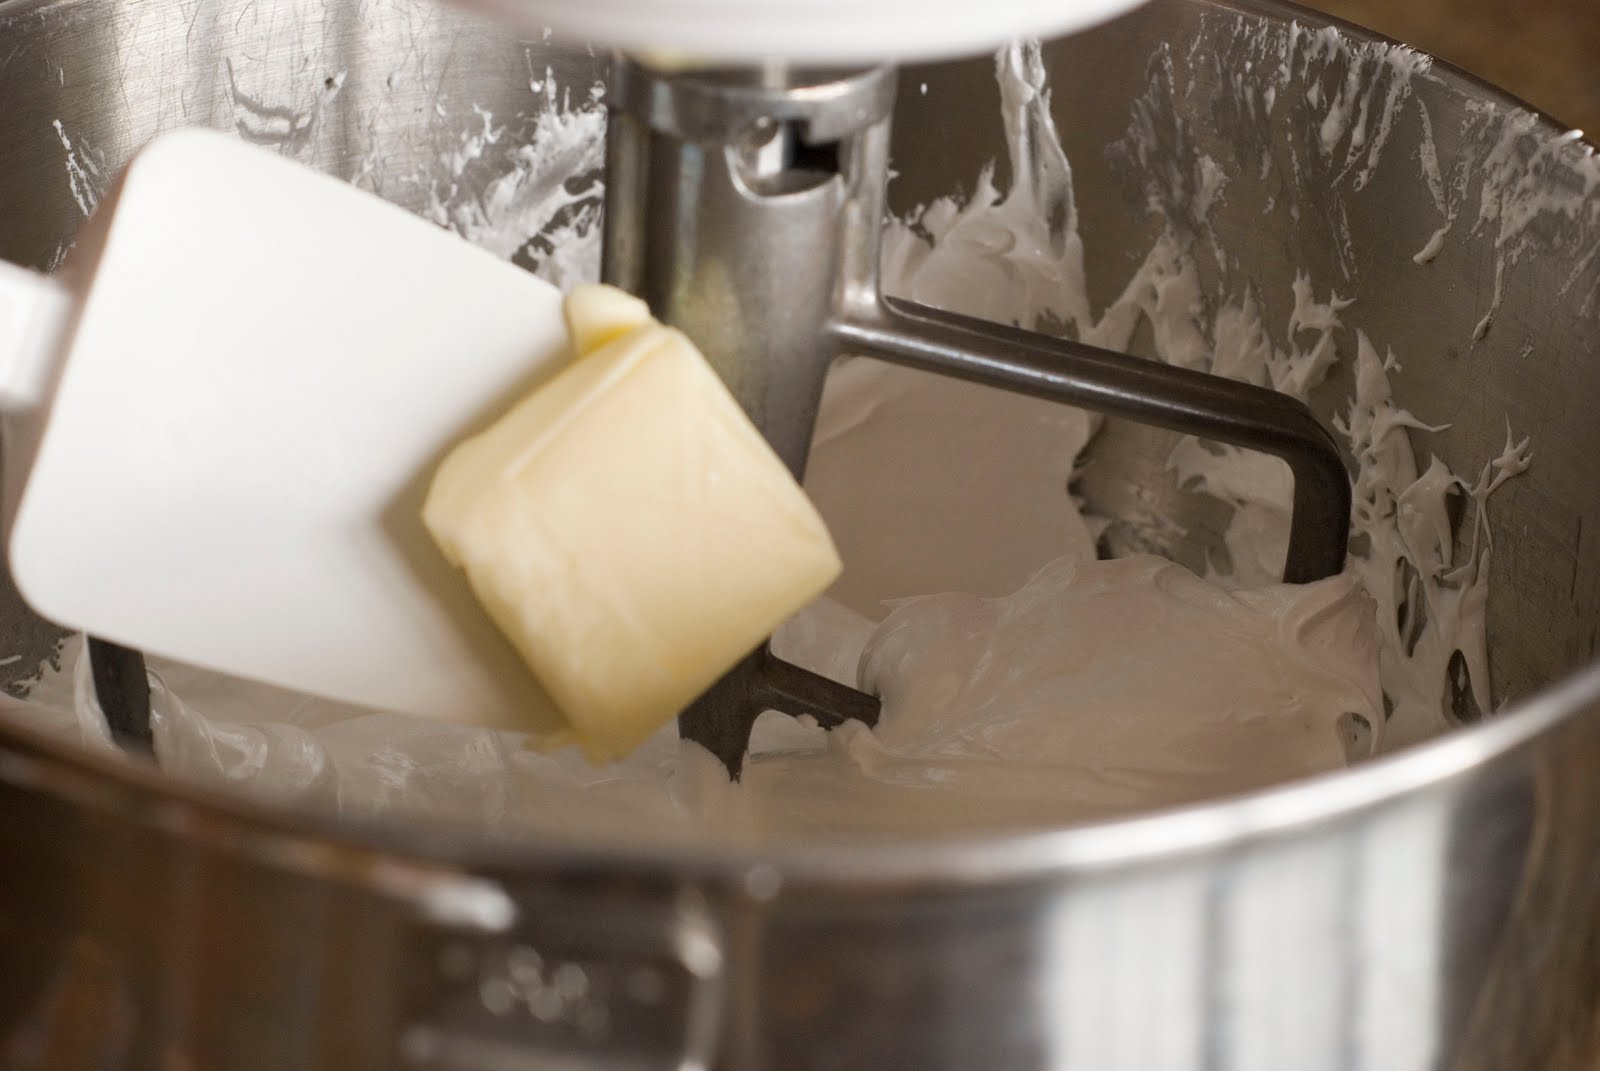
With the mixer on medium-low speed, start adding the butter several pieces at a time.  Mix thoroughly after each addition.
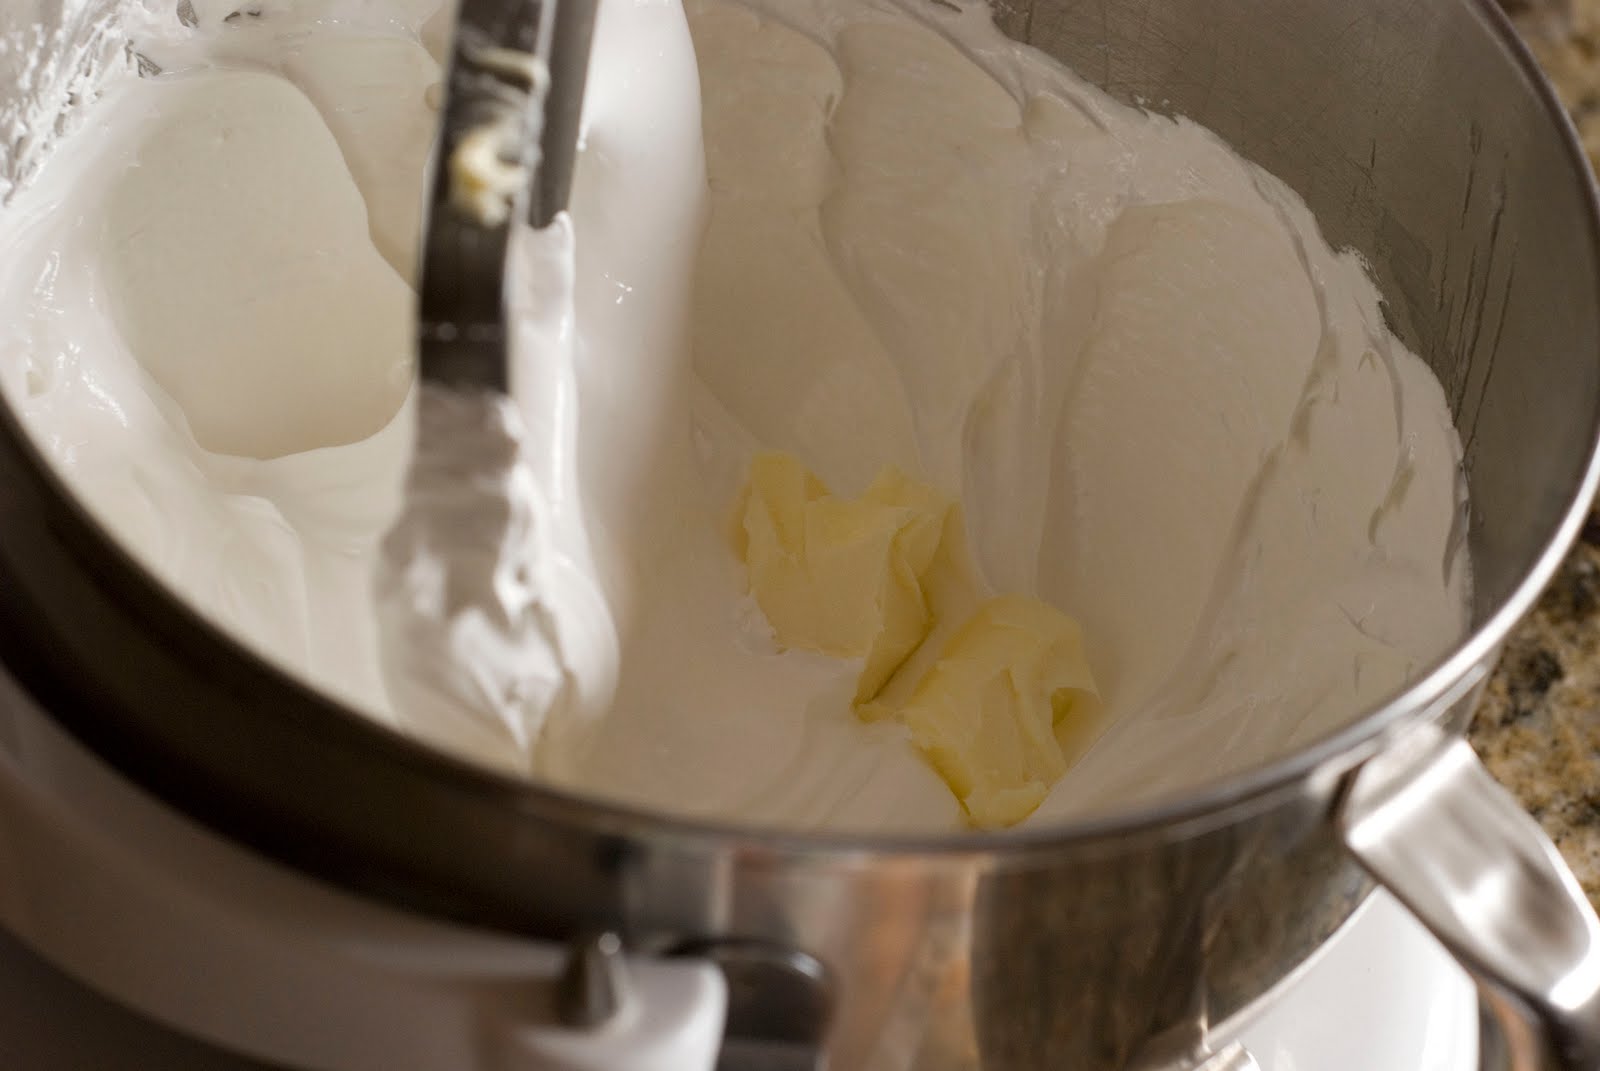
As you add the butter the meringue will slightly deflate.
Add the vanilla and salt.
Blend in the hazelnut paste.
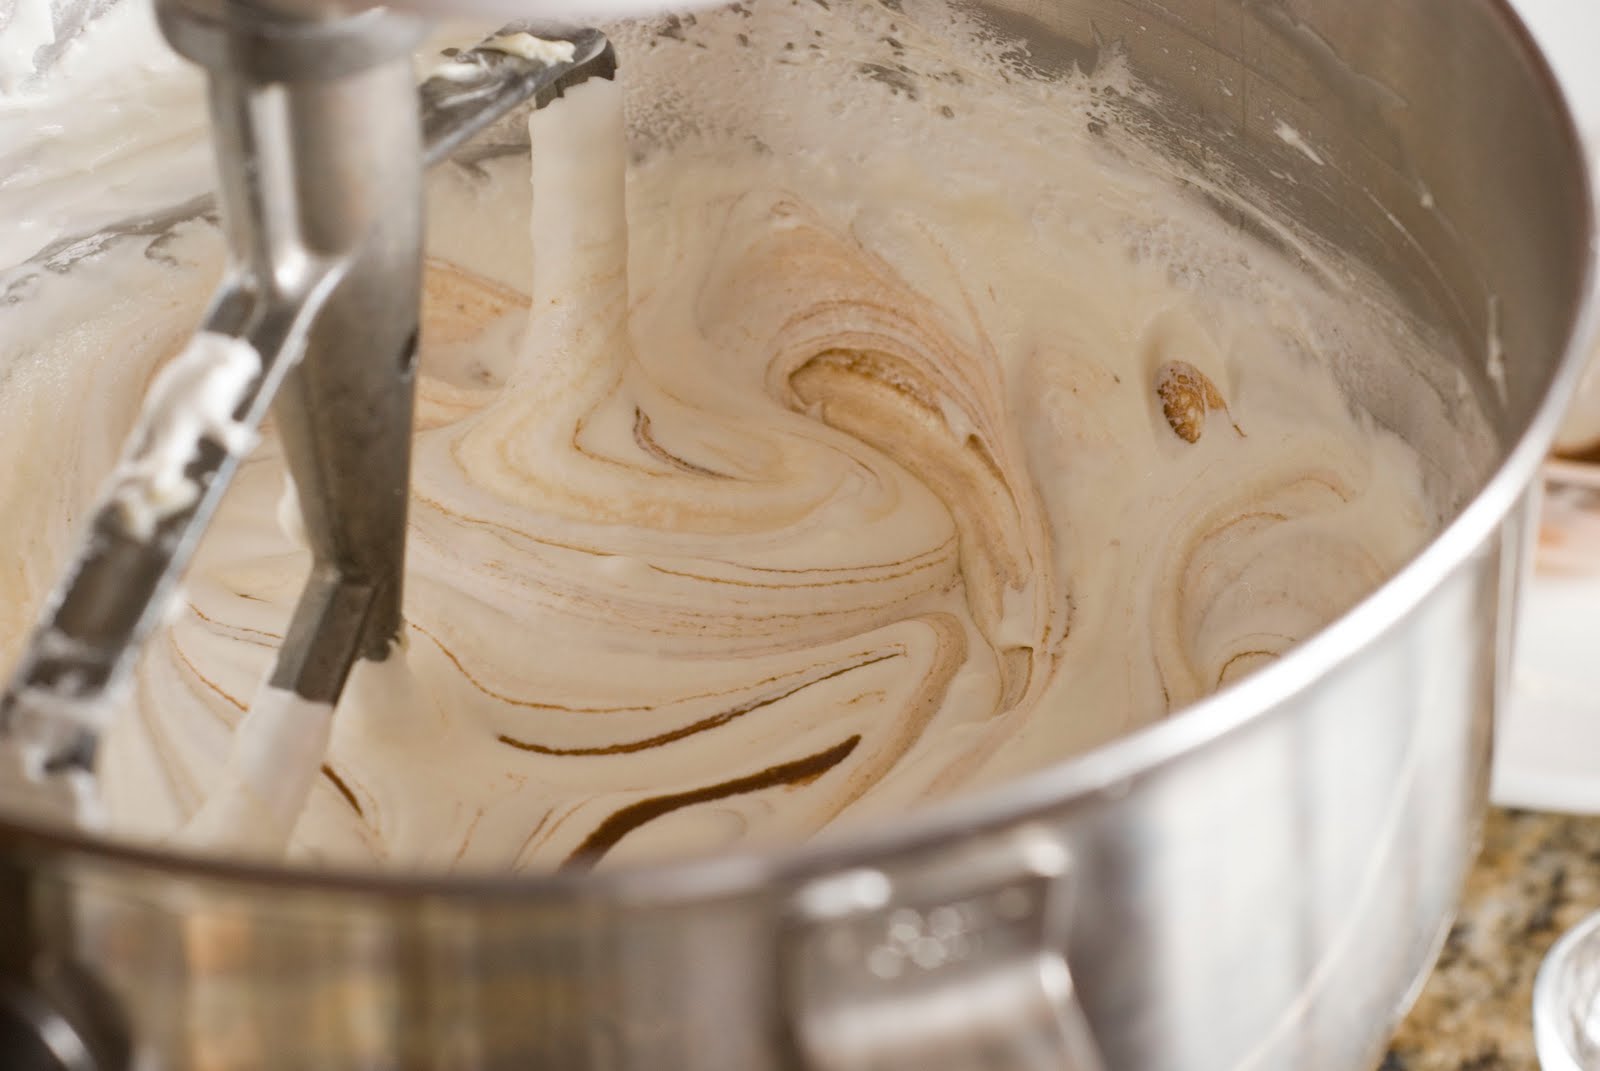
This is what the mixture should look like.  It’s very fluffy.
Gently fold in the whipped cream that you put in the refrigerator early.
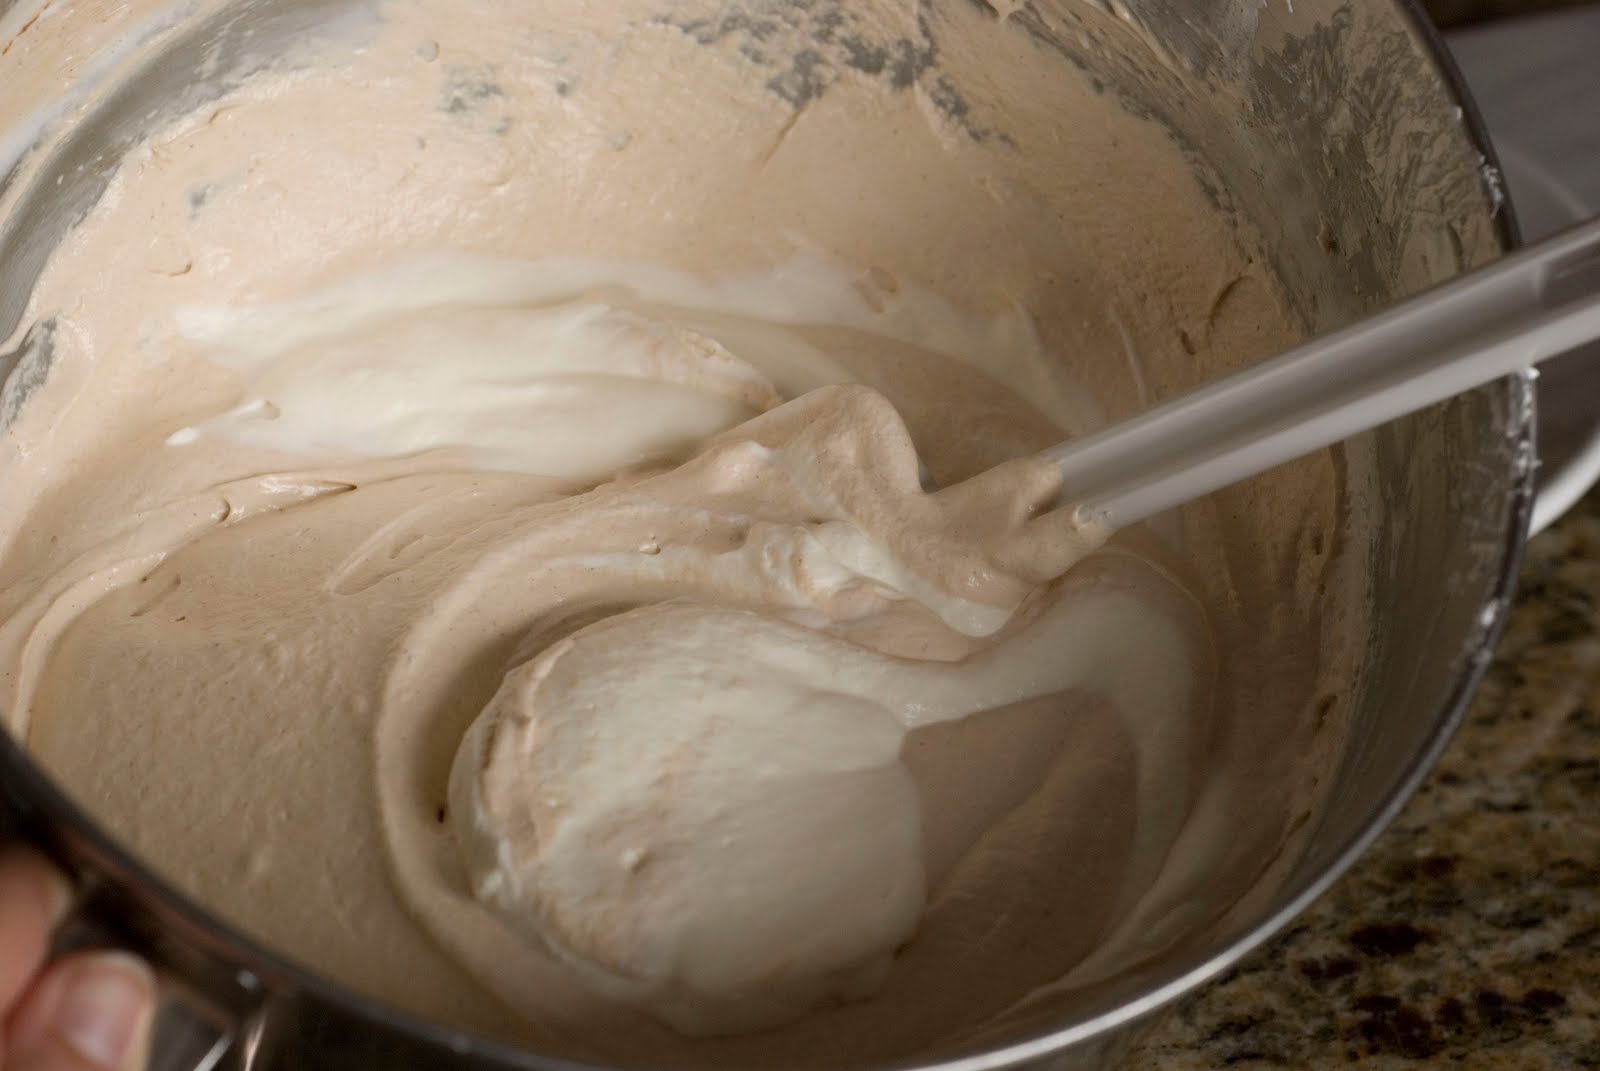
It should look like this.  The filling doesn’t hold well, so you need to use it immediately.
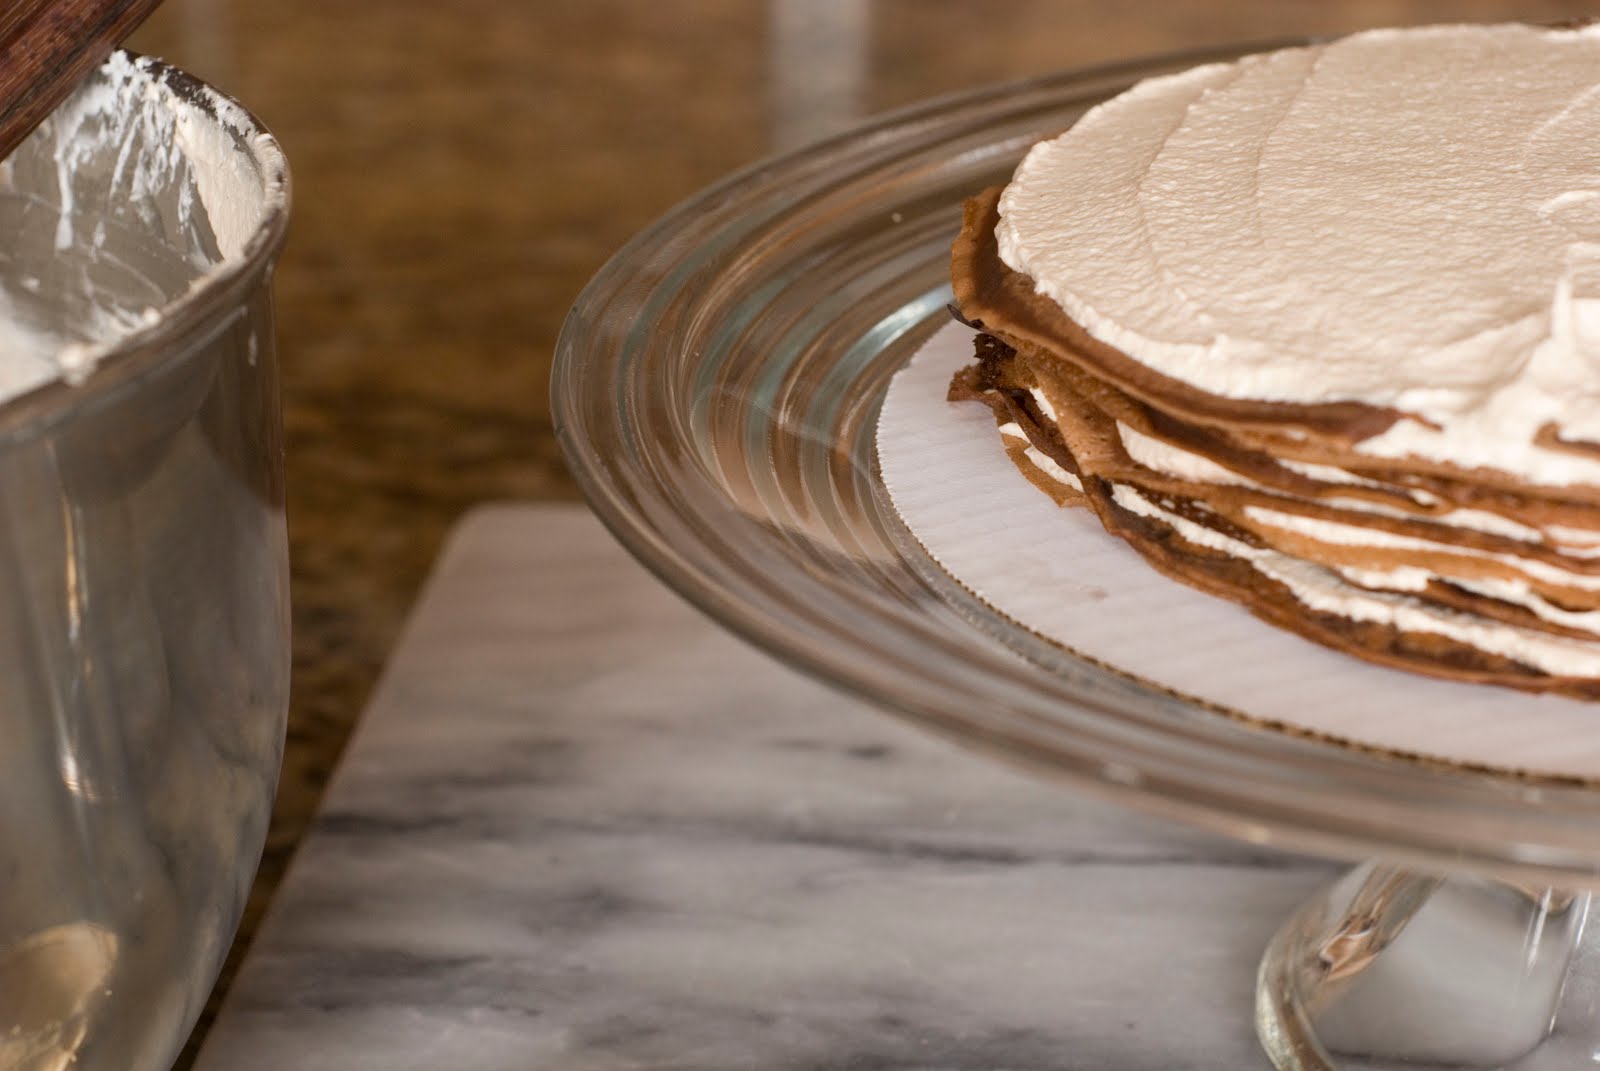
Time to start layering the crepes.  I like to use a cardboard disk on top of a pedistal cake stand.  The stand makes it higher and I can turn it easily as I spread the filling.
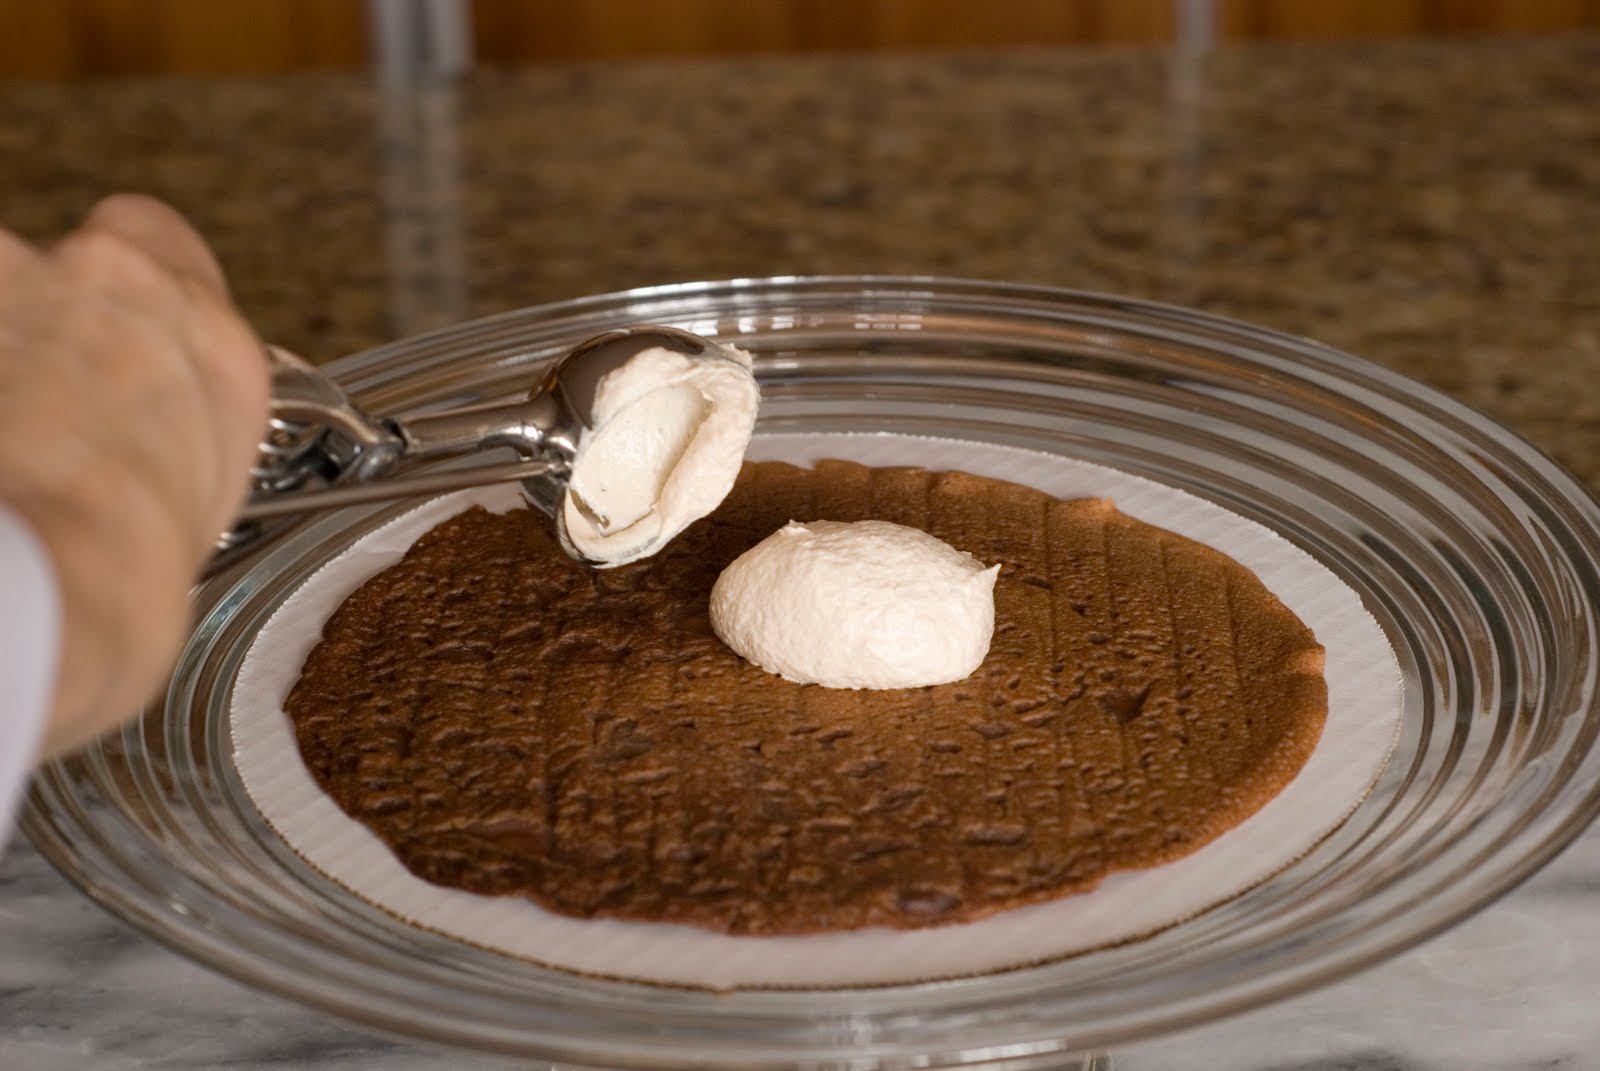
I like to use this ice cream scoop.  It measures out about 2 tablespoons of the filling.  By using the scoop I can get the same amount of filling on each layer.  It works out quite well.  Place the first crepe on top of the cardboard disk.  The cardboard disk is optional by the way.
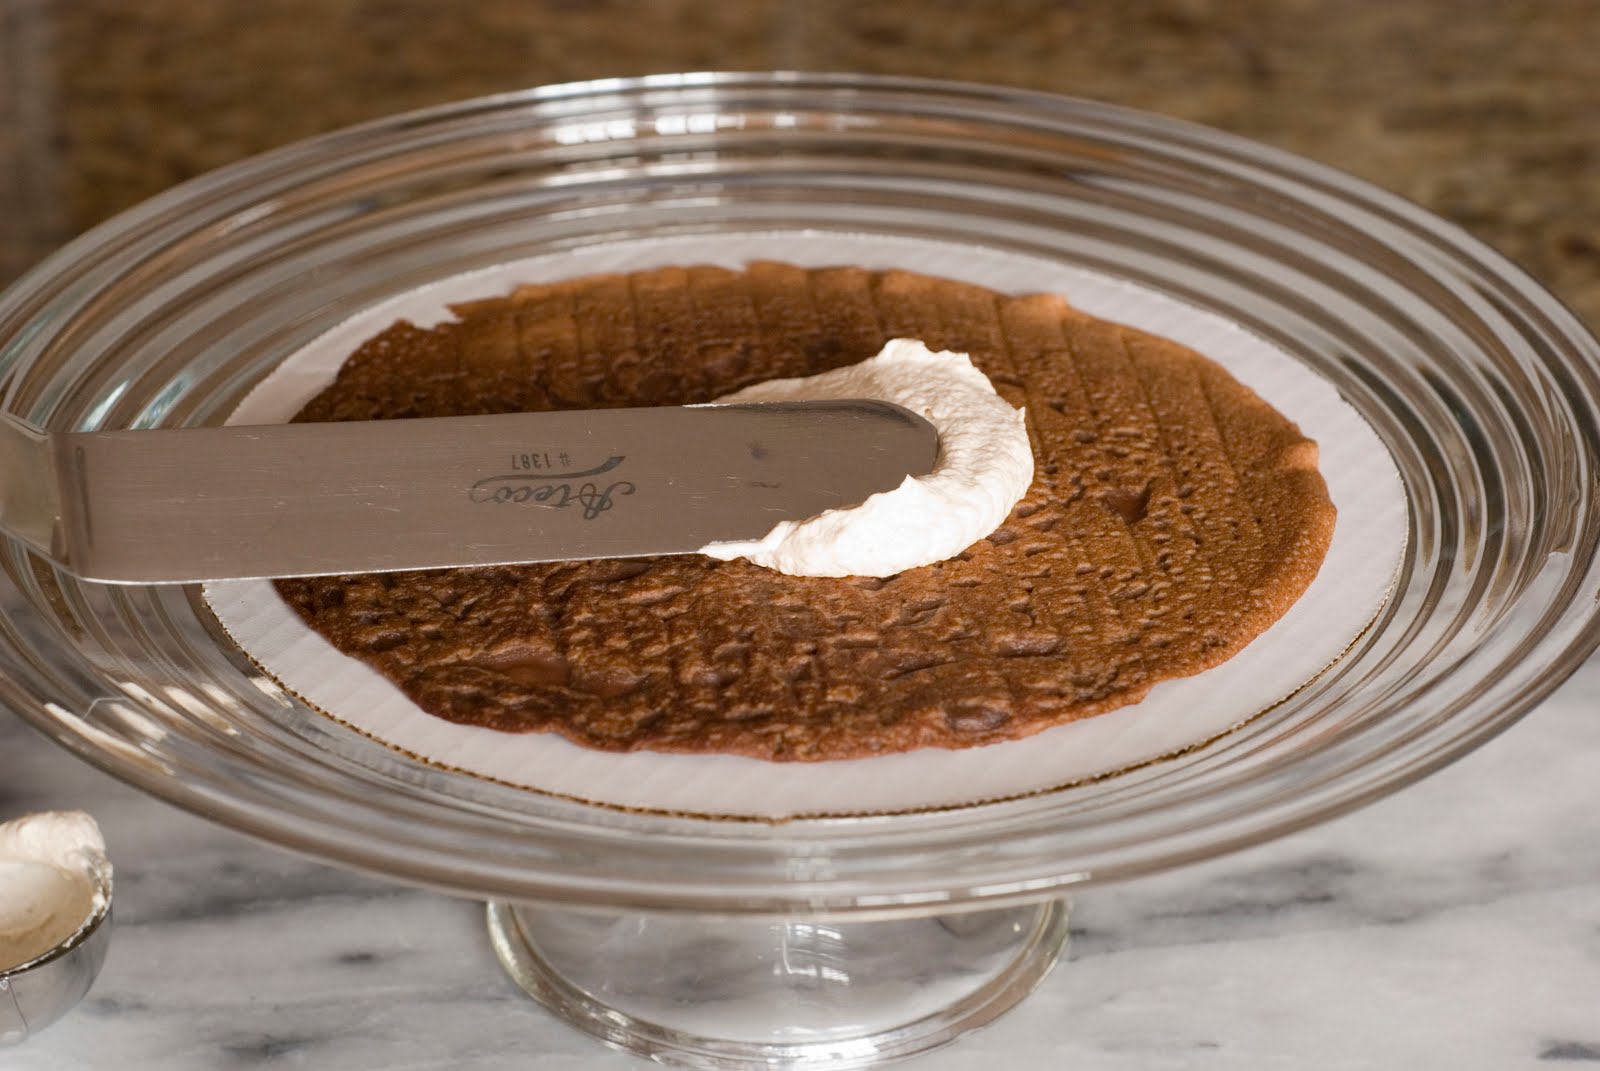
I like to use an off-set spatula to spread the filling. 
Spread the filling evenly across the entire crepe.
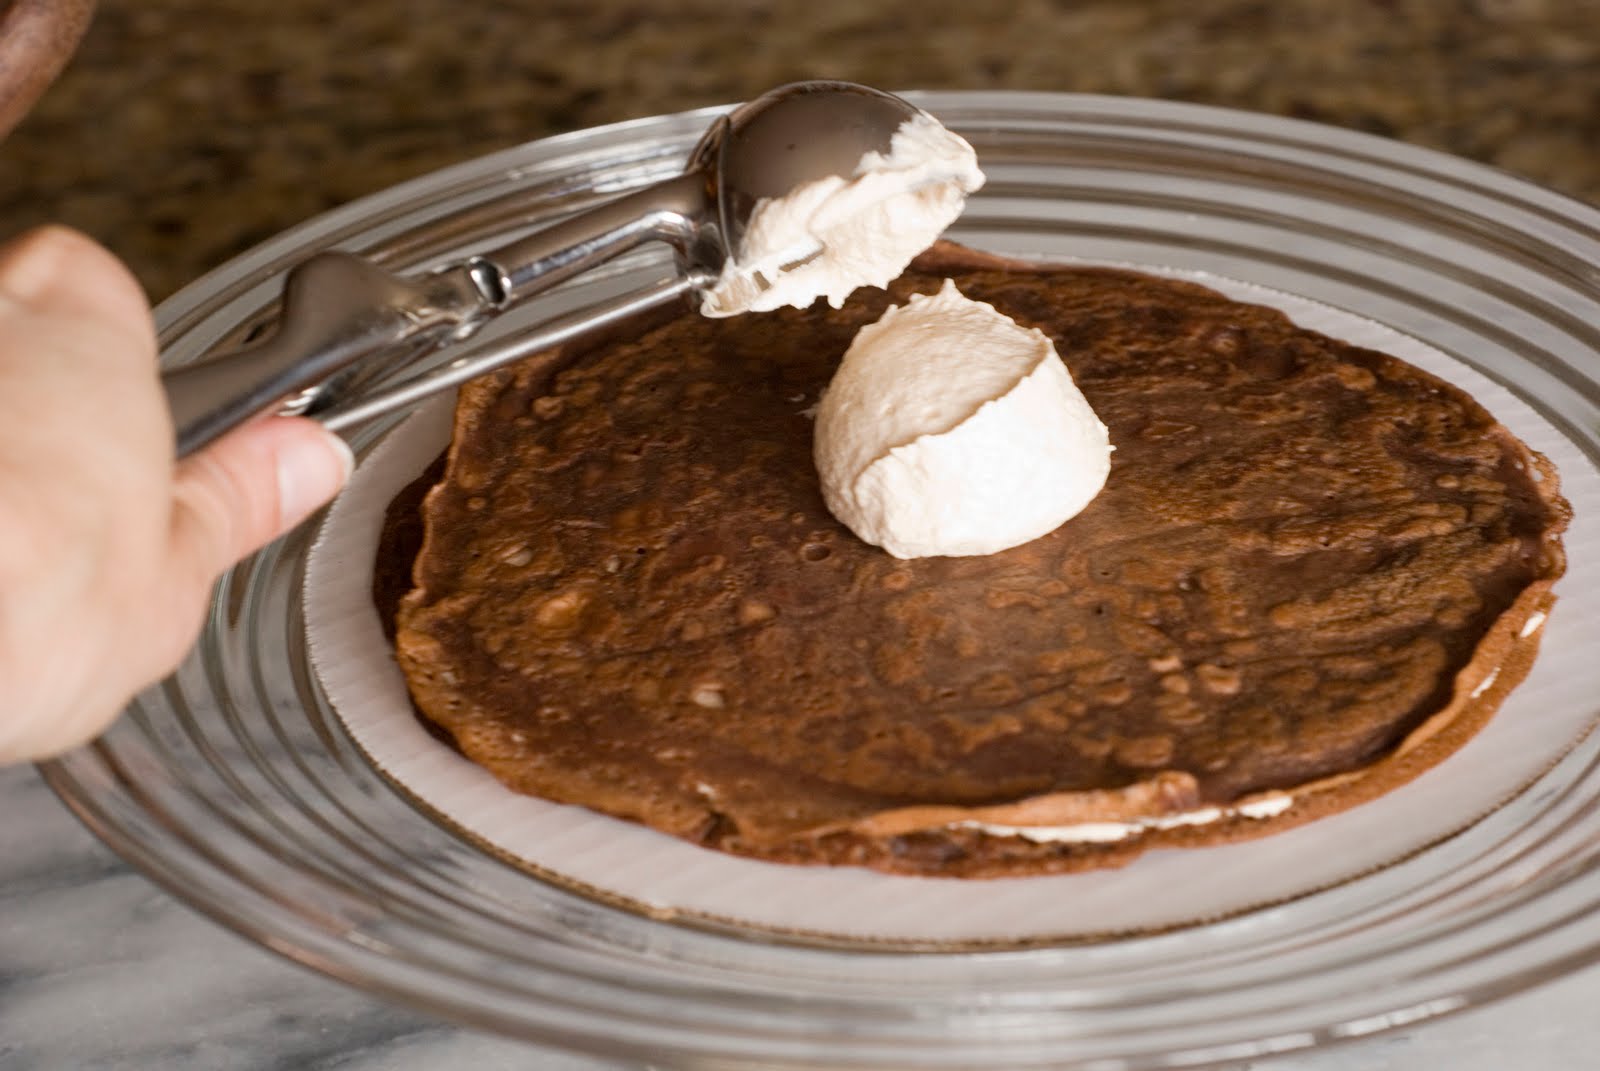
Repeat with each crepe.  Spread another thin layer of hazelnut filling in between each crepe.
Do your best at keeping the crepes level and even.  It’s ok of the edges are not perfectly lined up.  The ganache will cover up all of the edges.  If you can tell that the stack is a little slanted, just add a bit more filling to the lower side to build it up.  It’s ok to do that because once it is sliced no one will ever know.
This is my completed stack of crepes.  I think I had about 30 crepes, which makes 60 layers with the filling.  Wait until you slice into this, it’s SO impressive.
Now cover the crepes with plastic wrap.  I just lifted the stack off the cake plate using the cardboard disk.  Now refrigerate this for several hours.  You want the filling to set up before you start spreading the ganache (step #3).  At this point you can cover it with aluminum foil and freeze for up to a week if you want. I’m going to refrigerate this overnight. 
We have just completed all of step # 2.  That wasn’t so bad.  I hope you take the time to lick the hazelnut filling bowl clean.  My son wanted that job, then he saw how much butter was in the filling and turned me down when I offered it to him.  So I licked it clean.  Enjoyed every finger full! 
Hazelnut Filling
2/3 cup heavy cream
6 large egg whites
1 2/3 cups sugar
1 ¾ cup (3 ½ sticks) unsalted butter, cut into pieces, softened
1 teaspoon pure vanilla extract
1/3 cup hazelnut cream (available at Liberty Heights Fresh)
Pinch of salt
1. Put cream into a bowl of an electric mixture fitted with a whisk attachment; beat on medium-high speed until soft peaks form, about 4 minutes. Transfer to a medium bowl. Refrigerate.
2. Whisk egg whites and sugar in the clean bowl of mixer set over a pan of simmering water until sugar has dissolved and mixture registers 160 degrees, 5 minutes.
3. Attach bowl to mixer fitted with the clean whisk attachment; beat on high speed until slightly cooled and stiff, (but not dry) peaks form, about five minutes.  Make sure the bottom of the bowl has completely cooled before add the butter.
4. Fit mixer with paddle attachment. With mixer on medium-low speed, add butter several pieces at a time, mixing well after each addition (meringue will deflate slightly as butter is added. Add vanilla, hazelnut cream and salt; mix until mixture comes together, 3-5 minutes. Fold in whipped cream with a rubber spatula. Use immediately. 
5.  Spread about 2 tablespoons of the filling inbetween each layer of the crepes.

Share this:

  • Click to share on X (Opens in new window) X
  • Click to share on Facebook (Opens in new window) Facebook

Related

Filed Under: Cakes and Cupcakes, Dessert Tagged With: Dessert

Previous Post: « Dark Chocolate Crepe Cake Step # 1
Next Post: Dark Chocolate Crepe Cake Step # 3 Chocolate Ganache »

Reader Interactions

Comments

  1. Cindy Long says

    January 26, 2014 at 3:04 am

    Thank you for your attention to detail. Have you thought of using pasteurized eggs? I'm going to try that will elimate the double boiler step. If you don't think its a good idea please let me know.

    Reply
    • Janet Barton says

      January 28, 2014 at 3:16 am

      I love to know if that works. The heat, also, starts to dissolve the sugar. I'll cross my fingers for you.

      Reply
  2. Ava Ivey says

    November 16, 2013 at 5:11 pm

    I am unable to find hazelnut paste. Can I substitute it with anything?

    Reply
    • Janet Barton says

      November 17, 2013 at 2:57 am

      My son used hazelnut paste right next to the peanut butter in the grocery store. He said it worked great.

      Reply
  3. Dogwalker says

    May 1, 2013 at 5:33 pm

    Two questions. First, will this work as a cake filling if not how would you change the recipe or do you have a different one? Second how much does this recipe make? Tanks

    Reply
    • Janet@simplysogood says

      May 1, 2013 at 7:13 pm

      It would be delicious as a cake filling. It's basically a Swiss Meringue butter cream with the addition of whipping cream. It makes a lot. Probably 6 cups or more.

      Reply
  4. Anonymous says

    July 8, 2012 at 5:01 pm

    I'd love to try this but the 3rd step for Chocolate Ganache is a link to pictures of step 2' the filling. Can you assist?

    Reply
    • Janet@simplysogood says

      July 9, 2012 at 3:28 am

      Hmmm. I don't know where you are linking. When I tried the drop down menu under desserts, I didn't have a problem with finding Step #3 for the ganache. I'm sorry I'm not much help. Could you be a bit more specific? I'll keep looking.

      Reply
  5. Anonymous says

    October 14, 2010 at 9:30 am

    it's yummy.. i try to do this!!

    Reply

Leave a Reply Cancel reply

Your email address will not be published. Required fields are marked *

Recipe Rating


This site uses Akismet to reduce spam. Learn how your comment data is processed.

Primary Sidebar

About Me

Janet Barton

Hi I'm Janet and this is where I share my delicious made-from-scratch seasonal recipes that I make at home for my family every day.

I believe cooking from scratch, using unprocessed and whole foods is an important part of healthy eating. My goal is to help you create amazing recipes by providing easy step-by-step photos and instructions.

Read More »

Trending Recipes

  • No-knead Crusty Bread in a Dutch oven No-knead Crusty Bread

  • Several chocolate drop cookies on white background Chocolate Drop Cookies

  • Wooden board with chocolate cookies with half chocolate icing and half vanilla icing Chocolate Half Moon Cookies

  • pink iced heart sugar cookies Sour Cream Sugar Cookies with Cream Cheese Frosting

  • Glass of almond milk with 2 gray striped straws on wood board with container of almond milk in background Quick Homemade Almond Milk

  • fried ice cream with spoonful taken out with honey and berries Fried Ice Cream

  • Lemonade and raspberry lemonade in tall glasses Old Fashioned Lemonade

  • chocolate glazed and glazed spudnuts stacked on cutting board with donut holes Spudnuts (Potato Doughnuts with Glaze)

  • Slices of No-knead Partially sliced Green Chile Cheddar Bread No-Knead Green Chile Cheddar Bread

  • Rustic Strawberry Rhubarb tarts

Latest on Instagram

simplysogood

🍋 I teach you how to cook from scratch
🍒 Follow simple step-by-step recipes
🫐 A lover of fresh, seasonal, & local ingredients

Fresh Herb Crockpot Turkey Breast with Brown Butte Fresh Herb Crockpot Turkey Breast with Brown Butter Pears is perfect for a smaller but still impressive Thanksgiving dinner. This easy recipe features a boneless turkey breast coated in homemade herb butter and "roasted" in a slow cooker, then served with a creamy cider herb gravy and sautéed browned butter pears....

https://www.simplysogood.com/fresh-herb-crockpot-turkey-breast-with-brown-butter-pears/
These strawberry rhubarb crumble bars will take yo These strawberry rhubarb crumble bars will take you straight to dessert paradise! 🥰⁠🍓
.⁠
Sweet-tart love in every bite, they’re the perfect treat for sunny days and cozy nights. Grab a bar and let’s indulge in this fruity delight!⁠
.⁠
Give this recipe a try by clicking the link in my Instagram bio, where I post step-by-step photo instructions!
⁠
#rhubarbseason #homemadewithlove #dessertclub #strawberryrhubarb #strawberryrhubarbpie #strawberrycrumble #strawberryrhubarbcrumble
Baking up some homemade magic with my no-knead Lem Baking up some homemade magic with my no-knead Lemon Rosemary Gruyere bread!
•
This recipe is as easy as pie (or should I say bread?), bringing the flavors of tangy lemon, fragrant rosemary, and oh-so-melty Gruyere to life. 🍋🍞🌱
•
Click the link in my bio to read through these helpful tips that will make your homemade bread a melt-in-your-mouth success!

#homemadebread #nokneadbread #gruyerebread #lemoncheesebread #cheesebread #homemadecheesebread
Starting the day off right with these indulgent no Starting the day off right with these indulgent no-knead brioche morning buns! 🤎 There’s just something about the buttery, flaky brioche and the sweet cinnamon swirl that makes mornings extra special.
•
The base dough recipe for no-knead brioche morning buns is a buttery no-knead dough that is refrigerated overnight. The chilled dough is very easy to roll, fill, slice, and bake.
•
So go ahead, treat yourself to something delicious and let these buns brighten up your day! 

The recipe link is in my Instagram bio!

#MorningTreats #BriocheLove #SweetIndulgence #cinnamonsugar #cinnamonandsugar #morningbuns
No fancy Ice Cream Maker — no problem! 🍦🍨 No fancy Ice Cream Maker — no problem! 🍦🍨 This no churn Strawberry Raspberry Ice Cream recipe is quick and easy to make without an ice cream maker in only 10 minutes.
•
Simply blend together a mix of frozen strawberries and raspberries with vanilla ice cream and raspberry sherbet for a rich, fruity, and creamy dessert that tastes homemade! 🍓
•
Give this recipe a try by clicking the link in my Instagram bio, where I post step-by-step photo instructions!

#nochurnicecream #homemadeicecream #strawberryicecream #raspberryicecream #kidfriendlyrecipes #simplerecipes
These chewy peanut butter bars have been a family These chewy peanut butter bars have been a family favorite for decades! Peanut butter cookies layered with chocolate and a delicious peanut butter glaze! 🥜🍫
•
Trust me, your family will LOVE them!
•
Click the link in my bio to read through these helpful tips that will make your peanut butter bars a melt-in-your-mouth success!

#peanutbutterbars #peanutbuttercookies #pbbars #peanutbutterchocolate #peanutbutterlover #pbandchocolate
Start your day off on a flaky note with these skys Start your day off on a flaky note with these skyscraper buttermilk biscuits!
These melt-in-your-mouth treats are the perfect indulgence for breakfast, brunch, or anytime you’re craving something buttery and delicious.
•
So go ahead, treat yourself to these heavenly delights and savor every flakey, buttery bite with me!
•
The recipe link is in my Instagram bio!

#butterybiscuits #homemadeisbest #breakfastindulgence #brunchgoals
Sharing my famous Lemon Curd Recipe! 🍋🌼💛 Sharing my famous Lemon Curd Recipe! 🍋🌼💛 The one that everyone says I should sell at farmers markets — nah! I’ll just share the recipe with you all instead!
•
I love lemon curd, and use it for so many things!!
🍰 Layered in a cake
🍦 Swirled into ice cream
🍪 Smashed between cookies
☀️ Filled inside scones

The possibilities are endless!! Give this recipe a try by clicking the link in my Instagram bio! And if you’d like the recipes for my other lemon curd inspired goodies, they’re all linked in my Instagram stories!

#lemoncurd #lemoncurdcake #lemoncurdicecream #lemonicecream #lemondessert #lemoncurdrecipe
Have you ever tried an olive oil cake!? 🍰 They Have you ever tried an olive oil cake!? 🍰 They are incredibly soft and moist — you gotta give it a try!
•
This citrus olive oil cake recipe features a tart lemon curd filling and a rich mascarpone frosting. Then we gently add flowers for beautiful decoration. It is an impressive looking and mouth-watering dessert that’s perfect for any special occasion! 🍋🤍🌼

Recipe is linked in my Instagram bio!

#oliveoilcake #oliveoilcakes #lemoncurdcake #mascarponefrosting #mascarponeicing
Follow on Instagram
  • No-knead Crusty Bread in a Dutch oven No-knead Crusty Bread posted on September 19, 2018

  • Several chocolate drop cookies on white background Chocolate Drop Cookies posted on May 20, 2024

  • Wooden board with chocolate cookies with half chocolate icing and half vanilla icing Chocolate Half Moon Cookies posted on April 5, 2024

  • pink iced heart sugar cookies Sour Cream Sugar Cookies with Cream Cheese Frosting posted on February 8, 2025

  • Glass of almond milk with 2 gray striped straws on wood board with container of almond milk in background Quick Homemade Almond Milk posted on June 3, 2020

  • fried ice cream with spoonful taken out with honey and berries Fried Ice Cream posted on May 4, 2025

  • Lemonade and raspberry lemonade in tall glasses Old Fashioned Lemonade posted on June 22, 2018

  • chocolate glazed and glazed spudnuts stacked on cutting board with donut holes Spudnuts (Potato Doughnuts with Glaze) posted on October 21, 2019

  • Slices of No-knead Partially sliced Green Chile Cheddar Bread No-Knead Green Chile Cheddar Bread posted on August 20, 2024

  • Rustic Strawberry Rhubarb tarts posted on April 12, 2019

Footer

Featured on

The Daily Meal Logo The foodgawker-logo reddit Logo BuzzFeed Logo halfbaked Harvest Logo Browneyed Baker Logo FOOD52 Logo University of Washington Logo sheknows Logo

Copyright © 2025 Janet Barton
Privacy Policy