Just released Jan. 1, 2015 and instructional video for the Crusty Bread recipe:
Click on the link here: Crusty Bread Video
Let me clarify that the recipe originated with Jim Lahey of Sullivan Street Bakery. Please do not send me a comment stating that I make it appear to be my brainchild. I’m not. I’m just helping everyone through the process.
I have received THOUSANDS of questions and responses to this recipe. I have received helpful hints on how to clean my pots, which are sparkling at the moment. Thank you very much. Many of you have sent in your fabulous creations. From classy fig, walnut, and bleu cheese to less classy pepperoni and sausage.
I have had more fun reading about how successful bread baking experiences. I have scratched my head over questions that completely puzzle me. Oh, how I wish I could just pop into a few kitchens to help solve a dilemma. I have answered the same stickin’ questions OVER and OVER again. I have literally answered some questions HUNDREDS of times! I have to admit I don’t mind. Keep them coming. I love hearing from you.
I would like to go over this simple recipe once again.
My starting advice:
- Be chill. It’s only yeast. It won’t hurt you. Just follow the instructions the best you can.
- Play in your kitchen and play with your food. Especially this bread. CREATE!
- Take a deep breath. You can do this.
- The recipe is VERY forgiving.

Simple. Don’t complicate the ingredients.
You will need:
3 cups of all-purpose flour
1/2 teaspoon instant or rapid-rise yeast


IF you do not have instant or Rapid-rise and you only have regular active dry yeast, THEN proof the yeast before you use it by mixing the yeast with 1/4 cup warm water. Let it set for 5 minutes then mix the yeast in with the water. BAM! It will work.


I’m using a dough whisk also found at King Arthur flour. (they are not paying me to promote their products. I just wanted to give you a source for purchasing if you want one more kitchen toy)
You can use a wooden spoon, rubber spatula, whatever you have to mix the dough.


Cover the bowl with plastic wrap.
Let the dough sit for 12-18 hours.
If the dough only sits for 11 hours, it’s ok. Don’t sweat the fact that it needs another hour. If the dough sits for 24 hours, it’s ok. Don’t stress. It will all be good in the end.


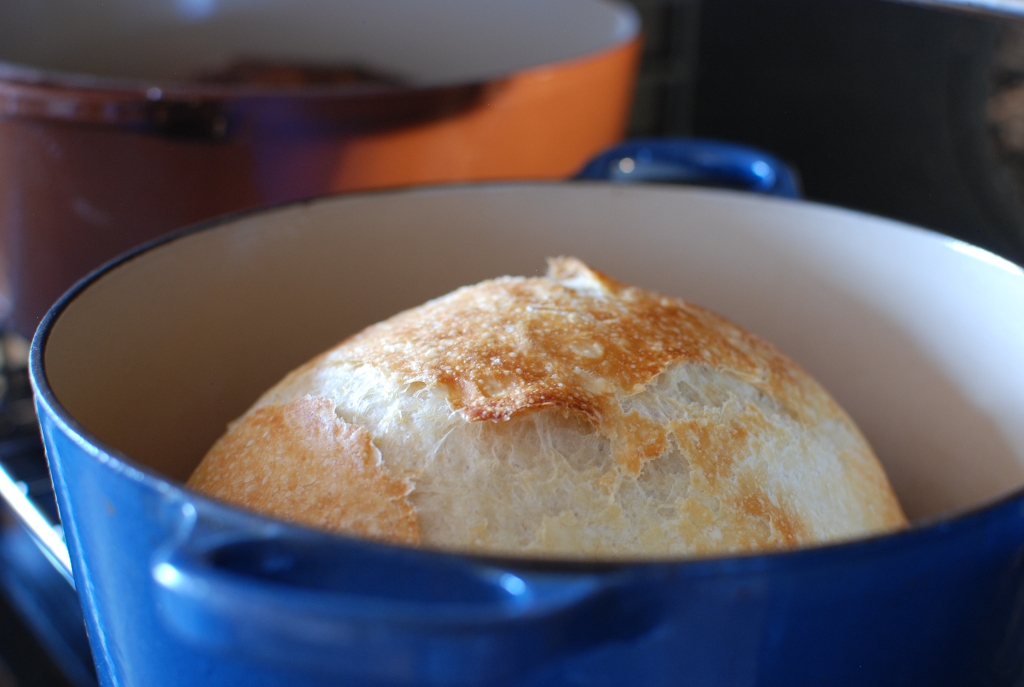
Once the oven has heated to 450 put your pots with the lids into the oven to preheat for 30 minutes
VERY IMPORTANT NOTE:
You do not HAVE to have a enamel coated cast iron pot. They are awesome and I can’t live without mine, but it’s not completely necessary.
Here is a list of what many people have used with great success:
Old camping dutch oven
A crockpot insert. If the knob on the lid is plastic, it must be removed or it will melt)
The idea is to create a steam oven inside the pan. The steam is what produces a nice crisp crust. What ever the container is that you use, just make sure it can take temperatures up to 450 degrees F. I have some Emile Henry covered dishes, but they don’t like an oven hotter than 400 degrees. They will crackle like crazy if you put them in a 450 degree oven (experience).
Oh! Your pot will need to be hold at least 3 quarts. 5 – 6 quarts is ideal, but the smaller will work, just be careful not to burn yourself putting the bread in or removing it. I received at least 500 questions about the size of my pots. I hope I answered that question well enough.
MEANWHILE…

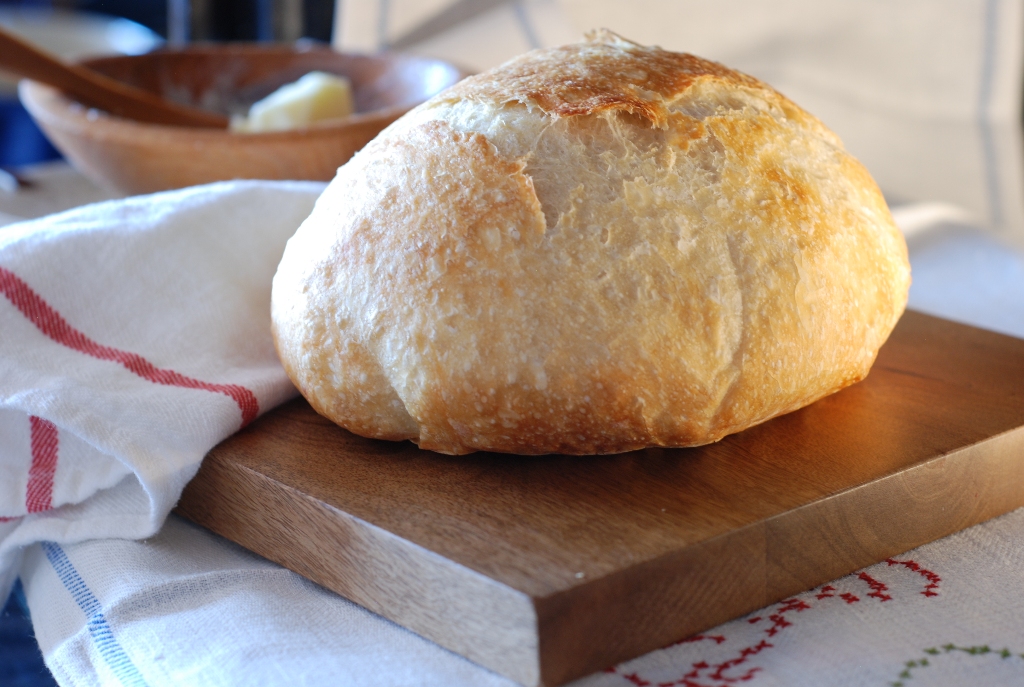
Heavily flour a surface. I’m using a pastry cloth, which is nothing more than canvas with the edges surged. You can use your counter top, a bread board, whatever works. Just flour the daylights out of it.
If you have a dough scraper, use it.

Gently form the sticky mass of dough into a round ball. Look closely at the dough and you will be able to see a large air bubble in the lower right side of the dough. That’s good. I don’t want to knead out the large air holes. We are making artisan bread and want many large air holes.


Place the lid on the pot. Remember we are creating a steam oven. If you are using aluminum foil, crimp it around the edges as tight as you can. Please don’t burn yourself.
Bake covered for 30 minutes.
I know what you are thinking. If I don’t use parchment paper, do I need to grease or oil the pan. NO! NO! I have never had the bread stick to the enamel covered pot. Oil or grease in this hot pot will smoke like crazy. If you are worried about the dough sticking, invest in parchment paper.

Ta da! Isn’t that just amazing. It’s so pretty I get all giddy inside.
Bake an additional 15 minutes with the lid OFF.
After 15 minutes, remove the pot from the oven and place the bread on a cooling rack. Chances are you are going to be cutting into the bread immediately. I did. Why not. It’s amazing.
If you have the will power to let it sit until it’s cool, it will be much easier to cut. Who cares? The bread is amazing right out of the oven.
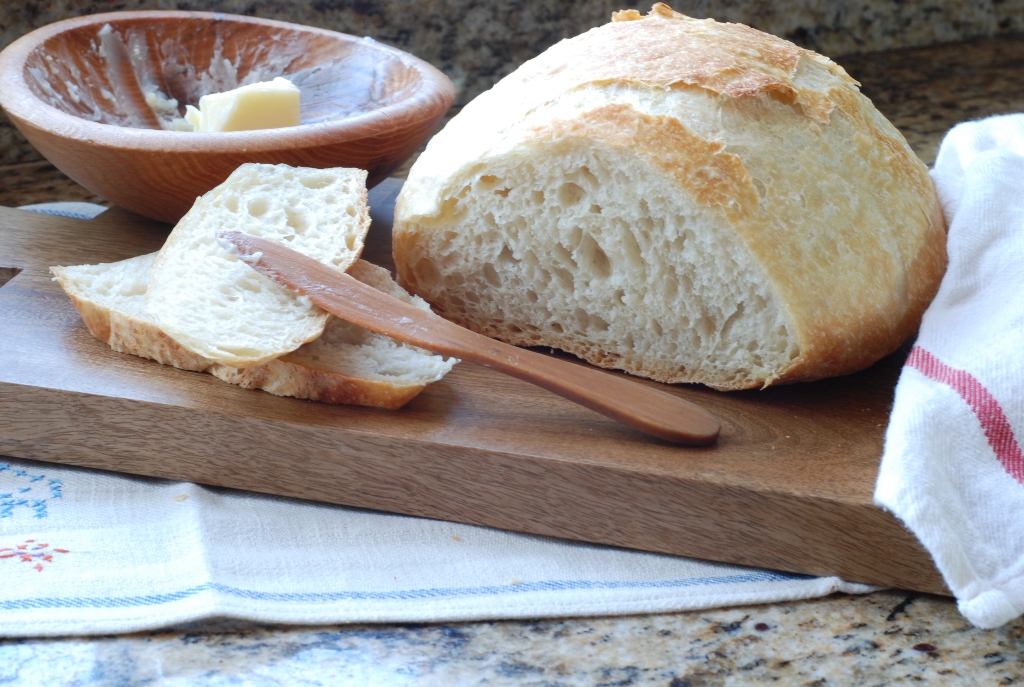
You did it. Pat yourself on the back. You are one amazing bread baker.
Crusty Bread
Learn to make this crusty artisan bread, and then you can add any flavors and mixins your heart desires.
Ingredients
- 3 cups unbleached all purpose flour
- 1 3/4 teaspoons salt
- 1/2 teaspoon yeast
- 1 1/2 cups water
Instructions
-
In a large mixing bowl, whisk together flour, salt and yeast. Add water and mix until a shaggy mixture forms. Cover bowl with plastic wrap and set aside for 12 - 18 hours. Overnight works great.
-
Heat oven to 450 degrees. When the oven has reached 450 degrees place a cast iron pot with a lid in the oven and heat the pot for 30 minutes. Meanwhile, pour dough onto a heavily floured surface and shape into a ball. Cover with plastic wrap and let set while the pot is heating.
-
Remove hot pot from the oven and drop in the dough. Cover and return to oven for 30 minutes. After 30 minutes remove the lid and bake an additional 15 minutes. Remove bread from oven and place on a cooling rack to cool.
Hi!
If I have a brick oven already, would combo cookers still be necessary? Thanks!
-Andee
I'm so jealous. I would try it. The reason for the pots is that the lid on the pot creates a steam oven inside the pan which creates the crisp crust. Let me know how if you use your brick oven. I would love to know the results.
first make today – great . I used fine oatmeal and sesame seed mix to coat – sprinkled liberally on top before turning out of bowl and tipped it onto silicon sheet so didn't have to handle it again – little too moist, maybe needed a little longer after the lid came off
I would let the bread baking longer with the lid ON. This way the bread will not over brown, but will allow the inside to cook longer without burning the outside. I love your idea of oatmeal and sesame seed to coat the dough. Sounds fabulous.
I love this recipe. We have had trouble finding a good rye bread so I thought I would adjust this recipe and see how it would turn out. I used 1 1/2 cups Rye flour and 1 1/2 cups unbleached all purpose flour plus 3 TBLS Caraway seeds. It was fabulous.
Made this for the first time ever and I was skeptical using my crockpot insert…ha ha was I wrong. This was the most amazing thing I have made, it was a work of art!
Bravo!
Another attic 24 follower here. I made the loaf last weekend but like someone else commented, it was a little flat. I put the mixture in my airing cupboard to rise for 12 hours, could it have been a little too warm in there? It started to rise and then eventually went flat. Would it be okay to just leave it at room temperature in future for the required time – am I being too fussy?! However, even though it was flat it still tasted gorgeous and I WILL be trying again.
It's possible the dough got too warm. It is pretty forgiving, however. Just let it sit on the counter top no need to fuss. You could try to add less yeast. Maybe the rising time was too long for your dough. the dough will collapse when that happens. Start with less yeast, maybe you will only need 1/4 tsp?? Let me know if this works. I will feel so bad if it doesn't.
Pumpkin Pie Crusty Bread
2 cups unbleached flour
1 cup whole wheat flour
1 3/4 cups pumpkin puree
1/2 cup water
your preferred spices for 1 pumpkin pie
1/3 cup sugar
1/2 tsp salt
1/2 tsp yeast
3 tsp wheat gluten
Mix the water with the whole wheat and allow to sit for 30 minutes.
After 30 minutes, mix the remaining ingredients and follow the rest of the Crusty Bread instructions.
This bread will be very moist and the smell of pumpkin pie will be stronger than the actual taste, but oh, so yummy for something very different.
I have gotten much better results lowering the temp to 425 degrees (even for preheating the water filled pan) and prefer to place corn meal in the bottom of my pan prior to adding the bread.
In keeping with home made is best, I use pie pumpkins grown in my garden that have been cleaned, baked, pureed and frozen.
Thank you for the excellent blog! I have learned so much!
Jeanette
Thanks, Jeannette. This looks fabulous!!
Good recipe. I am a first time bread maker and this came out perfect.
If I want to use
1.) All whole wheat flour OR
2.) GF flou
How do I need to change the yeast and/or water content?? Thanks!!
If you add cheese to this recipe, how much and how is it cut? I tried to make cheese biscuits once and the cheese melted all the way through the dough. They came out terrible! Help, please!
No need to grease your new cast iron pan, just as long as the pan has been seasoned you should be ready to bake.
Thank you so much, Pauline. I was thrilled to see Attic24 repost the recipe. I have had several questions and comments from UK. So happy to hear it is more accessible for you. I'll try my best to offer metric measurements.
Hello. I read Attic24's account of making this recipe and I made a loaf last night/today. It was perfect. Thank you for the recipe, and for allowing Lucy to publish it with her photos and translation into British measurements. We in Britain have always used weight to measure dry ingredients, and a measuring jug marked off in fluid ounces for liquids, so Lucy has made the recipe accessible for many of her followers. Your blog has now been put on my "favourites" list. Pauline
I have a true cast iron dutch oven which I have never used?? I am going to try using this recipe in it and was wondering if I should oil/grease the dutch oven first? I am a total beginner at trying this sort of bread since I have always used a bread machine before. I have a potato bread recipe that I want to try using also. If anyone is interested I can post the recipe?? Thank you, Pam.
No need to grease your new cast iron pan, just as long as the pan has been seasoned you should be ready to bake.
Today I used my cast iron and my stainless steel dutch ovens. One plain loaf, one with lemon, rosemary, and walnuts. So good!! Thanks again for this recipe!
I keep my yeast in fridge. Should I have yeast at room temperature before I make the bread? I have the yeast you suggest but it doesn't seem to raise well. I have checked it to be sure it was still active (yes it was) and still didn't raise well so my only thought was that I should have it at room temperature. Do you store your yeast in fridge? I have a dutch oven cast iron pan, will this work for this bread? As you can see I am a beginner at this. Thank you so much, Pam.
I do store my yeast in the fridge, but you don't have to bring the yeast to room temp. It's ready to use. I have not had any trouble using my cold yeast in recipes.
I buy my yeast in bulk at Costco, divide it into 3 jars, and store it in my freezer. I use one jar at at time, and it lasts me a year – staying as fresh & active as when I first bought and opened it. I use it straight from the freezer in recipes as directed. They're so tiny they heat right up in the warm water. 🙂 As for this bread – I got a cast iron Dutch Oven JUST for this!! So, I went to my Bookmarks to find the recipe, and found I had 8 different sites! Each with *their* recipe for Jim Lahey's "No Knead Bread"! (The only differences in their ingredient amounts… but no one had explained *why* they needed to be changed from the original at all.) I chose you because you're so detailed, clear, and have all these photos! *Thank you*!! And like others have said, you gave me courage to just go ahead and try it, and your humor made me feel like I would do *fine* my first time! Even though mine has only been mixed for 5 hours, I'm already excited to try flavoring my next loaf! I want to try Rosemary, but I don't know how much to add, whether to add fresh or dry herbs, or when to mix them in? The user that added walnuts with the Rosemary – that sounds delicious! I love nuts in bread! You've covered about every question in the comments (you're so amazing, btw, that you pay so much attention to your readers, and take the time to respond to almost every one! 🙂 ) When I came I only had two myself – one you've answered already – on whether to oil the bottom of the pan with something with a high heat tolerance, like Crisco… but I *love* your parchment idea better! My other was whether a stainless steel bowl would be okay to hold the dough for that long, or if I should use glass or plastic, but it appears it is! Well, my loaf should be ready in 12 to 18 hours! I'll let you know how it turns out. Thank you so much for this post! Now I'm excited to look at and try some of your other recipes, too! 🙂
Just read through all hundred million comments! You are a popular lady, and for good reason! Okay, I tried GF! In fact, I've been making them and selling them at our Farmer's Market for the past 4 weeks. I sell out every time! They are beautiful, but not quite as round and smooth as yours. Can't wait to try leaving it on the parchment paper, what a gooey mess!
I have to increase the water by 50% so I use 2 1/4 C water. I have tried Pamela's Bread Mix and Better Batter Bread Mix, they get pretty close to the same results. The only other alteration that I've had to make is I throw it in my stand mixer and let it go on low for 5 to 10 minutes. When it's GOOD AND BLENDED, I add the extras! The one that I came up with that sells out fastest is the "No Thyme" loaf. It has parsley, sage, rosemary and …. oregano?
WaaLa! Thanks for making "That Gluten Free Lady" look like she knows what she's doin'!
Hi! I used half whole-wheat flour and half bread flour. I increased the yeast by 1/4 tsp and it worked magnificently. I put my pizza stone on the bottom rack of my oven to absorb and distribute the heat more evenly, which prevented my bottom from burning.
I also have this recipe for a more sour-dough like bread, with a similar process.
3 cups (15 oz) unbleached all-purpose flour
1/4 tsp instant or rapid rise yeast (the fresher the yeast the better – I've done this with some yeast in a packet that had been sitting in the fridge for a few months and it doesn't work as well)
1 1/2 tsp table salt
3/4 c plus 2 tbsp (7 oz) water at room temperature (too hot or too cold is bad – the yeast don't like it)
1/4 c plus 2 tbsp beer (they say use mild-flavored lager, but I've used just about anything we had in the fridge)
1 tbsp white vinegar (as we discovered, apple cider vinegar does not work as well)
1. Whisk all dry ingredients together in a large bowl. Add all wet ingredients. Using a rubber spatula, fold dry ingredients into wet, scraping bottom of the bowl until a shaggy ball forms.
2. Cover bowl with plastic wrap and let sit at room temperature for 8 – 18 hours (I have found 12 – 14 hours works best for me)
3. Lay a sheet of parchment paper inside a 10-in skillet and spray with nonstick cooking spray. Transfer the dough to a floured work surface and knead 15 – 20 times.
4. Shape dough into a ball and transfer to parchment paper in skillet. Lightly spray surface of dough with cooking spray and cover loosely with plastic wrap. Let rise at room temperature until dough has doubled in size and does not readily spring back when poked with a finger. (I have found this is usually about 2 hours)
5. About 30 min before baking, adjust oven rack to lowest position and place a Dutch oven, with lid on the rack. Preheat to 500F. Lightly flour the top of dough, use a sharp knife to make one 6 inch long, 1/2 inch deep slip along the top of the dough. Carefully transfer parchment paper and dough to the heated Dutch oven. Replace lid. Reduce temperature to 425F and bake covered for 30 min. Remove lid and continue to bake for 20 min longer.
6. Cool on wire rack!
Wow!! This just looks amazing. What a great resource for others to follow. Thank you so much for sharing with everyone. I have had several comments regarding a sourdough bread. This will be very popular for sure. Thank you!
Thanks for your comment. It's amazing how any container that can take the heat will work for this recipe.
Thank you for the recipe! I need to make a few adjustments (which I found on the forum – thanks!) I found a Caphalon baker at Marshalls…worked great. Can't wait to make it with add ins…something with lemon…
I have wanted to buy a Big Green Egg and now I want one even more!! Sounds delicious.
Great recipe. Made this on my Big Green Egg last night. Tasted wonderful. The smoke from the grill gave it this great wood fired oven taste! Thanks much!
Juan, when you did this on the big green egg did you just do it on plate setter or did you still put it in the dutch oven?
I just stumbled across this recipe and am anxious to try it. I have Corning Visions Dutch Oven with lid. It's amber color glass. Am thinking of using that to bake the bread.
Could I do two loaves together in an oval enamel roaster?
I'm thinking of adding caraway seeds to one loaf, and rosemary and thyme to the 2nd loaf.
Thank you for your recipe and helpful hints.
Yes you can bake two loaves in a larger pot. If you don't want the bread dough to touch you can place a piece of parchment paper in between the loaves. Caraway seeds are delicious in this bread. Rosemary is probably my favorite addition. Happy baking.
Love the recipe. I use beer in place of the water and it tastes wonderful and I get a beautiful darker brown crust. I have several friends now making this bread with beer.
Wahoo! I'm so glad you shared this information. I have had questions regarding the use of beer. Thank you so much.
I found a crack across my big Rival Crock-pot ceramic inner and almost consigned it to the bin before thinking it would be just perfect to cook this bread. The glass lid has a plastic handle so I covered it with aluminium foil and it worked a treat. I need to find a way to make the bread a more suitable shape to cut for sandwiches! Thank you for all the tips and encouragement to have a go, I feel confident I could share this bread even after my first attempt, and for a cowardly cook that's real progress!
Made this last night so that it could be baked on Christmas morning, and it is fabulous! I mean really really good and so easy – it might be the easiest thing I've ever baked. It is now Christmas night, and the little piece left that I stored in a ziplog bag is still very moist and delicious. Can't believe it is so easy – it tastes like there's more ingredients. Going to try a garlic version this weekend.
Helpful tips – First, I buy really cheap shower cap/hair color covers at Walmart, fifteen of them for about a dollar… I use these to cover my bowl during rising. They fit about any size bowl and are way cheaper then the equivalent Glad brand ones and work just as well. Second, when I do the twelve hour rise I put a cereal bowl full of very warm water in my microwave, then a ceramic plate, then the covered dough bowl… This makes for a nice draft free warm "sweat box" as it were. I love this recipe and bake this bread 4 or 5 times a week! — TraceyinVA
Wonderful post ! Love all the crazy answers .. I've been making a version of this for several years , often using a combo of flours and extras … always works , and only ever had one loaf stick to my pots . For fun I tried this in a silicone meatloaf pan , with a tinfoil top … guess what , it worked out perfectly . Thanks for the post , i really enjoyed it .
Can the recipe be doubled?
I make it using 12 cups all the time , works fantastic … todays batch was 2 cups 12 grain , 2 cups WW , and 8 cups unbleached white .
Thanks Rich. Great combo idea.
Have you tried 50% whole wheat or higher proportion? I really like high poocentage of whole wheat. Most of the times I even include a third flour: Rye (whole), just because I love the flavor. Also, I use my own sourdough starter. So my question is:
Including these changes – sourdough starter and more than 50% of whole wheat (maybe rye too) how much the time changes (the 18 hours in your original recipe)?
I am asking this because the reason I am baking is because I prefer healthier bread (higher whole wheat) so I want to keep baking my own bread because it simply delicious…. but I am getting a little tired – after a year – of having to be 6-9 hours sticked at home each time I bake. So if you have any idea about who the time should be would be good. By the way, if that helps, I always use 20% of sourdough starter, that is, is I use 1000 gr of flour, then I use 200 of starter (I am basically following Chad Robertson's Tartine Book… but I would prefer more free time too).
Thanks for any advice!
I know what you mean. The more whole grain the better. I agree with you. You shouldn't have to add more time to the rise. You may notice that the more whole wheat you add then less the dough will absorb the flour. You can play with it. I added rye and loved the flavor. The bread didn't rise as high, but the flavor was fabulous. I love the addition of sour dough start. You can add the same proportions that you are used to adding. You should have great success. This recipe is very forgiving. Start with 50 percent, if that works great add 1/2 cup more. I hope this helps. Best of luck.
Hi, I love your recipe, it's so simple and looks gorgeous!
But I have a question.. I would like to add 1 cup of rolled oat and 2 cups of flour, instead 3 cups of flour as your recipe says.
Is that possible?
I haven't tried that combination, but I think it would work. This bread is pretty forgiving. You could put your rolled oats in a blender and make flour with the oats. That would work. Let me know your results.
Just made this for the first time, after reading the recipe a long time ago. I baked mine in a 6 qt (gallon?) calphalon copper pot. They are oven safe up to 500 degrees. Thanks for all of the extra tips! They were super helpful.
I've made this a dozen times, followed the recipie word for word and all I can say is wow. I've added combinations of; candied ginger and dried apricots, cheese and carmelized onion, lemon peel and…thank you so very much
At WHat point in the recipe do you add your other ingredients if youre making a combo bread?
Add all the other ingredients before adding the water. It’s pretty hard to fold in the ingredients after water has been added. Works for me every time!
Hi there,
Has anyone tried to make this bread with Gluten Free flour? If so, how does it turn out?
I make this bread pretty regularly, but I have a friend coming to a dinner party who is GF and if possible, I don't want her to miss out on this bread!
And, has anyone added cheese or olives or anything to this mix and is it safe to leave out on the counter over night with these things in it? I have added garlic powder and dried herbs before, but never cheese.
Cheers,
Danielle
Yes GF has been tried with success. Cheese olives and herb mixtures work really well.
Linda, The loaves aren't huge. I wish I had a measurement. I have some loaves that turn out larger than others. Was you dough pretty stiff or did it seem pretty sticky?
I have made your recipe and passed on your link to so many friends! I have made varieties of this recipe for gatherings, reunions, and even as part of a fundraising auction (one loaf went for $25!).
I wish you could have a separate page listing all the different varieties people have made of this (what add ins they have done).
Thank you for this gift of a recipe! I have not bought store bread in over 6 months since finding your recipe!
Thanks, Bev. A separate page is a fabulous idea. I'll check into it. I have over 4,000 comments. It could take some time to archive all of the great ideas. Thanks for spreading the joy. I had someone email me with the cost break down of making this bread only using white flour. The cost was .25 cents. $25 is a great return. Way to go!!
I've been making Jim Lahey's bread since the technique was first published in the NY Times. I always bake covered for 20 mins and uncovered for a further ten. Any longer and it would burn in my oven. I've tried many variations – lots of olives, soaked mixed seeds, rolled oats, different flour combinations, and also added sourdough starter. It ALWAYS works!
Great tip. Thank you so much. Many comments have been regarding the bread burning a bit on the bottom. Problem solved. Thanks for your variations. Great ideas.
I moved from San Francisco bay area to northern Minnesota this summer. Nary a loaf of hard crusted artisan bread to be found. I was bereft until my daughters (one in Nevada and one in Louisana) pointed me in the direction of your recipe. It worked perfectly the first time. I make this bread once a week now. Last night I prepped the dough using half unbleached Red Mill white flour and half of Red Mill's white whole wheat flour. I noticed it didn't 'look right' when I put it to rest. After looking at it on and off for about 10 minutes I decided tp add 3 tablespoons of water. I gave it a mix with my dough whisk and covered it back up with plastic wrap. When I looked again 15 minutes later, it 'looked right' – had a moist appearance and was starting to bubble. I love that you gave me courage to trust myself with this bread. Using white whole wheat flour changes the texture a bit. I don't think I will try using more than half of whole wheat flour and next loaf I'll try 1/3 whole wheat and 2/3 white. Thanks for making this transplant from foodie paradise happy again.
I'm so sorry you left the foodie city. Nothing compares to San Francisco sour dough bread. I'm happy you sent your trail of the wheat and white version. You must be an awesome baker. Thanks so much for your comment and tips.
King Arthur flour folks suggest adding 2 tsp liquid per cup of whole grain flour used to substitute for AP – so with half of this subbed out, a little extra water should be the ticket. 🙂 That will help the loaf not be too dense. 🙂 My favorite version of this bread is 2/3 AP and 1/3 white wheat.
Thank you so much for sharing this recipe,it's amazing to find you end up,with such a fantastic loaf from such a simple process. I find that wet hands make forming and lifting the dough easier than floury hands.
Fabulous tip. I'm so happy you like the bread. Happy baking.
A little bit of experimentation using a cup each of plain,whole wheat and semolina flour resulted in a great tasting loaf you just have to try. To complete the experiment I scattered some sesame seeds on top of the dough straight after I popped it into the pot…Looks really pretty and tastes great too 🙂
After reading your comment, I jumped up from my chair and went to the kitchen to make this wonderful creation only to find I was out of semolina. I thought I just purchased a 5 lb bag, but I purchased Polenta. I'm off to the store to buy semolina. I can't wait to make this. You are genius! Thank you so much for sharing such a great idea.
It worked – it is much better – haven't tasted yet but it just came out of the over looking a lovely shape and colour. Fantastic!!! I can't wait to taste it.
Great news! Let me know if you venture into other flavor additions.
Hi Pete, Let's see if we can figure out your problem. Start by reducing the water by 1/4 cup. If it appears to be too dry then add in 2 tbl. You could try reducing the amount of yeast. Try 1/4 teaspoon. If you are still having problems, send me a comment through the "contact me" at the top of the page under my header. Then we can chat through email. Good luck
Help – I keep trying this no knead bread but it keeps failing flat – quite literally – I get a mix that looks like yours in the bowl (I get a really fast bubbly rise to start but then after about 5 hours it starts to fall back down) when I try to shape – yes it is sticky and I don't have a problem working with it sticky and well floured but I cant get it to a ball shape like your picture – it just keeps spreading and oozing – I bake it hoping it will rise in the dutch oven but it stays pretty flat – I really really want to make bread for my kids but It just aint working – any ideas? Pete
Hi Janet
I baked the bread on a pizza stone with a tray of hot water set beneath it. I also wet the bread before it went in the oven and sprayed a couple of squirts from a spray bottle into the oven.
It came out lovely and crispy on top with heaps of lovely holes in the middle. Very springy crumb also, similar to a ciabatta bread. Served it to some guests with cheese and dips and they loved it.
Cheers
Toby
Do you score the top of the bread?
I don't score the top, but you certainly can.
Hi! I have never, ever had any success with yeast breads … until last night and today! You made the process look so easy, I decided I had to give this recipe a try. So glad I did. My bread looked exactly like your photos and my husband (who has had tried a fair amount of my bread failures in the past), declared it delicious! Thank you! I love your site and look forward to trying more of your tasty looking recipes.
Bravo. I hope you come back and try other recipes. I think you have mastered the art of yeast.
Thank you so much for this excellent advice and idea. I will try it. Thanks you for your kind comments as well.
Hi from a mountainside (7500 ft) in far Northern New Mexico. Thanks so much for your excellent explanation. Before I read your blog I used a no-knead recipe my neighbor has used for years and the bread was the best I've ever made. Your blog, however, answered some questions I had after that first experience. Thank you.
Here's an interesting variation my friend does: Using the same proportions she makes up 3 or 4 times more dough recipe. She lets it rise a couple of hours then puts it into the fridge for from 12 hours to two weeks. Any time she wants to make a loaf of rustic bread she just cuts some of the chilled dough off, shapes it (shapes easily when cold) and lets it rise for about 40 minutes.
This approach is really helpful for folks like us who live far from a supermarket and bake our own bread regularly.
have just baked your bread in my brand new Le Creuset….yummy, yummy. Also turned the temperature down for the last 15 minutes. Thanks so much.
Shelley from S. Africa
Hi Shelley from S. Africa. thank you so much for commenting and so happy to hear the bread was a success in S. Africa.
Bravo! Thanks for sharing from Australia.
Thanks for the recipe! It worked!
K from Australia
Evette: First of all what kind of flour are you using? I have had a few comments about Lily White not working on this recipe. Check the protein content of your flour. It should be a brand that is consistent with their protein content. Around 12% protein in an all-purpose flour is best. I would start my using less water…oh maybe about 1/4 cup less. Then mix and see how the dough looks. Let me know how this works. Please use the comment tab at the top of the page to respond to me and I can get back to you directly. Good luck.
Hi,
Has anyone tried baking "No Knead" bread using a vintage 1930's Westinghouse stone loaf pan? I bought one from eBay and am wondering if it can take the high temperature of 450 deg Fahrenheit especially when it is pre-heated for 30 minutes before the dough is added in?
Thanks,
Suet
How did you get your dough from the pastry cloth to the parchment (since it seems like it's very soft and would lose its carefully crafted shape if simply lifted by hand)? Did you flip it over, or use a bench scraper, or what? Thanks. Can't wait to try this recipe.
Very carefully! Yes the dough is sticky for sure. I just flour my hands well and I can always count on the dough sticking to my fingers. It's all good the bread looks great in the end.
For the second bake, I turn down the oven to 400 and bake for 20 minutes. We are at an elevation of about 1100 feet. Here, the original recipe comes out doughy in the middle and over brown on top without this adjustment. My daughter in Colorado, at 7000 feet, got good results without the second bake at all.
This is such helpful information. Thank you so much for sharing it with everyone.
I find that if after the final bake with the lid off, if you turn the oven down to 300F and bake for another 15 min you get an amazing crust without over browning the bottom. Love this bread.
Fabulous tip!! Thank you so much.
you don't mention that dough rising time depends on room temperature. the warmer it is, the less time you need for the dough to rise. give it more time at higher room temperature, and the dough turns into a liquidy mass that you cannot work with anymore. so no, it's not that simple. 😉
This may be helpful info. Thank you so much. I personally have not had any trouble with room temp and rising time. I have let the dough go for 20 hours in the summer.
I've had no problem with time/room temp either – I make it loads and always just bung everything in a bowl and leave it on the kitchen counter for an amount of time, then bake – it really is that easy, don't be tempted to put in more yeast than stated!
THE best bread I've ever made at home, I just put it all in a bowl, generally in the evening, put it in when I get home from work the next day – virtually makes itself. I used to make it in a cast iron pan with a foil lid, which worked well but I recently got a cast iron pot with a lid (sales!) and it is even better! Thank you so much, it's the only bread I eat at home now, easier than going to the shop!
My loafs look fantastic and taste great, but the inside still seems a bit under cooked- not doughy but not at all fluffy. I've scanned through the posts as best I could, but no one seems to have an issue with this. How dense should the inside of the bread be?
The bread isn't a light a fluffy bread like normal homemade bread. It is wetter and more dense. If you feel you need to bake longer, just leave the lid on an additional 5 minutes. This should continue to bake the bread without browning the crust too much. I hope this helps.
I made my first loaf today. I used 2 cups of unbleached white whole wheat flour and 1 cup of all-purpose flour. Thank you so much for this recipe. It came out perfect and tasted delicious. I can't wait to make some different varieties.
Made my first loaf today. I used 2 cups unbleached white whole wheat flour and 1 cup all-purpose flour. It turned out excellent. Thank you so much for the recipe. I can't wait to try different varieties.
Fabulous! I'm so glad you had success. It's great to hear that the addition of whole wheat works. Thank you for your comment. I can't wait to hear about your new creations.
I made this type of bread many times. Always amazing. I even make it on vacations ( we have timeshares) I DO grease my pot and no problem at all.
Great post!
Thank you for sharing how easy the recipe is. I have made this on vacations as well. It's a no brainer. Thanks for the tip on oiling pans.
Just tried your no kneed crusty bread. So good! Thanks. And, I thought I might be able to add to your Q&A forum.
1) bleached flower worked great!
2) stainless steel dutch oven worked great — absolutely zero sticking. Didn't oil it or anything. (Figured the oil would smoke immediately on a 450 degree bottom.) Just dumped the blob onto the stainless and it came out perfect.
Thanks!
-Doug
Wow! What an amazing story. Thank you so much for sharing. My son's would LOVE a brick oven. It would be a dream for them. Way to make your dad proud.
Thank you for this recipe. I have made it many times since I first discovered it. Loaves have been donated to bazaars – they sell well. When there is a pot luck, I am asked, "Barbara, can you bring a loaf of that bread?" I just mixed up dough with cheddar and dried onion for a lenten soup and bread supper tomorrow night.
The enameled cast iron dutch oven was purchased from Amazon just for bread. I do not remember the brand, but it was not expensive and happened to be on sale, which didn't hurt.
Thank you again.
Barbara
You must be the most popular person at the bazaar. You are amazing. Thank you so much, Barbara for all of your tips and ideas.
I have mad this bread several times and it is amazing. I would like to know how you clean your enamelled cast iron after the bread baking. Mine is looking a little, shall we say, used.
My pots looked like they had been through a war. I put them through a cleaning cycle in my oven and they came out looking brand new. I keep them up with the magic eraser sponge after each use and they still look great.
I normally will fill the pot with good amount of water and bring it to boil. I let the water boil further for another 5 minutes while I scrap the bottom with wooden spoon with flat edge. The boiling water helps the dirts to soften and release themselves from the bottom of the pot. In this way I clean the pot without damaging it.
best, Retno.
You seriously need to do a recipe book. I know it would sell like crazy.
Tammy
Tammy, your are my new BF. My husband keeps telling me that. I'm curious…does anyone buy cookbooks any more. I find myself turning to blogs more than cookbooks. Hmmm….you have me thinking.
Yes! I've been wanting to cook through one in a year for fun but having a hard time finding a decently healthy one and also one that cooks things I've heard of lol do it!!!
Yes please please make a cook book! I'd buy it and buy them to give as gifts!
-Steph
Yes, a cook book with recipes that shows how to cook with real food, not the kind that adds a pre packaged mix of this added to a pre packaged mix of that to make something. Most recipes are aimed at how quick something can be made. This cookbook of yours would be a fabulous idea.
I followed your recipe today and I just pulled the bread out of the oven and I said out loud "You have GOT TO BE KIDDING ME!" I'm literally laughing because I can't believe how pretty and perfect it turned out! Thanks so much for posting the play by play of what to do. I love your blog, Janet! A big thank you!!
You are one amazing baker, Suzanne. Keep it up.
"You are one amazing baker." LOL! We all are. 😉
I thought you did a fine job of explaining this recipe the first time around, and it cracks me up that you still get so many questions despite having covered them, reanswered them, and created a forum. It is very simple and flexible… I have made it countless times — sometimes with white flour, sometimes white and wheat, sometimes whole-wheat — with varying amounts of water and yeast and additives as well as a variety of pans (Le Creuset enamelware like yours, stainless steel pots with lids, and loaf pans inside covered roasting pans), and I have never had a bad loaf! The least successful loaf hadn't risen as much as I would've liked because it was cold in my kitchen during the rise. Thank you again for this recipe.
Fabulous comment. I can't tell you how many times I answered the question, "how big is your pot". I guess I should have stated the size from the very beginning. You made me smile.
The first time I made this it was amazing! The second time I was impatient and didn't let the pot heat in the oven for a full 30 minutes. It didn't cook all the way through. 🙁 Oh well. We can't learn if we don't make mistakes! And I put a little bit of corn meal in the bottom of my pan so it didn't stick.
Cornmeal is a fabulous idea. Thanks for the great idea.
I've made this and I love it. I think I got the recipe from you originally. thanks. It's great.
Thanks for the comment.
I am a huge fan of "thefreshloaf.com" and always thought that great bread took lots of time and work – boy was I wrong!!!!! I just pulled the bread out of the oven, and all I can say is "holy cow – that was easy"! It looks just like yours, is crusty, and absolutely delicious! I had an old Calphalon 8qt stock pot that I used along with parchment paper (I think the parchment helps to retain the shape as you're putting it in the pot) and it turned out perfect! Thank You Thank You Thank You!!!!! Now, on to make another loaf (or 2, or 3…….).
I love this recipe since I first found it a couple months ago, I use my crockpot insert, covered with alu foil, works perfect. Last week I made this bread with cranberries and walnuts,it's just as good. Also the cheesebread is delicious, can't stop eating it.
Thank you for your testimonials and helpful tips. I would love to have a brick oven in my back yard, Trina. That would just put this bread over the top.
I have LOVED this recipe since I discovered it here a year or so ago. Thank you! My family thanks you, too. I cover mine with a dishtowel, instead of saran wrap. Works fine.
I bought my cast-iron enameled Lodge pot at Target online, fairly cheaply. I'm waiting for a sale to buy a second one, as we always double the recipe and I hate having the oven on for over 2 hours straight.
They are even cheaper at Walmart, same Lodge Dutch oven
Thanks for the comments. Great tips and ideas.
I can vouch for the ease of this recipe. My family LOVES this bread, and so do I. Thank you for posting, and for encouraging people to bake. It's much easier than so many of us think!
Thank you, thank you. That's the message I want everyone to hear.
Baked in loaf pans, it is wonderful too!
I'm so thankful I found your original post! This is my go to recipe! Last Christmas I made 15 loaves wrapped up in red and green dish towels… It was such a hit! We just love this bread and love bringing it as a hostess gift too.
Lucky friends and family. It does make a great gift. Thanks for the reminder.
15 loafs? You are my hero! 🙂
I tried this bread first time before Thanksgiving of 2014…It was such a hit.
Before we finish one loaf I already prepare dough for another one. !
I used to buy good bread at fancy local bakery but since I discover this recipe I never buy another one.
Fun to make, fun to bake and even more fun to eat. !
Lol, I posted a recipe very similar to this one, and got the same response! I love your recap, full of every possible answer to every possible question. I might have to just refer them back here when I get new questions! And hey, now I know why mine was flat when I tried yours, wrong yeast! Silly me 🙂
~April @DimplesandDelights
Thanks, April. Love your comment.
I have made the recipe 3 times now carefully following the amounts and directions but every time the mix is like thick cake batter. I added extra flour which rectified the consistency but would like to know what you think the problem may be? After adding extra flour it tasted good but was much heavier than the photos of the ones you made.
Many thanks
Evette,
Are you perhaps using a non-instant yeast, blooming it in 1/4 water as suggested, and then still adding 1 1/2 cups of water? That would result in a thinner batter.
Luck!
Awesome! Now that’s a perfectly baked NO-KNEAD BREAD. It’s definitely going in my recipe book. I regularly bake at home in my pure clay pot I got from miriamsearthencookware.com, they are perfect for baking. The bread baked in it is always soft moist and delicious.
Question. If using regular active dry yeast, do you still only use 1/2 t yeast to the 1/4 cup water, or do you follow package directions on the yeast and do 2 1/4 t yeast to 1/4 cup water?
Can I add some sourdough starter to this recipe ?
Soooo… if you bloom your yeast… then you ajust your water, after? I didn't do that…. hope bread comes out ok… 🙂