• Skip to primary navigation
  • Skip to main content
  • Skip to primary sidebar
  • Skip to footer

Simply So Good

  • Home
  • About
  • Recipes
  • Contact
You are here: Home / Recipes / Jams, Jellies, and Condiments / Strawberry Raspberry Freezer Jam

Strawberry Raspberry Freezer Jam

June 30, 2012 Updated July 22, 2017 15 Comments

10 shares
  • Share
  • Tweet

I have the best reason ever for not posting for the past few weeks.  Little Lettie Jane (named after my Great Grandmother) joined our family.  She’s a tiny thing weighing just 5 lbs. 7 oz.  
I was the lucky grandma that got to tend the older three children for a week while mom recovered.
It took me a week to recover myself!  
After neglecting my garden for a week, I went out to see how high the weeds were.  To my surprise my raspberries where ripe and ready for picking.  They were just perfect for a batch of freezer jam.  

If you have never tried making homemade jam, this is the recipe you should try.
Homemade freezer jam is so quick and simple.  It will last in your freezer for one year.  It has a bright fresh flavor that is fabulous slathered over buttered toast.  I pack my freezer full every year.  
Let me give you some tips on making the most flavorful jam.
1. Choose bright red berries that are full of flavor.  I like to mix raspberries and strawberries.  Make sure the strawberries are completely red.  No white spots or semi-red berries.  Make sure the have great flavor.    Costco may have the best prices but may be lacking in flavor.  This is why I wait for the raspberries from my garden or wait until local berries are available at the farmers market.  Remember “garbage in garbage out”.
2.  Use only freshly squeezed lemon juice.  You probably know how I feel about that bottled stuff.  I still haven’t found a culinary use for it yet.  The bottles reconstituted juice has a strong flavor that will take over the flavor of your jam.  You want the lemon juice to brighten the flavors of the berries not over power them.
3.  Read the instructions that come with the packaged pectin you are using to the “T”.  Add every single grain of sugar the recipe calls for.  If you want to reduce the amount of sugar in the jam, look for pectin that is specific for “reduced sugar”.
4.  Brace yourself right now.  There is a boat load of sugar in this recipe.  That’s just the way it is.  Accept it.
Let’s get started.
You will need:
1 1/2 cups crushed strawberries (2 pints)
1 3/4 cups crushed raspberries (2 pints)
1/4 cup fresh lemon juice
4 1/2 cups sugar
1 cup light corn syrup
1 package Pectin (this recipe is from a package of MCP pectin)
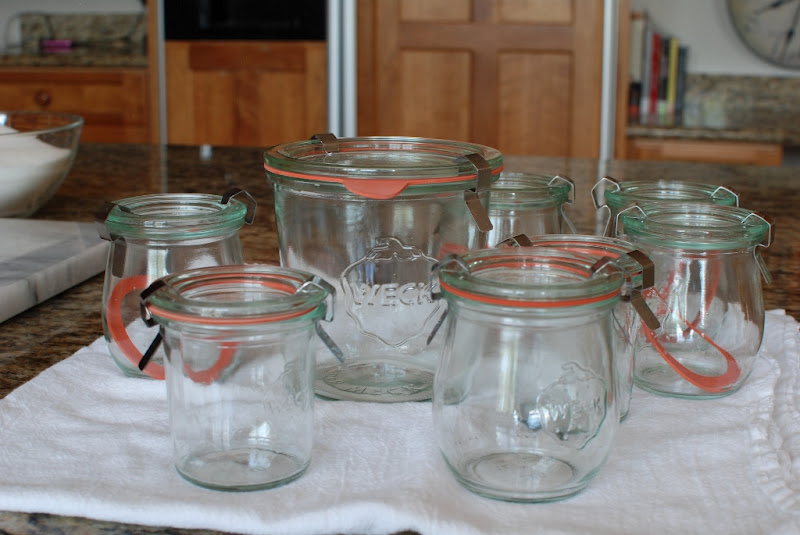
Clean washed jars with lids.  You can use plastic containers if you wish.
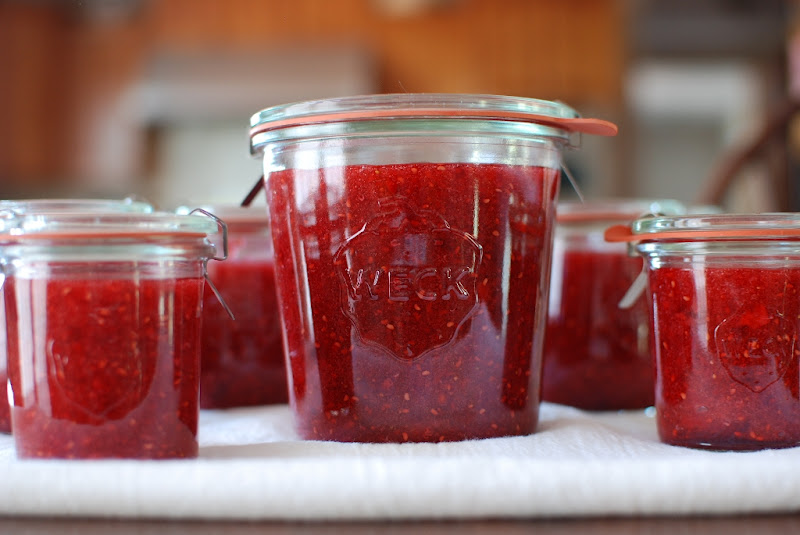
I have a few Weck jars that I purchased from Crate and Barrel.  I like to have a few cute jars on had for gifts.  A jar of jam and homemade bread are a great gift combo…I think.

Start by washing your berries.
Remove the tops of the strawberries and slice.
I like to give them a few quick pulses in the food processor.  You can crush them using a potato masher if you would prefer.

Make sure they measure 1 1/2 cups exactly.
Pour into a large mixing bowl.
Crush the raspberries.  I’m using the food processor again.

Measure exactly 1 3/4 cup.

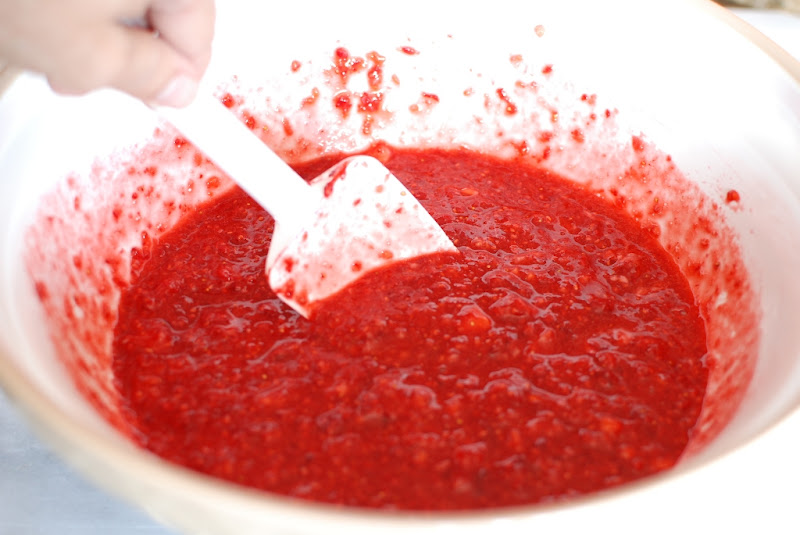
Add the the crush strawberries and stir together.
***I completely forgot to add the photo of the lemon juice being pour into the berries***
DO THAT NOW!    Add the freshly squeezed lemon juice that you extracted for a real live lemon that you cut in half and juiced.  
Mix well.
Add the pectin.
Sprinkle the pectic over the top of the fruit while stirring.
Stir until the pectin is mixed in very well.  
THIS IS IMPORTANT!  Let the mixture stand for 30 minutes stirring EVERY 5 minutes to dissolve pectin thoroughly.
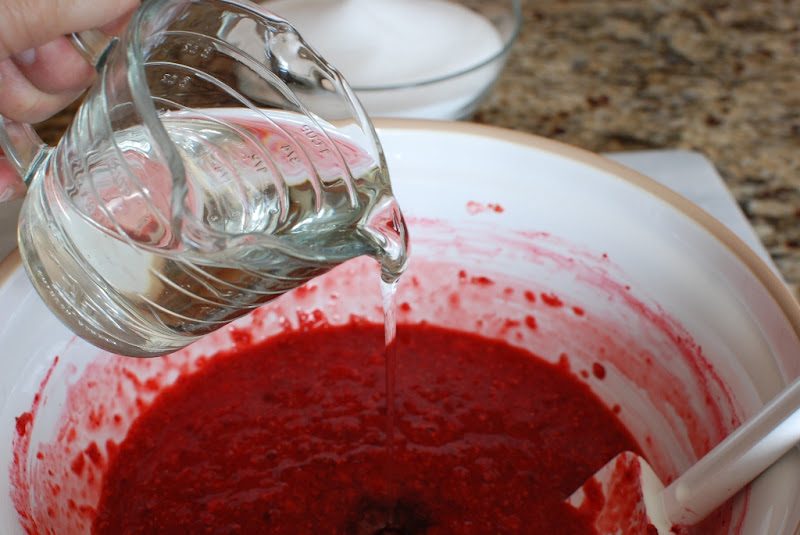
After 30 minutes, pour 1 cup corn syrup into fruit mixture.  This prevents sugar crystallization during freezer storage.

 Stir well.

It’s best to measure the sugar into a bowl.  This way you don’t forget how many cups of sugar you have added…done that.
Stir in sugar gradually.  
Stir constantly until sugar is completely dissolved and no longer grainy.
As you stir the jam will begin to thicken.  Don’t worry that the jam isn’t completely set.  It will continue to set while setting 24 hours.
Ladle into your jars or containers.  Leaving 1/2-inch space at top for expansion during freezing.
Put on the lid.
Your jam is complete.
You will need to let the jam stand at room temperature for 24 hours until set.  

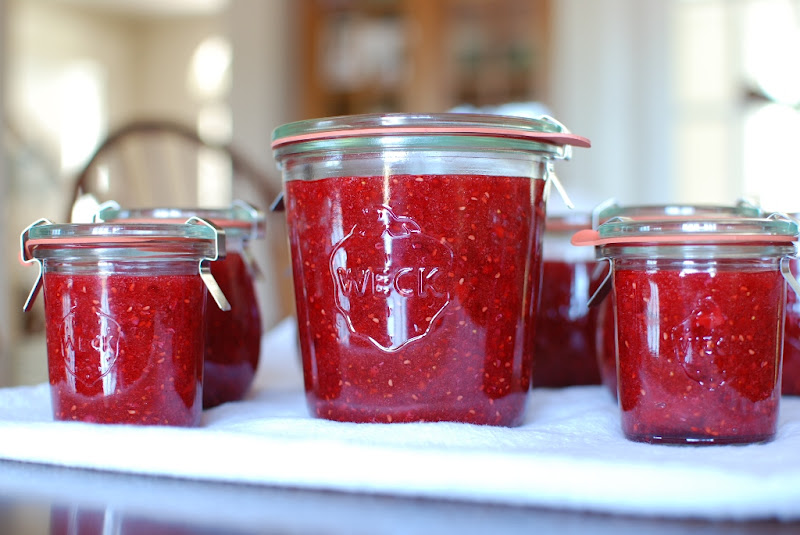
After 24 hours you can refrigerate your jam for up to 3 weeks or freeze for up to one year.  This recipe makes 7 cups of jam.
How easy was that?
Strawberry Raspberry Freezer Jam

1 1/2 cups crushed strawberries (2 pints)
1 3/4 cups crushed raspberries (2 pints)
1/4 cup fresh lemon juice
4 1/2 cups sugar
1 cup light corn syrup
1 package Pectin (this recipe is from a package of MCP pectin)
1.  Wash and rinse containers with tight fitting lids.
2.  Prepare fruit by rinsing and crushing berries.  Measure exactly and place in a large mixing bowl.
3.  Stir in lemon juice.
4.  Gradually stir 1 box of MCP pectin into fruit.  Mix thoroughly.  Set aside 30 minutes, stirring every 5 minutes to dissolve pectin thoroughly.  
5.  Measure exact amount of sugar into a separate bowl.  Do not reduce the amount of sugar.  If you do, your jam will not set.  Set aside.
6.  Pour 1 cut light corn syrup into fruit mixture.  Mix well.  This prevents sugar crystallization during freezer storage.
7.  Stir in sugar gradually.  Stir constantly until sugar is completely dissolved and no longer grainy.
8.  Pour into prepared containers, leaving 1/2-inch space at top for expansion during freezing; cover.
9.  Let stand at room temperature 24 hours until set.  Refrigerate up to 3 weeks or freeze for up to one year.  Thaw in refrigerator.  
Makes 7 cups jam

Print this recipe

I have made up to 7 batches at a time. Just line up several bowls to create an assembly line of jam.  Works great.  Don’t try to double or triple this recipe.  Just do one recipe batch per bowl and you will have success and fabulous fresh jam for the fam!

Share this:

  • Click to share on X (Opens in new window) X
  • Click to share on Facebook (Opens in new window) Facebook

Related

Filed Under: Jams, Jellies, and Condiments Tagged With: homemade freezer jam, homemake jam, jam, raspberry jam, strawberry jam, strawberry raspberry jam

Previous Post: « Fauxmade Ice Cream
Next Post: Independence Day Celebration »

Reader Interactions

Comments

  1. Jenny Koecke says

    June 2, 2014 at 12:36 pm

    if I want to do just all raspberries, what do you think the measurements would be for total raspberries! my mom and gramma made freezer jam that was the very best and it used all your ingredients, I have found recipes with no lemon juice or no karo syrup, your is it and has both, I just need all raspberry due to a strawberry allergy! thanks so much!!

    Reply
    • Janet Barton says

      June 2, 2014 at 3:23 pm

      Raspberry jam is amazing. Just use 3 1/4 cup crushed raspberries. You will basically just replace the strawberries with raspberries equally. I hope you love it because it's crazy good.

      Reply
  2. Morgan E. Dominique says

    March 6, 2013 at 2:16 pm

    If i just wanted to make strawberry jam can i replace the raspberries with more strawberries?

    Reply
    • Janet@simplysogood says

      March 6, 2013 at 2:57 pm

      Absolutely. Just replace equal amounts.

      Reply
    • Ann Taylor says

      July 18, 2013 at 11:51 pm

      I have made this jam many times over the years, and have discovered that if you heat the Karo almost to boiling before you slowly pour it in, it warms the mixture just enough to make the sugar dissolve faster. I have also been known to give the bowl a couple 20-second zaps in the microwave (separated by some energetic stirring!) to help dissolve the sugar. It hasn't hurt the quality of the jam one bit. Ann Taylor

      Reply
    • Janet Barton says

      July 21, 2013 at 3:42 am

      Fabulous advice. Thank you so much.

      Reply
  3. Leigh and Anthony says

    July 25, 2012 at 4:36 pm

    Can you do this with other fruit? Peaches or apricot?

    Thanks.

    Reply
  4. Little Magnolia Kitchen says

    July 5, 2012 at 8:43 pm

    I just bought a book from Williams-Sonoma yesterday called "The Art Of Preserving" because I have been wanting to try to make my own jellies, preserves, etc. The part that scares me is making sure there is no contamination. This recipe makes it sounds easy! So I think I will give this recipe a try! Thanks for posting with perfect timing!!

    Reply
    • Janet@simplysogood says

      July 6, 2012 at 4:24 pm

      When you are canning and preserving food to be put on a shelf you definitely need to be extremely careful of contamination. This is pretty much fresh fruit mixed with sugar and frozen. Pretty simple. You will be amazed at how fresh tasting the jam is compared to cooked and bottle jam. Good luck. Let me know how it works out.

      Reply
  5. Hermann says

    July 2, 2012 at 12:14 pm

    Congratulations! A sweet child!

    Greetings from Germany

    Hermann

    Reply
    • Janet@simplysogood says

      July 2, 2012 at 3:49 pm

      Thanks, Hermann. It's always great to hear from my friend in Germany.

      Reply
  6. Caroline says

    June 30, 2012 at 11:17 pm

    Your jam looks fabulous. I've always made cooked jam/jelly but with this heat wave in the southeast I can't bear the thought. I'll let you know if I try this out.

    Reply
    • Janet@simplysogood says

      July 1, 2012 at 3:52 am

      I hope you love this as much as we do. Please let me know if you try it. Thanks for commenting.

      Reply
  7. Anonymous says

    June 30, 2012 at 10:51 pm

    Was wondering where you've been. I have missed you! But couldn't have had a better reason. Congratulations! She's adorable!
    But we want more summer goodies & berry recipes!

    Hailey

    Reply
    • Janet@simplysogood says

      July 1, 2012 at 3:51 am

      I was worried that I was using too many berry recipes. I just love using what is in season. Thanks for missing me. My life should be getting back to normal…oh wait I have a daughter getting married in August. I do my best!

      Reply

Leave a Reply Cancel reply

Your email address will not be published. Required fields are marked *

Recipe Rating


This site uses Akismet to reduce spam. Learn how your comment data is processed.

Primary Sidebar

About Me

Janet Barton

Hi I'm Janet and this is where I share my delicious made-from-scratch seasonal recipes that I make at home for my family every day.

I believe cooking from scratch, using unprocessed and whole foods is an important part of healthy eating. My goal is to help you create amazing recipes by providing easy step-by-step photos and instructions.

Read More »

Trending Recipes

  • No-knead Crusty Bread in a Dutch oven No-knead Crusty Bread

  • Rustic Strawberry Rhubarb tarts

  • pink iced heart sugar cookies Sour Cream Sugar Cookies with Cream Cheese Frosting

  • Lemonade and raspberry lemonade in tall glasses Old Fashioned Lemonade

  • Wooden board with chocolate cookies with half chocolate icing and half vanilla icing Chocolate Half Moon Cookies

  • Cherry Cola Glazed Ribs

  • Several chocolate drop cookies on white background Chocolate Drop Cookies

  • Jerk Spatchcock Chicken on wood Jamaican Jerk Spatchcock Chicken

  • chocolate glazed and glazed spudnuts stacked on cutting board with donut holes Spudnuts (Potato Doughnuts with Glaze)

  • Baked southern peach cobbler in cast iron skillet Southern Peach Cobbler

Latest on Instagram

simplysogood

🍋 I teach you how to cook from scratch
🍒 Follow simple step-by-step recipes
🫐 A lover of fresh, seasonal, & local ingredients

Fresh Herb Crockpot Turkey Breast with Brown Butte Fresh Herb Crockpot Turkey Breast with Brown Butter Pears is perfect for a smaller but still impressive Thanksgiving dinner. This easy recipe features a boneless turkey breast coated in homemade herb butter and "roasted" in a slow cooker, then served with a creamy cider herb gravy and sautéed browned butter pears....

https://www.simplysogood.com/fresh-herb-crockpot-turkey-breast-with-brown-butter-pears/
These strawberry rhubarb crumble bars will take yo These strawberry rhubarb crumble bars will take you straight to dessert paradise! 🥰⁠🍓
.⁠
Sweet-tart love in every bite, they’re the perfect treat for sunny days and cozy nights. Grab a bar and let’s indulge in this fruity delight!⁠
.⁠
Give this recipe a try by clicking the link in my Instagram bio, where I post step-by-step photo instructions!
⁠
#rhubarbseason #homemadewithlove #dessertclub #strawberryrhubarb #strawberryrhubarbpie #strawberrycrumble #strawberryrhubarbcrumble
Baking up some homemade magic with my no-knead Lem Baking up some homemade magic with my no-knead Lemon Rosemary Gruyere bread!
•
This recipe is as easy as pie (or should I say bread?), bringing the flavors of tangy lemon, fragrant rosemary, and oh-so-melty Gruyere to life. 🍋🍞🌱
•
Click the link in my bio to read through these helpful tips that will make your homemade bread a melt-in-your-mouth success!

#homemadebread #nokneadbread #gruyerebread #lemoncheesebread #cheesebread #homemadecheesebread
Starting the day off right with these indulgent no Starting the day off right with these indulgent no-knead brioche morning buns! 🤎 There’s just something about the buttery, flaky brioche and the sweet cinnamon swirl that makes mornings extra special.
•
The base dough recipe for no-knead brioche morning buns is a buttery no-knead dough that is refrigerated overnight. The chilled dough is very easy to roll, fill, slice, and bake.
•
So go ahead, treat yourself to something delicious and let these buns brighten up your day! 

The recipe link is in my Instagram bio!

#MorningTreats #BriocheLove #SweetIndulgence #cinnamonsugar #cinnamonandsugar #morningbuns
No fancy Ice Cream Maker — no problem! 🍦🍨 No fancy Ice Cream Maker — no problem! 🍦🍨 This no churn Strawberry Raspberry Ice Cream recipe is quick and easy to make without an ice cream maker in only 10 minutes.
•
Simply blend together a mix of frozen strawberries and raspberries with vanilla ice cream and raspberry sherbet for a rich, fruity, and creamy dessert that tastes homemade! 🍓
•
Give this recipe a try by clicking the link in my Instagram bio, where I post step-by-step photo instructions!

#nochurnicecream #homemadeicecream #strawberryicecream #raspberryicecream #kidfriendlyrecipes #simplerecipes
These chewy peanut butter bars have been a family These chewy peanut butter bars have been a family favorite for decades! Peanut butter cookies layered with chocolate and a delicious peanut butter glaze! 🥜🍫
•
Trust me, your family will LOVE them!
•
Click the link in my bio to read through these helpful tips that will make your peanut butter bars a melt-in-your-mouth success!

#peanutbutterbars #peanutbuttercookies #pbbars #peanutbutterchocolate #peanutbutterlover #pbandchocolate
Start your day off on a flaky note with these skys Start your day off on a flaky note with these skyscraper buttermilk biscuits!
These melt-in-your-mouth treats are the perfect indulgence for breakfast, brunch, or anytime you’re craving something buttery and delicious.
•
So go ahead, treat yourself to these heavenly delights and savor every flakey, buttery bite with me!
•
The recipe link is in my Instagram bio!

#butterybiscuits #homemadeisbest #breakfastindulgence #brunchgoals
Sharing my famous Lemon Curd Recipe! 🍋🌼💛 Sharing my famous Lemon Curd Recipe! 🍋🌼💛 The one that everyone says I should sell at farmers markets — nah! I’ll just share the recipe with you all instead!
•
I love lemon curd, and use it for so many things!!
🍰 Layered in a cake
🍦 Swirled into ice cream
🍪 Smashed between cookies
☀️ Filled inside scones

The possibilities are endless!! Give this recipe a try by clicking the link in my Instagram bio! And if you’d like the recipes for my other lemon curd inspired goodies, they’re all linked in my Instagram stories!

#lemoncurd #lemoncurdcake #lemoncurdicecream #lemonicecream #lemondessert #lemoncurdrecipe
Have you ever tried an olive oil cake!? 🍰 They Have you ever tried an olive oil cake!? 🍰 They are incredibly soft and moist — you gotta give it a try!
•
This citrus olive oil cake recipe features a tart lemon curd filling and a rich mascarpone frosting. Then we gently add flowers for beautiful decoration. It is an impressive looking and mouth-watering dessert that’s perfect for any special occasion! 🍋🤍🌼

Recipe is linked in my Instagram bio!

#oliveoilcake #oliveoilcakes #lemoncurdcake #mascarponefrosting #mascarponeicing
Follow on Instagram
  • No-knead Crusty Bread in a Dutch oven No-knead Crusty Bread posted on September 19, 2018

  • Rustic Strawberry Rhubarb tarts posted on April 12, 2019

  • pink iced heart sugar cookies Sour Cream Sugar Cookies with Cream Cheese Frosting posted on February 8, 2025

  • Lemonade and raspberry lemonade in tall glasses Old Fashioned Lemonade posted on June 22, 2018

  • Wooden board with chocolate cookies with half chocolate icing and half vanilla icing Chocolate Half Moon Cookies posted on April 5, 2024

  • Cherry Cola Glazed Ribs posted on June 8, 2023

  • Several chocolate drop cookies on white background Chocolate Drop Cookies posted on May 20, 2024

  • Jerk Spatchcock Chicken on wood Jamaican Jerk Spatchcock Chicken posted on May 18, 2018

  • chocolate glazed and glazed spudnuts stacked on cutting board with donut holes Spudnuts (Potato Doughnuts with Glaze) posted on October 21, 2019

  • Baked southern peach cobbler in cast iron skillet Southern Peach Cobbler posted on August 8, 2024

Footer

Featured on

The Daily Meal Logo The foodgawker-logo reddit Logo BuzzFeed Logo halfbaked Harvest Logo Browneyed Baker Logo FOOD52 Logo University of Washington Logo sheknows Logo

Copyright © 2025 Janet Barton
Privacy Policy