
I have been baking these rolls for 40 years and they are my go-to dinner roll because they mix up so quickly. The refrigerated dough is so easy to roll out and shape without leftover scraps of dough. Perfect!
Tips for Perfect Crescent Dinner Rolls
- Don’t use too much flour. The dough should be sticky before refrigeration.
- Carefully measure the flour. Stir the flour to lighten it up, then gently scoop into a measuring cup and level off.
- Use good quality flour. Yes, there is a difference in the flavor of the flour. King Arthur all-purpose or Central Milling Co. all-purpose flours are a good choice.
- Use unsalted butter for the dough and for rolling out the dough.
- Let the dough mix for a good 5-8 minutes after the last flour addition.
- No need to oil the bowl. This is an enriched buttery dough. Just scrape down the sides of the bowl, cover, and refrigerate.
- Use fresh yeast. Instant/rapid rise or active dry yeast works well.
- Don’t overbake!
- After rolls have been placed on the baking sheet. They can be put in the freezer and frozen completely. They put the rolls in a re-sealable bag and return to the freezer to bake at another time. Just thaw and let rise until light, which will take 4-5 hours.
Mixing the Dough
 1
1 3
3 5
5 2
2 4
4 6
6- Stir the yeast into the lukewarm water. Set aside.
- In the bowl of an electric mixer fitted with a paddle attachment, add the eggs and mix until frothy. With the mixer still running add sugar, and salt Set aside.
- In a small saucepan, melt the butter. When the butter has completely melted and the butter starts to bubble, add the milk all at once.
- Immediately take off the heat. Don’t let the milk mixture get too hot. The temperature should not exceed 113℉.
- With the mixer on low add the warm milk/butter mixture to the egg mixture. Mix well.
- Stir in the dissolved yeast.
 1
1 3
3 5
5 2
2 4
4 6
6- Add the flour 1 cup at a time until you have added 4 cups of flour. Mix well after each addition. Mix for 3-5 minutes.
- Add additional flour 1/4 cup at a time until the dough starts to pull away from the sides. I rarely add the full 5 cups of flour. Continue to mix for 5-8minutes. I like to clean up my mess and do the dishes while the dough continues to mix. You don’t want a still dough. It needs to be quite sticky.
- Scrape the dough away from the sides of the bowl.
- Scrape down the bowl and slightly form a ball of dough. No need to oil the bowl.
- You can see how sticky the dough is.
- Cover with plastic wrap and refrigerate the dough overnight.
How to Roll and Cut the Rolls
 1
1 2
2 3
3 4
4 5
5 6
6- The following day, about 3-4 hours before you want to bake the rolls, remove the dough from the refrigerator. The dough will have risen slightly. Not quite double in size, but close.
- Remove the dough from the bowl onto a lightly floured surface.
- Divide the dough into two equal pieces.
- Shape each half into a ball of dough. Slightly flatten the dough into a disk. Dust lightly with flour.
- Roll the dough into a large 14-inch circle.
- Pour 1/2 of the melted butter into the middle of the circle and spread with the back of a spoon to within 1-inch of the edge.
- Using a pizza cutter or a sharp knife cut the circle in half.
- Now cut the dough in half the other directions. The dough should be cut into fourths.
- Cut each fourth into thirds. Get it? You should have 12 triangles of dough.
Shaping the Crescent Rolls
 1
1 3
3 5
5 2
2 4
4 6
6- To make the crescent shape roll, start at the wide end of the triangle and begin to roll toward the tip.
- II like to pull on the tip and stretch it out a bit as I roll.
- Make sure the tip of the dough is tucked all the way under the roll. If the tip isn’t secure, it will start to unravel as the dough is baked.
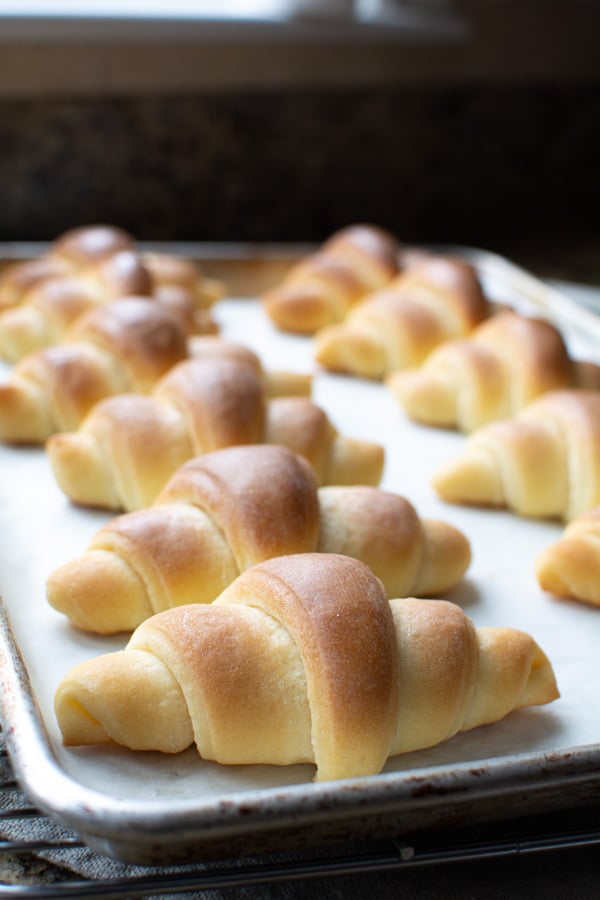
- Repeat the process with the remaining dough and place on a buttered or parchment-lined baking sheet. Only put 12 rolls on a 12 x 17-inch baking sheet. This gives the rolls room to spread during baking.
- Cover lightly with a cloth or towel to rise. Because the dough is cold it should take 3-4 hours for the rolls to rise.
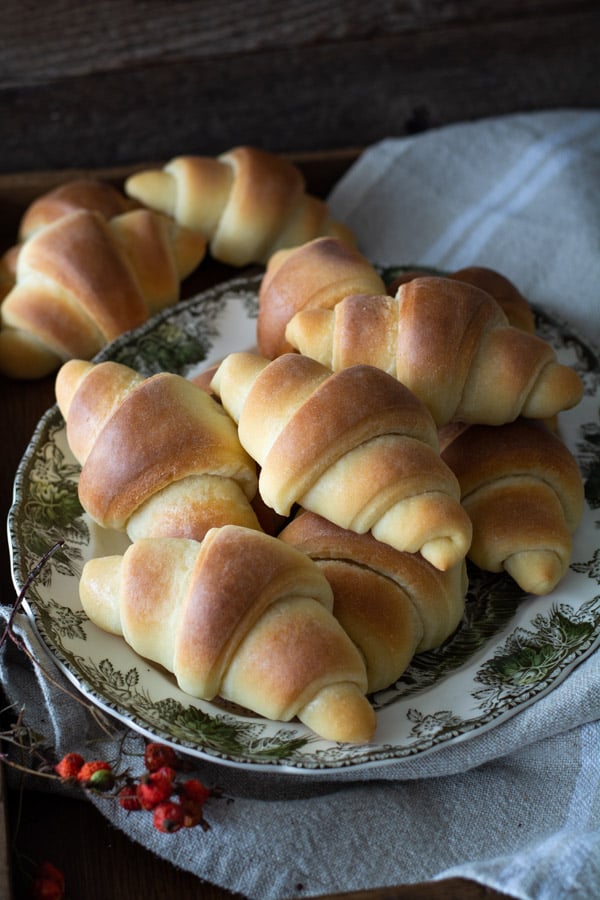
- Lightly touch the risen rolls. They should feel like a fresh marshmallow to the touch. Preheat the oven to 375℉. Bake the rolls for 15-18 minutes or until golden brown.
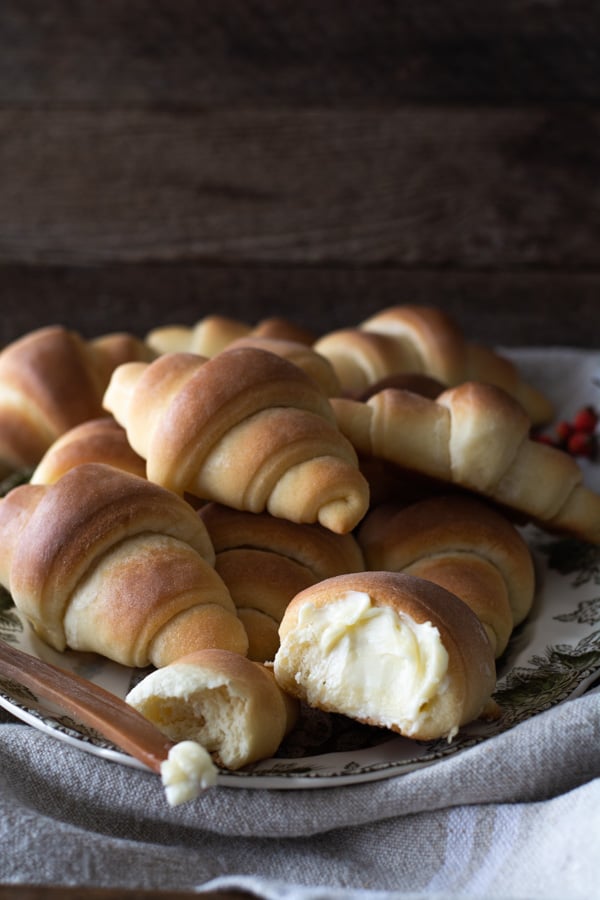
I bet you can’t eat just one!

Overnight Crescent Dinner Rolls
Ingredients
- 1 tablespoon yeast
- 1/4 cup warm water
- 3 eggs
- 1/2 cup sugar
- 3/4 teaspoon salt
- 1/2 cup butter
- 3/4 cup milk
- 4 1/2 - 5 cups flour
- 6 tablespoons butter for rolling out dough
Instructions
Mixing the dough
-
Stir the yeast into the lukewarm water. Set aside. In the bowl of an electric mixer fitted with a paddle attachment, add the eggs and mix until frothy. With the mixer still running add sugar, and salt. Continue to mix on low speed until well blended then set aside.
-
In a small saucepan, melt the butter. When the butter has completely melted and the butter starts to bubble, add the milk all at once. Immediately take off the heat. Don’t let the milk mixture get too hot. The temperature should not exceed 113℉. With the mixer on low add the warm milk/butter mixture. Mix well. Stir in the dissolved yeast.
-
Add the flour 1 cup at a time until you have added 4 cups of flour. Mix well after each addition. Mix for 3-5 minutes. Add additional flour 1/4 cup at a time until the dough starts to pull away from the sides. I rarely add the full 5 cups of flour. Continue to mix for 5-8minutes. I like to clean up my mess and do the dishes while the dough continues to mix. You don’t want a stiff dough. It needs to be quite sticky.Scrape the dough away from the sides of the bowl.Scrape down the bowl and slightly form a ball of dough. No need to oil the bowl.You can see how sticky the dough is.Cover with plastic wrap and refrigerate the dough overnight.
Rolling out the dough
-
When ready to bake, remove dough from the refrigerator. Place the dough onto a lightly floured surface. Cut the dough in half. Shape each half into a ball of dough. Roll out each ball into a 14-inch circle. Melt 1/2 cup butter. Pour half the butter into the middle of each circle. Spread butter to within one-inch of the edge. Cut each circle in half then cut in half the other direction so that the dough has been cut into fourths. Cut each fourth into thirds. Each circle should be cut into 12 triangles. Beginning at the wide edge of the triangle roll the dough towards the tip of the dough. Place the crescent-shaped rolls onto a greased or parchment-lined baking sheet, point down. Place 12 rolls per baking sheet. Cover and allow to rise for 3-4 hours or until the dough feels like a marshmallow when gently pressed. Bake in a preheated 350-degree oven and bake for 15-18 minutes or until golden. Makes 2 dozen rolls.
Recipe Notes
Tips for Perfect Crescent Dinner Rolls
- Don’t use too much flour. The dough should be sticky before refrigeration.
- Carefully measure the flour. Stir the flour to lighten it up, then gently scoop into a measuring cup and level off.
- Use good quality flour. Yes, there is a difference in the flavor of the flour. King Arthur all-purpose or Central Milling Co. all-purpose flours are a good choice.
- Use unsalted butter for the dough and for rolling out the dough.
- Let the dough mix for a good 5-8 minutes after the last flour addition.
- No need to oil the bowl. This is an enriched buttery dough. Just scrape down the sides of the bowl, cover, and refrigerate.
- Use fresh yeast. Instant/rapid rise or active dry yeast works well.
- Don’t overbake!
- After rolls have been placed on the baking sheet. They can be put in the freezer and frozen completely. They put the rolls in a re-sealable bag and return to the freezer to bake at another time.
This is a previous post from 2011. I have updated photos, a printable recipe, and nutritional information which is only an estimate.


I looked at all the comments and see that people who tried these loved them and had success, but I don’t understand when to add the yeast. One line saYs add yeast and sugar and theN at the end of the paragraph -it says to stir in dissolved yeast. I’m sure they’ll be delicious when I understand the diRections.
Thank you for your wonderful blog!
I’m so sorry for the confusion, Cindy. Thanks for bringing this to my attention. I have no idea how I messed that up so badly. I have made the corrections. Add the yeast after the milk/butter mixture. So mix the eggs, sugar, and salt. SEt aside. Melt the butter in a pan then add the milk into the butter. Remove from the heat and add to the egg mixture. Mix well THEN add the dissolved yeast. Please let me know if you have any more questions.
And yet, 8 years later, these are still my favorites. Thank you J.
Thank you so much! They are my favorite too. 😋
I'm really looking forward baking these dinner rolls! I would like to ask if the dough of the rolls hasn't rise enough, do I still need to cover them with the dish cloth and wait for the time it rise enough ? Thank you ! 🙂
It is best to cover the rolls so they don't dry out. Let them rise until they are double in size. I hope this helps.
Your instructions are awesome, but I suck at making bread – all bread, which makes me worry about these. They look beautiful so I am going to give them a try and possibly freeze part of the batch because we are just a family of four. How long can the frozen ones stay in a chest freezer – six months or just 3? Thank you!!
Hi Lisa, You can do it! Remember yeast is your friend. Just follow the instructions and you will have the best rolls ever. Yes they can be frozen. I think the longest I have kept them well has been about 3-4 weeks. You can reheat them in a 300F oven for about 5 minutes. Keep me up to date.
Oh this sounds so yummy! Even though we don't celebrate Thanksgiving in Germany, I'll have to try this really soon. Your recipe and the brilliant photos made my mouth water 😉 Thanks for sharing!
Thank you for your kind comment. You don't need a special occasion to make these rolls. I make them often for our Sunday meal.
So sorry … now that I have read the all recipe I found the answer to my question. Anyways I had the opportunity to tell you how much I like your blog.
Bye now!!!
No worries. Remember, "yeast is your friend". You can do it. email me if you have any questions while you are making the dough simplysogood@hotmail.com.
Thank you so much for your kind comments. You have made my day. Happy Holidays to you.
Happy Holidays to you to and thank you for being so nice!!!
Any time. I hope your rolls are a great success. Just keep practicing and playing with yeast. Happy Holidays to you.
Have to compliment you on this rolls … they look amazing!!! Anyways, I love your blog and I have been following it for the longest time. I bake and cook pretty well (that's what everybody says) but I am afraid of making any kind of bread or anything with yeast. But this year for the first time my house is going to be full of family for Christmas and I would like to give this recipe a try. So … my question is, what kind of yeast did we use and what is the brand that you like the most. Thank you so much for your time and please continue with this wonderful blog … and HAPPY HOLLIDAYS!!!!
Yes you can put refrigerate them after shaping them. They should be ready to bake within an 1 -1 1/2 hours. Freeze the shaped rolls on a baking sheet. Cover and freeze. Remove from baking sheet and place in a ziplock bag. Thaw and allow to rise for 4-5 hours. Bake as usual.
Can they b made day aheade for thanksgivin? maybe in covered dish in fridge. then placed on counter to rise a few hours before baking?or if u freeze how do u thaw before baking
Yes they can. My mother-in-law used to freeze before baking. Freeze the unbaked roll on a baking sheets until frozen then transfer to a covered container or ziplock. The freeze well baked too.
Can these be frozen? Thanks
WHAT is thaaaaaaaaaaaaaaaaaaaaat ???!
very professional indeed
🙂
You are the best!
hey janet 🙂 i made the rolls again as i said and his time i followed the recipe the 1st time i had a loose batch of homemade yogurt for unknown reason and i used the yogurt instead of th milk bcoz i didn't want it to go to waist (my yogurt had consistency of heavy cream) and the dough way fluffier and triple in size when i let it raise in the fridge….the 2nd time the dough was barely doubled….the out com of the 1st batch was by far the best i will be replacing the milk next time with thinned yogurt with a some milk or water…i thought u would be interested in trying it 🙂
I will try it! Thank you so much for the advice. Happy baking.
i made this recipe today and it was amazing out of this world fluffy and melts in ur mouth 🙂 thank u soo much for the great recipe i am thinking to re-do it again for tomorrow !!! i stuffed some wz cheese and sprinkled them with za'tar
we ate them for breakfast along side the plain ones with some homemade strawberry jam 🙂 in our house they were breakfast rolls not dinner rolls 😀 by the way i love love love ur blog this was my first recipe to try but it's not the last one thank u for inspiring me to bake some more 🙂
Ahhh, thanks for your kind comment. I think breakfast rolls are a great idea, especially the cheese. Thanks for reading by blog.
Janet,
I LOVE your blog and have spent hours searching recipes. I have yet to try one that is not absolutely delicious. Thank you!!!!
Dear Janet,
I would really want to thank you for this adorable recipe, I made the rolls today and they are already gone. The only thing I changed is I made them stuffed 🙂 Thank you!
Hello! This recipe looks amazing. I have been trying to find rolls to make for thanksgiving and I think this is the one. I was wondering if you use salted or unsalted butter. According to "Martha" you should always use unsalted when baking but I followed that rule when making cinnamon buns a couple of weeks ago and you there was definitely something missing. (Previously I had always used salted butter) Thanks again for the recipe
Depends on your taste. This recipe doesn't have a lot of salt in it. I would use what you have. If you used salted butter, you shouldn't have to adjust the recipe. If you use unsalted butter, I would add 1/4-1/2 teaspoon more salt. Good luck. Let me know how they turn out.
Wow these look absolutely amazing!
Thank you for your kind comment. I hope you try them some time.
My 14 yr. old daughter loves to bake and she just made her first batch of these rolls. They are awesome! We are wondering where you got your pastry cloth from. Your blog is very informative and the photos are beautiful and very helpful, thanks for sharing!
Way to go 14 year old daughter! I purchased the cloth at a local kitchen store. It's basically canvas that has been serged around the edges. I have made a few my just purchasing the canvas at a fabric store, pre-washing. You can sew the edges or not. Pretty simple. I love the cloth it's awesome.
It doesn't matter what they look like, I'm sure they will taste amazing.
Mine are rising, for Thanksgiving dinner. They don't look quite as nice and uniform as yours, but I'm excited to try them. And I made the Raspberry Honey Butter… Yummo!
I hope you love the rolls. Happy thanksgiving.
They look delicious. I think that I will try the recipe for Thanksgiving dinner. Thanks for the recipe and great info.
Helen
1 Tablespoon of yeast.
How much yeast did you use?
Awww, thanks Samantha. I need to get blogging again so you have more recipes to read. Busy week.
I just LOVE this blog! I never read blogs but am always reading recipes and ALWAYS baking. The pictures are beautiful and EXTREMELY helpful when following along. The instructions have a perfect amount of info without overwhelming you. I also LOVE the little tidbits of info (didn't know about the sugar and eggs fact). Thank you for this. I will DEFINITELY read more of your recipes!
Я так счастлив, вам понравился рецепт. У вас есть блог под названием "Между небом и пирог"?
Если это так, я люблю его. Это так красиво. Спасибо за ваш комментарий.
я готовила сегодня – получилось супер)
спасибо))
I dissolved 1 tablespoon of yeast (all of it) in the warm water.
How much of yeast did you use with water?
I made using the same I use for making pizza dough, it worked the same. Great recipe.
Sure why not. I've never tried it, but I think the dough would be great for that.
Can these be filled with sausage? or maybe tuna or chicken? They look delicious. I am looking for a soft dough recipe to fill up with savory stuff.
Whew! I'm so happy to hear when my recipes turn out great for someone. Pat yourself on the back you did all the work and made them great.
Yes, they are great for a family dinner. I made them Sunday and they were very light and yummy!! Great blog, great recipes!!!
They really are light and fluffy. But, the don't have the layers upon layers of buttery goodness of a croissant. Great for a family dinner.
So pretty! I can't believe those rolls didn't require all the butter and folding usually associated with crescent rolls! They look so fluffy!
Why thank you, Sarah. I love getting positive comments. It just makes my day. I'm such a novice at photography. I so much to learn. Have a great day.
Mmmm! I can't wait to make these. I love your blog. . . even though I am a complete stranger. I found a link to it on a friend's blog. I am so impressed by your photography!