
I was asked to bring a dessert to a bridal shower. The bride requested chocolate and raspberries.
Chocolate is my thing and raspberries are peaking at my local farmers market. Of course, I can do that.
I decided to use my Grandma Dearden’s chocolate cake. It’s a “no fail” recipe for me. I knew I’d be a little pushed for time on the day of the shower because I had to complete my last 20 mile run in preparation for my upcoming marathon. (Ya – I still have that fete to accomplish in 2 1/2 weeks) I baked the cake in advance and put in the freezer, which would make assembly a bit quicker the day of the shower.
Brace yourself there is at least 1,000 pictures for this recipe…well there are a ton. Please don’t get overwhelmed. Just take the recipe a bite at a time. Just like how you would eat a piece of cake.
Let’s start with the chocolate cake. Keep in mind you can freeze this cake for at least a week before icing and serving.
I have this recipe step-by-step in this order: Chocolate Cake, Chocolate Ganache (for the layers), and Raspberry buttercream for the top and outside of the cake.
To Prepare the Chocolate cake:

For the cake you will need: butter, eggs, sugar, cocoa, flour, salt, baking soda and vanilla.

Whoops! Almost forgot the sour cream and boiling water.

Before we begin the mixing process, we better prepare the baking pans. You will need 2 9-inch round cake pans and two sheets of parchment paper.

Trace an outline of the baking pan on the parchment.

Cut around the circle.

Oh! This is a terrible picture, but you get the idea.

Butter the bottoms and edges of both baking pans.
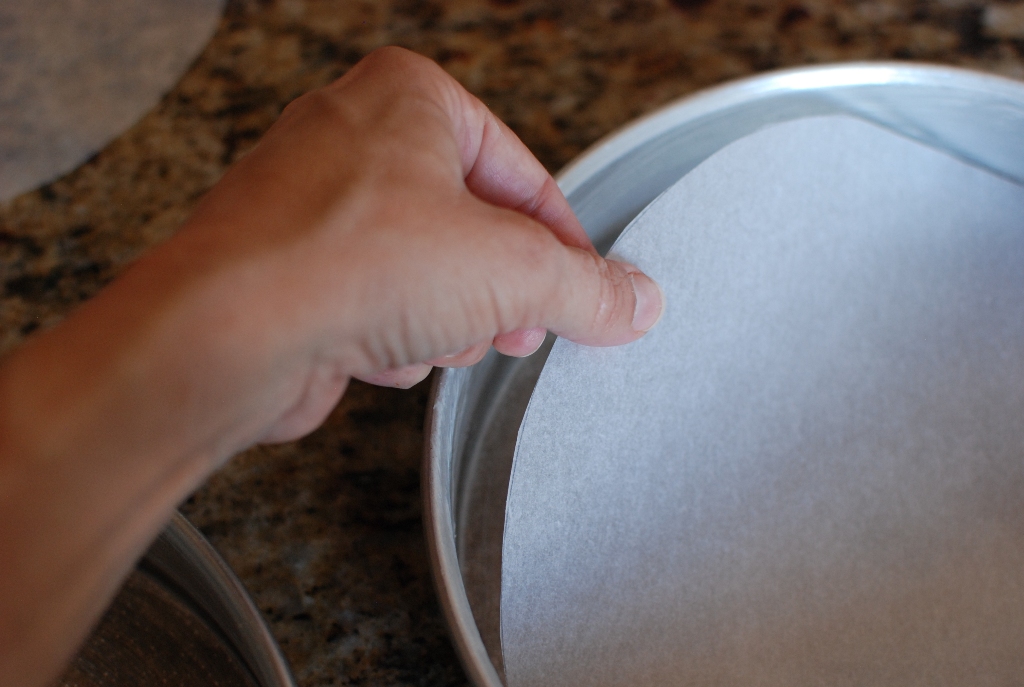
Place the parchment round in the bottom of each pan.

Butter the top of the parchment paper.

Now flour the bottom and sides of each pan.
I know this probably seems like “over kill”, but I’m not taking any chances of this cake sticking to the bottom or sides of the pans.

Tap out the flour. Really tap it out. It just isn’t cool to have chunks of flour sticking to the bottom of your cake.

Put softened butter in a large mixing bowl.

Add the sugar and…

cocoa. I love dutch processed, you can use your favorite.

Cream the butter, sugar and cocoa.

Add the eggs.

Mix well. Scrape down the sides of the bowl and mix again.

Add the sour cream.

Blend together.

Add the salt and baking soda to the flour.

Sift together. I just give it a whisk.

Add the flour to the sugar/butter mixture and mix just until blended. If you over mix, the cake could be tough.
Scrape down the sides of the bowl and mix again.

The batter should be smooth.

Add the 1 cup of boiling water.

Mix on low speed so the water doesn’t splash all over you and your kitchen.

Add the vanilla.

Mix in the vanilla and the batter is now complete.
Piece of cake!
Pour the batter into prepared baking dish.

Divide the batter equally between the two prepared pans.
Place in a pre-heated 350 degree oven and bake for 25-30 minutes or until the cake lightly springs back when touched.
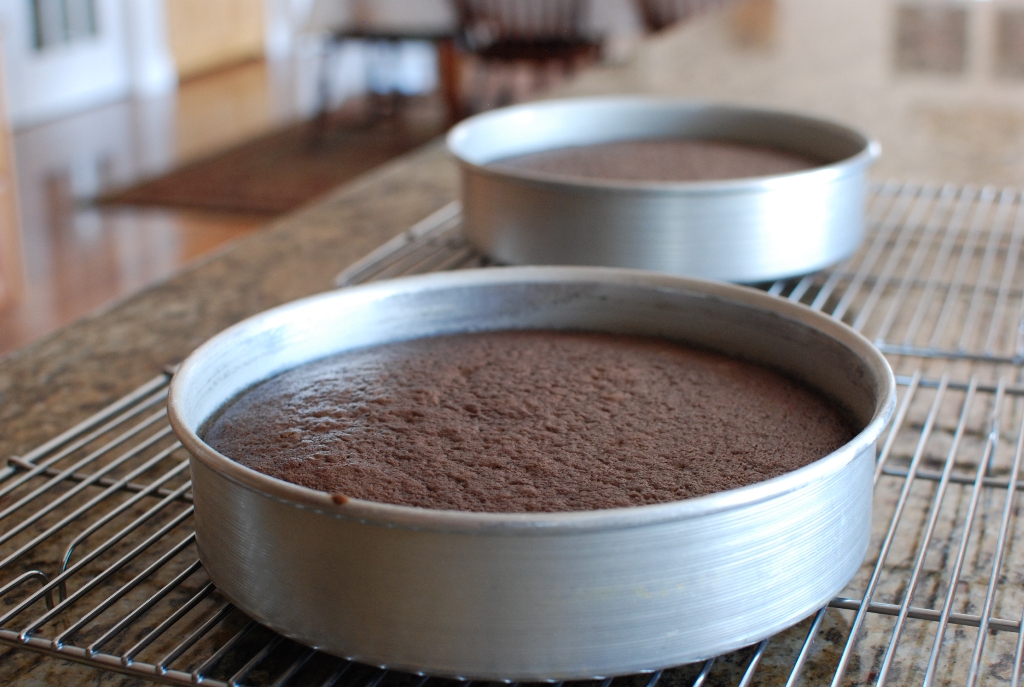
Remove baked cakes from oven and place on a cooling rack for 10 minutes.

Invert the pan on to the cooling rack and remove the pan. The cake will release.

Peel off the parchment paper.

Cook the cakes completely.
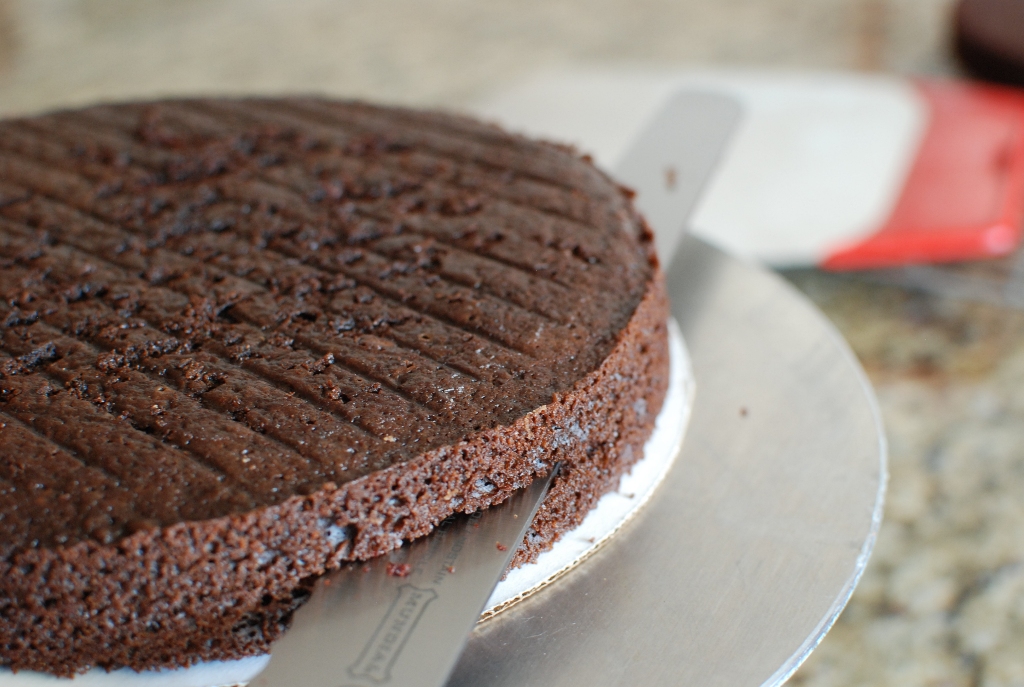
Slice the cooled layers in half. This will create 4 layers. Set a side while preparing the other ingredients.
At this point you can place waxed paper in between the layers and wrap well then place in freezer for up to one week.
To Prepare Chocolate Ganache:

You will need 1 pound of semi-sweet chocolate and 1 1/2 cups heavy cream.

Place the chocolate in a large bowl.

Bring it to a simmer. Stir it once or twice to make sure the cream is not just heated around the edges of the pan. You want the cream to be very hot. Simmering and steaming.

Pour the hot cream over the chocolate pieces.

Let it sit there for 5 minutes. Don’t touch it! Just let it sit.

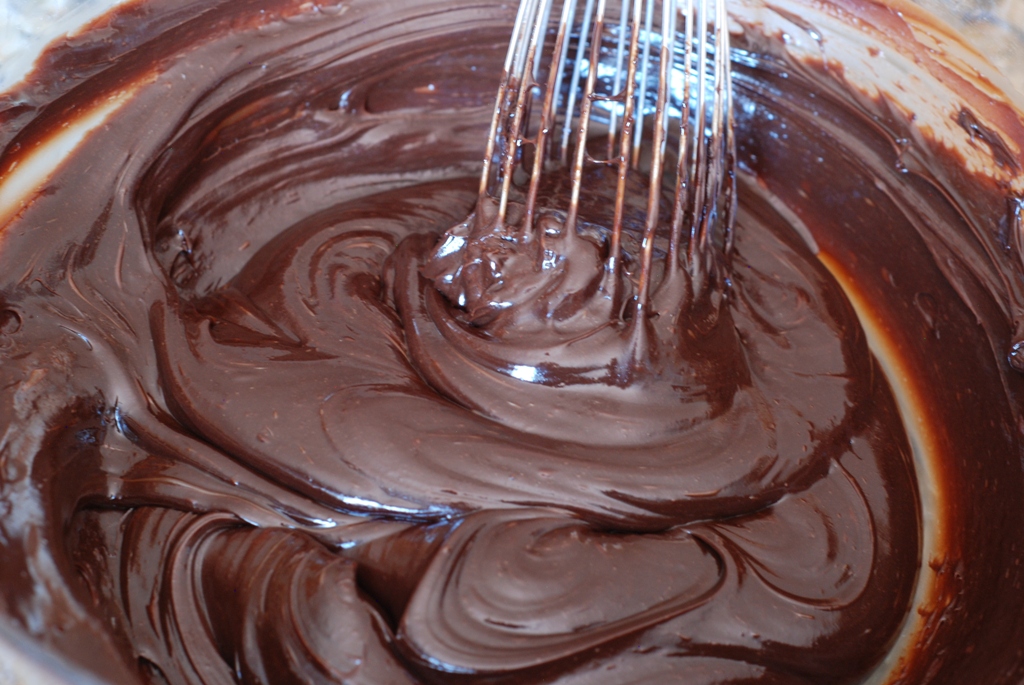
After 5 minurtes the chocolate should be melted. Starting in the center, start whisking the cream and chocolate together.

As you whisk, the mixture will start to come together. Keep whisking until the chocolate and cream are completely mixed together and no cream shows. If by chance you still have a few chocolate pieces left that haven’t melted, just remove them. If you have alot that have not melted, you can place the bowl in the microwave for about 10 seconds. The continue stirring.

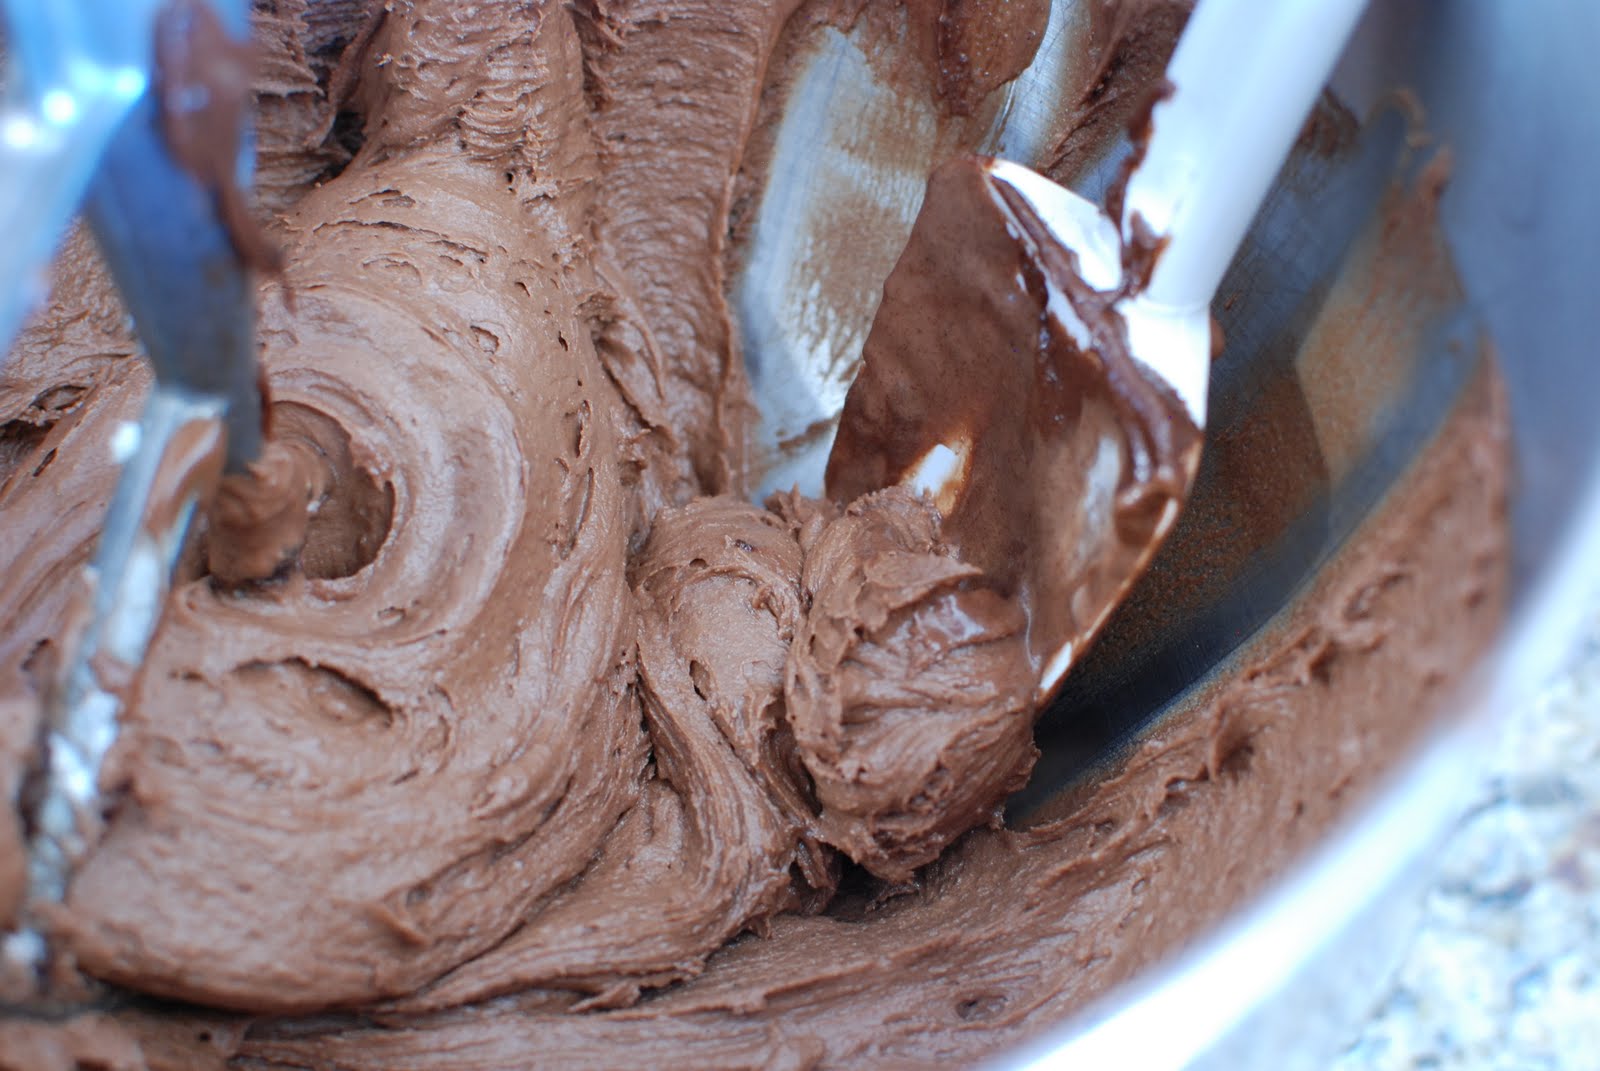
This is what the ganache should look like. At this point you can just let the ganache sit on the counter until it sets up, but that could take a couple of hours. You could put it in the refrigerator for an hour and stir every 10 minutes or so until it sets. I like to put it in an ice bath.

Put ice and water in a very large bowl. Place the bowl of ganache in the ice water. Don’t fill it too full because you don’t want the water flowing into your ganache. Not good. Now just keep stirring until it reaches the perfect spreadable consistancy.

Keep stirring. It could take as long as 10 minutes. I like using the ice bath because it also helps the ganache keeps it’s pretty glossy sheen.

Bahhhh! I love it when it get’s to this consistancy. LOVE IT!!! Look at how creamy it is. I haven’t found ANYTHING that glides over a cake like chocolate ganache. Seriously all I need is a bowl of this and a spoon. Oh, be sure to remove from the ice bath now or it will harden. We don’t want that to happen.
The ganache is now ready to spread in between the cake layers. It’s also perfect for eating with a spoon.
To Prepare the Raspberry Buttercream…yum:

You will need 4 1/2 cubes of butter that is one FULL pound plus 1/4 cup of unsalted butter, 5 egg yolks, sugar, water and raspberry puree.

In the bowl of a mixer add the egg yolks. Using the wire whisk attachment, beat the eggs until they are light yellow and a thicken. This will take about 5 minutes on high speed.

The eggs will ribbon off of the beater when they are whipped enough.
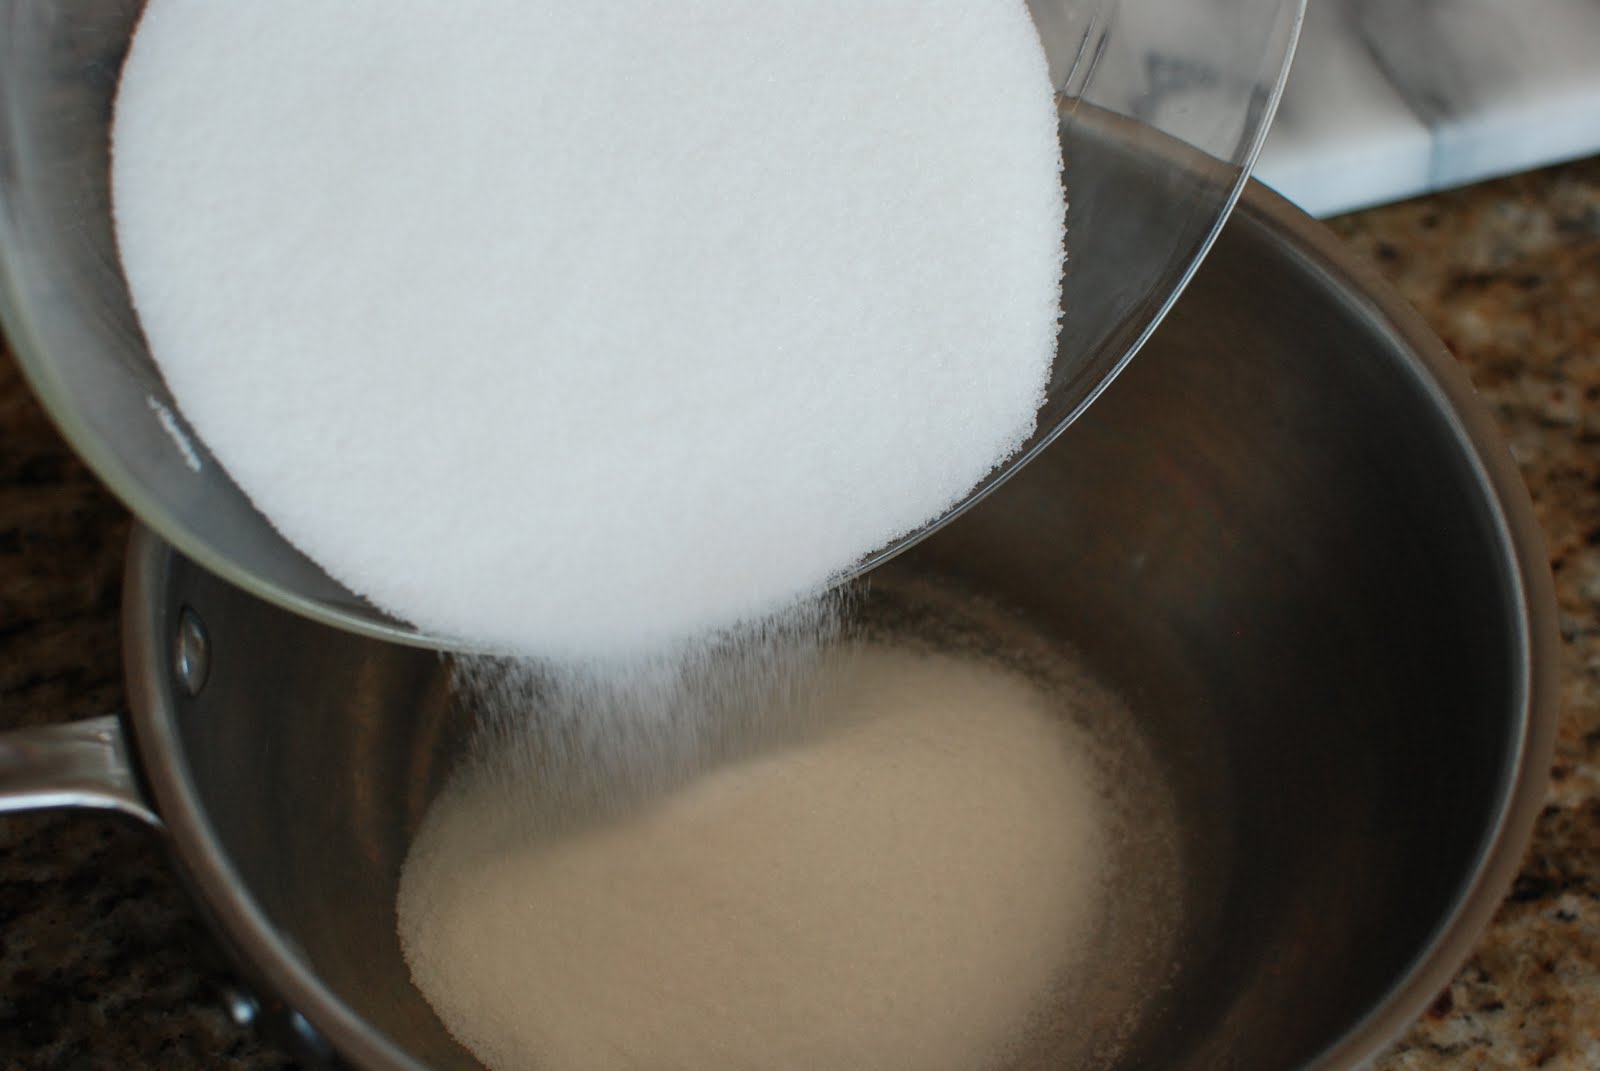
Meanwhile, Add the sugar into a medium saucepan.

Add the water to the sugar.

Place the pan over medium-high heat. Mix only until the sugar dissolves. After the sugar dissolves DO NOT stir the mixture any longer.

Attach a candy thermometer to the pan if you have one. You will need to cook the syrup to a soft ball stage or 234-240 degrees.

Let the syrup boil like crazy.

Once the temperature reaches 234 it will start to cook fast. By the time I realized it was 234 the temperature shot up to 236, which is just fine.

This is the hard part…well for me it is. You have to add the sugar syrup VERY slowly to the beaten egg yolks. If you add the syrup too fast, you will have cooked egg yolks. The hard part is pouring the syrup between the beaters and the side of the bowl. The key is not too hit the beaters. If you do, the syrup will fling all over the sides of the bowl. It happens! Oh well. I do my best.

You can see how I failed at not letting the syrup fling to the sides of the bowl. Oh well. Now at this point you must continue to beat the mixture until the bottom of the bowl feels completely cool. This will take about 10 minutes or so.

If you don’t let the mixture cool enough, it will melt the butter. You don’t want that to happen. BE PATIENT! That’s why I told you to block off 45 minutes. Trust me this buttercream is so worth the time.

Your egg mixture has beaten for a while on high speed and the bottom of the bowl feels cool to the touch

Beat in the butter ONE TABLESPOON at a time. Once the butter has incorporated add another tablespoon. Continue until all of the butter has been beaten in.

Oh my! Take a look at that creamy goodness/FAT. Heaven.

Oh my! Take a look at that creamy goodness/FAT. Heaven.

Add 1/2 cup raspberry puree. I put 1 pint of fresh raspberries through a food mill. I wanted to get out as many of the seeds as I could. There are still a few seeds remaining, but that’s ok.

Mix until the puree is completely blended through.

Take out a spoon and taste how divine this buttercream is.
To Assemble the Cake:

I like to use a soaking solution on my cake because it gives flavor and makes the cake so moist. I have found the Torani flavored syrups to work great for soaking cakes. You will need about 3/4 cup of raspberry flavor syrup.

Dip a pastry brush into the syrup.

Brush the layers of the cake with the syrup. I use about 1/4 cup per layer.

Spread with a layer of ganache. I use about 1/3 cup.


Repeat with remaining layers.


Ugh, another blurry picture.

You now how four layers of cake. Three layers have been brushed with raspberry syrup and spread with chocolate ganache.
At this point I lightly wrap with plastic wrap and place in the freezer to set the ganache. This makes it easier to spread with buttercream. In fact, at this point you can freeze for at least a week in advance. Remove from freezer and just ice with the buttercream. That should help with a busy day. That’s actually what I do.
Yes! It get’s better.

Now spread the raspberry buttercream on the top and edges of the layered cake.


There will be left over butter cream. I like to take a pastry bag and a large star tip and create a boarder around the top of the cake.

Fill bag with butter cream.

Twist the bag closed.

Pipe a boarder around the outer edge of the cake.
Disclaimer: I am NOT a cake decorator and I am piping impaired.
Please do not laugh at my attempt to decorate a cake.

I think buttercream is awesome to work with. It is so shiny and smooth.
It gets better.

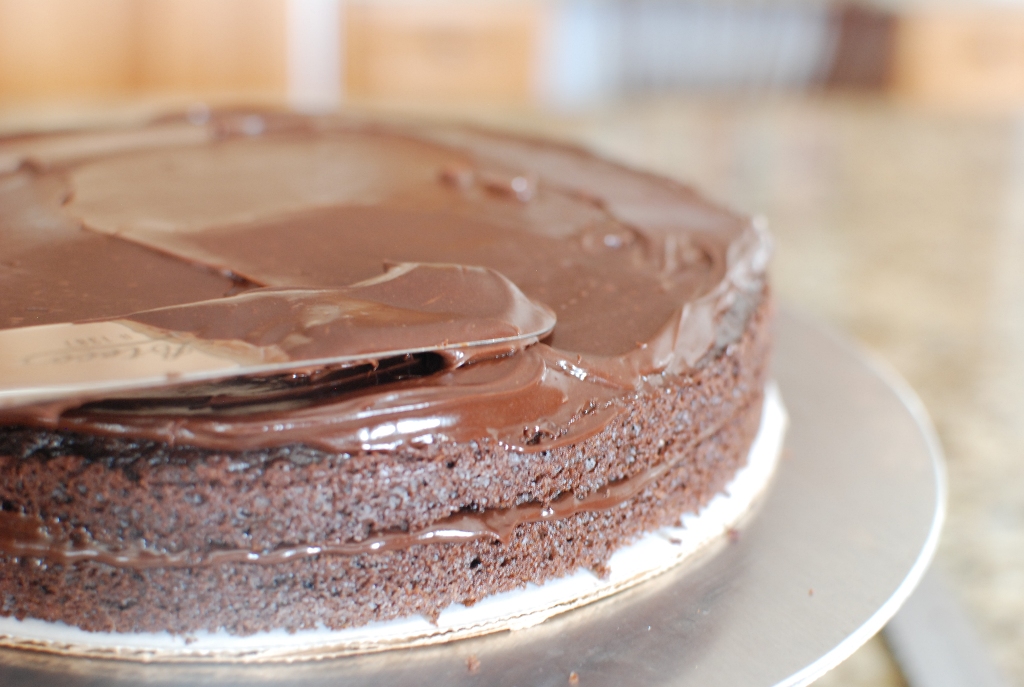
This is my form of cake decorating. Cover the top of the cake with fresh raspberries and some chocolate curls.

Ta Da! At this point I like to refrigerate the cake. This will harden the buttercream a bit and make it easier to slice the cake.

The husband that never reads this blog loves chocolate cake with raspberries, as well. We pretty much
polished off this slice before we had our dinner. You would have done the same.
In case you are wondering, yes, I did take the cake to the bridal shower with one slice missing.
Nothing was mentioned.
Devil’s Food Cake
½ cup butter, softened
1 1/3 cup sugar
¼ cup cocoa, preferable Dutch processed
2 eggs
1 teaspoon vanilla
½ cup sour cream
2 cups flour
2 teaspoons baking soda
1 teaspoon salt
1 cup boiling water
Grease and flour two 9-inch cake pans or a 9 x 13-inch baking pan. Set aside. Sift together flour, soda and salt. Set aside. In a large mixing bowl cream butter, cocoa and sugar for approx. 3 minutes. Add eggs and vanilla and beat until smooth and creamy. Add sour cream and mix until smooth. Add flour mixture and mix just until blended. Slowly add boiling water and beat until smooth. Bake in a preheated 350 degree oven for 25-30 minutes or until cake springs back when lightly touched. Cool in pans for 10 minutes. Invert to a cooling rack to cool. Bake cupcakes for 18-20 minutes.
Chocolate Ganache
1 lb. semi-sweet chocolate, chopped
1 1/2 cup heavy cream
Place chocolate in a large bowl. Set aside. In a small sauce pan heat the cream to simmering. Pour the hot cream over chocolate. Let sit for 5 minutes without stirring. After 5 minutes the chocolate should be melted. Start whisking the cream and chocolate together. Start in the center working outward as the chocolate and cream blend together. Mix until smooth and creamy. If there are any large pieces of chocolate that have not melted, just remove the pieces.
Ganache can be used for fondue. Drizzled over ice cream. Stirred into hot milk to make a rich hot chocolate. I’m sure you can think of hundreds of uses. My favorite is just a bowl of ganache and a spoon. Enough said.
Raspberry Buttercream
5 egg yolks
1 1/2 cups plus 1 1/2 tablespoons sugar
1 1/2 cups water
2 1/4 cups (4 1/2 sticks) unsalted butter, cut into tablespoon-size pieces, room temp.
1/2 cup raspberry puree
Using electric mixer, beat yolks in bowl until pale yellow and slowly dissolving ribbon forms when beaters are lifted, 5 minutes
Meanwhile, stir sugar and water in heavy medium saucepan over low heat until sugar dissolves. Increase heat and boil without stirring until candy thermometer set in syrup registers 234 – 240 degrees (soft-ball stage)
Beat to syrup into egg yolks in slow steady stream. Continue beating until thick and cool, about 10 minutes. Gradually beat butter into yolk mixture 1 tablespoon at a time. When butter has been beaten in, mix in Hazelnut paste.
Don’t feel overwhelmed. You can do it. It’s a piece of cake!
I haven't had this in years. such a delicious cake. thanks for sharing.
Simon
I haven't made it years myself. I think we should both make it today!
That's awesome! The process of making butter cream is just perfect! The other day I think I can make it!))
It looks so delicious! Raspberry and chocolate…mmm
Deliciously moist raspberry chocolate chip layer cake is so easy to make!
Merci 🙂
I made this today for my family. It was very simple to make and super delicious to eat. Thank you for this post.
I love this cake so much. I thrilled you made it for your family and even more thrilled that they loved it. Thank you so much for commenting. I love hearing success stories.
Ahh I do live at sea level so I will try that. The taste is amazing so I know it'll be perfect when it rises properly 🙂 Thank you!
Let me know if the adjustments I gave you don't work.
Do you use baking soda or powder? You mention powder in the step-by-step photos, but elsewhere it says soda. I just made it with soda and it's really flat 🙁
It is baking soda. I'm sorry for that error I have changed it to baking soda. It could be your altitude. If you live at sea level, you might have to adjust the recipe. Try adding 1 tablespoons sugar and deleting 1 tablespoon of flour. That might help with the cake being flat. If you live above 3,000 ft, there shouldn't be any changes. I hope this helps
I just want to say that this is truly the best chocolate cake I have ever made/tasted. It has become my go-to for chocolate cakes! I can't thank you enough for sharing this recipe!
I made this amazing cake for my step-daughter’s birthday today and it is a 10! Every item – the cake, the ganache, the icing – is a winner, and together they are over-the-top wonderful. I have never attempted such a complicated cake before, but the loads of pictures and detailed instructions gave me courage. I agree with others who said the raspberry syrup on the cake really brought the tastes all together and made the cake very moist. Here are a points I'd like to mention: (1) The cake cannot really be made in one day, and unless I’d read the recipe several times I would not have figured that out; I wish the recipe had stated that. (2) The recipe is a bit disjointed, with the assembly details following the instructions on how to prepare everything, when in fact the cake is assembled the day before the icing is made. This caused me to have to skip around the recipe on my computer (in my office) while cooking (in my kitchen). (3) I got to the raspberry puree part for the icing and was stumped. First I bought a jar of raspberry jam since I don’t have a food sieve and don’t like to buy hardware for just one recipe. Then I decided jam wouldn't work but figured out I could use a regular strainer with cheesecloth. The fresh raspberries were necessary, I am glad I did not substitute. (4) There are a few inconsistencies, e.g., when to put in the vanilla (not a biggie) and the written recipe calling for hazelnut paste rather than raspberry puree. (5) The written recipe (the one for printing) has incomplete instructions in several places. (6) I had a lot of product left over, including the ganache and icing. These can be used for other purposes, but I would have preferred to have less leftovers. I am only pointing out some things I can be improved in the recipe presentation, but there is nothing that can be improved about the cake or about the wonderful photographs or step-by-step comments by the author. Thank you for giving me the courage to attempt this incredible and memorable cake!
mmmmmmmm.sounds good I cant wait to make it
Hi Janet! This cake looks great! I am planning to make it on Friday and pop it in the freezer for a few days until I'm ready to ice and serve. When you pull it out of the freezer, do you frost it right away? How long should I allow for the cake to defrost? Thanks in advance!
You will be amazed at how quick the cake with thaw. I would wait for it to soften up a bit so the layers aren't so stiff. It should begin to soften in about 30 minutes. Good luck. Please let me know how your cake turns out.
The cake was amazing! The raspberry syrup between layers made all the difference. Thanks for another great recipe, Janet!
Great news. Bravo to the baker. I'm so happy you loved the recipe. What's not to love with chocolate and raspberries. thank you so much for keeping me informed.I appreciate your comment.
This cake looks heavenly! My mom loves the chocolate raspberry combination and her birthday is coming up. I will be giving this recipe a shot this week for her birthday, since I make her a cake every year (ever since I was about 10 years old and started out with Betty Crocker boxed cakes… I'm moving up!). I love to bake people cakes because I think it's like art, and you can personalize it to their taste. I do have a question about the step when the sugar is boiled for the butter cream. Can this be done without a candy thermometer? Do you have any directions as to how I can know when to take it off the burner without one? I look forward to trying this 🙂
This cake is amazing. I hope your mom loves it. You are an awesome daughter to go to so much work for her…but moms are so worth it. Yes you can make the buttercream without a thermometer. You need to cook the sugar syrup to a soft ball stage. You can test the syrup by pouring a spoonful of hot syrup into a cup of cold water. You should be able to pick up the syrup and start to form it into a ball. If you can do this, the syrup is ready. Let me know if you have any more questions. Good luck.
this looks amazing and i am going to make this for my mum for her birthday… only thing is i cant seem to find raspberry syrup at he shops…. where/ what types of shop should i be looking at?
Check the coffee isle. It's generally used for flavored coffees or Italian sodas. If you can't find it you can omit the ingredient or make a simply syrup with equal parts of sugar and water. I hope this helps.
Oh! You made it so nice and easy to follow! Takes for sharing this yummy cake!
Thank you Jaclyn. I hope you give this cake a try someday. It's amazing.
This stuff is down t earth, hats off buds out there.
click here
Thank you for the recipe and wonderful step-by-step photos, I'm in the process of preparing the butter cream, but wanted to know if the taste is very buttery or has it been masked by the sugar & raspberry syrup?
Hmmmm. Well it completely melts in your mouth because of the butter content. I wouldn't say that the butter takes over. You will definitely taste raspberry when it first hits your tongue. Simply divine! I hope this helps and best of luck on this most beautiful cake. It tastes as amazing as it looks.
Such a gorgeous cake Liz! Absolutely beautiful!!!
Wow! You made my day Liz. If only I can get my husband to cook with my recipes.
Janet,
This isn't the first recipe that I have made of yours, but I absolutly love what you are doing. My husband can even cook with your recipies (and he has) we have made the apple cake (YUMMY) and this recipe (so good, but can only eat a little cuz it is rich!) We are going to try the Pork Carnitas soon. Keep it up and THANK YOU!!!
Yes you can substitute 1/3 cup hazelnut paste instead of the raspberry puree and let me tell you that it is DIVINE! Good luck. Let me know how everything turns out.
I love your recipes!
I do have a question about the Raspberry Chocolate cake. In the Buttercream directions you state to add the Hazelnut paste after the butter- may I ask how much you use for this recipe? I am going to make this for someone at work in a couple of weeks-I can hardly wait!
The recipe I use is an Italian Buttercream and it is amazingly creamy. Unlike anything else I have ever had. I'm sure you could use a basic cream cheese icing and just add the raspberry puree or the hazelnut butter/praline.
Hello,
This cake looks amazing and decor is very pretty! I also saw your hazelnut buttercream cupcakes and noticed that you can basically make any type of buttercream. It looks really soft and fluffy…Can the same thing be done using cream cheese in the frosting?
Hell* NO!
*Not edited for the web
Oh my goodness honey… you certainly out did yourself this time! And for the record, you are a darn* fine cake decorator! So um, when can I pick up your wedding cake catalog??? No rush, the wedding is not until November!
*edited for the web
Whoops my English isn't so great. I meant "your English"
You english is amazing! Thank you for such kind words. When you go off of your diet, make the cake eat one piece then get rid of it. Take it to friends just get it out of the house. That's what I do. The next morning after I gave the cake away I really wanted a piece for breakfast and I would have eaten it if it were here. Good luck on that diet. It is important to be healthy. Oh I'm a Pisces…
Absolutely! I love being a dinner guest.
fantastic recipe and photos 🙂
God Janet I love you ,your recipes and StumbleUpon because it brought me to you.I am on a loosing weight diet with Herbalife for 8 months now and since then I'm reading your recipes everyday and I just CAN'T WAIT to make each one of them .I know them by heart ! I can't wait to finish with this strict diet and make especially this cake.You are an amazing person ,I know it takes a lot to make all this recipes and take photos at every minute just for us ,and you do all those things with love and patience.I hope you understand everything I wrote because English isn't my first language ,I'm from Romania (by the way ,food is so amazing here ,especially our traditional food ,you should come here one day :).
P.S: I was just wondering what's your zodiac sign? If you believe in them ,of course.
So if I invite you over, can you bring this? Just kidding!!! I don't even want dinner now – I just want a piece of this cake :).
We can make that happen. A better goal would be to "eat" this cake someday.
Um. My new goal is to make this cake one day.